How to Improve Tableau Appearance – A Complete Guide
Job-ready Online Courses: Click for Success - Start Now!
In this Tableau tutorial, we are going to learn about how to improve Tableau appearance for the sake of conveying the meaning more precisely. We will see how to change looks of dates in a tableau, formatting tooltips content, change the order of color expressed in charts, and expose header. We will also discuss unpacking pre-practed book File (.TWBx), making parameterized axis label, using continuous fast filters for ranges of values, creating custom date hierarchy, and assemble your own custom fields.
So, let us start how to improve Tableau appearance.
Tableau Appearance
Naturally, all channels that you set in Tableau are figured freely. That is, each channel gets to all lines in your information source without respect to different channels. Be that as it may, you can set at least one absolute channels as setting channels for the view. You can think about a setting channel similar to an autonomous channel.
Whatever other channels that you set are characterized as reliant channels since they process just the information that goes through the setting channel. Through this tutorial, we are trying to improve Tableau appearance.
Read about Tableau Data Terminology to Learn Tableau
Changing Looks of Dates
To improve Tableau Appearance, alter date formats that seem on AN axis by informing at the date header, right-clicking, and choosing the Format Menu possibility. This exposes many various date formats—including a custom info possibility as seen in Figure 1.
Let’s discuss Tableau Date Functions with Examples
The specific date info on the market can vary counting on the sort of date being expressed (continuous or discrete). Continuous dates give a lot of info choices than separate dates.
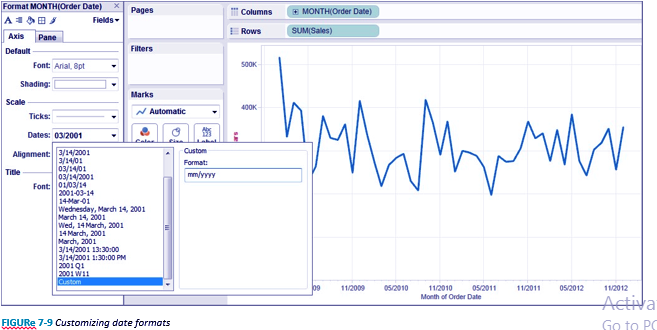
Figure 1. How to Change Looks of Dates in Tableau
A figure to show Customizing date formats to improve Tableau appearance.
Formatting Tool Tips Content
Tooltip in worksheets and dashboards is improved by adding fields that don’t seem to be enclosed within the reading, info text font and color, and adding directions. Edit your Tooltip from the most menu by choosing Worksheet/Tooltip. Figure 2 shows a changed Tootip that uses custom colors, custom font sizes, field name revisions, and instructive text together with contact info.
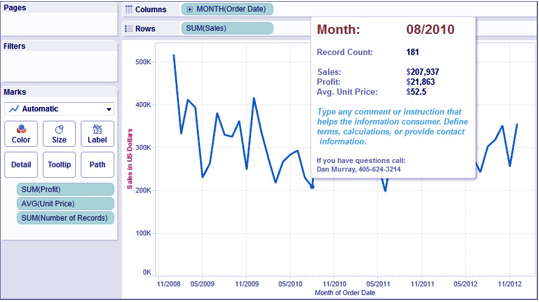
Figure 2.Tableau Appearance – Formatting Tool Tips Content
Note that any fields enclosed on the marks cards are another to the Tooltip. Tooltips area unit a space-efficient thanks to adding details-on-demand to worksheets and dashboards.
Let’s discuss more Tableau Formatting
Change Order of Color Expressed in Charts
When victimization colors to precise members of dimensions, scrutiny totally different members within the set are less complicated if the item you would like to concentrate on starts at identical purpose on the axis. The figure shows a stacked bar graph that compares the sales combine proportion of product classes in numerous date aggregations (month, quarter, and year) by employing a fast table calculation and color to precise the relative sales for every product class.

Figure 3. How to Change Order of Color Expressed in Charts
Dragging the article of furniture article of furniture furnishings color to rock bottom of the color legend as seen on the proper of Figure allows a lot of precise comparison of the furniture product class.
Do you How to Make Pie Chart in Tableau
Exposing Header
To improve Tableau Appearance, adding a tiny low crosstab during a dashboard will give a good suggests that for triggering a filter action. For this reason, you will wish to make a really basic crosstab as you see in Figure.
The chart was created victimization the Superstore knowledge set. Building Figure 4 needs 2 steps:
1. Double-click on the Region field within the Dimensions shelf.
2. Double-click on the Sales field within the Measures shelf.
This is quick and simple, however what if you would like to feature a header directly over the sales values to make a well-labeled crosstab while not having to feature a worksheet title. Worksheet titles consume further pal height which can take a lot of vertical areas than you have got on the market.
Let’s Learn String Functions in Tableau
At now there’s a row label over the region names in Figure 4, however no row header over the sales worth. Tableau’s default behavior doesn’t give a row label once just one live is enclosed within the reading. To urge a header to seem forthwith on top of the sales values, double-click on the other field enclosed on the lives shelf (except for the geocoding lives used for mapping) then purpose at the column heading of the second measure and right-click to cover the measure.
As an alternative, right-click on the live Values pill (that mechanically appeared on the Marks card once the second live was added) and filter the new live so the Sales field is that the solely live remaining in sight. The crosstab ought to currently seem like the one in Figure.
The figure presents a really compact read of the sales by region with headers directly on top of the sector values. This crosstab can be placed into a dashboard requiring an identical quantity of area as a multi-select filter, however providing a touch further knowledge. In our own way to make identical crosstab is to use live Names and live Values on to build the read by following these steps:
1. Double-click on the Region field on the scale shelf.
2. Double-click on the live Names field on the scale shelf.
3. Right-click on the live Values pill on the Marks card.
4. Filter-out all of the measures going solely the Sales chosen.
Read About Tableau Aggregate Functions with Examples
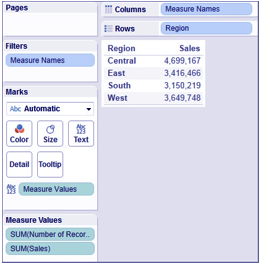
Figure 4. Tableau Appearance – Exposing Header
Unpacking Pre-practed Book File (.TWBx)
Unpacking a Tableau pre-packed book (twbx) file permits you to look at the first data-source. This is helpful if your data-source is file-based (Excel/Access/CSV). To open this sort of file, purpose at it then right-click and choose the unpackaged possibility. Tableau can produce a knowledge folder that contains a duplicate of the file supply.
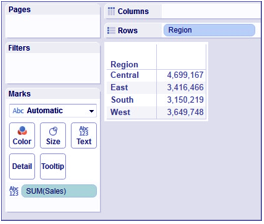
Figure 5.Unpacking Pre-practed Book File
Let’s Discuss Tableau File Types With Their Extensions
Make a Parameterized Axis Label
To improve Tableau Appearance, use parameters to change the live planned in an exceedingly read is a wonderful thanks to creating one chart serve several functions. But, the default axis label isn’t terribly informative as you see in Figure.
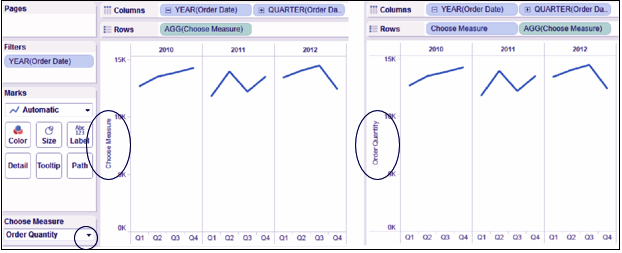
Figure 6. How to Make a Parameterized Axis Label
What is Tableau Parameter and How to Create Parameter
The time-series chart on the left of Figure displays the default axis label for the parameter management select live. To alter a dynamic parameterized label for the axis, follow these steps:
1. Drag the parameter from the parameters shelf to the axis.
2. Drop the parameter on the axis.
3. Take away the default axis title by right-clicking on the axis.
4. Erase the default title within the titles space.
5. Right-click on the parameter heading and conceal the sector label.
6. Rotate the parameter label by right-clicking thereon and choosing Rotate.
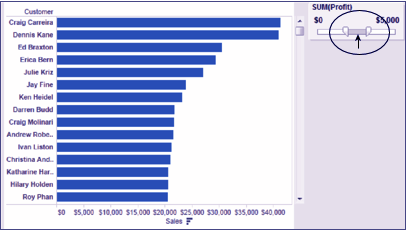
Figure 7.Filtering for a range of value
Using Continuous Fast Filters For Ranges of Values
When your worksheet or dashboard contains a continual fast Filter, many of us don’t understand you’ll be able to prohibit the vary of values so drag them from among the vary to scroll. Figure 7 shows a bar graph that displays sales by a client and a fast Filter exploitation profit.
Read More about Tableau Filters – Types of Filters in Tableau
Restrict the vary by dragging the bar handles in or by typewriting specific values within the filter values. You’ll be able to see that the vary has been restricted from zero to five,000. To scroll, purpose at the area within the filter bar and, whereas pressing your left push button, drag the vary to the left or right to maneuver through the whole set in $5,000 profit vary increments.
Create Custom Date Hierarchy
Tableau’s automatic information hierarchies save a great deal of your time, however what if you don’t need to show all of the hierarchy that Tableau provides? By making custom dates you’ll be able to mix them into hierarchies that meet your specific wants. Figure 7 shows a bar graph examination sales values for specific dates.
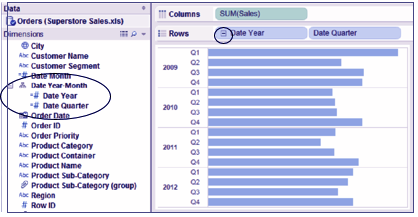
Figure 8. How to Custom Date Hierarchy
The custom hierarchy includes distinct year and quarter values and zip a lot of. Notice that the Date Year pill are often swollen by clicking the sign, however the grouping of the custom “Date Year” and “Date Quarter” overrides the traditional date hierarchy structure among Tableau.
Read More About Tableau Hierarchy Data – Creating Groups & Hierarchies
To create custom date hierarchies follow these steps:
1. The purpose at a date field within the dimension shelf and right-click.
2. Choose the produce Custom Date choice.
3. Edit the date as you need.
4. Drag one date field on prime of another to make the custom hierarchy.
5. Use the custom hierarchy in your read.
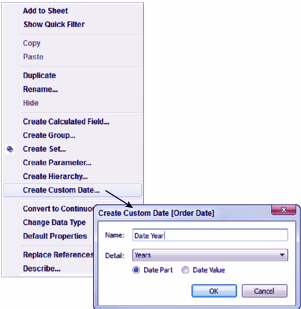
Figure. 9 Custom Date Hierarchy
Complete the date by giving it a selected name. Use the Detail drop-down selector to select the precise date roughness you need. The radio buttons below that outline whether or not the date could be a distinct date (date part) or a continual date (date value).
After the custom dates square measure outlined, drag one on prime of another within the dimension window to make your custom date hierarchy. You’ll be able to right-click and edit the name of the hierarchy as desired. This method is especially helpful in dashboards after you ought to limit the growth of the hierarchy in order that the chart fits into the out there house nicely.
Do You Know How to Create Tableau Combination Chart
Assemble Your Custom Fields
This is a favorite simple formula hack for making key records on the fly if your data source doesn’t extremely embrace a very distinctive key record. To make a brand new field that’s the mixture of 2 or a lot of
Figure 7 making a custom data fields, use the Formula Editor. Figure 8 shows a concatenation formula.
Read More About Tableau LOD – Level of Detail Expression
Using the + sign between every field creates a concatenated (joined together) field that may be out there on the dimension shelf. This can be conjointly helpful after you need to assemble addresses from distinct fields to make mailing lists. In Figure 10 the formula conjointly inserts a literal string as well as a comma and an area between the client Name and town fields. If you expertise performance degradation exploitation this method, strive to combine sets. Consult with the set section in Chapter three for a lot of details.
Let Tableau Build Your Actions
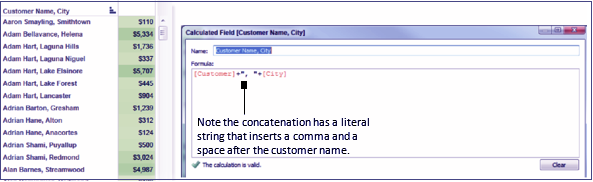
Figure 10. Let Tableau Build Your Actions
Color or form legends are often wont to produce highlight actions. Activate a color action by choosing the light tool within the legend as you see in Figure 11.

Figure 11. Creating a highlight action from a color legend
Similarly, the form legend is often wont to produce another highlight action. The ensuing action within the dashboard can use the mixture of color and form once choosing marks from a scatter plot.
Let’s Explore Tableau URL Action
Selecting a blue circle within the scatter plot triggers the highlight action—changing look of the scatter plot and bar graph. The mixture of Order Priority (shape) and merchandise class (color) square measure highlighted. Tooltips for each things are displayed along in to reveal the small print for you to review. Tableau ordinarily displays only 1 Tooltip at a time.
You can read the actions definitions by about to the Dashboard menu/Actions, then choosing edit.
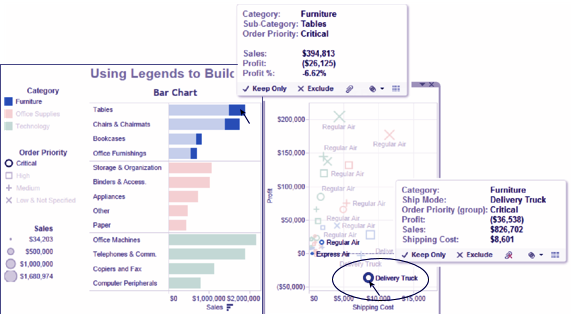
Figure 12. Tableau Appearance – Tableau building your action
Formatting Table Calculation Results
Table Calculations use your image to make new values. If the calculation outlined ends up in a null worth, Tableau provides a range of data format choices that enable you to regulate precisely, however, the null results square measure bestowed within the ensuing chart. An initial table calculation result and also the 5 choices provided to format the results.
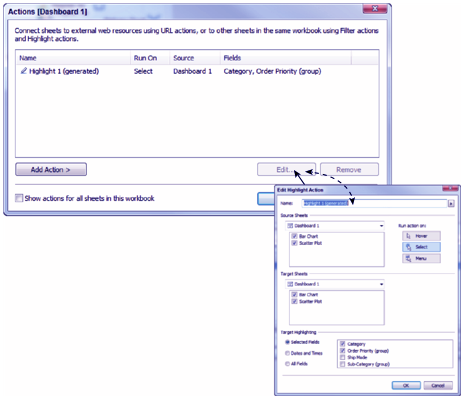
Figure 13. Tableau Appearance – Calculation Results
The window space (1) shows the short table calculation definition for a 3-month moving average. Note that the indicator within the window (null if there don’t seem to be enough values) is checked. Choosing this tells Tableau to not plot marks if there’s meager information to properly calculate the result. This implies that no mark is going to be planned if any month enclosed within the statistic doesn’t have information for the 3 preceding months.
Table Calculation in Tableau – Calculation Function
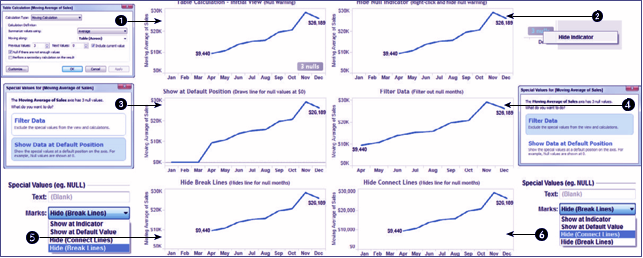
Figure 14. Tableau Appearance – Calculation Results
The end in the higher left section of the dashboard shows that a statistic chart has been planned with a tiny low gray pill within the lower right corner indicating that 3 null values square measure enclosed within the ensuing plot. Notice that there are not any marks for the Jan through March period of time. This can be as a result of {the information the in the information} set failed to embrace data for the preceding Gregorian calendar month through December period of time.
One way to contend with the null warning space (1). Right-clicking on the three nulls pill exposes the management space (2), which exposes the Hide Indicator choice. Choosing this selection simply removes the null warning pill from reading while not shaping however further null values ought to be treated. If your supply information is being updated often, this choice hides the null indicator while not providing any further data format rules for Tableau to use if new null values seem within the information.
Let’s Look At How to Create Bins in Tableau
If the (3 nulls) pill is chosen exploitation the left push button, the window areas (3 and 4) is displayed. Showing the information at the default position causes Tableau to draw the road for the months with null values at zero. If the Filter information choice (4) is chosen, Tableau can filter the null worth months from a read. Notice the axis for space (4) starts in a Gregorian calendar month. this selection may well be deceptive if the supply information includes gaps in the middle of the statistic. For this reason, Tableau provides 2 further choices to format null values.
The bottom charts within the dashboard (areas five and 6) look like the chart in space (2) solely as a result of the null values during this example occur within the 1st 3 months of the statistic. If the null values had occurred within the middle of the statistic, these choices give slightly completely different treatments of the information breaks within the plot. To access the Special Values (e.g., Null) data format window, right click on the sector pill that you just square measure exploitation to precise the table calculation and choose Format. This exposes the data format menu for the pane as seen in areas (5 and 6).
Table calculations provide several choices for etymologizing new data from your supply information. Tableau’s data format choices for null values give for a nuanced treatment of missing values in your supply information in order that data customers don’t seem to be misled by gaps in your supply information.
Read About Tableau Calculated Fields – Number Function
The key to understanding fast Table Calculations and Table Calculation
Functions are to know that the image you’ve created provides the supply information for the result. If your image has missing values, then your result can embrace missing values.
Conclusion
Hence, in this Tableau tutorial, we learned how to improve Tableau appearance for the sake of conveying the meaning more precisely. For improving tableau appearance we discussed how to change looks of dates in a tableau, formatting tooltips content, change the order of color expressed in charts, and expose header.
Hope you enjoyed the session and learnt a lot from it. Do share your feedback in the comment section.
If you are Happy with DataFlair, do not forget to make us happy with your positive feedback on Google


