Creating QlikView Alerts – Alert Components, Alert Wizard, Dialog box
Job-ready Online Courses: Click, Learn, Succeed, Start Now!
In our last tutorial, we talked about QlikView Direct Discovery. Now, we open a new chapter, QlikView Alerts.
Moreover, we will discuss how to create alters in QlikView with its components. Along with this, we will learn QlikView alerts wizard and dialog box.
Alerts play a vital role especially in Business Analysis tools like QlikView where missing even a minute but important change in data trends cannot afford.
QlikView’s Alert feature provides easy ways of creating alerts in the applications. This feature gives great flexibility in the way of functioning as it provides the user with many options to choose from, suiting their requirements.
So, let’s start Qlikvirw Alerts tutorial.
What are QlikView Alerts?
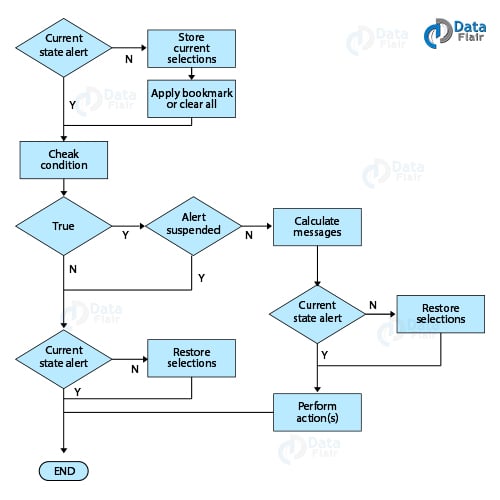
QlikView Alerts can create and maintain in two ways i.e. from Alerts dialog option or from Alert Wizard (both given in the Tools tab in the menu bar). The flowchart helps us to understand the logical flow of actions.
Introduction – QlikView Alerts
As we can see in the flowchart, when an alert checks trigger in QlikView, it starts from evaluating the current state of the alert, if the condition evaluates to as True then the check condition evaluate for triggering as specified during creating the alert.
If this evaluates to be True then in the next step Alert suspension condition check (whether it instructed to suspend and not get execute). If the outcome is True, then the process will end in the current state of the alert.
Do you know how to load data from previously loaded data?
But, if it is False i.e. not to suspend then the message or condition expression calculates if the outcome is True or
Yes, then the final alert action will perform. The alert calls to fire when boolean condition met and assign an action to perform.
In order to initiate the initial checks for the alerts to execute, there are three ways for the initiation of the check to take place.
First, is Automatic checking i.e. when the usual actions like document opening, script reloading or document reduction took place and there is a probability of a potential change in the data. Then the conditions check, and expressions calculate again.
The second way is doing it manually through Internal Macro Interpreter using an automation interface (API).
A third way is when QlikView is run in Batch mode from external programs. Then the check-in triggered.
The QlikView Alerts store as a part of the document, they create in. However, the Alerts feature is available only for the Windows users and not for the AJAX clients.
QlikView Alert Components
QlikView Alerts comprises three components:
A Condition– A condition is a logical expression which is evaluated while an Alert check triggers. Whether or not the alert will execute depends upon the outcome (True or False) of this condition.
Logical state– The logical state is one of the three states; Bookmarks, All Clear or Current Selection of the data. This state checks before the logical condition or expression apply.
An action– After the condition and logical states applied an action is performed which displays the alert on screen. There can be one or more than one actions as a result of the conditions evaluating to be true. Some common actions are showing an alert message on pop-up window, sending e-mails to one or more recipients having the alert message.
QlikView Alerts Dialog Box
One way of creating and more so, maintaining QlikView alerts is through the alert dialog box. It load with full equipment to set and manage all the important aspects of alerts.
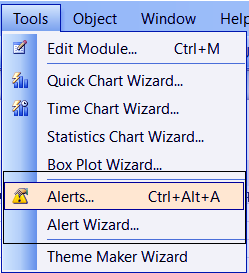
Let us navigate through the alert dialog and learn about what each of the given options does. The QlikView alerts dialog box is accessed through Tools>Alerts in the menu bar.
QlikView Alerts Dialog Box

QlikView Alerts – Dialog Box
We recommend you to see QlikView Time Chart Wizard
The ID is the unique ID assigned to each alert existing in the alerts list.
The Enable checkbox will activate or deactivate an alert.
In the Description column, the one creating the alert can write a commentary or explanatory description as to what purpose does this alert serve and does not display during execution.
In the Message column, you can write the message to display while the alert gets displayed.
Now, in the Mail Subject column, you can enter the subject of e-mail in case the alert message is sent through mail. You can also enter an expression here by going to the three dots given at the right corner of the column to make the subject dynamic. By default, the subject line set as ‘QlikView Alert’.
Here, In the Mail Recipients section below Mail Subject, mail recipients can add by separating each mail id by a semicolon ‘;’. In this column also, there is the option for using expressions window if you want dynamic updates.
Coming to the centre-right of the dialog box, we see a box having three options; Condition, Bookmark and All Clear. These are the logical states of the data and of which you will have to choose anyone. In the condition section, you have to enter the logical expression. If you want to select a Bookmark, you must choose from a list of existing bookmarks.
In the Events section at the bottom right, are the check conditions as to when the check should trigger for alerts in QlikView. The alert check takes place automatically according to the event you select here. Multiple events can also select. The options are On Open (when you open a document), On Post Reload (after the document script is reloaded), On Post Reduce (after a data reduction has taken place).
Also, there are two other options; Delay and Trigger Level. In the Delay option you can set the number of days you want to delay for the alert to get re-fire.
The default value is set as 0 which means that no delay must do in re-firing. You can also use decimals in the delay value to specify fractions of a day.
Have you known how to apply Trellis in QlikView?
The Trigger Level option lets you suspend the re-firing of an alert based on the change of the alert’s state. There are three options to choose from.
One is Always option in which the re-firing happens in any case regardless of state change. Second is Message Changes in which re-firing is suspended until a change in the Message takes place.
A change in the Mail Subject message also consider. And the third case is of State Changes, where re-firing of the alert is suspended until the state of alert changes.
Using the Show Pop-up option, you get the alert message displayed in a pop-up. You can also custom a pop-up and its format through the Use Custom Pop-up option.
The Mode section has two option which decides the mode of the alert. If you choose the Interactive mode, it is the normal relevant to the general QlikView document layout (automated triggers). Whereas, the Batch mode is the mode where alerts are relevant to the QlikView being run as an external program in batch mode (execution is through command line).
How to Create Alert in QlikView?
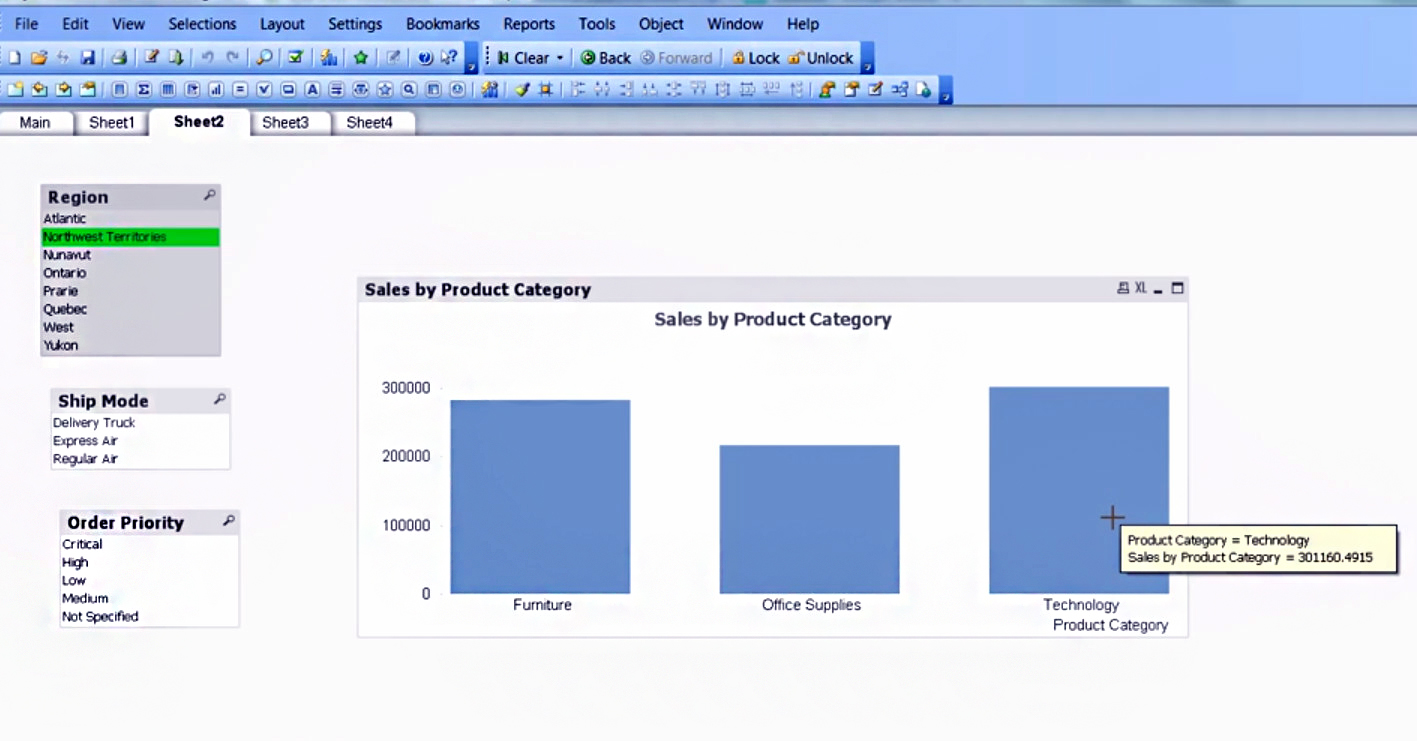
Now that we know about each component of the Alert Dialog box, we will learn how to create a new alert through it. We have taken sample sales data and will set an alert for when the sales go below 1 Million.
Step 1: Go to the Tools>Alerts.. in the menu bar of the QlikView document.
Step 2: As seen in the screenshot of the bar chart below. In the Alert Dialog, we will enter the description ‘Alert users when sales is going below 1000000’. The alert message entered is ‘This particular region is having less than 1M sales’.
Next, we set the condition expression as sum(sales)<1000000 defining that alert should prompt if total sales go below 1 million. The event has been set On Open and action is Show Pop-up.
Step. 2 How to Create Alert in QlikView
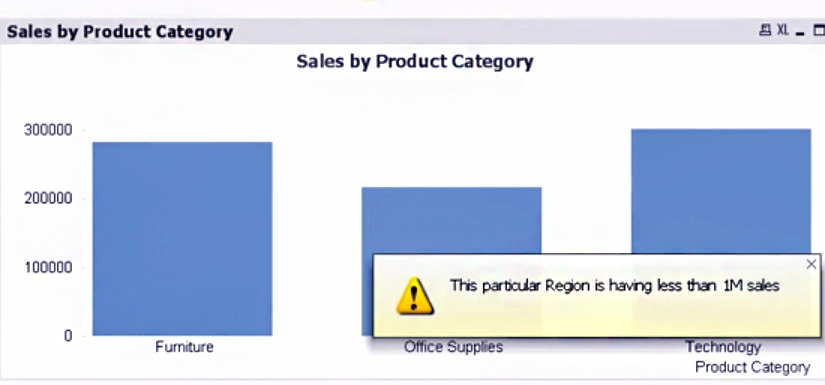
Step 3: Click OK when you are done with setting up the alert properties. Now, upon opening the document again after the saving the changes made.
The alert will display because the condition (of total sales being less than 1 million) holds True.
Step. 3 How to Create Alert in QlikView
Also, Read – QlikView Transformation Wizard
QlikView Alert Wizard
As discussed earlier, we know that another and probably a system guided way of creating new QlikView alerts through the Alert Wizard.
Alert wizard is a step by step guide of creating an alert. This purpose and significance of each step mention in the dialog itself along with instructions to navigate in the wizard.
To start the alert wizard, go the Tools tab and select Alert Wizard..
For those of you who will open the wizard for the first time, two introductory, as well as informative dialogs, will open explaining the concept and basics steps of alert wizard.
Check the Don’t show this page again if you don’t want them to appear every time you open the wizard.

QlikView Alerts – Alert Wizard

QlikView Alerts – Alert Wizard
1. Name/describe the alert
Enter the commentary or description about the alert create. The description text does not display in the final alert message.
Do you know What is QlikView Backus Naur Form (BNF)?
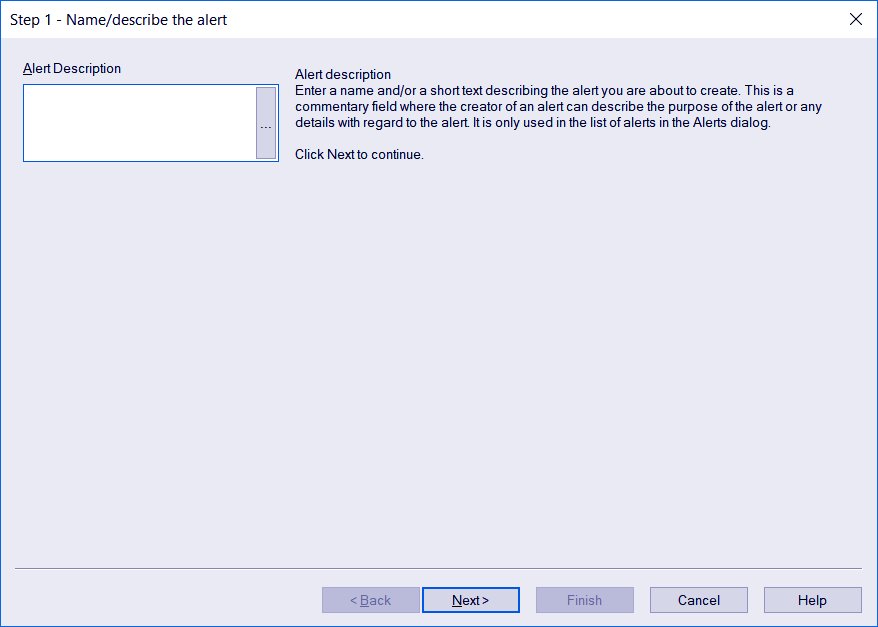
QlikView Alerts Tutorial – Name/describe the alert
2. Define the alert condition
Here you define the condition expression which will evaluate and will decide whether the alert message will get a display. You can get the expression syntax of your choice from the three dots gives at the right of the condition bar. Also, in this step, you get to select one from the three logical states given.
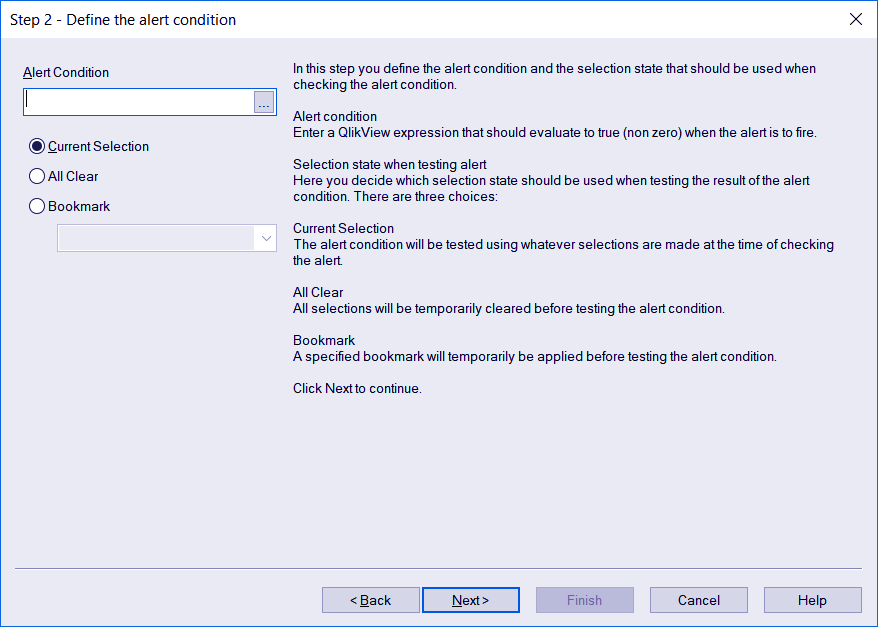
QlikView Alerts Tutorial – Define the alert condition
3. Define when to test the alert condition
Here you get to select the Mode and Event type for the alert.
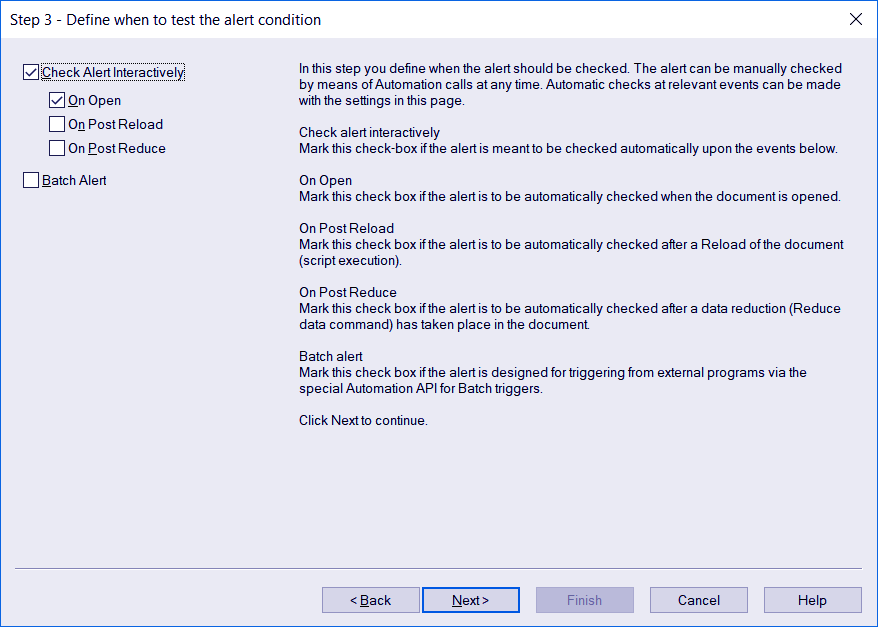
QlikView Alerts Tutorial – Define when to test the alert condition
We recommend you to read QlikView Publisher Repository (QVPR)
4. Define test delay
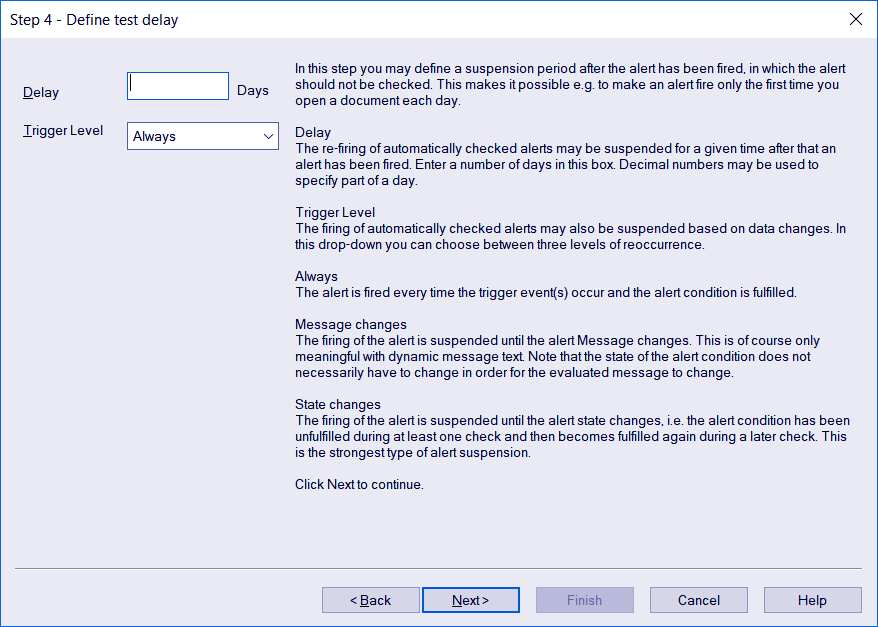
QlikView Alerts Tutorial – Define test delay
5. Define action(s) to take when the alert fires
In this step, the alert message entered and associated actions for pop-up select. You can also select the mailing options if you wish to send the alert message through mail.

QlikView Alerts Tutorial – Define action(s) to take when the alert fires
So, this was all about QlikView Alerts Tutorial. Hope you like our explanation.
Conclusion
This concludes our lesson on the QlikView Alerts. We learned about the alerts as a concept and their role in QlikView.
We saw how in two ways i.e. through the Alert Dialog and Alert Wizard can the alerts create. However, in an alert wizard, you can only create a new alert.
If you wish to manage or make changes in an existing alert, you will have to do it using the Alert Dialog. We hope now you can create and manage QlikView alerts on your own while working.
Furthermore, if we miss something/you have a query, feel free to approach us!
Related Topic – How to Create QlikView Macro
Did we exceed your expectations?
If Yes, share your valuable feedback on Google


