QlikView Autogenerate – How to Generate Data in QlikView
Placement-ready Online Courses: Your Passport to Excellence - Start Now
In our last QlikView Tutorial, we talked about QlikView Dashboard. Today, we start our session with what is QlikView Autogenerate. Moreover, we will learn the features of autogenerate and how does it work. Along with this, we will study how to generate data using autogenerate in QlikView.
What is QlikView Autogenerate?
Qlikview provides a feature called Autogenerate which is used to generate data using device programming.
Qlikview’s software creates data automatically with few commands using QlikView Autogenerate. Such data which autogenerate creates is not loaded from an external source but is created uniquely. A data analyst has great use of such program generated data for analytical purposes.
QlikView Autogenerate might generate data like 20 random numbers, dates of the 15th week of the year, date and days from current date to last of the year etc. It is very tedious to generate or input such data manually. Hence this feature proves to be useful.
Do you know about QlikView Star Schema?
How to Generate Data using Autogenerate in QlikView?
To explain how Autogenerate works in Qlikview, we have considered a case where the condition is generating data such that only the dates of Thursday and Saturday starting from first of the current month and ending on the last date of the year.
In order to execute this, certain variables are to be defined and certain functions to be applied. We will load the into Qlikview’s script the following code.
Let vMinDate = Floor (MonthStart (Today()));
Let vMaxDate=  Floor (YearEnd (Today()));

LOAD Date,
WeekDay (Date) as Weekday,
Year (Date) as Year,
Month (Date) as Month,
where WeekDay (Date) = ('Thursday') or
WeekDay (Date) = ('Sunday');

Load
Date (recno () + $ (vMinDate)) as Date AutoGenerate vMaxDate - vMinDate;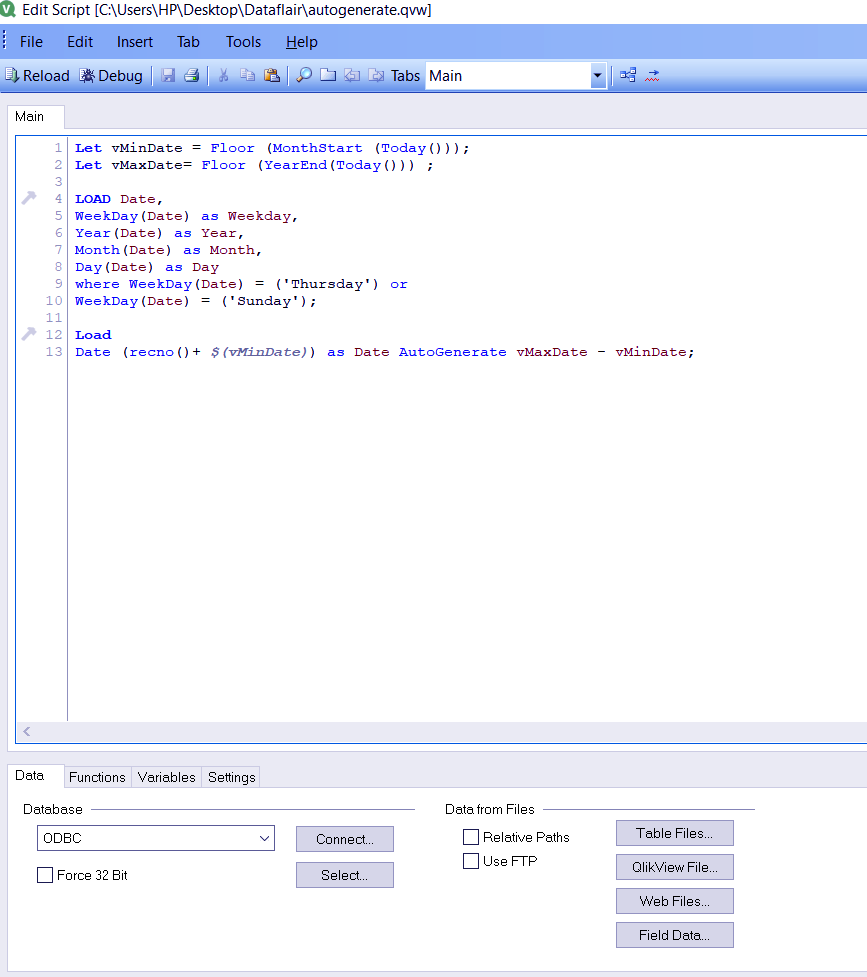
Image.1 Generate Data using Autogenerate in QlikView
In the screenshot of our system, we have defined two variable in the start so that the system takes the first of the current month as the start date of the range and last date of this year as the end date of the range. Then we have used some date and time functions to input the date, day, month and year.
After that we have applied specific conditions so that we only get the days Thursday and Sunday as generated data. The recno() functions will create a record for each date. And finally, we apply the QlikView Autogenerate function giving the variable range as an expression.
After saving this file, we reload it (CTRL+R) and create a table box to visualize the autogenerated data.
Follow this link to know about QVD (QlikView Data Flies)

Image.2 Generate Data using Autogenerate in QlikView
As you can see, the below table contains values corresponding to only Thursday and Sunday, starting from the month of August 2018 and ending on December 2018.
Have a look – QlikView Architecture
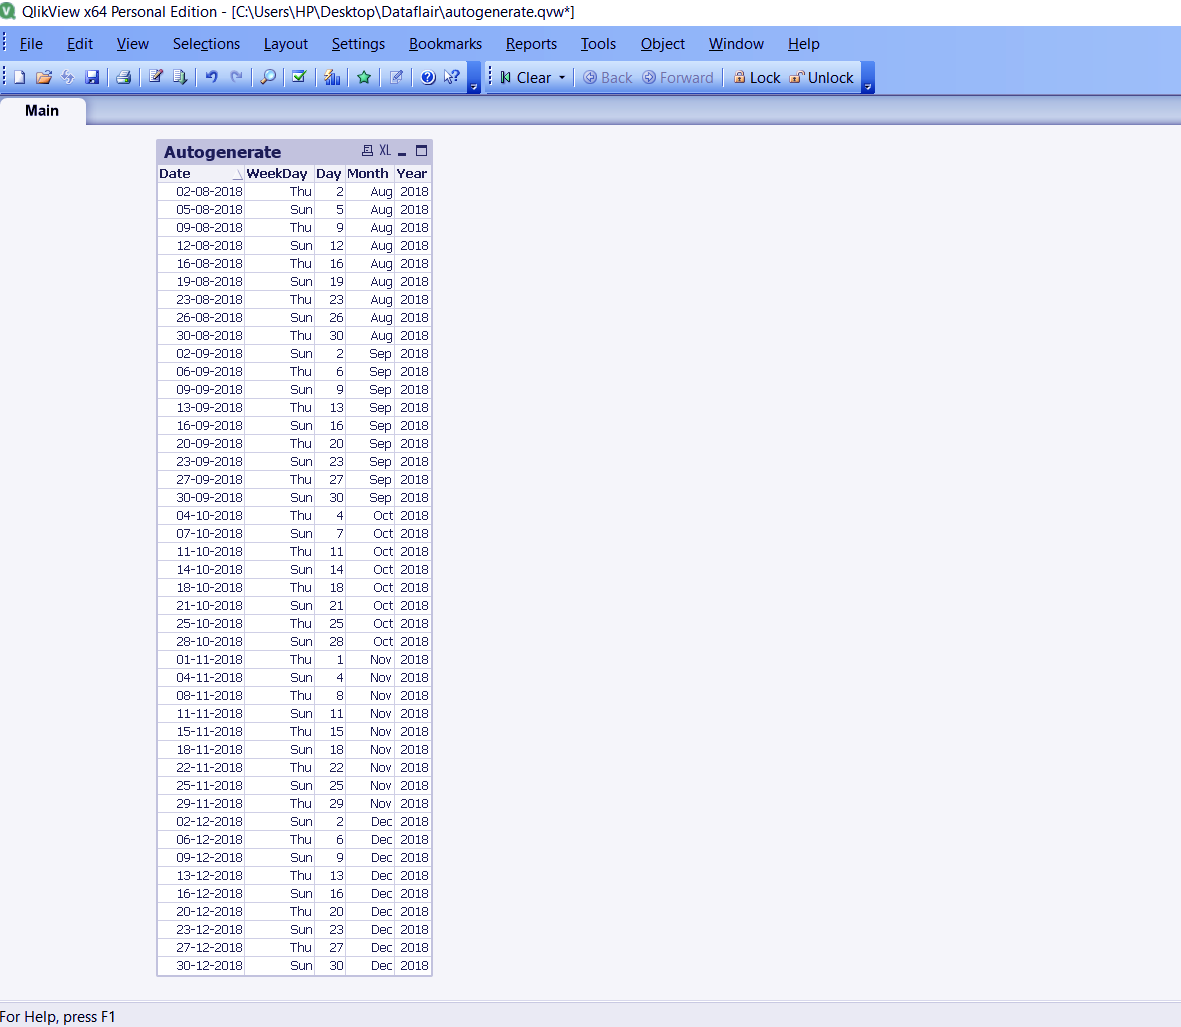
Image.3 Generate Data using Autogenerate in QlikView
So, this was all about QlikView Autogenerate Tutorial. Hope you like our explanation.
Conclusion
Hence, with the help of QlikView autogenerate feature, you can generate data of any sort that you want without wasting your time in doing it manually. Still, you face confusion? Feel free to ask us in the comment box, we will definitely get back to you!
Related Topic – QlikView Career Opportunities
For reference
Your 15 seconds will encourage us to work even harder
Please share your happy experience on Google


“Bel article d’apprentissage! Aymeric Inpong”