QlikView Security – Authentication, Authorization, Types of Securities
Job-ready Online Courses: Dive into Knowledge. Learn More!
The last session was on QlikView Script Statements and Keywords. Today, we explore QlikView Security, in which we studied Authentication, authorization (Layers of QlikView Security), and types of Security in QlikView. Along with this, we will learn methods of Authorization used in QlikView Security.
As we know that QlikView is a Business Intelligence tool hence it is obvious that the clients taking its services are dealing with highly important data. So, it becomes a necessity to have strict and trustable data security provision in the software.
So, let’s start QlikView Security Tutorial.
Layers of QlikView Security
There are two layers of QlikView security. We will explore each layer one by one in detail.
- Authentication
- Authorization
i. Authentication
Authentication is done so that the system can verify who you are and asks you to prove it. The process of authentication done through a server and the data secure. Also, a secure communication establishes by HTTPS.
At the back-end, QlikView will verify the services the user authenticate to use by checking the user details on the directory catalogue. The documents reload and distribute to the user once the authentication and authorization confirm.
Do you know What are QlikView Certificate Exams?
Authentication Protocols used by QlikView:
Integrated Windows Authentication
HTTP Header
Ticketing
QlikView Customer Directory
ii. Authorization
Authorization process decides what data sections user allows to access and view. Once the user gets authenticated, the next step is authorization. This controls user access and works permissions.
Methods of Authorization in QlikView
Authorization of user privileges takes place at two levels in QlikView. One is at the Document/Application/File level, which is at the front-end where the user is using the document. The authorization conduct through commands in QlikView script editor. The second method or level is called the data level security which functions from the backend. Let us discuss it in detail.
i. Document Level Security
The document or application level security decides what documents or section of a document an authenticated user will allow to see and open. There are two modes of document-level security in QlikView,
NTFS Mode (Windows control the file access)
DMS Mode (QlikView controls the file access)
ii. Data Level Security
This secures data access at the very initial level i.e. data level. This type of QlikView security methods is when the admin needs to decide what section of the entire data set is the user allow to view and use. There are two ways to accomplish data-level security which can use individually or in combination. They ways are:
a. Section Access
The section access works on the file level in which once you have been granted access to a QlikView file, it decides what data sections within that data file the user will have access to. The section access security in QlikView can do up to row and field levels within a data table using the feature of ‘Hidden Script’ available in QlikView.
Read about QlikView Advantages and Disadvantages
Example of Section Access:
Let us suppose that a client is trying to get access to a QlikView Document titled Sales.qvw. The QlikView software services ask for authentication (either through directory catalogue or by userID and password). Once authenticated, there are two types of users, ADMIN and USER type. The level of authorization or data access decide by what type of users. The admin has access to all the documents.
Whereas, the level of access given to the USER depends upon the authorization specifications in the section access script. As you can see in the image below, all the three users, A,B and C have permitted access to different sets of data from the source Sales.qvw file.
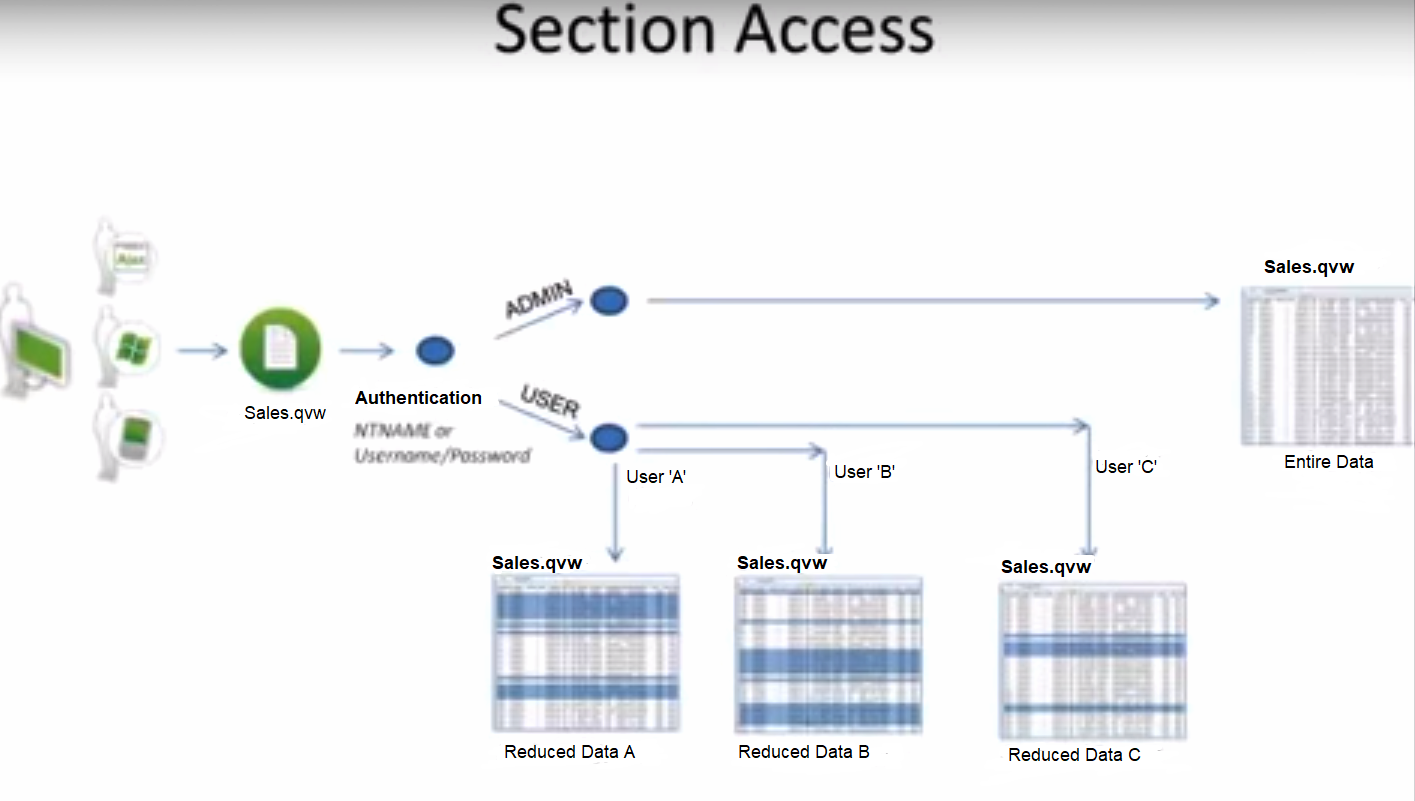
QlikView Security – Example of Section Access
b. QlikView Publisher Reductions
The QlikView Publisher reduction method breaks down a source data file into smaller files (reduced files) and each reduced file contains subsets of data from the larger source file. These reduced files can then only access by the authorized users. This method is highly secure because user’s access gets limited to only the newly formed/reduced user documents and restricts the access of the source document.
Example of QV Publisher Reductions:
At the backend, the QlikView Developer creates a source data file called Sales.qvw which contains the entire data related to sales of the concerned enterprise. This file store in a source document directory in the Publisher, create for reloading and distributing by Publisher.
The reload script within the source document initiates the reloading of the required data from various data sources like SAP, Oracle, Excel files etc. After this, the source file reduces into six smaller files based on country wise sales data. These reduces documents are then distributed to QlikView Server (working at the front-end).
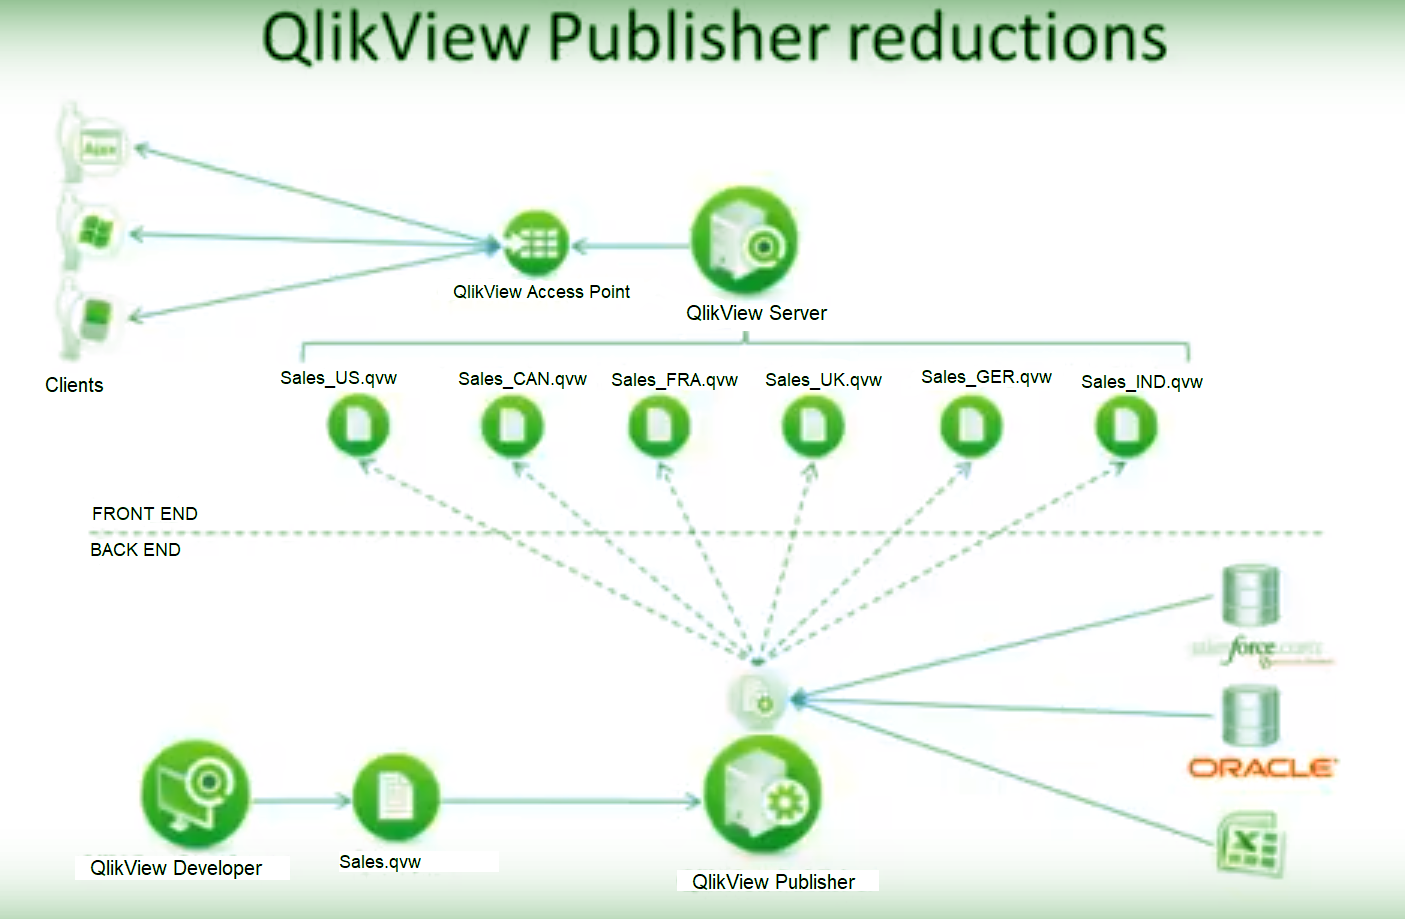
QlikView Security – Example of QV Publisher Reductions
The authorized users can then access the files from the QlikView Access Point. If a user is authorized to see the data files for sales in the countries like USA and Canada, then the file Sales_US.qvw and Sales_CAN.qvw will be made available to the user. These files will only have data which is relevant to the user’s purpose of use.
Have a look at Major Properties of QlikView Documents
Types of QlikView Security
In this section, we will discuss different types of security methods applicable at Document/Application level or at Server/Publisher level or both.
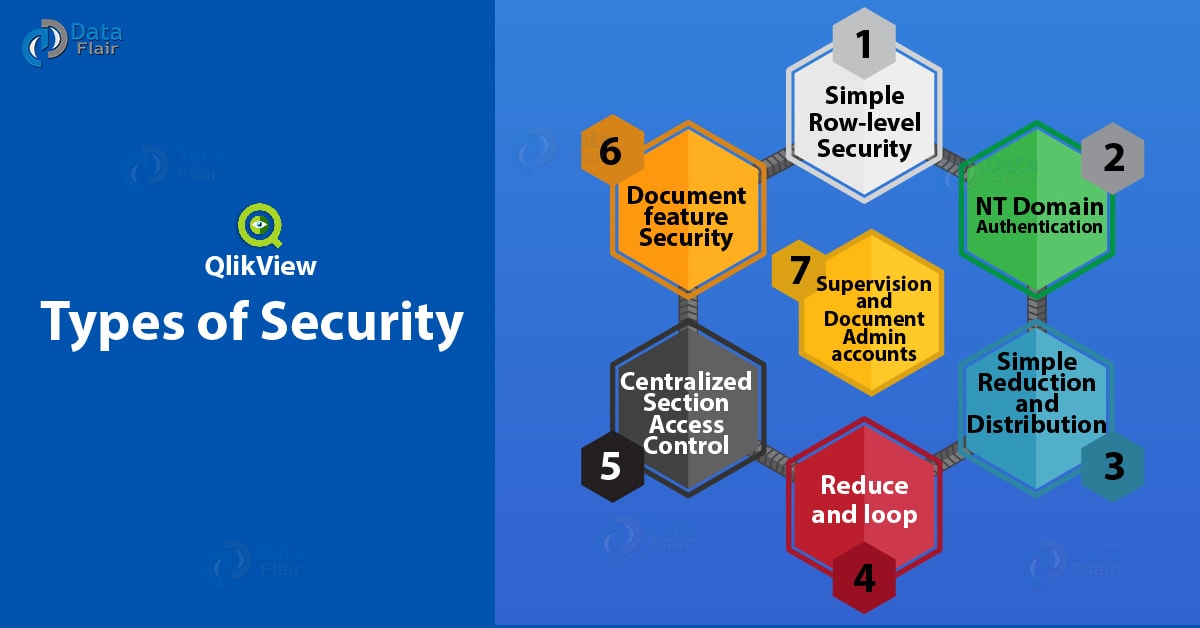
Types of QlikView Security
i. Simple Row-Level Security
The simple row-level security is the section access type of security in QlikView. It happens at the document level which you can apply through the QlikView script. With this type of security mode, an authenticated user having access to a set of data can choose what part of that document data can another user access.
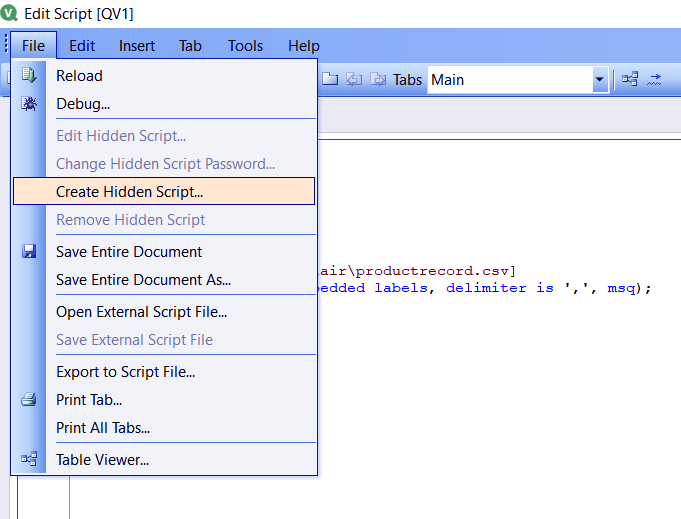
This can done by creating a Hidden Script in the script editor. Go to the FILE option in the script editor and select CREATE HIDDEN SCRIPT from the drop-down list.
QlikView Security – Simple Row-Level Security
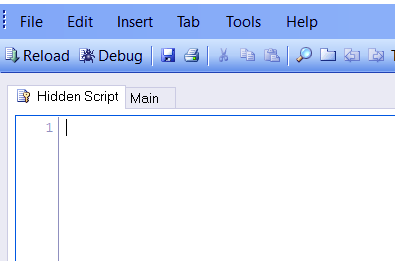
You will ask to enter a password to secure this script. A new tab named ‘Hidden Script’ opens.
LOAD Product_Id,
     Product_Line,
     Product_category,
     Product_quantity,
     Product_cost,
FROM
[C:\Users\HP\Desktop\Dataflair\productrecord.csv]
(txt, codepage is 1252, embedded labels, delimiter is ',', msq);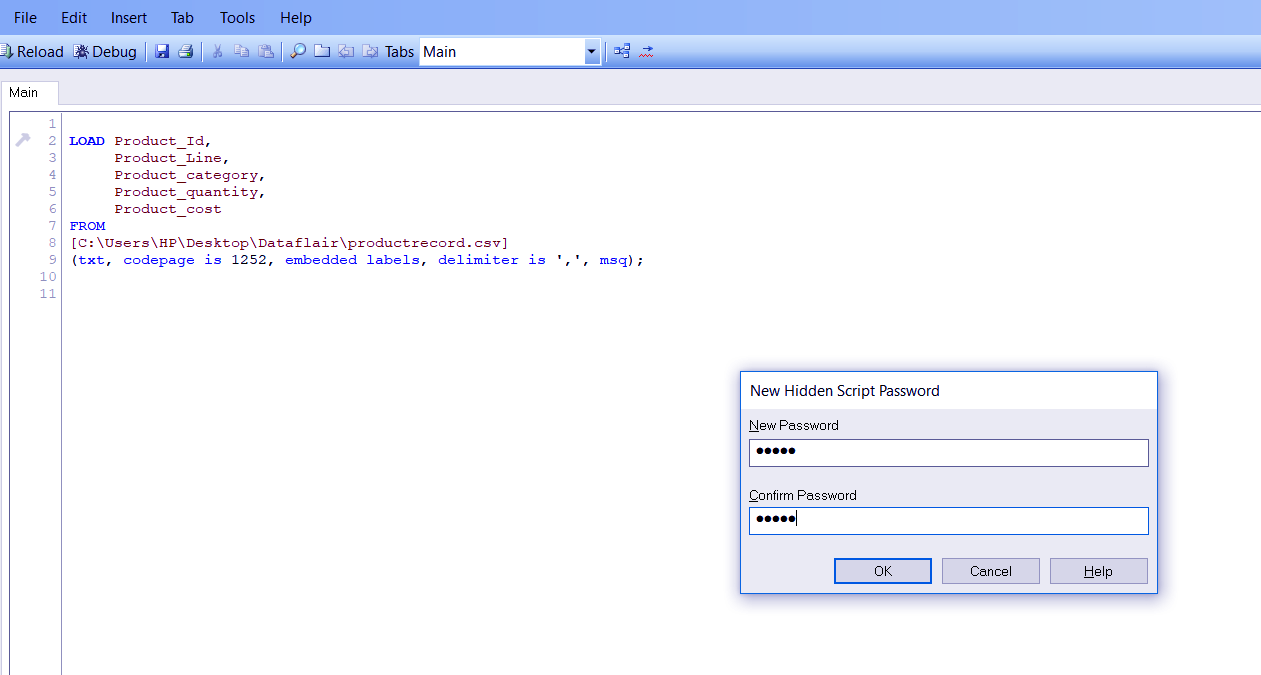
QlikView Security – New Tab
QlikView Security – Hidden Script
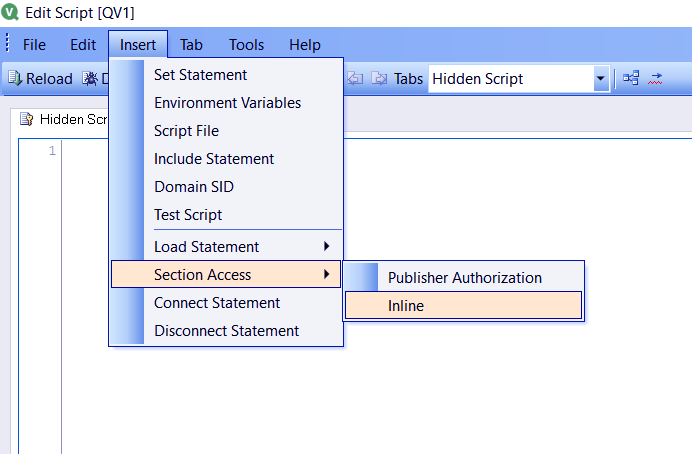
Now you can specify section access details in the script. Go to the INSERT tab then open SECTION ACCESS and select INLINE.
Follow this link to know about QlikView Join Functions
QlikView Security – Open Insert Tab
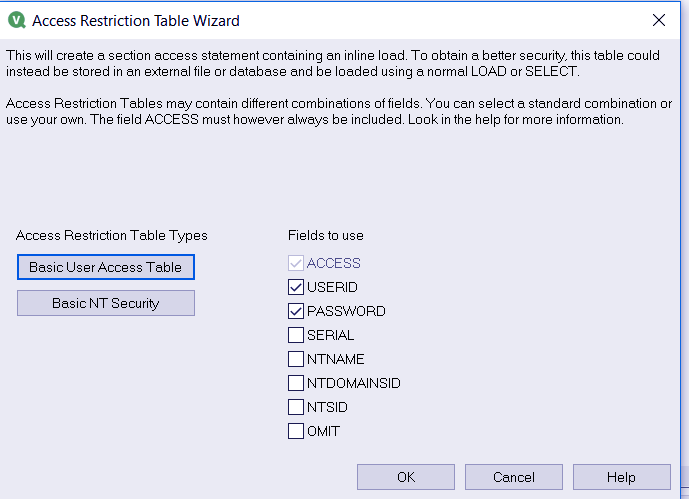
You will get an access wizard dialog box from where you can choose the security fields to ask to the user while requesting access permission. Here we choose only USERID and PASSWORD then click OK.
QlikView Security – Access Restriction Table Wizard
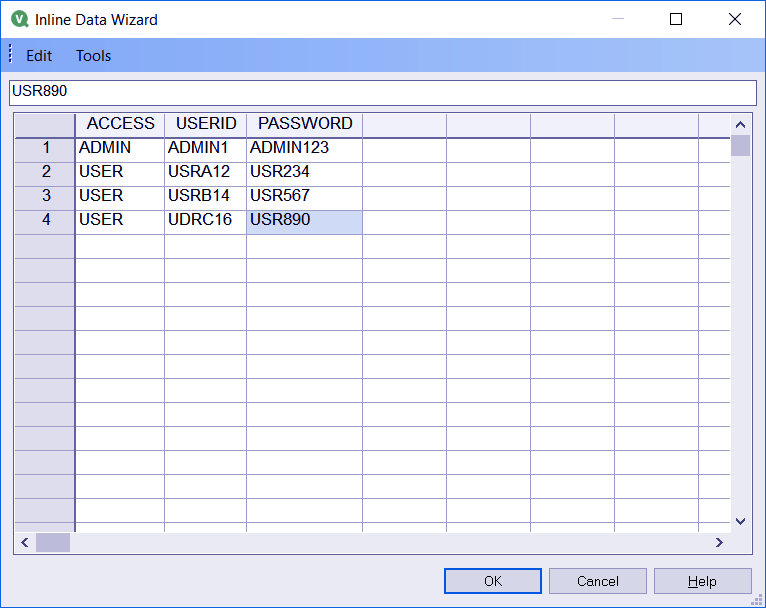
Next, an Inline Data Wizard will open where you get to enter the access type (admin or user), UserID and Password to ensure user authentication. Click OK when you are done.
QlikView Security – Inline Data Wizard
As, you can see in the screenshot attached below, the script will automatically load having the selected specifications for section access. As can see at the bottom of the script code, the Selection Application section lets you choose which user with a specific UserID can have access to which row of a data field. We have assigned the rows to access from the data field Product_Line to each user.
Do you know How to Create QlikView Dashboard?
Hidden script code-
Section Access;
LOAD * INLINE [
ACCESS, USERID, PASSWORD
ADMIN, ADMINl, ADMIN123
USER, USRA12, USR234
USER, USRB14, USR567
USER, UDRC16, USR890
];
Section Application;
LOAD * Inline [
USERID, Product_Line
USRA12, Arts & Entertainment
USRB14, Home & Garden
UDRC16, Health & Beauty
];
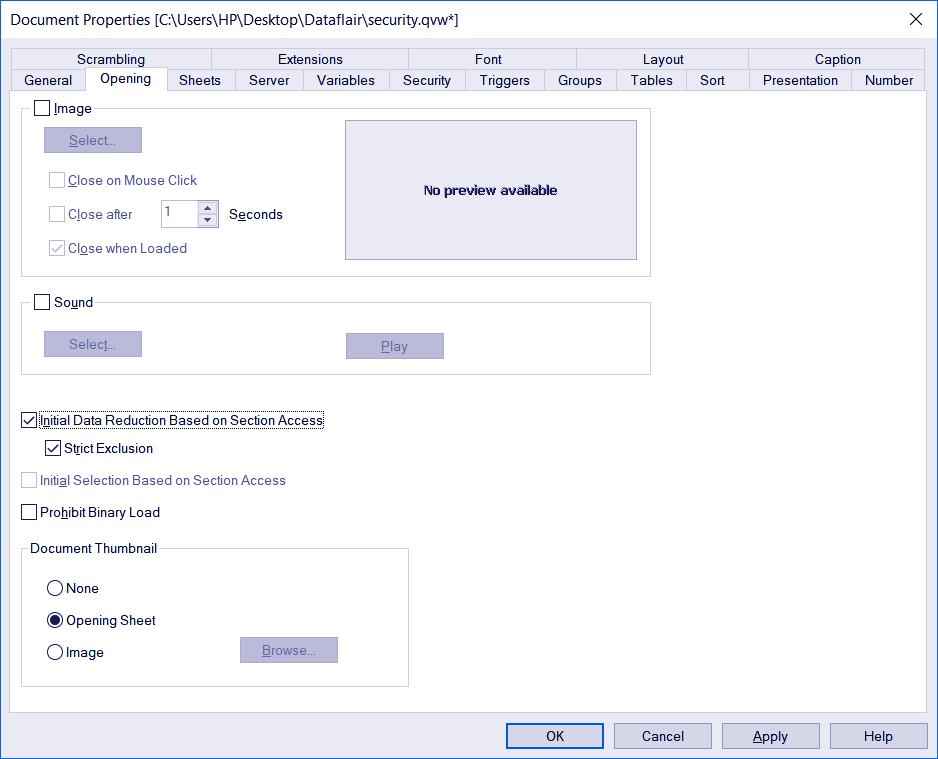
Click OK and save this script CTRL+S and exit the script editor. In the next step, open the Settings tab from the main document and go to Document Properties. Select the OPENING tab in the Document Properties wizard and check the box for ‘Initial Data Reduction Based on Section Access’. This will make the software execute the hidden script every time a user opens the document.
QlikView Security – Document Property
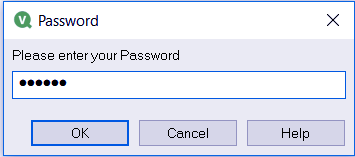
Now when you open this secure document, you will have to first enter a username and password (set earlier in hidden script). According to what username you enter the data row assigned to that UserID will show.
Also Read – QlikView Bar, Pie Chart and Text Box

QlikView Security – User Identification
QlikView Security – Password
If we enter the UserId as USRA12 then we will only see the data related to Arts & Entertainment.

QlikView Security – Product_Id
ii. NT Domain Authentication
This is also a document level security in QlikView but is supported by Windows. What we studied earlier is QlikView’s authorization method as opposed to this method which is Windows’. The row-level security has a drawback, i.e. in the hidden script, all the user id and passwords are written in plain text and have no encryption.
So, a better way to apply section access is by NT Domain. NT Domain authentication uses a centralized security system where any Windows NT user can authenticate automatically by the system without needing to enter a password.
Follow this link to know about QlikView List & Multi Box
To enable NT Domain authentication, you need to open the Section Access wizard and check the box for NTNAME (there are several other NT options to choose from). Now, upon opening a document, QlikView will first ask for NT user authentication and then check for normal username, password authentication if no NT user is found.

QlikView Security- Access Restriction Table Wizard
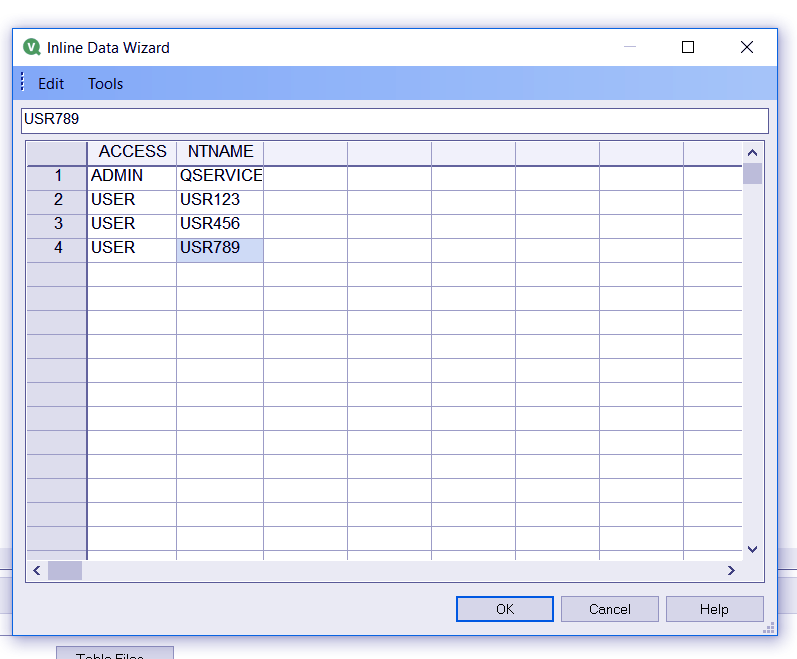
Now, in the Inline data wizard, enter the details of access type and NTname. The NTName will be the IDs of the NT users that you want to grant access to. The access type will decide whether the user gets Admin or User privileges. There no column for a password because the authentication check is happening at the windows level and not at the QlikView level.
QlikView Security – Inline Data Wizard
The script loaded will have details of section access and section application. We have assigned access permissions to only certain countries per NT user.
Let’s Explore QlikView Vs Power BI
Section Access;
LOAD * INLINE [
ACCESS, NTNAME
ADMIN, QSERVICE
USER, USR123
USER, USR456
USER, USR789
];
Section Application;
LOAD *Inline [
USERID, Store
USR123, USA
USR456, Australia
USR789, London
];
Main tab-
LOAD * INLINE [
F1, F2, F3, F4, F5
UserID, ProductType, ProductName , Store, Price
U1, Arts, Easle, USA, $203
U2, Home&Garden, Garden Planters, USA, $170
U3, Arts, Premium Brushes, London, $190
U4, Furniture, Recliner, USA, $500
U5, Sports, Football kit, Australia, $320
U6, Arts, Crafting Material, London, $150
U7, Health&Beauty, Massage kit, Australia, $280
U8, Furniture, Floor lamp, London, $480
U9, Sports, Artificial Grass, USA, $550
U10, Furniture, Display Unit, London, $600
] ;
iii. Simple Reduction and Distribution
As we know that security in QlikView is applied at both document-level and server/publisher level, hence, we must discuss both. The two methods seen so far are of document level securities. Whereas, simple reduction and distribution is server/publisher level security. In this method, the source document is reduced and distributed to an authorized user.
The source document is broken down into smaller documents specific to some user privilege criterions. It is implemented through the QMC (you can only access the QMC if you are an authorized user of Admonitors Group). To automate the reduction of source data, open the QlikView Management Console. Go to the Documents>Source Documents tab. Select the source .qvw file that you wish to reduce.
Follow this link to know about QlikView Architecture
Then through the add icon create a task on to perform on that source document. You will have different tabs like Reduce, Reload, Distribute etc. We can create any number of files using reduce function. Click on ‘Open Document’ and you can see all the available fields and values in the data source. You can select the field you want to perform data reduction on. You can also select unique names for each reduced file.
The distribution of these reduced files is done in the Distribute tab of the QMC. You can manually distribute files by selecting the server (user or group). The chosen users will the authenticate users to be able to view and use the relevant data from reduced files.
Once all this is done, you can see in the Status tab that Distribution of the selected files with reductions is shown. You can also run the task manually from status tab. The reduced can see and used in the Access Point.
iv. Reduce and loop
Reduce and loop using NT Username is also a server-side security method. By reducing and loop, specific data sets can share with individual authenticated users. This is also handled by the QlikView Enterprise Management Console. First, the data is reduced based on some criterion. For instance, if in a sales table there are region wise details of sales.
This data file can reduce based on regions as three files for East, West and Central regions. The three files can then distribute to the authenticated users using a unique NT username. During distribution, in the distribution tab select Loop Field in Document to loop across a document field. Select the field like Login ID to make the data access user specific and then select the distribution parameters accordingly.
v. Centralized Section Access Control
Centralized Section Access control works on both document and server/publisher level of QlikView security. As we have seen in the previous two document level security methods that the security is directed by creating a hidden script by the admin of the document.
That hidden script contains section access, reduction and section application details. What best practices suggest that all of these QlikView security details can access from a single server location. Let’s see how it can be done if you want to centralize the section access of the document you are admin of.
To fetch the user authorization from a centre, go to INSERT>SECTION ACCESS>PUBLISHER AUTHORIZATION.
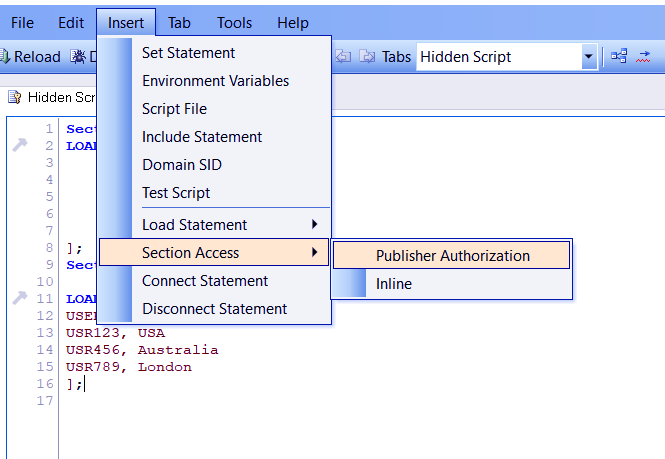
QlikView Security – Centralized Section Access Control
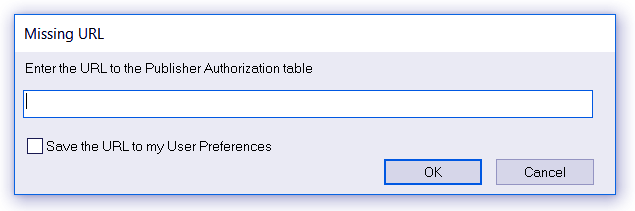
If you are a member of the Administrators Group, the user authorization file URL will enter automatically and include in the script so that the access information gets centralize. Otherwise, you will ask to enter the missing URL for the authorization table.
Refer this – QlikView Silent Installation
QlikView Security – Missing URL
Now, the second part of this QlikView security control is through the QMC. On the Users section access tab in QMC, you can find two tables names Default and Section Access Test. In the Section Access Test table, you will find the details about all the authenticated users we created earlier using hidden script code. In this table, however, the native and NT users can manage together or separately.
As soon as you click on Apply, you will get a main table view of the Section Access Test table and the URL of this user authentication table is given in the URL bar above the table. This is the URL that we have added in the hidden script earlier to centralize section access control. The user authentication table can simply load in the script using this URL anytime.
vi. Document Feature Security
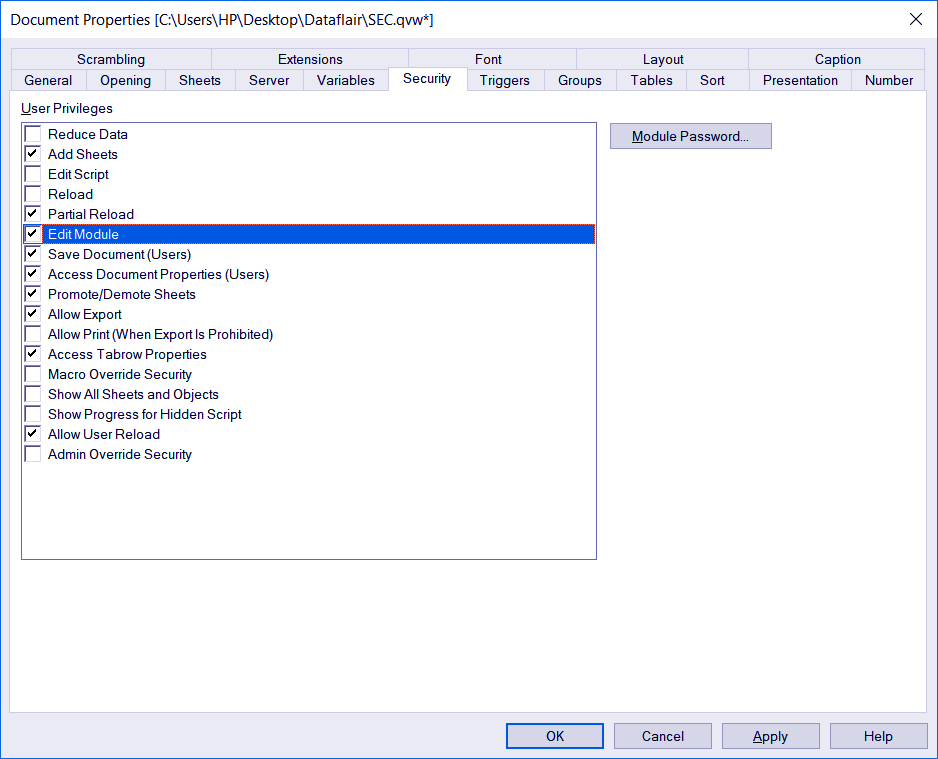
Document Feature Security in QlikView, is a document level security type. In this section, we will discuss how to implement document feature security in QlikView document using section access. Through this the document admin can select what privileges should grant to an authorized user.
Document feature security lets the admin select user privileges through the Settings>Document Properties (Ctrl+Alt+D) option. In the document properties wizard, select the Security tab. There will be a list of QlikView’s basic operations or user privileges in the topic’s context from which you can select or unselect the boxes according to what operations do you want the user to be able to perform.
QlikView Security – Document Feature Security
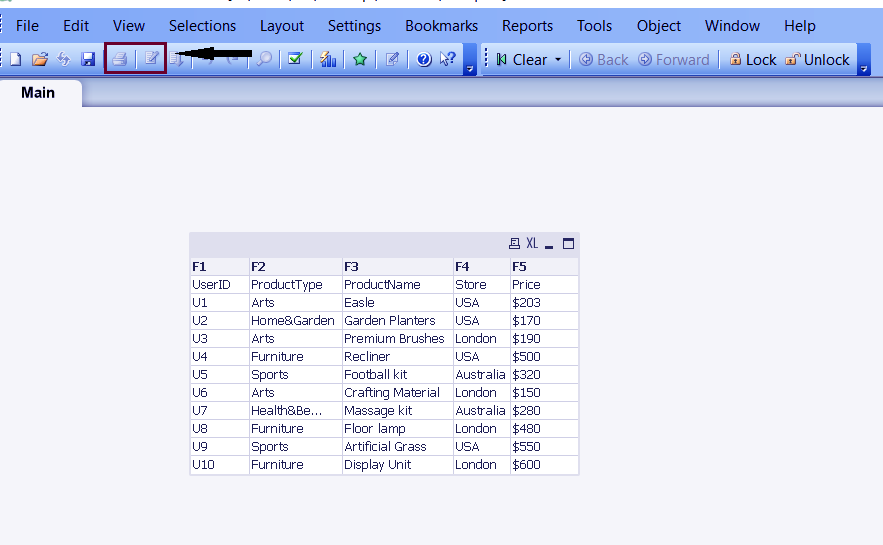
Here, we see user privileges like Reduce Data, Edit Script, Reload, Allow Print deselect. Upon the user opening this document using appropriate Id and password, the document will not provide the user privileges that not select by the admin. As we can see in the screenshot given below, the icons for Edit Script and Reload deactivate, that means the user can’t open the script editor and make changes in the script.
Do you know Which Companies are using QlikView
QlikView Security – Document Feature Security
vii. Supervision and Document Admin accounts
In this section, we will discuss the role played by supervision and document admin accounts located on the server/publisher side in QlikView’s data security. As we know that there are two types of users that can access the document after authenticating themselves, Admin and Users. In addition to the Admin type users account, there can be supervision and document admin user accounts.
If the admin selects certain users and makes them the document admin. Then using the Id and password, when the document admin logs into the QMC, he/she will have limited QMC tabs based on the privileged granted. Most commonly, the document admins assign reload, reduction and distribution tasks on the source documents via QlikView Publisher. Document admins can also assign user privileges on user documents for end users.
Similarly, if an admin chooses some users as the supervision admin, then that user will have a full view of all the documents available in a particularly authorized directory for the supervision admin to supervise. The supervision admin can access these services by login in the Supervision Admin Account. This admin keeps an eye on the reduction, distribution and reload states of all the documents manipulate and instructe through tasks at the QMC. A supervision admin monitors everything from the QV Access Point.
So, this was all about QlikView Security Tutorial. Hope you like our explanation.
Conclusion
With this tutorial, we have covered all the important topics and sub-topics of security in QlikView. As you might have noticed, that QlikView provides a very flexible design of security and there are many ways in which you can secure the data.
Hope you find this tutorial helpful. Drop your comments in case of any queries or feedback.
See Also – QlikView Scripting
Did you know we work 24x7 to provide you best tutorials
Please encourage us - write a review on Google


how to give column security