QlikView Database Connection | QlikView Inline data
Interactive Online Courses: Elevate Skills & Succeed Enroll Now!
In our last tutorial, we talked about QVD Files. Today, we will discuss QlikView Database Connection & Inline Data. In this QlikView Inline Data tutorial, we will explore steps for a data connection in QlikView. At last, we will cover QlikView Inline Data.
So, let’s start the QlikView Database Connection.
QlikView Database Connection
QlikView can connect to many different data sources or databases like MySQL, Oracle, SQL server etc. Once the database from these external files is loaded into the in-memory of QlikView software. This stored data can be quickly retrieved for further analytical purposes.
Let us see the QlikView Database Connection. Before we move on, you might need to make sure that you have a pre-existing MySQL database in your computers.
- In order to connect with a MySQL database, you need to follow some steps. You can connect through the ODBC connection which connects to DSN (Data Source Name) and then the DSN connection fetches the MySQL database.
- If you do not have a DSN connected to MySQL database you can do that online.
Moving on with the steps for QlikView Database Connection,

QlikView Database Connection | QlikView Inline data
a. Database Connection
Open the script editor in QlikView and click on the connect option after choosing ODBC in the database option. A window will appear showing all the existing databases.
Select MYSQL userdsn (DSN) and click on the test connection. If your connection goes okay, then a message prompt saying Connection Test Succeeded will appear.
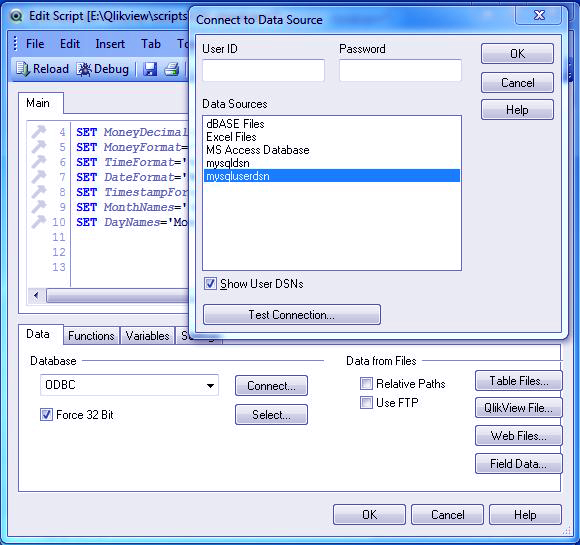
Step.1 QlikView Database Connection
b. Connection Verification
Next, we need to check whether our connection with the database was successful or not. For this you need to notice the script editor window, which will show confirmatory text on the screen.
Now click on Select below the Connect tab to continue.
SET DateFormat='M/D/YYYY';
SET TimestampFormat='M/D/YYYY h:mm:ss[.fff] TT';
SET MonthName='Jan;Feb;Mar;Apr;May;Jun;Jul;Aug;Sep;Oct;Nov;Dec';
SET DayNames='Mon;Tue;Wed;Thu;Fri;Sat;Sun';

ODBC CONNECT32 TO mysqluserdsn;
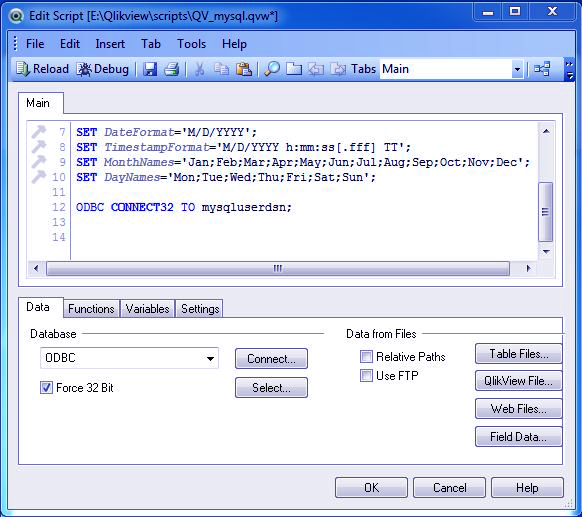
Step.2 QlikView Database Connection – Connection Verification
c. Selecting Database Table
Here the database name is Sakila which is in the Data source file that we selected earlier. It has got a list of table databases to select from. We have chosen actors.
You can also choose any other database from the drop-down list. Then click OK to continue.
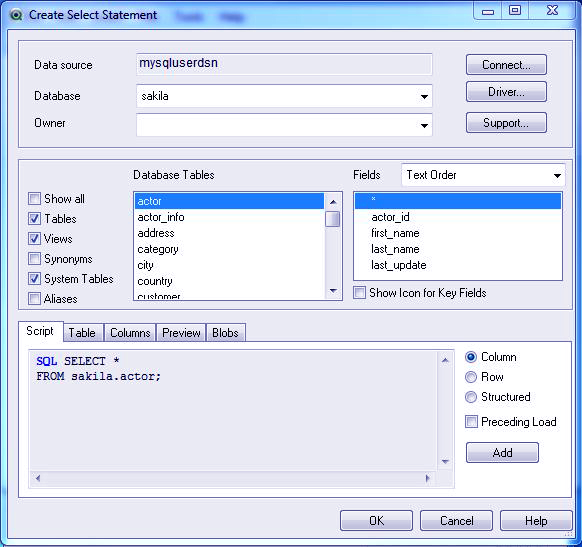
Step.3 QlikView Database Connection – Selecting Database Table
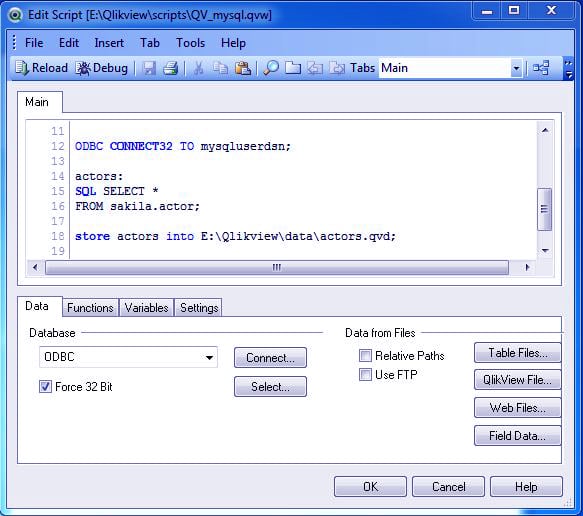
d. Table Loading Script
Now that the table titled actor is been selected it starts showing in the script editor as well.
SET TimestampFormat='M/D/YYYY h:mm:ss[.fff] TT';
SET MonthName='Jan;Feb;Mar;Apr;May;Jun;Jul;Aug;Sep;Oct;Nov;Dec';
SET DayNames='Mon;Tue;Wed;Thu;Fri;Sat;Sun';

ODBC CONNECT32 TO mysqluserdsn;
SQL SELECT *
FROM sakila.actor;
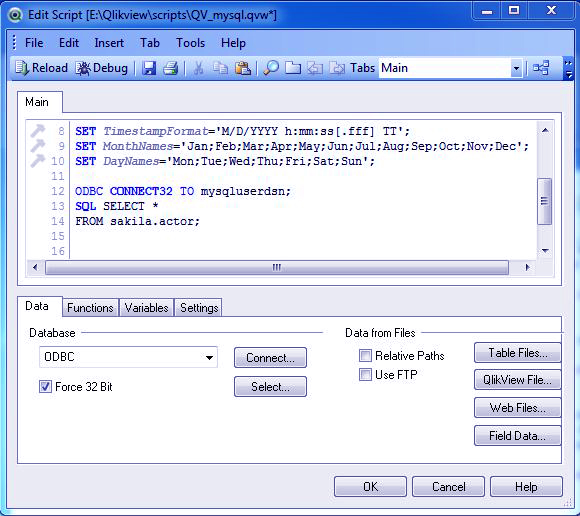
Step.4 QlikView Database Connection – Table Loading Script
e. Storing Loaded Data
We will have to type some commands to store our data permanently. We give all the important information through this command and define a path for the file.
The extension to this file will be .qvd. Next, we save this file with a suitable name in .qvw format.
ODBC CONNECT32 TO mysqluserdsn;

actors:
SQL SELECT *
FROM sakila.actor;

store actors into E:\Qlikview\data\actors.qvd;
Step.5 QlikView Database Connection – Table Loading Script
f. Creating the Table
The final .qvd file can be retrieved or reloaded in the main document by pressing CTRL+R. You can now select a straight table to visualize the data in a tabular form with all required columns and rows.

Step.6 QlikView Database Connection – Creating the table
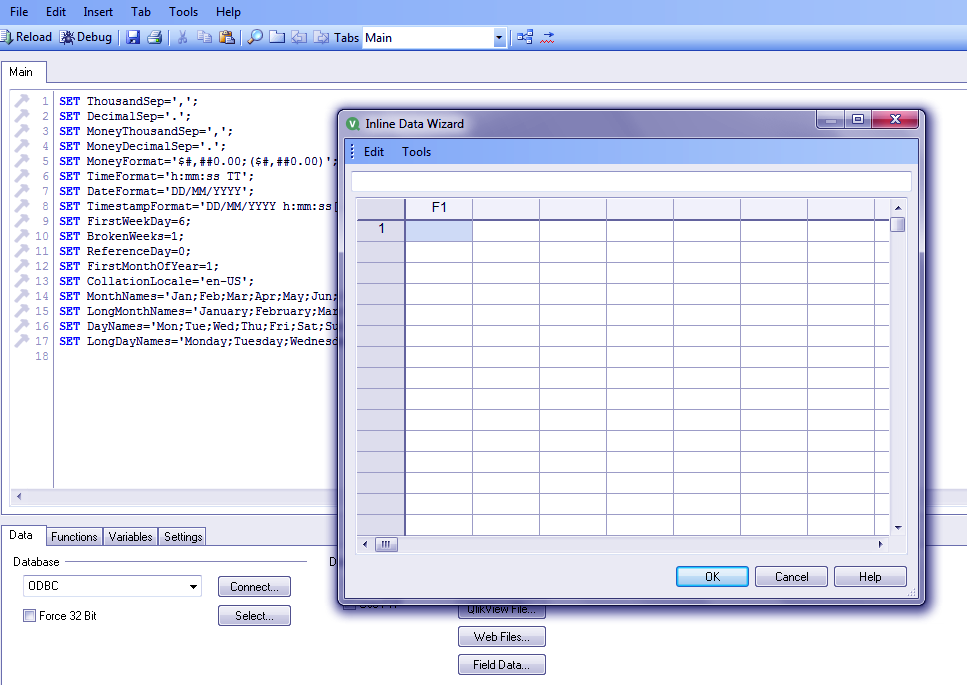
QlikView Inline Data
Inline data features allow you to directly enter data into QlikView from a clipboard. Let us learn how to do it. First of all in a new QlikView document open the script editor. Go to Insert > Load Statement > Load Inline.
QlikView Database Connection | QlikView Inline data
a. Inserting Data
An excel like spreadsheet will open in QlikView itself and you can enter data there as shown in the image below.
Step.1 QlikView Inline Data – Inserting Data
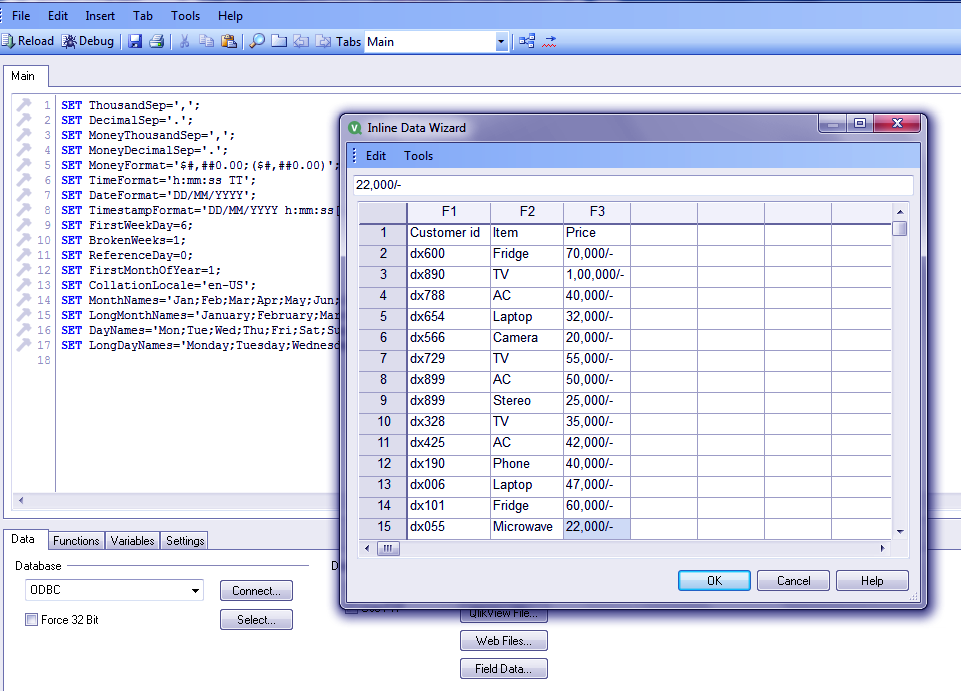
b. Loading Script
Once you did with making all the entries (we have entered an electronic store record), click on OK. As soon as you do this all your entries will appear on the script.
Save this file with a suitable name (will be saved in .qvw format) and click on OK.
Step.2a QlikView Inline Data – Loading Script
SET FirstMonthOfYear=1;
SET CollationLocale='en-US';
SET MonthName='Jan;Feb;Mar;Apr;May;Jun;Jul;Aug;Sep;Oct;Nov;Dec';
SET LongMonthNames='January;February;March;April;May;June;July;August;September;October;November;December';
SET DayNames='Mon;Tue;Wed;Thu;Fri;Sat;Sun';
SET LongDayNames='Monday;Tuesday;Wednesday;Thursday;Friday;Saturday;Sunday'
LOAD * INLINE
    F1, F2, F3
    Customer id, Item, Price
    dx600, Fridge, "70,000/-"
    dx890, TV, "1,00,000/-"
    dx788, AC, "40,000/-"
    dx654, Laptop, "32,000/-"
    dx566, Camera, "20,000/-"
    dx729, TV, "55,000/-"
    dx899, AC, "50,000/-"
    dx899, Stereo, "25,000/-"
    dx328, TV, "35,000/-"
    dx425, AC, "42,000/-"
    dx190, Phone, "40,000/-"
    dx006, Laptop, "47,000/-"
    dx101, Fridge, "60,000/-"
    dx055, Microwave, "22,000/-"
];

Step.2b QlikView Inline Data – Loading Script
c. Creating Table Box
On the main document in QlikView, retrieve the saved file through CTRL+R . Then go to LAYOUT and select a NEW SHEET OBJECT then TABLE BOX. Add fields you wish to be displayed on the table and click on OK.
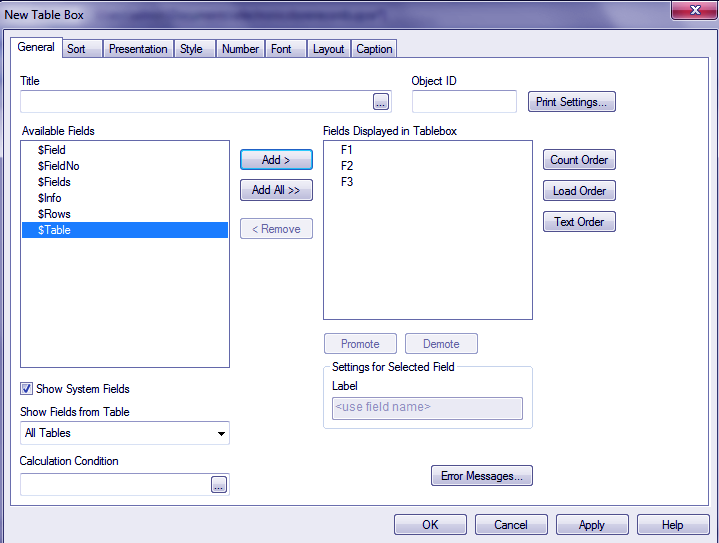
Step.3a QlikView Inline Data – Creating Table Box
Upon clicking OK you will get to see a table with all the entries that you did.
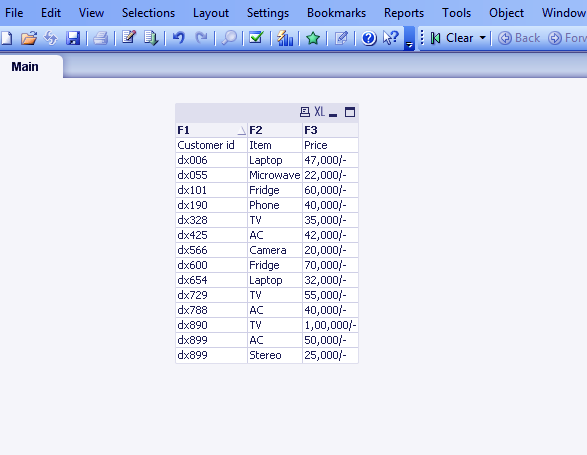
Step.3b QlikView Inline Data – Creating Table Box
So, this was all about QlikView Database Connection. Hope you like our explanation on QlikView Inline Data.
Conclusion
Hence, we are pretty sure that after learning to work on QlikView this much you must not be feeling daunted by this tool anymore. Be confident and you will become master of this tool in no time.
So, we have seen how to load files like XML, Web, Delimited and Excel files.
Here, we learned QlikView Database Connection and QlikView Inline data. Furthermore, if we miss something, do let us know in the comment section.
Did you like this article? If Yes, please give DataFlair 5 Stars on Google


