Create Synthetic Keys in QlikView – 4 Simple Ways to Resolve it
Interactive Online Courses: Elevate Skills & Succeed Enroll Now!
The concept of keys must be clear to you if you have an idea about RDBMS. Here, we will study what are Synthetic Keys in QlikView and how to create it. Along with this, we will learn how to resolve QlikView Synthetic Keys.
In the previous tutorial of Star Schema, we learned about two kinds of keys, Unique key that is a field name common in both dimension table and fact table. Another is a Primary key which is the collection of all the unique keys in the fact table. The synthetic key is also one such provisional key in the case of an exception.
So, let’s start tutorial on ” Synthetic Keys in QlikView”.
Create Synthetic Keys in QlikView – 4 Simple Ways to Resolve it
QlikView Synthetic Keys
A synthetic key is a provisional key created in QlikView when there occurs a situation when there are more than two same fields between tables. In the star schema, we saw that the fact table had only one common field (unique key) between two tables. Whereas in the case of synthetic keys in QlikView, there are two or more common fields between two tables.
To counter this confusion, a new table or synthetic key is created which shows the fields that are common. Whenever such a situation arises, the synthetic keys in QlikView creates automatically, and this change is also loaded into QlikView’s memory.
Do you know how to create QlikView Time Chart Wizard?
How to Create QlikView Synthetic Keys?
To create a synthetic key in Qlikview load the tables into QlikView’s memory or script. The two data tables that we have used have two common fields i.e., Product ID and Sub-category.
LOAD [Product ID],
Category,
[Sub-Category],
[Product Name]
FROM
[C:\Users\HP\Desktop\Dataflair\Product details.csv]
(txt, codepage is 1252, embedded labels, delimiter is ‘,’, msq);
LOAD [Product ID],
[Sub-Category],
[Sales ID],
Sales,
Quantity,
Discount,
Profit
FROM
[C:\Users\HP\Desktop\Dataflair\Sales details.csv]
(txt, codepage is 1252, embedded labels, delimiter is ‘,’, msq);
As soon as the files are loaded and saved in memory. Upon pressing CTRL+T, the table structure display with a synthetic key created.
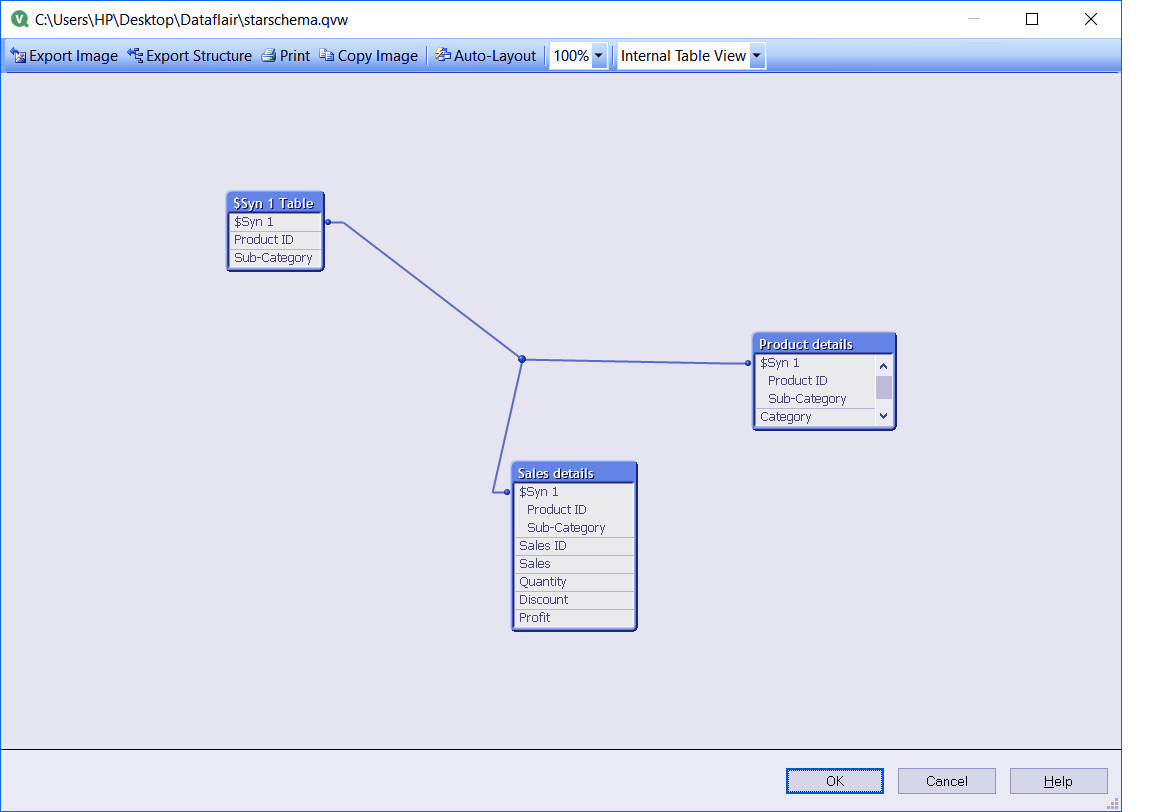
Create Synthetic Keys in QlikView
Follow this link to know how to apply QlikView Layout Themes?
As you can see in the screenshot above, the two fields Product ID and Sub-Category are common in the tables titled ‘Product Details’ and ‘Sales Details’. A third table Syn1 Table (Synthetic key) create having the two common fields.
When you see the source table view where all the common fields between tables show to directly connect.
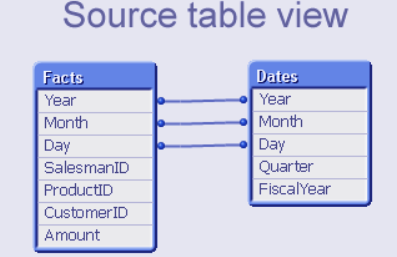
Synthetic Keys in QlikView – Source Table View
But the internal logic does not treat common fields between tables like this. Internally the common fields are shown in a separate table i.e. Syn Table. The syn table or synthetic key in QlikView, table contains the collection of all the composite keys between the tables. It is also called a symbol table for composite keys because of an identifier symbol like $Syn 1.
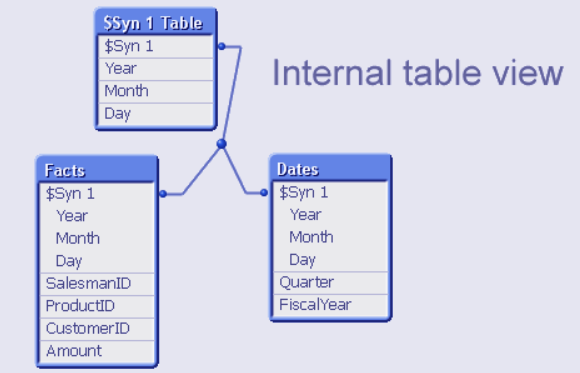
Synthetic Keys in QlikView – Internal Table View
How to Resolve Synthetic Keys in QlikView?
QlikView Synthetic keys, perceive as bad, but they are not to blame. What synthetic keys truly reflect is the users’ incapability in designing a good data model or data structure. So, instead of cringing on a synthetic key in QlikView, you must focus on building a better data structure so that no synthetic keys are formed.
So, the problem of QlikView synthetic keys resolves by removing the synthetic keys. Certain methods use to resolve synthetic keys in QlikView:
a. Removing Fields
Such fields which are common between tables and are extra can potentially form a synthetic key in QlikView. You can remove the fields by making them a comment which is done by adding a ‘//’ sign in front of that field or remove the field from the script.
In the sample script code given below, as you can see there are two tables ‘Sales’ and ‘Branch Mapping’. Two fields which are ‘Branch’ and ‘Region’ are common between the tables. This might form a synthetic key, so to avoid it, we have made the Region field a comment (// Region).
Sales:
LOAD Branch,
// Region
Empcode,
Product,
Sales
FROM
Sales.xlsx
(ooxml, embedded labels, table is Transaction);
Branch Mapping:
LOAD Branch,
Region,
Country,
Category
FROM
Sales.xlsx
(ooxml, embedded labels, table is Branch_Mapping);
Also, Read – QlikView Ports & Client Communication
b. Renaming Fields
Another way to resolve synthetic keys in QlikView, is by renaming one of the two common keys. Like in the sample code below, we have renamed the field Region as Sales Region, so that the Regions field (common in both tables) are read as different fields and no synthetic key form.
Sales:
LOAD Branch,
Region as Sales Region,
Empcode,
Product,
SaIes
FROM
Sales.xlsx
(ooxml, embedded labels, table is Transaction);
Branch_Mapping:
LOAD Branch,
Region,
Country,
Category
FROM
Sales.xlsx
(ooxml, embedded labels, table is Branch_Mapping);
c. Renaming Using QUALIFY
You can also rename a field using the keyword QUALIFY. This renames common fields in the format ‘TableName.FieldName’. This gives the fields unique identity and prevents from a synthetic key formation.
Qualify Region;
Sales:
LOAD Branch,
Region,
Empcode,
Product,
SaIes
FROM
Sales.xlsx
(ooxml, embedded labels, table is Transaction);
Branch_Mapping:
LOAD Branch,
Region,
Country,
Category
FROM
Sales.xlsx
(ooxml, embedded labels, table is Branch_Mapping);
For, instance, in the code shown above, we have qualified the common field Region. Now, in the resultant data structure table, the names of this field will change to ‘Sales.Region’ and ‘Branch_Mapping.Region’.
Let’s Explore QlikView Tables – Cross, Straight, Pivot and Mapping
d. Using Autonumber/Composite Keys
One more method of resolving synthetic keys in QlikView, is by using Autonumberhash128 or Autonumberhash256 functions. These functions create composite keys and generate a 128bit or 256bit values for each composite key field combination.
Sales:
LOAD Branch,
Region,
Empcode,
Product,
SaIes
Autonumber(Branch&Region) as Check
FROM
Sales.xlsx
(ooxml, embedded labels, table is Transaction);
Branch_Mapping:
LOAD //Branch,
//Region,
Country,
Category
Autonumber(Branch&Region) as Check
FROM
Sales.xlsx
(ooxml, embedded labels, table is Branch_Mapping);
This will create a bit value for the field combination ‘Branch & Region’ using the Autonumber() function.
So, this was all about QlikView Synthetic Keys. Hope you like our explanation.
Conclusion
Thus, the creation of a synthetic key is a very convenient feature that clears all the confusion concerning common fields in tables. However, having them might impair the functioning of your application in terms of speed and memory issues. So, under best practices for performance optimization, it is suggested to not have any synthetic keys in your data model.
Furthermore, if you have any, feel free to share with us. We will get back to you.
Related Topic – QlikView Management Service & QMC
You give me 15 seconds I promise you best tutorials
Please share your happy experience on Google


