QlikView Master Calendar – Creating with Example in Just 5 Steps
We offer you a brighter future with industry-ready online courses - Start Now!!
After completing QlikView Keep Function, let’s move towards the QlikView Master Calendar Tutorial. Here, we will learn how to create Master Calendar in QlikView with an example. As QlikView is known for it’s user-friendly and convenient operating, one such feature of QlikView is a Master Calendar.
So, let’s start the QlikView Master Calendar Tutorial.
What is QlikView Master Calendar?
Time plays an important role in data analysis. Whenever you are analyzing a data set having data generated over a period of time. You would want to have better insight into the details of time like which year? What month? Which quarter etc.
But usually when data is generated, or entries are made the time and date are recorded in a fixed format like DD/MM/YYYY, and no information of week, weekday, quarter etc, is provided for analysis.
QlikView Master Calendar is created to counter this issue. A Master Calendar created through QlikView script and can link to any of the databases present in QlikView. Whenever a database contains entry fields having time or date, creating a Master Calendar in QlikView and linking it with that particular database or fact table will give you all the details of time and date.
How to Create Master Calendar in QlikView?
Let us learn how to create QlikView Master Calendar and join it with the fact table containing a date field. The sample data that we have taken is a sales record (CSV file), which contains sales information like Order ID, Order date, Item name, and Sales value. We will create and link a QlikView master calendar with the OrderDate field.
Input Data
Sales-
Order ID,OrderDate,Item,Sales
1,08/01/2018,Bookcases,261
2,10/01/2018,Chairs,735
3,11/01/2018,Labels,146
4,19/01/2018,Tables,1500
5,20/01/2018,Storage,226
6,25/01/2018,Furnishings,2486
7, 27/01/2018,Art,728
8,30/01/2018,Phones,9052
9,02/02/2018,Binders,185
10,04/02/2018,Bookcases,1149
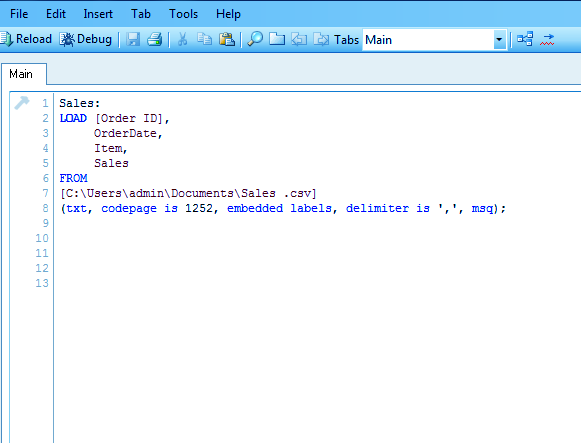
Firstly, we will select the above-delimited file from the INSERT option in the script editor (CTRL+E) and load it into QlikView’s memory and save the loaded script.
Sales:
LOAD [Order ID],
     OrderDate,
     Item,
     Sales
FROM
[C:\Users\admin\Documents\Sales .csv]
(txt, codepage is 1252, embedded labels, delimiter is ',', msq);
Step.1 To Create QlikView Master Calendar
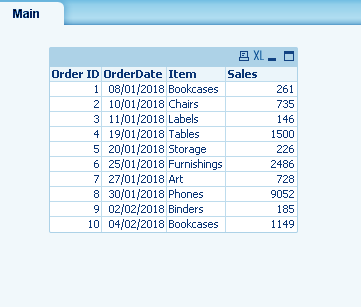
This is a simple dataset without the master calendar QlikView can create. As you can see, upon creating a table box using the above data file we get the date field displayed normally without any additional data fields for time and date.
Step.2 To Create QlikView Master Calendar
Now, we will add more fields related to date by creating and adding a master calendar in the same script.
Do you know What is QlikView Join Functions?
Sales:
LOAD [Order ID],
     DATE (DATE# (OrderDate,'D/M/YYYY')) AS OrderDate,
     Item,
     Sales,
FROM
[C:\Users\admin\Documents\Sales.csv]
(txt, codepage is 1252, embedded labels, delimiter is ',', msq);


LOAD
    Date(OrderDate) as OrderDate,
    Year(OrderDate) as Year,
    Month(OrderDate) as Month,
    Day(OrderDate) as Day,
    Week(OrderDate) as Week;

LOAD
Date(MinDate=IterNO ()-1) as OrderDate
While(MinDate=IterNO ()-1) as <= Num(MaxDate);

LOAD
   Min(Date(Date# (OrderDate, 'D/M/YYYY'))) As MinDate,
   Max(Date(Date# (OrderDate, 'D/M/YYYY'))) As MaxDate
Resident Sales ;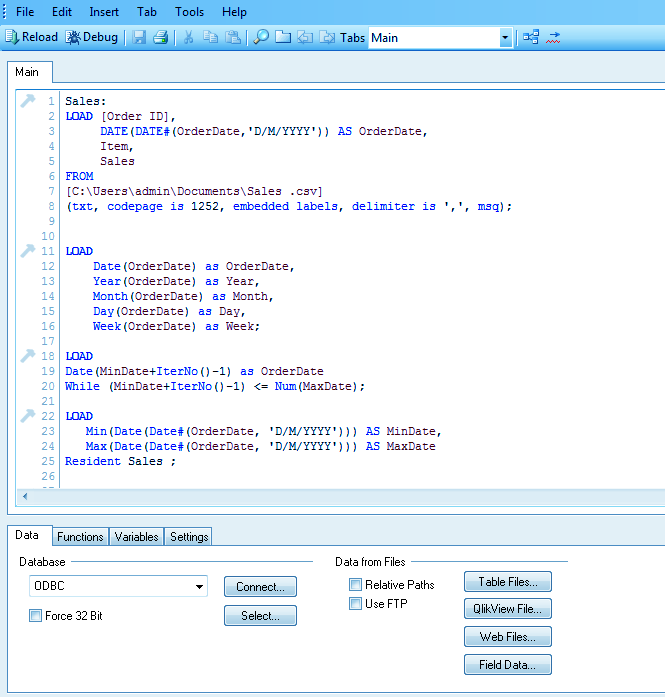
Step.3 To Create QlikView Master Calendar
In the script, we have used the load statement several times. The first load statement is to load the main fact table ‘Sales’. The second load statement use for load the master calendar and the two load statements use after that to set a range of dates to start from and end it.
If we would have only loaded the calendar without setting a minimum and maximum dates range. The calendar details for only the entered dates would have been shown. That is, QlikView Master Calendar for only the ten dates available in the data field would have been created. But if we also want the dates between the mentioned values, we have to write a code that sets a range of dates to fetch.
So, we take a min date and max-date which will the entry of the first date in the table and the entry of the last date. The master calendar then will show all the dates and related details from the start to end or min to a max asset in the condition. The table link with the master calendar via resident load.
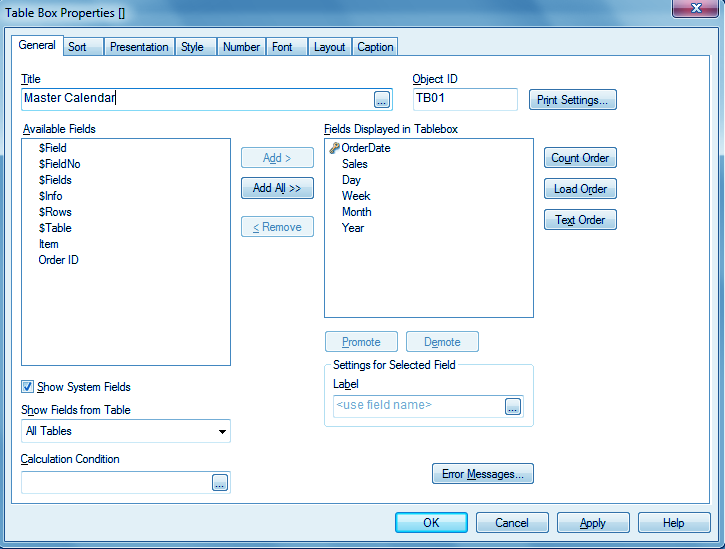
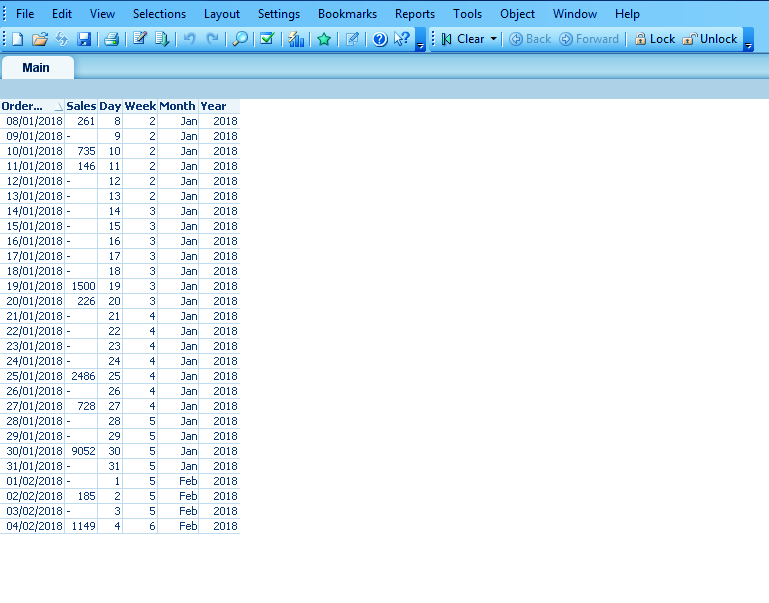
Once you have created the script, saved(CTRL+S) and reloaded (CTRL+R). The script then creates a table box to see the date and time columns added by the master calendar. The new fields will also available in the field’s options given in the table box, add all these new fields like Day, Week, Month, Year and click OK.
Step.4 To Create QlikView Master Calendar
The table box created will have all the new columns created by the master calendar as you can see in the screenshot given below. The table displays dates from 8/01/2018 till 4/02/2018 as per the range we have selected.
Let’s explore the QlikView System Requirements for Version 11 & 12
Step.5 To Create QlikView Master Calendar
You can also add a code line in the QlikView Master Calendar code if you wish to add a column displaying the Quarter of the year a particular date comes in.
Code-
‘Q’ &Ceil(Month(Nameofthedatefield) / 3) AS Quarter,
So, this was all about QlikView Master Calendar Tutorial. Hope you like our explanation.
Conclusion
Hence, we studied steps to create QlikView Master Calendar. In addition, we discussed using the master calendar in QlikView, we can very easily add important date and time aspects into a dataset table through which analysis of that data with respect to time or a defined time period becomes very convenient. Is this Information helpful to you? Share your feedback with us!
Related Topic – QlikView Installation
Your opinion matters
Please write your valuable feedback about DataFlair on Google


Thank you for your detailed explanation.
My problem it’s that im getting in Qlick sense the correct values + all the possible dates from the beggining with 0 values.
For example i ask for sales of 2 days ago, it gives me zeros all the way from 3 years ago, and then the correct values non zeros from 2 days ago.
I read somewhere there is a line of code i have to set, so this doesnt happen.
Thank you