QlikView Data Load – 6 Ways to Implement Data Loading in QlikView
FREE Online Courses: Transform Your Career – Enroll for Free!
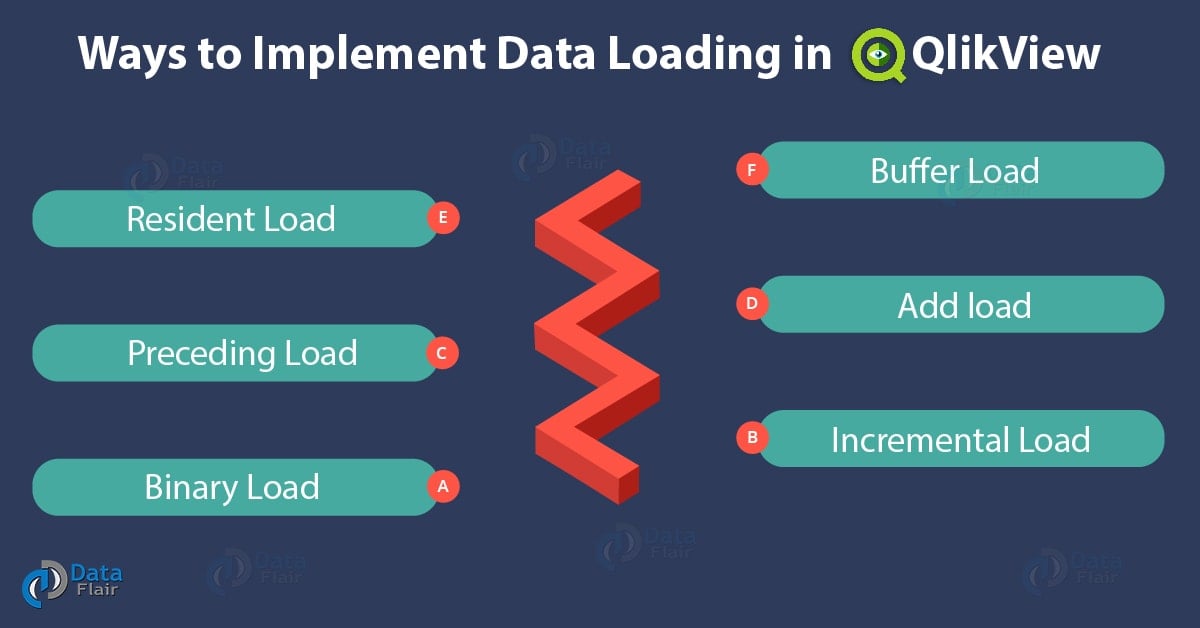
In our last QlikView tutorial, we studied QlikView Reference Circular. Here, we will learn about what is QlikView Data Load and different ways to implement data loading in QlikView: Resident Load, Preceding Load, Binary Load, Buffer Load, Add load and Incremental Load in QlikView.
So, let’s start QlikView Data Load Tutorial.
Resident Load in QlikView
In QlikView, you can load data from files already existing in the RAM or you have entered through Inline data loading. With the help of QlikView resident load feature, you can add a table from in-memory in the pre-existing file script. The only condition is that both the old and the new table should load in the same script.
Let us learn now how to implement resident load in QlikView:
Loading the script– Open the script editor by CTRL+E and load a data file (you can load an excel file or can create a new inline-table). Once you do it, you can see the text on the script editor. The name of the table we have created is REGIONS which has information about sales in different countries in the specific years.
Do you know What is QlikView Scripting?
We will create another table TOTAL. Here we will give the commands desiring the output of Total Sales as per Country.
In the end of this command script, we will drop the REGIONS table as we only want the TOTAL table for analysis.
Regions:
LOAD * INLINE [
   Country, Sales, Year
   India, 1295, 2015
   UK, 2871, 2014
   USA, 5423, 2017
   India, 1339, 2018
   China, 6201, 2016
   Australia, 972, 2015
   Russia, 4216, 2012
   Germany, 187, 2015
   USA, 1065, 2015
   UK, 5450, 2017
   South Africa, 763, 2016
   Canada, 1200, 2016
   Australia, 1007, 2016
];
Total;
Load
    Country, SUM (Sales) as [Total Sales]
Resident Regions Group By Country;

Drop Table Regions;Creating the Table Box– Now to see our results in a tabular form, we will save the above script and reload it on the main document by CTRL+R.

Technology is evolving rapidly!
Stay updated with DataFlair on WhatsApp!!
QlikView Data Load – Creating the Table Box
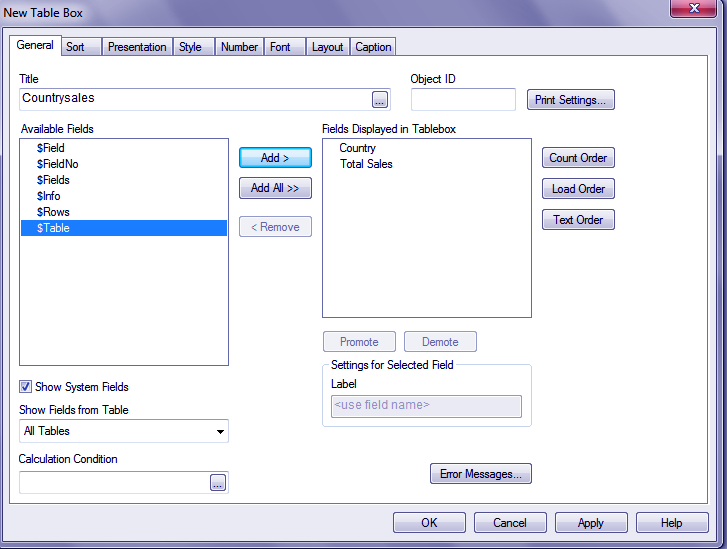
Next, we will create a table box by the usual method.
Let’s explore QlikView Tables in detail
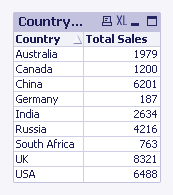
Name the table and add fields according to the order you wish and click OK. As you can see in the screenshot below, a table COUNTRYSALES showing only two fields Country and Total Sales having the sales sum of the countries.
Preceding Load in QlikView
The preceding load is used in loading a new statement by using elements from already existing load statements in the same script. The data is processed from the first load statement which is south of the script editor and then the second load statement is processed which is north of the script editor and the data is used by it. Let us learn how to do it.
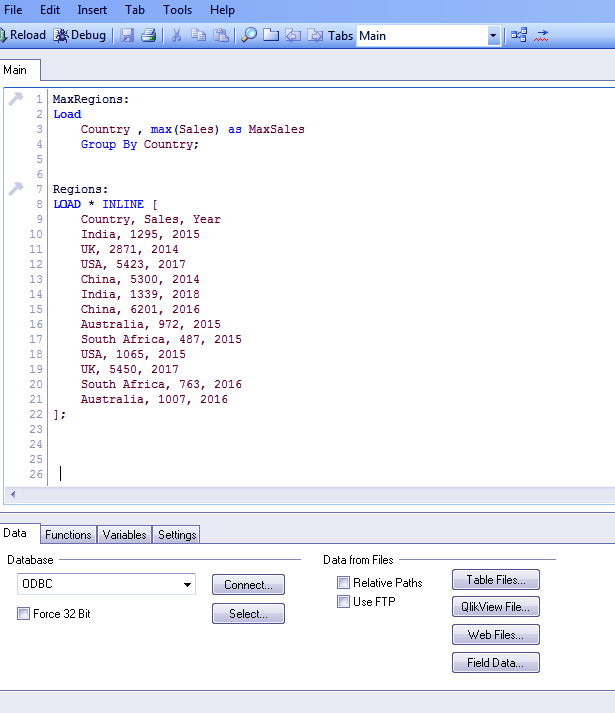
Script Loading– You start by loading data from a file. As soon as you do it the script will load. We have loaded sales data from a file. The table is called Regions and it has year wise sales records of several countries. Do study the data from the screenshot below.
MaxRegions:
Load
    Country, max(Sales) as MaxSales
    Group By Country


Regions:
LOAD * INLINE [
   Country, Sales, Year
   India, 1295, 2015
   UK, 2871, 2014
   USA, 5423, 2017
   China, 5300, 2014
   India, 1339, 2018
   China, 6201, 2016
   Australia, 972, 2015
   South Africa, 487, 2015
   USA, 1065, 2015
   UK, 5450, 2017
   South Africa, 763, 2016
   Australia, 1007, 2016
];
Applying the function- After this we have applied a max function on the sales column (refer to the screenshot above). We provide appropriate Group By clause and also mention the criteria of choosing maximum sales.
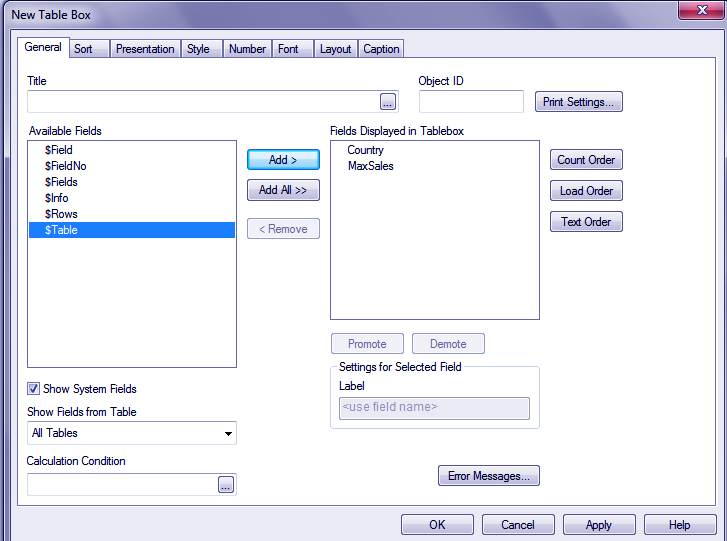
Creating Table Box- As we have done during the process of resident load, we will do the same here. Save the above script, reload the script by CTRL+R, create a Table Box, add titles and fields and click OK. You can now see a table with fields Country and Max Sales. The function applied selected the year with maximum sales from the two options given for each country and displayed the result.
Follow this link to create QlikView Bar Chart, Pie Chart & TextBox?
Incremental Load in QlikView
QlikView Incremental loading helps you update your scripts every time new entries are been made. The files that are loaded with data and are very large might give you trouble while loading. It will take up a lot of system’s in-memory and loading will very slow. To avoid all this, incremental loading in QlikView loads only the newly added or updated data. This concept of loading only the updated data from the source is called Incremental Load in QlikView.
You can use unique keys or data timestamps to filter out only the updated data. We must now learn the method to implement the concept of Incremental Load.
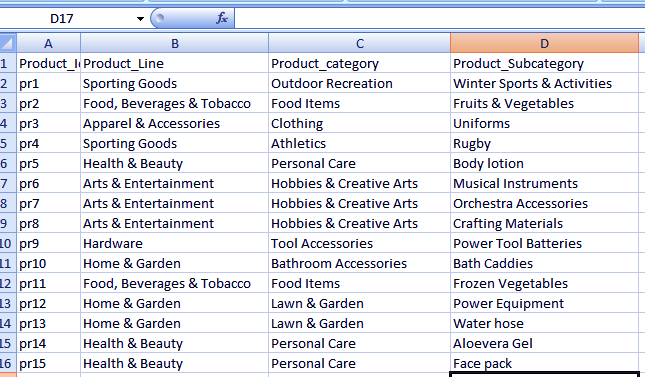
Loading the script– First of all we will load a .csv file from the INSERT option given in the script editor. Recall the steps to load a delimited file we learned in the previous tutorial. Do the same here. The CSV file we are using is Product details file as shown below.
The script will load upon selecting the CSV file.
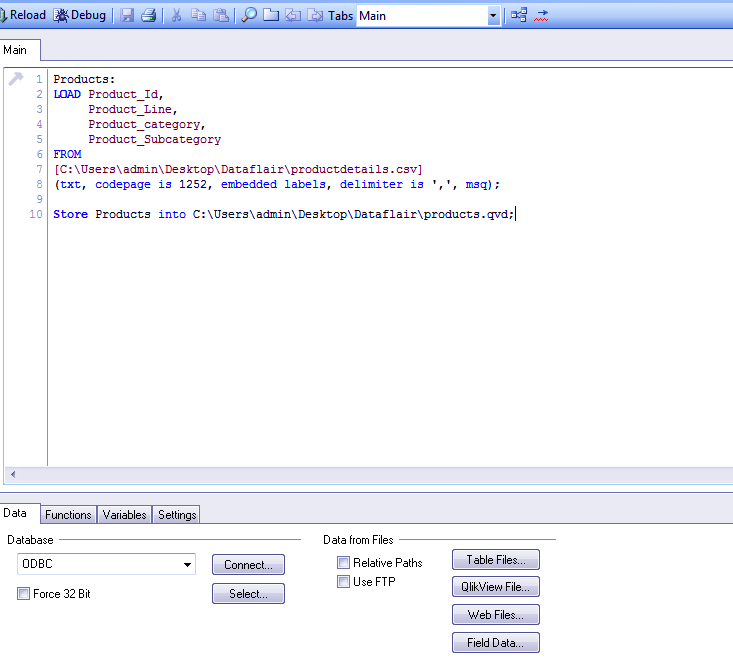
Storing as .qvd file– Next we will add a statement to store our CSV file in .qvd format and also define a path for saving the file.
Have a Look – How to Create QVD Files?
Products:
LOAD Product_Id,
     Product_Line,
     Product_category,
     Product_Subcategory
FROM
[C:\Users\admin\Desktop\Dataflair\productdetails.csv]
(txt, codepage is 1252, embedded labels, delimiter is ',', msq);

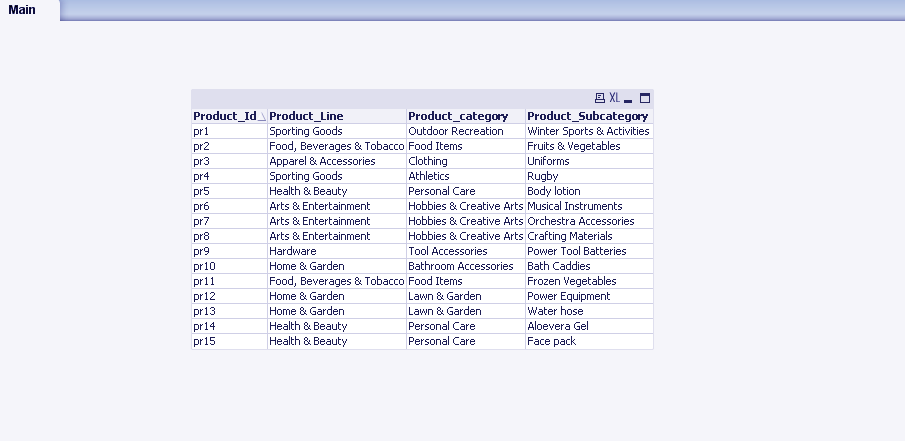
Store Products into C:\Users\admin\Desktop\DataFlair\products.qvd;Table Box- We will save our script and verify whether or not our data has been loaded by seeing it a Table Box layout option. We got results as shown below.
Updating the data source– Now we have made a few more data entries in our source CSV file.
| pr16 | Food, Beverages & Tobacco | Food, Items | Cereals |
| pr17 | Food, Beverages & Tobacco | Beverages | Fruit Juices |
| pr18, | Sporting Goods | Athletics | Football |
Incremental Load Script– We will now have to make add a few codes and commands in the load script in order to get the updated data file. The code for incrementing load is given below. Read it carefully.
// Load the data from the stored qvd.
Stored_Products:
LOAD Product_Id,
Product_Line,
Product_category,
Product_Subcategory
FROM
[C:\Users\admin\Desktop\Dataflair\products.qvd]
(qvd);

//Select the maximum value of Product ID.
Max_Product_ID:
Load max(Product_Id) as MaxId
resident Stored_Products;

//Store the Maximum value of product Id in a variable.
Let MaxId = peek('MaxId',-1);

drop table Stored_Products;


//Pull the rows that are new.
NewProducts:
LOAD Product_Id,Product_Line, Product_category,Product_Subcategory
from [C:\Users\admin\Desktop\Dataflair\products.qvd]
(txt, codepage is 1252, embedded labels, delimiter is ',', msq)
where Product_Id > $(MaxId);

//Concatenate the new values with existing qvd.
Concatenate
LOAD Product_Id,Product_Line, Product_category,
Product_Subcategory
FROM [C:\Users\admin\Desktop\Dataflair\products.qvd](qvd);

//Store the values in qvd.
store NewProducts into [C:\Users\admin\Desktop\Dataflair\products.qvd](qvd);
Updated Table– Now after saving the incremental load script, we will create a table box again. In the new table box created we can see the updated data.
Let’s read Difference Between Power BI and QlikView
Binary Load in QlikView
QlikView Binary load is the file loading of pre-existing QVW files from QlikView document to another. Such binary QVW data files are loaded from the RAM to disk (in 0s and 1 s) and is then ready for loading into another QlikView file/document. This process of binary loading can also be said as replication of the data model of one document to another.
The advantage of binary loading is that user doesn’t have to fetch the data files from the external source to load it into an existing file. The QVW files loaded through binary can then manipulate in the existing document or can also combine into the larger data file.
Implementing Binary Load in QlikView-
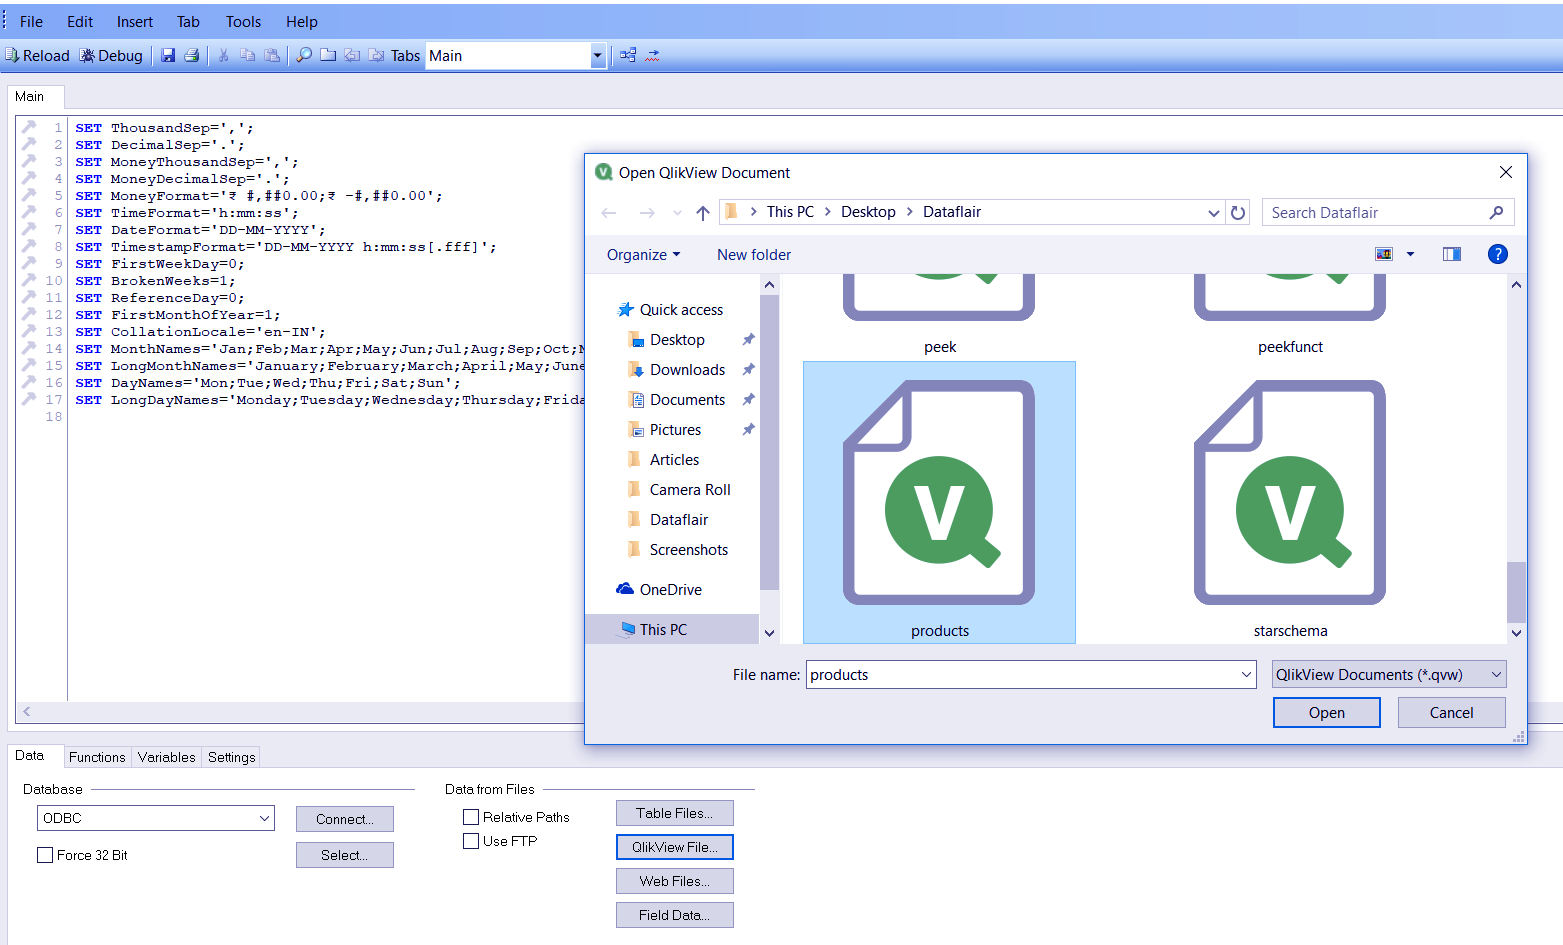
Let us learn how to load files in the binary form. First of all, we will open the script editor (CTRL+E) in the QlikView document we want to load binary in. Open the ‘QlikView File..’ option given at the bottom of the script editor. Select the QVW file you wish to load as binary. Click OPEN after selecting.
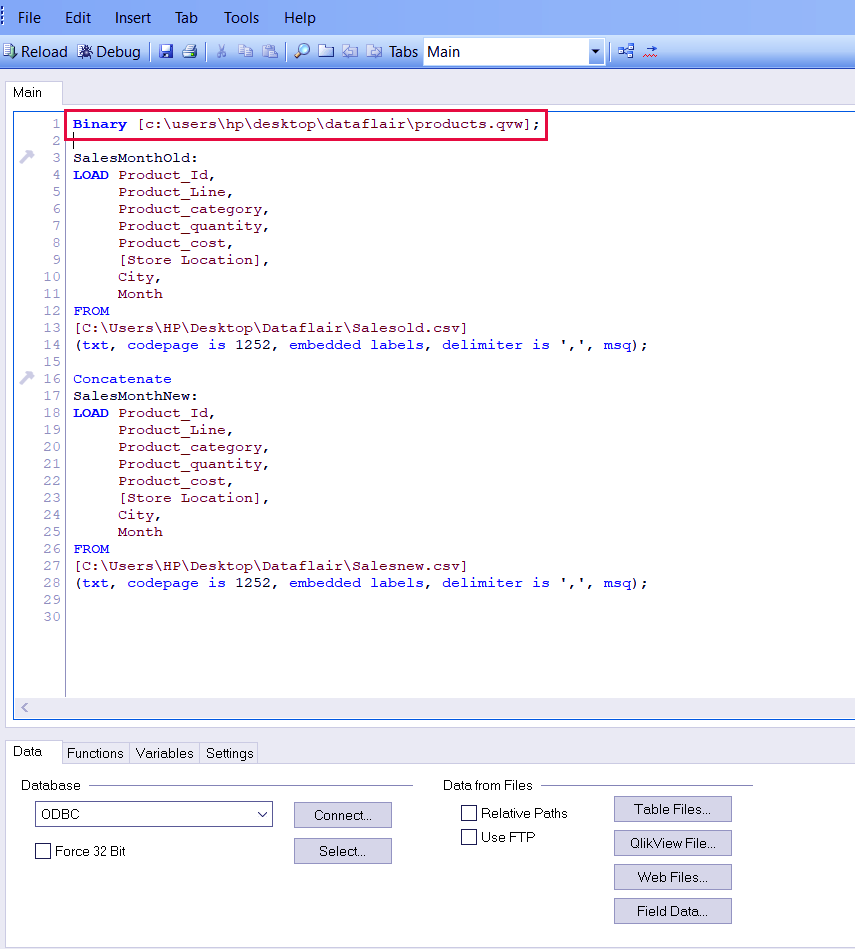
The binary load statement will display on the top line of the script. You can load binary into the script having pre-existing files loaded already.
Binary [C:\users\hp\Desktop\Dataflair\products.qvw];

SalesMonthOld:
LOAD Product_Id,
     Product_Line,
     Product_category,
     Product_quantity,
     Product_cost,
     [Store Location],
     City,
     Month
FROM
[C:\Users\HP\Desktop\Dataflair\Salesold.csv]
(txt, codepage is 1252, embedded labels, delimiter is ',', msq);

Concatenate
SalesMonthNew:
LOAD Product_Id,
     Product_Line,
     Product_category,
     Product_quantity,
     Product_cost,
     [Store Location],
     City,
     Month
FROM
[C:\Users\HP\Desktop\Dataflair\Salesnew.csv]
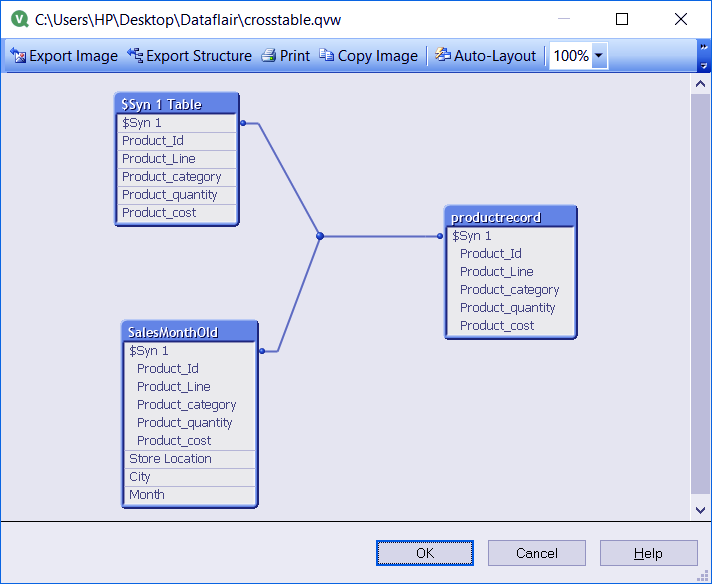
(txt, codepage is 1252, embedded labels, delimiter is ',', msq);Save the script and click OK to exit script editor. The QVW file will load in the document along with other files. As you can see in the screenshot attached below, we refer the newly added data file as a ‘$ Syn 1 Table’ table because it has certain fields in common with the pre-existing files and so we form a synthetic key.
Add Load in QlikView
During a partial load, a data file appends or add into an existing file with no check being made od duplication. In such a case, a new file with a new name creates and add along with an existing file through the load/add select statement. Such a file load as it is without any error for file duplication as the new append file will contain fields from the existing file.
Example of appending using add a statement,
LOAD
Name,
Number
FROM Persons.csv;
ADD LOAD Name1,
Number
FROM NewPersons.csv Where Not Exists(Name1);
Let’s revise the QlikView Features in detail
Buffer Load in QlikView
We use QlikView buffer load statement to transform a file into QVD file or create and maintain a file as QVD in QlikView’s memory for future use. Such files are created using a Buffer prefix and typically stores in the user defined location selected through User Preferences > Locations.
You can load through buffer statement in three ways,
First is a simple buffer statement which creates a QVD file. This will create a QVD file of originally a delimited file named Storesales. You can use this load statement for any file type like excel, delimited, xml etc. For example,
Buffer select * from Storesales;
The second kind is when you only want the incremented or appended load to convert into a QVD format. This typically uses for text log files. For example,
Buffer (incremental) load * from Saleslog.log;
A third is the Stale after option where you get to select the period for which the loaded file will store in memory as a QVD. As soon as the period expires the file regains its original format and required loading from its source where it originally resides.
For example,
Buffer (Stale after 10 days) * from Storesales;
So, this was all about QlikView Data Load Tutorial. Hope you like our explanation.
Conclusion
Hence, we studied different ways for QlikView Data Load: Resident Load, Preceding Load, Binary Load, Buffer Load, Add load and Incremental Load in QlikView. In addition, we learned how to implement data loading in Qlikview practically. We hope you are performing and practising all the exercises that we do here on your computers as well because that is the best way to learn.
Please drop your reviews and queries in the comment section below.
Keep practising and keep learning!
Must Read – QlikView IntervalMatch
Did you like our efforts? If Yes, please give DataFlair 5 Stars on Google






pls , share the excel files also
In Example 6 there is a code: FROM NewPersons.csv Where Not Exists(Name1);
I’m getting an error, because the Qlik expects file with name: `NewPersons.csv Where Not Exists(Name1)`
When I declare the file type it’s getting loaded: FROM NewPersons.csv (txt) Where Not Exists(Name1);
Thank you