How to Read, Display and Save Image in OpenCV – Step-by-step Guide
Python course with 57 real-time projects - Learn Python
Beginners Guide to Read, Display and Save Image in OpenCV
In the last tutorial, we have successfully set up the OpenCV environment. Now we can finally start learning with the basics. We will see how to work with images in OpenCV.
To write code, you can use any editor of your choice.
Steps to Read, Display and Save Image in OpenCV
Reading Images
To read the contents of an image, we have a function cv2.imread(). The image should be in the same directory. If not, then the full path of the image should be given.
The function takes two arguments :
- The first argument is the path of the image.
- The second argument is a flag that describes the way the image is read. The default is:
- cv2.IMREAD_COLOR : Loads image in color. It is used by default.
- cv2.IMREAD_GRAYSCALE : Loads image in gray mode.
- cv2.IMREAD_UNCHANGED : Loads image as it is, including alpha channels.
Your first code:
import numpy as np
import cv2

# loads the image in color
img = cv2.imread(“cat.jpg”)

# loads the image in grayscale
gray_img = cv2.imread(“image.jpg”, cv2.IMREAD_GRAYSCALE)
As you can see, we also import numpy in our program. OpenCV uses numpy and with numpy, we can easily manipulate the data. After running this program in Python, we will be assigning the image data into the img variable.
Work on the Color Detection Python Project using OpenCV
Displaying Images
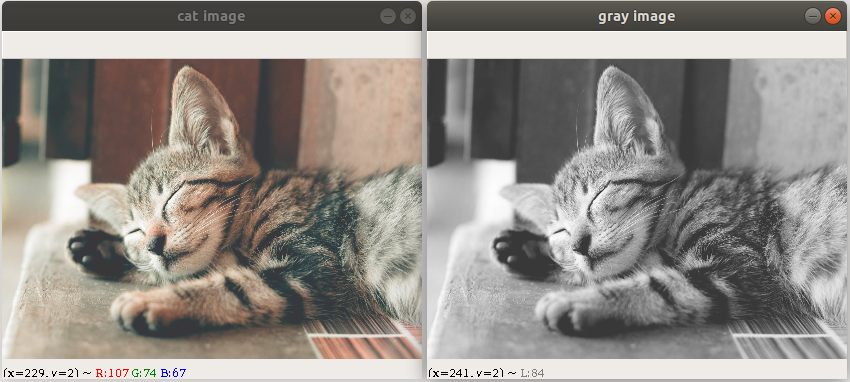
To display an image on the window, we have a function cv2.imshow(). This function creates a window and displays the image with the original size.
import numpy as np
import cv2

# load image in color
img = cv2.imread(“cat.jpg”)
#load image in grey
gimg = cv2.imread(“cat.jpg”,0)

#Displaying images
cv2.imshow(“cat image”, img)
cv2.imshow(“gray image”, gimg)

cv2.waitKey(0)
cv2.destroyAllWindows()
Output:
The function has two parameters. The first parameter is a string that describes the name of the window. The second parameter is the image array which contains the image data.
cv2.waitKey() function waits for a keyboard interrupt for a specific amount of time in milliseconds. Here we passed 0 (zero) which specifies that it has to wait for an indefinite amount of time until we press any key from keyboard and the execution continues.
The next function cv2.destroyAllWindows() closes all the windows in which images are displayed.
Check the OpenCV Features that you didn’t know about
Writing Images
To save an image into your local disk, we have the function cv2.imwrite().
The function has two arguments:
- The first argument is a string which is the file name.
- The second argument is the image array that you want to save.
cv2.imwrite(“cat_image.png”, img)
Summarizing Everything
So now you can read, display and save images in OpenCV. Let’s make a program that displays an image then waits from the keyboard interrupt. If the user presses ‘c’ key, then it will save the color image in our disk, if the user hits ‘g’ key then it saves the image in grayscale.
import cv2

#Reading images in color and grayscale
color_img = cv2.imread('cat.jpeg')
gray_img = cv2.imread('cat.jpeg',0)

#Displaying the image
cv2.imshow('Cat image', color_img)

#Storing the key pressed by user
k = cv2.waitKey(0)

#Check if user hits ‘c’ or ‘g’ key
if( k == ord('c') ):
  cv2.imwrite('color.jpg', color_img )
  print("Image is saved color")
  cv2.destroyAllWindows()

if( k == ord('g') ):
  cv2.imwrite('gray.jpg', gray_img )
  print("Image saved in grayscale")
  cv2.destroyAllWindows()
Summary
In this article, we learned how to read images, write images onto our local disk. We also saw how we can take input from the user and check which key the user has pressed. At last, we made a basic program in OpenCV on how to work with images.
Time to work on Free Python Projects with Source Code
Any difficulty to read, display and write image in OpenCV? Mention in the comment section.
Did you know we work 24x7 to provide you best tutorials
Please encourage us - write a review on Google


