Learn Python Flask – A Web Framework for Python
Master Python with 70+ Hands-on Projects and Get Job-ready - Learn Python
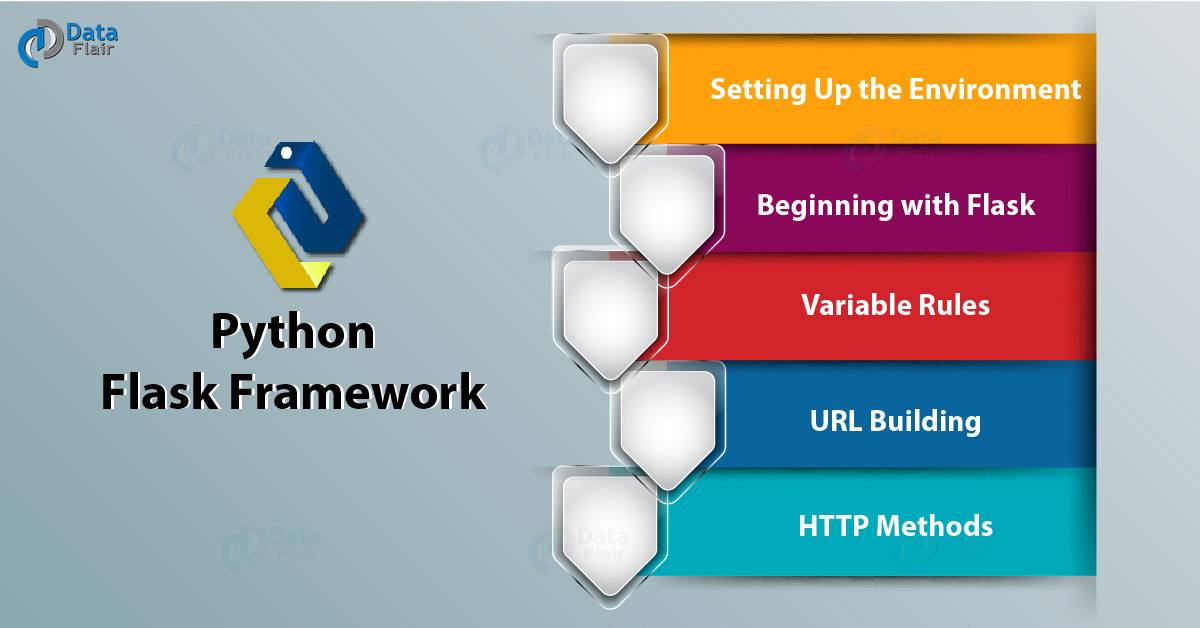
In this Python tutorial, we will learn the basics of Python Flask. Moreover, in this Python Flask Tutorial. We will discuss a web framework for Python.
Along with this, we will learn to set up the environment, some rules, and URL building for Python Flask. At last, we will see HTTP methods in Python Flask.
So, let’s begin the Python Flask tutorial.
Learn Python Flask Tutorial – A Web Framework for Python
What is Python Flask?
A micro web framework itself written in Python, Flask is BSD-license. It was developed by Armin Ronacher, and is by Pocco- an international group of Python enthusiasts. It is based on the Werkzeug toolkit and Jinja2 template engine. Now, the latest stable version is 1.0, released in April 2018.
Top applications that use it include Pinterest, LinkedIn, and the community page for Flask.

Learn Python Flask Tutorial – What is Python Flask
Since it does not need any tools or libraries, we can also call it a micro-framework. It also has no database abstraction layer or form validation. But we can find these features as extensions.
These include form validation, upload handling, object-relational mappers, open authentication technologies, and common framework tools.
Features of Flask in Python:
- Extremely lightweight: As it is a micro framework, it becomes easier for beginners to learn faster.
- Flexible: It doesn’t force you to use any database or a folder structure.
- Easy debugging: It shows you where the error is exactly in your web browser, making it easier to fix the error.
- Huge libraries add-ons: If you need a creative feature like a database, you can easily add an extension created in other languages.
Here, some names around Python Flask include:
- WSGI (Web Server Gateway Interface)– A standard for Python web application development.
- Werkzeug– A WSGI toolkit implementing requests, response objects, and other utility functions.
- Jinja 2– A Python templating engine.
Setting Up the Environment in Python Flask
Hence, to get started with Python Flask, we’ll first need to set up an environment that supports it.
1. Prerequisites for installing Python Flask
Basically, you’ll need Flask 2.6 or higher to be able to install Flask.
2. Install virtualenv
Next, you’ll need virtualenv to build a virtual Python environment. This is to create multiple environments at once to avoid compatibility issues between versions of libraries.
The command we use to install it is:
C:\Users\lifei>pip install virtualenv
Requirement already satisfied: virtualenv in
c:\users\lifei\appdata\local\programs\python\python36-32\lib\site-packages (15.1.0)
Since we already have it installed, it states so.
Now, create a new environment in a new folder:
C:\Users\lifei>cd Desktop
C:\Users\lifei\Desktop>mkdir projectx
C:\Users\lifei\Desktop>cd projectx
C:\Users\lifei\Desktop\projectx>virtualenv venv
Using base prefix ‘c:\\users\\lifei\\appdata\\local\\programs\\python\\python36-32’
New python executable in C:\Users\lifei\Desktop\projectx\venv\Scripts\python.exe
Installing setuptools, pip, wheel…done.
C:\Users\lifei\Desktop\projectx>
Then activate the corresponding environment:
C:\Users\lifei\Desktop\projectx>venv\scripts\activate
(venv) C:\Users\lifei\Desktop\projectx>
Finally, install Flask (You don’t necessarily have to be in the virtual environment for this):
(venv) C:\Users\lifei\Desktop\projectx>pip install flask
Collecting flask
Downloading
https://files.pythonhosted.org/packages/55/b1/4365193655df97227ace49311365cc296e74b60c7f5c63d23cd30175e2f6/Flask-1.0-py2.py3-none-any.whl (97kB)
100% |████████████████████████████████| 102kB 143kB/s
Collecting itsdangerous>=0.24 (from flask)
Downloading
https://files.pythonhosted.org/packages/dc/b4/a60bcdba945c00f6d608d8975131ab3f25b22f2bcfe1dab221165194b2d4/itsdangerous-0.24.tar.gz (46kB)
100% |████████████████████████████████| 51kB 67kB/s
Collecting Jinja2>=2.10 (from flask)
Downloading
https://files.pythonhosted.org/packages/7f/ff/ae64bacdfc95f27a016a7bed8e8686763ba4d277a78ca76f32659220a731/Jinja2-2.10-py2.py3-none-any.whl (126kB)
100% |████████████████████████████████| 133kB 33kB/s
Collecting click>=5.1 (from flask)
Downloading
https://files.pythonhosted.org/packages/34/c1/8806f99713ddb993c5366c362b2f908f18269f8d792aff1abfd700775a77/click-6.7-py2.py3-none-any.whl (71kB)
100% |████████████████████████████████| 71kB 36kB/s
Collecting Werkzeug>=0.14 (from flask)
Downloading
https://files.pythonhosted.org/packages/20/c4/12e3e56473e52375aa29c4764e70d1b8f3efa6682bef8d0aae04fe335243/Werkzeug-0.14.1-py2.py3-none-any.whl (322kB)
100% |████████████████████████████████| 327kB 33kB/s
Collecting MarkupSafe>=0.23 (from Jinja2>=2.10->flask)
Downloading
https://files.pythonhosted.org/packages/4d/de/32d741db316d8fdb7680822dd37001ef7a448255de9699ab4bfcbdf4172b/MarkupSafe-1.0.tar.gz
Building wheels for collected packages: itsdangerous, MarkupSafe
Running setup.py bdist_wheel for itsdangerous … done
Stored in directory:
C:\Users\lifei\AppData\Local\pip\Cache\wheels\2c\4a\61\5599631c1554768c6290b08c02c72d7317910374ca602ff1e5
Running setup.py bdist_wheel for MarkupSafe … done
Stored in directory:
C:\Users\lifei\AppData\Local\pip\Cache\wheels\33\56\20\ebe49a5c612fffe1c5a632146b16596f9e64676768661e4e46
Successfully built its dangerous MarkupSafe
Installing collected packages: itsdangerous, MarkupSafe, Jinja2, click, Werkzeug, flask Successfully installed Jinja2-2.10 MarkupSafe-1.0 Werkzeug-0.14.1 click-6.7 flask-1.0 itsdangerous-0.24
(venv) C:\Users\lifei\Desktop\projectx>
Beginning with Python Flask
Now, in the Python Flask tutorial, let’s begin with a program that says Hello.
from flask import Flask
>>> from flask import Flask
>>> app=Flask(__name__)
>>> @app.route('/')
def sayhello():
       return 'Hello'
>>> if __name__=='__main__':
       app.debug=True
       app.run()
We save this as demo.py in the project folder. Then, we get to the command prompt to run this.
C:\Users\lifei>cd Desktop/projectx
C:\Users\lifei\Desktop\projectx>python demo.py
* Serving Flask app “demo” (lazy loading)
* Environment: production
WARNING: Do not use the development server in a production environment.
Use a production WSGI server instead.
* Debug mode: on
* Restarting with stat
* Debugger is active!
* Debugger PIN: 174-045-654
* Running on http://127.0.0.1:5000/ (Press CTRL+C to quit)
127.0.0.1 – – [29/Apr/2018 15:00:03] “GET / HTTP/1.1” 200 –
127.0.0.1 – – [29/Apr/2018 15:00:04] “GET /favicon.ico HTTP/1.1” 404 –
From here, we take the address 127.0.0.1:5000 and paste it into the address bar of our browser:
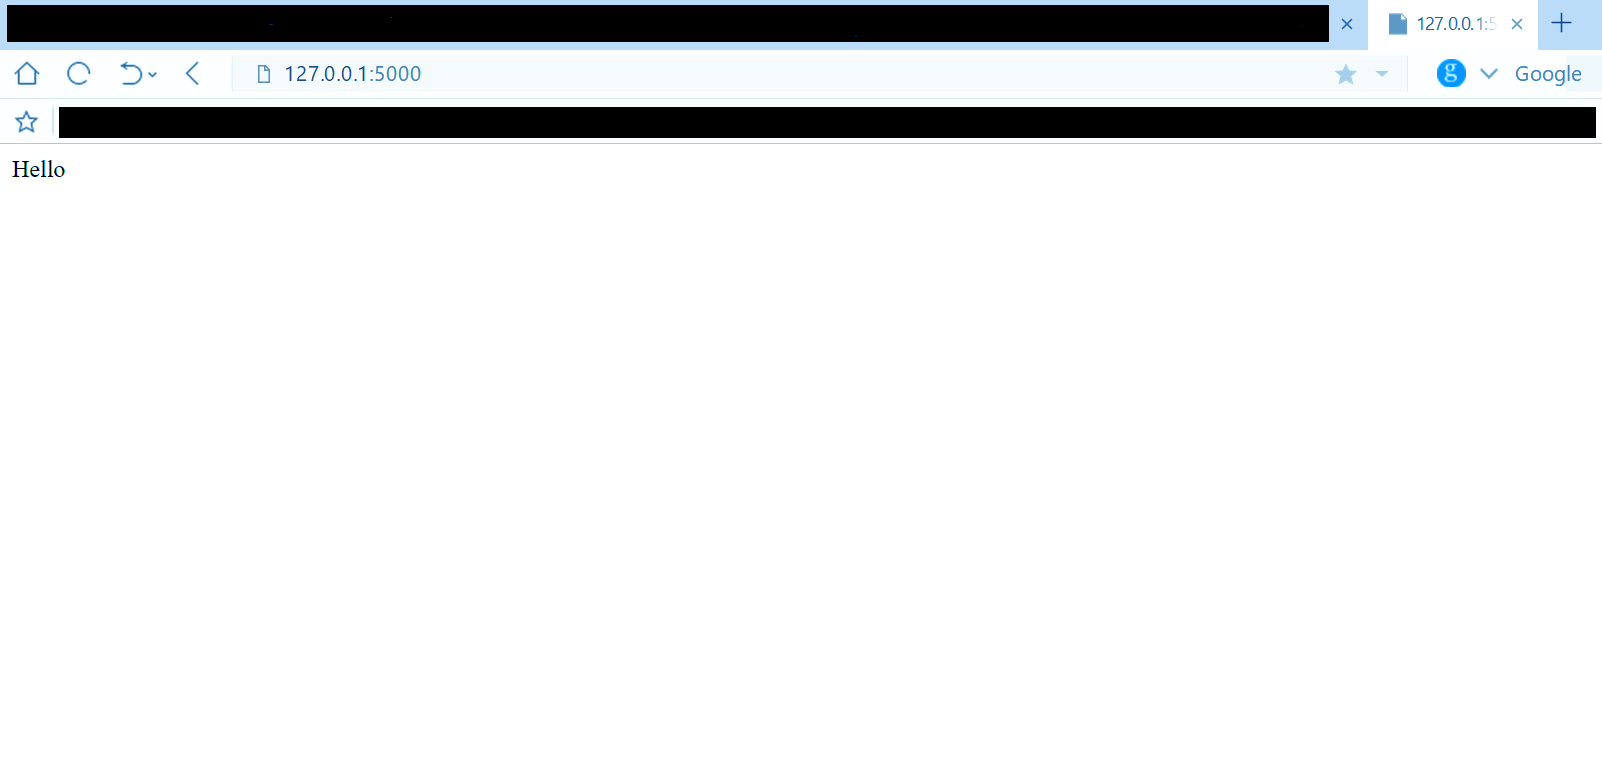
Python Flask Tutorial – Beginning with Python Flask
Here, the Flask() constructor takes an argument, the current module’s name: __name__.
route() is a decorator function that decides which URL to allow to call the associated function.
Its syntax is:
app.route(rule,options)
While the rule denotes the URL binding with the function, options hold parameters to be forwarded to this rule object.
Here, we bind the URL ‘/’ to the function sayhello(). So, getting to where that URL point takes us to where this function executes.
Take a look at this code:
From flask import Flask
>>> from flask import Flask
>> app=Flask(__name__)
>>> @app.route('/')
def sayhello():
      return 'Hello'
>>> @app.route('/hi')
def sayhi():
       return 'Hi'
>>> if __name__=='__main__':
       app.debug=True
       app.run()
When we go to the following URL:
http://127.0.0.1:5000/hi
The browser displays:
Hi
So, you can see all this activity on your command prompt side by side.
We can also use the app.add_url_rule() function for this:
>>> def salut():
       return 'Buna'
>>> app.add_url_rule('/salut','buna',salut)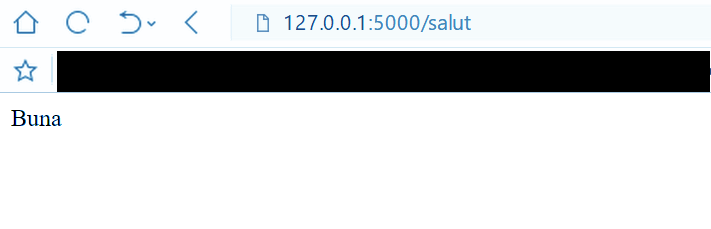
Python Flask Tutorial – Beginning with Python Flask
Now, when we set debug to True, the server automatically reloads on changes to the code.
Otherwise, we’d have to restart it manually for each change.
And finally, the method run() runs the application on the local development server. This may take up to four arguments:
run(host, port, debug, options)
The default hostname to listen to is 127.0.0.1 (the localhost); we can set it to 0.0.0.0 to avail a server externally.
The default port is 5000. debug is false by default, and we can forward the options to the underlying Werkzeug server.
Variable Rules in Python Flask
It is also possible to dynamically build a URL.
We put the variable parts in angular brackets in the rule, and pass them as parameters to the associated function:
From flask import Flask
>>> from flask import Flask
>>> app=Flask(__name__)
>>> @app.route('/')
def sayhello():
return 'Hello'
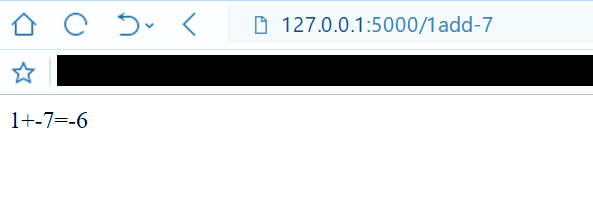
>>> @app.route('/<one>add<two>')
def add(one,two):
return f"{one}+{two}={int(one)+int(two)}"
>>> if __name__=='__main__':
app.debug=True
app.run()And in the browser:
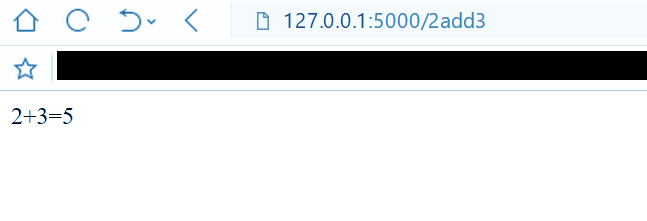
Python Flask Tutorial – Variable Rules in Python Flask
And another one:
Python Flask Tutorial – Variable Rules in Python Flask
So, we can also use the following converters- int, float, path:
>>> @app.route('/<int:one>add<int:two>')
def add(one,two):
       return f"{one}+{two}={one+two}"
>>> @app.route('/<float:one>add<float:two>')
def add(one,two):
       return f"{one}+{two}={one+two}"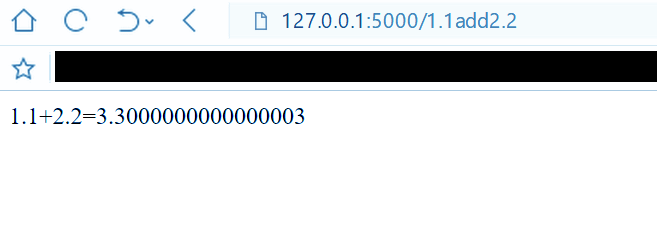
Python Flask Tutorial – Variable Rules in Python Flask
Werkzeug’s routing model ensures the uniqueness of these URLs, and also that they maintain the standards laid by Apache.
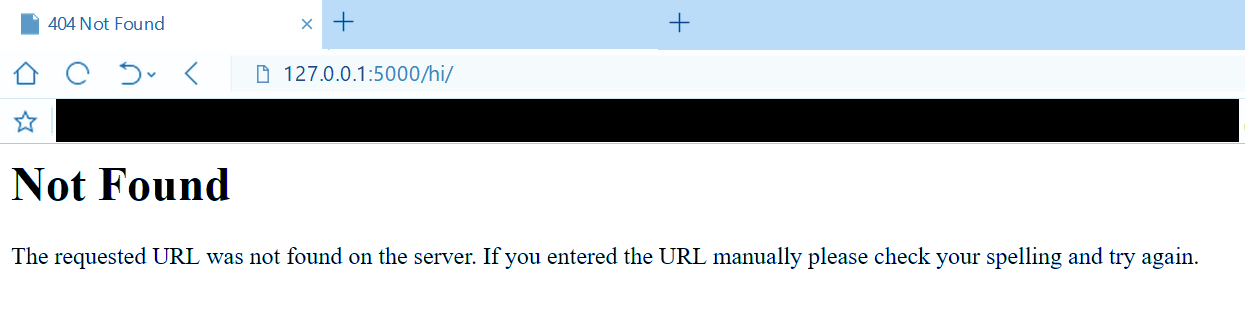
Ending a rule with a trailing slash will make it work with and without it. But not doing so, it won’t work with a trailing slash.
From flask import Flask
>>> from flask import Flask
>>> app=Flask(__name__)
>>> @app.route('/')
def sayhello():
      return 'Hello'
>>> @app.route('/hi/')
def sayhi():
       return 'Hi'
>>> if __name__=='__main__':
       app.debug=True
       app.run()
If we remove the trailing slash, the snippet of code remains:
>>> @app.route('/hi')
def sayhi():     return 'Hi'
And this happens:
Python Flask Tutorial – Variable Rules in Python Flask
URL Building for Python Flask
To dynamically build a URL according to need, we use two functions: redirect() and url_for().
We need to import these as well.
>>> from flask import Flask, url_for,redirect
>>> app=Flask(__name__)
>>> @app.route('/')
def sayhello():
               return 'Hello'
>>> @app.route('/<name>')
def sayhi(name):
               return f'Hi, {name}'
>>> @app.route('/panel/<salutation>')
def saysomething(salutation):
       if salutation=='guest':
               return redirect(url_for('sayhello'))
       else:
               return redirect(url_for('sayhi',name=salutation))
>>> if __name__=='__main__':
       app.debug=True
       app.run()
The function saysomething() takes a salutation as an argument. If this is a ‘guest’, it executes the function sayhello() and prints Hello.
If this is anything else, it prints hi to that string. For instance, getting to 127.0.0.1:5000/panel/ayushi takes us to 127.0.0.1:5000/ayushi and prints this:
Hi, ayushi.
HTTP Methods in Python Flask
Now, we discuss different HTTP methods to retrieve data from a URL.
1. GET: The GET method sends data to the server unencrypted.
2. HEAD: HEAD is like GET, except that it has no response body.
3. POST: The server does not cache the HTML form data that this sends.
4. PUT: This uses the uploaded content to replace current representations of the target resource.
5. DELETE: This removes current representations of the target resource suggested by a URL.
Basically, the default route takes GET requests, but we can alter this by using the route() decorator with a method’s argument.
Now, take the following Python code:
>>> from flask import Flask,url_for,redirect, request
>>> app=Flask(__name__)
>>> @app.route('/success/<name>')
def success(name):
return f'Hello, {name}'
>>> @app.route('/login',methods=['POST','GET'])
def login():
if request.method=='POST':
user=request.form['firstname']
return redirect(url_for('success',name=user))
else:
user=request.args.get('firstname')
return redirect(url_for('success',name=user))
>>> if __name__=='__main__':
app.debug=True
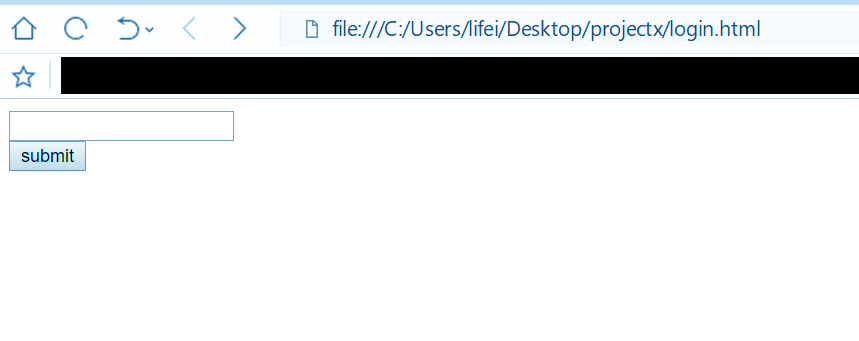
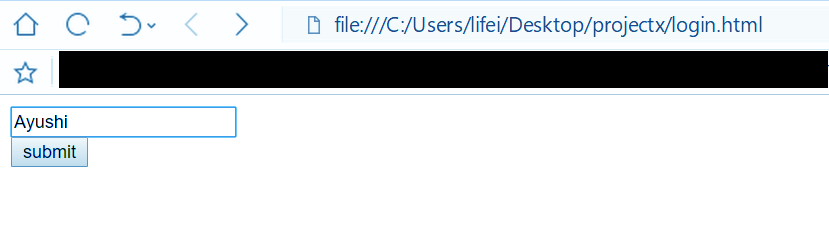
app.run()And this is the form we have:
<head></head>
<body>
<form action = “http://localhost:5000/login” method = “post”>
<input type=”text” name=”firstname”/><br/>
<input type=”submit” value=”submit”/> </form>
</body>
When you open this HTML page in the browser:
Python Flask Tutorial – HTTP Methods
Python Flask Tutorial – HTTP Methods
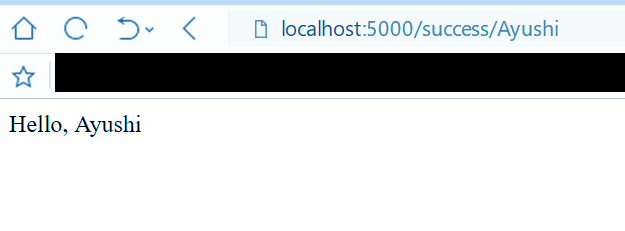
Learn Python Flask Tutorial – HTTP METHODS
So, this was all about the Python Flask tutorial. Hope you like our explanation.
Python Interview Questions on Flask Framework
- What is Python Flask good for?
- What are the features of Python Flask?
- Is Python Flask a frontend or a backend?
- How does Flask work in Python?
- Which is better, Flask or Django in Python? Explain with reason.
Conclusion
Hence, this is just a brief introduction to get you started with Python Flask. Here, we studied the basics of Python Flask, setting up the environment for Flask.
Moreover, we studied how to begin with Python Flask and its variable rules. Along with this, we saw how to build a URL for Python Flask.
At last, we discussed how to retrieve data from a URL using HTTP methods.
If you are Happy with DataFlair, do not forget to make us happy with your positive feedback on Google


