Working with Table in Power BI Dashboards and Reports
Job-ready Online Courses: Click for Success - Start Now!
1. Objective
In our last article, we talked about Waterfall chart in Power BI. Here, we are going to explore the working of a table in Power BI. In addition, we will discuss when to use a Power BI table with its prerequisites. Along with this we will study how to Create a table & Format the table, and adjust the column width of a table in Power BI.
So, let’s start Power BI Table Tutorial.
Working with Table in Power BI Dashboards and Reports
2. A Table in Power BI
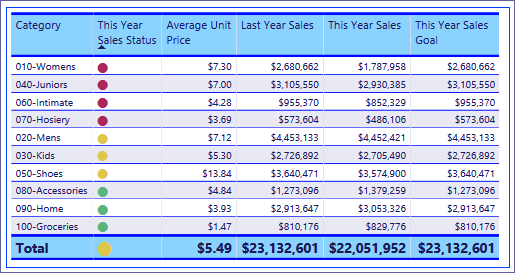
A table in Power BI is a network that contains related information in a sensible arrangement of lines and segments. It might likewise contain headers and a line for sums. Tables function admirably with quantitative correlations where you are taking a gander at numerous qualities for a solitary classification. For instance, this table presentations 5 distinct measures for Category.
Do you know How to Create Power BI Dashboard with Example
3. When to Utilize a Power BI Table?
A table in Power BI is an awesome decision:
- To see and think about definite information and correct qualities (rather than visual portrayals).
- To show information in a forbidden configuration.
- Show numerical information by classes.
Note – On the off chance that a table in Power BI has an excessive number of qualities, consider changing over it to a network or potentially utilizing drill down.
a. Requirements
- Power BI administration or Power BI Desktop
- Retail Analysis test
4. How to Create a Table in Power BI?
We’ll make the table presented above to show deals esteems by thing classification. To take after a long, sign in to Power BI benefit and select Get Data > Samples > Retail Analysis Sample > Connect and pick **Go to dashboard. Making a representation requires to alter consents to the dataset and report. Fortunately, the Power BI tests are on the whole editable. In the event that a report has been imparted to you, you won’t have the capacity to make representations in reports.
- From the left navpane, select Workspaces >My workspace.
- Select the Datasets tab, and look down to the Retail Analysis Sample dataset you just included. Select the Create report symbol.
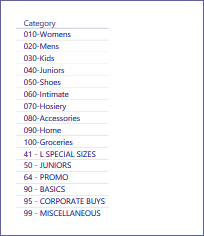
- In the report editorial manager, select Item > Category. Power BI consequently makes a table that rundowns every one of the classes.
Read about Power BI Data Sources (Supported) – Connecting Data Source
Sample
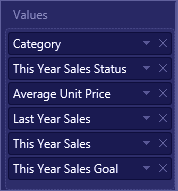
- Select Sales > Average Unit Price and Sales > Last Year Sales and Sales > This Year Sales and pick every one of the 3 alternatives (Value, Goal, Status).
Step.4- Creating a Table in Power BI
- In the Visualizations sheet, find the Values well and simplified the qualities to the point that the request of your diagram sections coordinates the primary picture on this page. Your values well should resemble this.
- Stick the table to the dashboard by choosing the stick symbol.
Step.4- Creating a Table in Power BI
5. How to Arrange a Table in Power BI?
There are numerous approaches to arrange a table in Power BI and we’ll just cover a couple of them here. An incredible method to find out about the other arranging alternatives is to open the Formatting sheet (paint roller symbol) and investigate.
Arrange a Table in Power BI
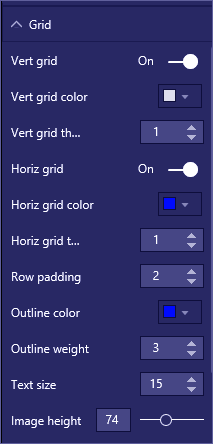
- Take a stab at designing the table network. Here we’ve included a blue vertical framework, added space to the lines, expanded the diagram and content size a bit.
Follow this link to know about Power BI DAX Basics
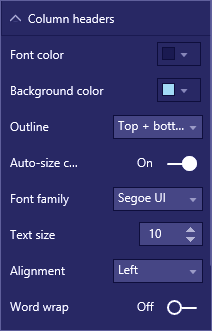
- For the segment headers, we changed the foundation shading, included a blueprint, and expanded the text dimension.
Step.2 Arrange a Table in Power BI

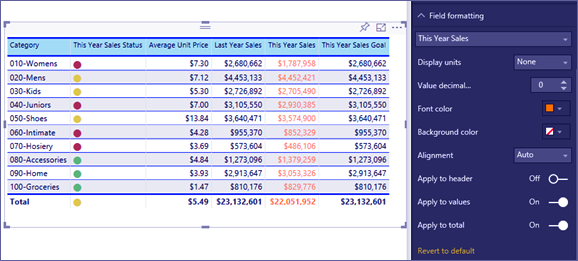
- You can even apply to design to singular sections and segment headers. Begin by extending Field designing and choosing the section to arrange from the drop-down. Contingent upon the section esteems, field arranging gives you a chance to set things like: show units, text style shading, number of decimal spots, foundation, arrangement, and the sky is the limit from there. Once you’ve balanced the settings, choose whether to apply those settings to the header and sums push also.
Step.3 Arrange a Table in Power BI
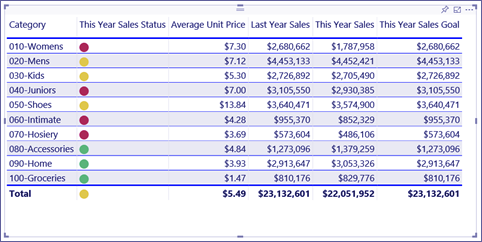
- What’s more, after some extra designing, here is our last table. Since there are such a large number of organizing alternatives, the most ideal approach to learn is, to begin with, the default designing, open the Formatting sheet, and begin investigating.
Step.4 Arrange a Table in Power BI
6. How can we do a Contingent Arranging in Power BI Table?
One sort of arranging is alluded to as restrictive organizing and is connected to fields in the Values well of the Visualizations sheet in Power BI administration or Desktop.
Let’s explore How to Create Power BI KPI Visuals (Key Performance Indicator)
With restrictive organizing for tables, you can determine redid cell foundation hues and textual style hues in view of cell esteems, including utilizing inclination hues.
- In the Visualizations sheet in Power BI administration or Desktop, select the down-bolt close to the incentive in the Values well that you need to arrangement (or right-tap the field). You can just oversee restrictive arranging for fields in the Values zone of the Fields well.
- Select Background shading scales. In the discourse that shows up, you can arrange the shading, and additionally the Minimum and Maximum qualities. In the event that you select the Diverging box, you can design a discretionary Center an incentive too.
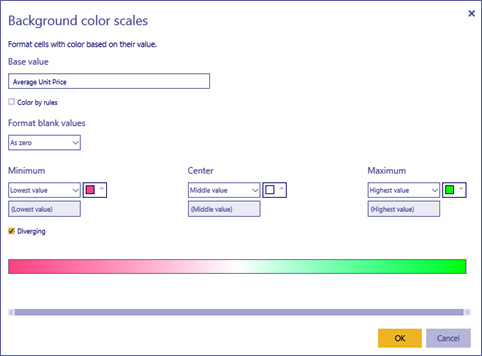
Step. 2 Contingent Arranging in Power BI Table
We should apply some custom arranging to our Average Unit Price esteems. Select Diverging, include a few hues and pick OK.
- Add another field to the table that has both positive and negative qualities. Select Sales > Total Sales Variance.
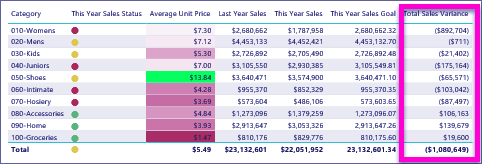
Step. 3 Contingent Arranging in Power BI TableTable in Power BI
- Include information bar contingent arranging by choosing the down-bolt adjacent to Total Sales Variance and picking Conditional designing > Data Bars.
- In the exchange that shows up, set hues for a Positive bar, Negative bar, put a checkmark beside Show bar just, and roll out some other improvements you’d like.
When you select OK, information bars supplant the numerical qualities in the table making it simpler to filter.
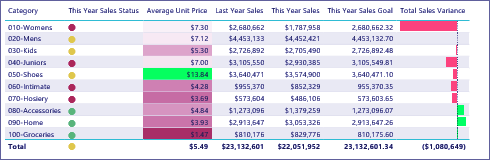
Step. 5 Contingent Arranging in Power BI Table
- To expel contingent organizing from a representation, without flaw tap the field once more, and select Remove Conditional Formatting.
Tip – Restrictive organizing is likewise accessible from the Formatting sheet (paint roller symbol). Select the incentive to an organization and afterwards set Color scales or Data bars to On to apply the default settings or, to modify the settings, select Advanced controls.
Let’s know about Power BI Query
7. Change the Segment Width of a Table
Once in a while Power BI will truncate a segment heading in a report and on a dashboard. To demonstrate the whole section name, drift over the space to one side of the making a beeline to uncover the two-fold bolts, select and drag.
So, this was all about Power BI Table visualization Tutorial. Hope you like our explanation.
8. Conclusion
Hence, in this Power BI Table tutorial, we learned about working with Power BI Tables, As well as, we discussed how to create a table in Power BI and adjust the column width of a table. Furthermore, if you have any query, feel free to ask in the comment box.
Related Topic- Power BI Donut Chart
For reference
Did you like our efforts? If Yes, please give DataFlair 5 Stars on Google


Thanks for the detailed Explanation. There is a question from my end, what if the report has many columns (30 columns) how can I display it more user-friendly and how can I avoid more scrolling. Is there any ideas please help me