Create Power BI Radial Gauge Chart in 4 Steps
Job-ready Online Courses: Click for Success - Start Now!
1. Objective
In our last tutorial, we discussed the Power BI Donut Charts. Today, we will discuss how to create a Power BI radial gauge chart. In addition, we will learn when to utilize Radial Gauge Chart in Power BI. At last, we discuss Utilize Organizing Alternatives to physically set Minimum, Maximum, and Target esteems.
So, let’s start the Power BI Radial Guage Chart.
Create Power BI Radial Gauge Chart in 4 Steps
2. Power BI Radial Gauge Chart
Power BI radial gauge chart has a round circular segment and shows a solitary esteem that measures advance toward an objective/KPI. The objective, or target esteem, is spoken to by the line (needle). Advance toward that objective is spoken to by the shading. Furthermore, the esteem that speaks to that advance is appeared in striking inside the circular segment. Every single conceivable esteem is spread uniformly along the curve, from the base (left-most esteem) to the greatest (right-generally esteem).
Do you know How to Install Power BI Apps
In the case beneath, we are an auto retailer, following our Sales group’s normal deals every month. Our objective is 140 and spoken to by the dark needle. The base conceivable normal deals are 0 and we’ve set the most extreme as 200. The blue shading demonstrates that we’re right now averaging roughly 120 deals this month. Fortunately, despite everything we have one more week to achieve our objective.
Radial Gauge Chart in Power BI
3. When to Utilize Radial Gauge Chart in Power BI
Power BI Radial gauge Chart is an extraordinary decision to:
Utilize Radial Gauge Chart in Power BI
- Demonstrate advance toward an objective.
- Speak to a percentile measure, similar to a KPI.
- Demonstrate the soundness of a solitary measure.
- Show data that can be immediately examined and comprehended.
Let’s Connect to Data in Power BI Desktop
Requirements-
- Power BI administration or Power BI Desktop
- Money related example Excel exercise manual: download the example specifically.
4. How to Make a Power BI Radial Gauge Chart
These guidelines utilize Power BI benefit. To take after a long, sign in to Power BI and open the Excel Financial Sample document. These steps help us to draw Power BI Radial Guage Chart:
Stage 1: Open the Financial Sample Excel document
- Download the example Financial Excel document on the off chance that you haven’t as of now. Keep in mind where you spared it.
- Open the document in Power BI benefit by choosing G to Data > Files and perusing to the area where you spared the record. Select Import. The Financial Sample is added to your workspace as a dataset.
- From the Dataset content rundown, select Financial Sample to open it in Explore mode.
Stage 2: Create a Gauge to track Gross Sales
- In the Fields sheet, select Gross Sales.
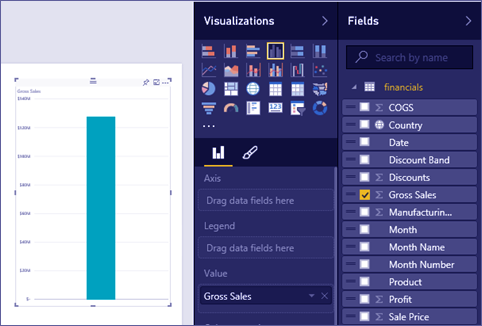
Step.2.1 Create Power BI Radial Gauge Chart
- Change the total to Average.
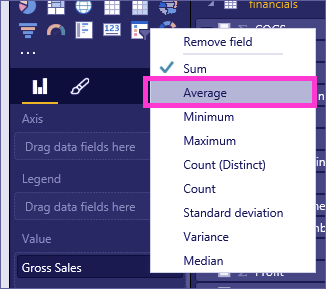
Step.2.2 Create Power BI Radial Gauge Chart
- Select the gauge symbol to change over the Column Chart to a gauge.
Let’s Explore How to Create Power BI Treemap
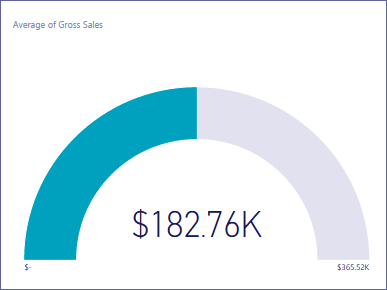
Of course, Power BI makes a Gauge outline where the present esteem (for this situation, Average of Gross Sales) is thought to be at the midpoint on the gauge. Since the Average Gross Sales is $182.76K, the begin esteem (Minimum) is set to 0 and the end esteem (Maximum) is set to twofold the present esteem.
Stage 3: Set an objective esteem
- Drag COGS to the Target esteem well.
- Change the conglomeration to Average. Power BI adds a needle to speak to our objective estimation of $145.48K. Notice that we’ve surpassed our objective.
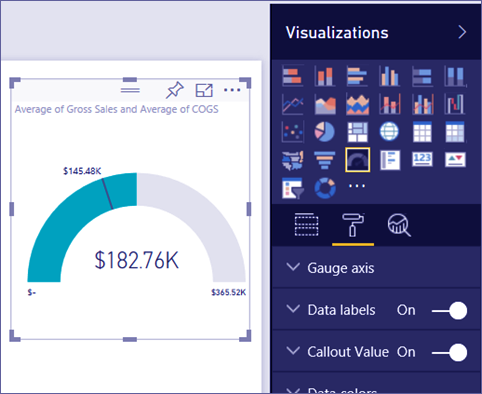
Step.3.2 Create Power BI Radial Gauge Chart
Note – You can likewise physically enter an objective esteem. See “Utilize arranging alternatives to physically set Minimum, Maximum, and Target esteems” beneath.
Stage 4: Set a most extreme esteem
In Step 2, Power BI utilized the Value field to naturally set least (begin) and greatest (end). Be that as it may, imagine a scenario in which you need to set your own most extreme esteem. Suppose that as opposed to utilizing twofold the present an incentive as the most extreme conceivable esteem, you need to set it to the most astounding Gross Sales number in your dataset?
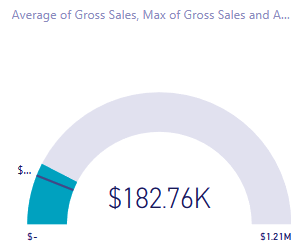
- Drag Gross Sales from the Fields rundown to the Maximum Value well.
- Change the conglomeration to Maximum.
Follow this link to know about Power BI Report Server
The Power BI gauge is redrawn with another end esteem, 1.21 million in net deals.
Stage 5: Save your report
- Spare the report.
- Include the gauge graph as a dashboard tile.
5. Utilize Organizing Alternatives
Utilize Organizing Alternatives to physically set Minimum, Maximum, and Target esteems
- Expel Max of Gross Sales from the Maximum esteem well.
- Open the designing sheet by choosing the paint roller symbol.

Power BI Radial Gauge Chart – Utilize Organizing Alternatives
- Grow the Gauge hub and enter esteems for Min and Max.
- Expel the present target an incentive by expelling the checkmark by COGS.
- At the point when the Target field shows up under Gauge hub, enter an esteem.
- Alternatively, keep designing your gauge graph.
So, this was all about Power BI Radial Guage Chart. Hope you like our explanation.
6. Conclusion
Hence, in this Power BI Guage Chart tutorial, we learned the Power BI Radial Gauge Chart and other pieces of information. Is this article helpful to you? Share feedback with us!
Related Topic – Power BI Custom Visualization
For reference
Did you know we work 24x7 to provide you best tutorials
Please encourage us - write a review on Google


What is COGS used in this tutorial?