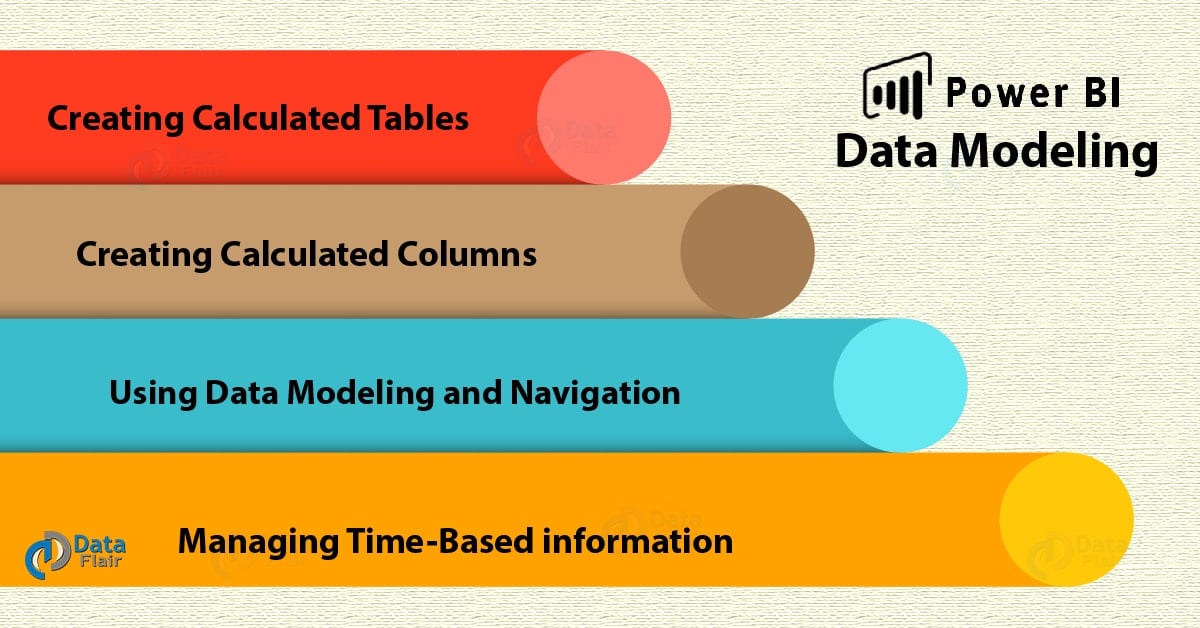
Power BI Data Modeling – Creating Calculated Columns
Job-ready Online Courses: Click for Success - Start Now!
1. Objective
In this Power Bi tutorial, we will study about Power BI data modeling. Moreover, we will see how we use Data Modeling in Power BI, and how to Create Calculated Columns in Data Modeling in Power BI. In addition, we will talk about how to Create a Calculated table in Power BI Data Modeling and Use information Modeling and Navigation.
So, let’s start Power BI Data Modeling.
Power BI Data Modeling – How to Create Calculated Columns
2. What is Power BI Data Modeling?
One of Power BI strengths is that you just do not get to flatten your information into one table. Instead, you’ll use multiple tables from multiple sources, and outline the link between them. You’ll conjointly produce your own custom calculations and assign new metrics to look at specific segments of your information, and use these new measures in visualizations for straightforward modeling.
Do you know How to Download & Install Power BI?
3. Using information Modeling and Navigation
Power Bi Data Modeling is one in all the options wont to connect multiple information sources in atomic number 83 tool employing a relationship. A relationship defines, however, information sources are connected with one another and you’ll be able to produce attention-grabbing information visualizations on multiple information sources.
With the modeling feature, you’ll be able to build custom calculations on the present tables and these columns may be directly conferred into Power atomic number 83 visualizations. This enables businesses to outline new metrics and to perform custom calculations for those metrics.
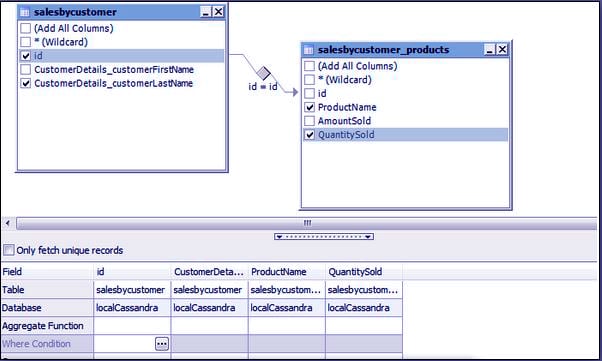
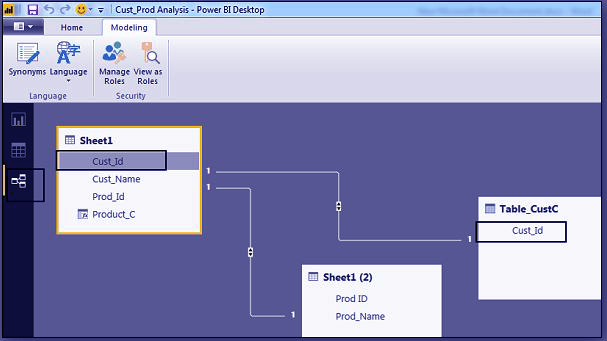
Data ModelingStep.1 Power Bi Data Modeling – How to Use information Modeling and Navigation
In the on top of an image, you’ll be able to see a typical information model, that shows a relationship between 2 tables. Each table is joined employing a column name “Id”.
Read about Power BI Relationship View
Similarly, in Power atomic number 83, you set the connection between 2 objects. to line the connection, you’ve got to tug a line between the common columns. You’ll be able to conjointly read the “Relationship” in a very information model in Power atomic number 83.
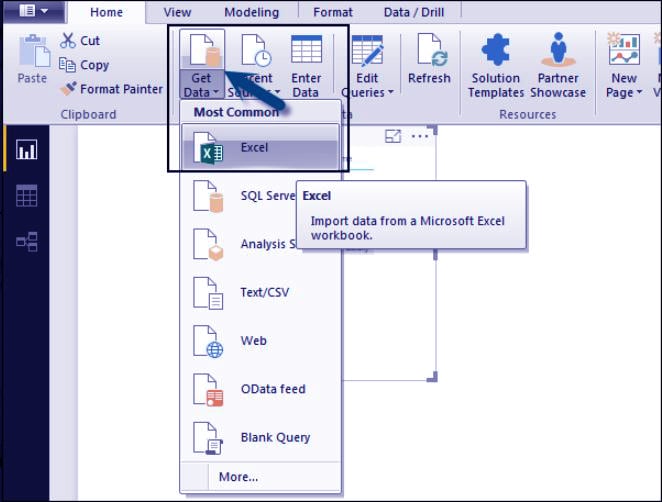
To create an information model in Power atomic number 83, you wish to feature all information sources in Power atomic number 83 new report possibility. To feature a knowledge supply, attend the Get information possibility. Then, choose the information supply you wish to attach and click on the Connect button.
Step.2 Power Bi Data Modeling
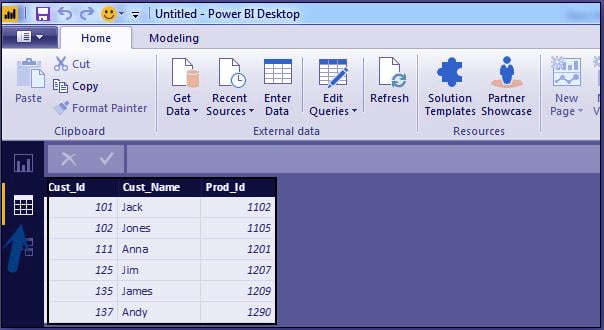
Once you add a knowledge supply, it’s conferred on the proper aspect bar. within the following image, we’ve used a pair of XLS file to import information – client, and merchandise.
Do you know How to Create Power BI Dashboard?

Step.3 Power Bi Data Modeling – How to Use information Modeling & Navigation
In Power atomic number 83 on the left aspect of the screen, you’ve got the subsequent 3 tabs −
Report
Data
Relationships

Step.4 How to Use information Modeling and Navigation
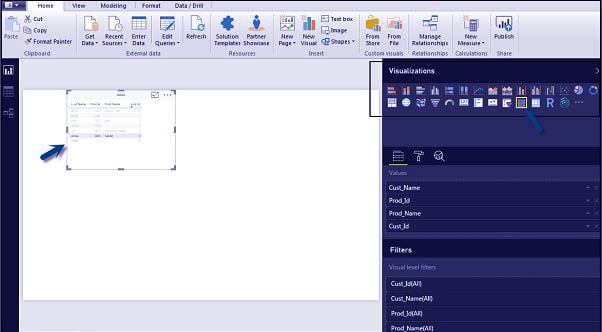
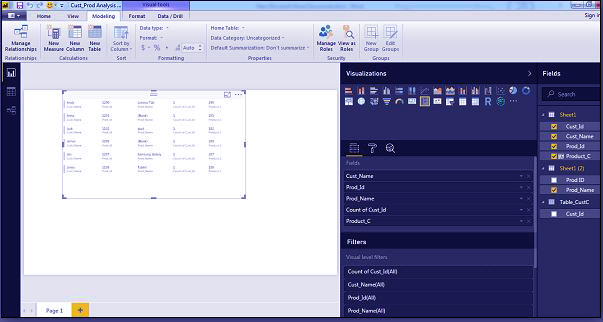
When you navigate to the Report tab, you’ll be able to see a dashboard and a chart hand-picked for information visual image. You’ll be able to choose totally different chart varieties as per your want. In our example, we’ve hand-picked a Table sort from offered Visualizations.
Step.5 Power Bi Data Modeling – Use information Modeling and Navigation
When you attend the information tab, you’ll be able to see all the information as per the outlined Relationship from the information sources.
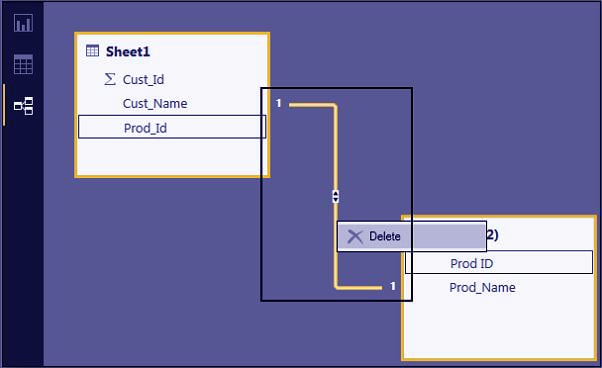
Step.6 How to Use information Modeling and Navigation
In the Relationship tab, you’ll be able to see the connection between information sources. once you add multiple information sources to Power atomic number 83 visual image, the tool mechanically tries to discover the connection between the columns. once you navigate to the connection tab, you’ll be able to read the connection. you’ll be able to conjointly produce a Relationship between the columns victimization produce Relationships possibility.
Let’s Create Workspace in Power BI – In 5 Min.

Step.7 Power Bi Data Modeling – Use information Modeling and Navigation
You can conjointly add and take away relationships in information visual image. to get rid of a relationship, you’ve got to right-click and choose the “Delete” possibility. to form a replacement “Relationship”, you only got to drag and drop the fields that you simply wish to link between the information sources.
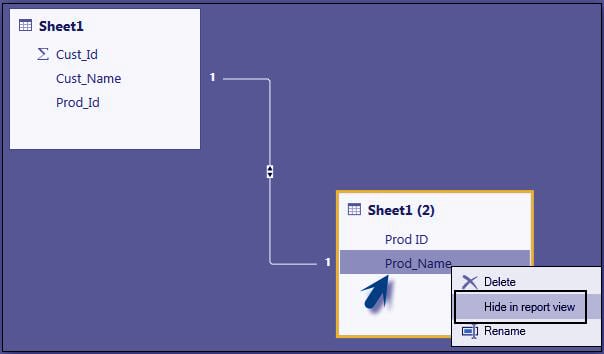
Step.8 How to Use information Modeling and Navigation
You can conjointly use the connection read to cover a specific column within the report. to cover a column, right-click on the column name and choose the “Hide in report view” possibility.
Follow this Tutorial – Power BI Report Server
Step.9 Power Bi Data Modeling – Use information Modeling and Navigation
4. How to Create Calculated Columns in Data Modeling?
You can produce calculated columns in Power atomic number 83 by combining 2 or a lot of components of the present information. you’ll be able to conjointly apply calculation on an associate existing column to outline a replacement metric or mix 2 columns to form one new column.
You can even produce a calculated column to determine a relationship between the tables and it may also be wont to set up a relationship between 2 tables.
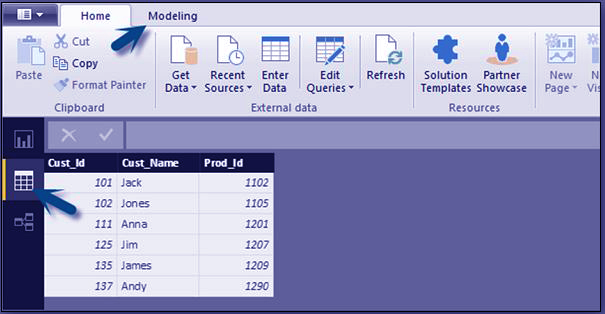
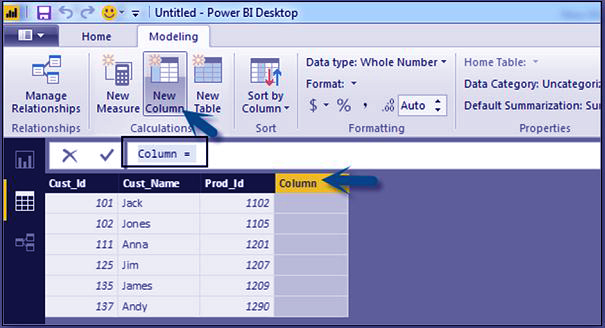
To create a replacement calculated column, navigate to information read tab on the left aspect of the screen and so click Modeling.
Step-1 How to Create Calculated Columns in Data Modeling
When you navigate to the Modeling tab, you’ll be able to see a replacement Column possibility at the highest of the screen. This conjointly opens the formula bar, wherever you’ll be able to enter DAX formula to perform a calculation. DAX- information Analysis Expression could be a powerful language conjointly utilized in surpass to perform calculations. you’ll be able to conjointly rename the column by dynamic the Column text within the formula bar.
Step-2 Power Bi Data Modeling – Create Calculated Columns in Data Modeling
In the following example, allow us to produce a replacement column: Product Code (Product_C), that comes from the last 3 characters of Prod_Id column. Then, write the subsequent formula −
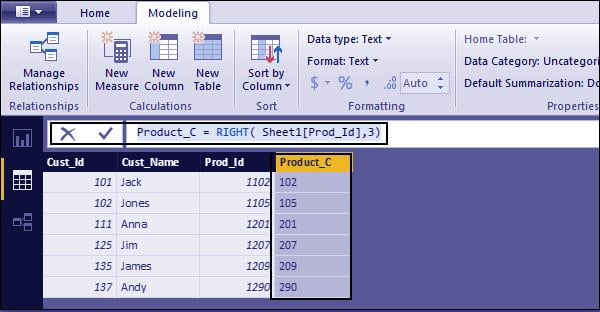
Step-3 How to Create Calculated Columns in Data Modeling
Product_C = RIGHT( Sheet1[Prod_Id],3)
A long list of formulas is additionally given that you’ll able to use for making calculated columns. You’ve got to enter the primary character of formula to utilize in calculations as shown within the following screenshot.
Have a look Relationship in Power BI – Modify Cross-Channel
5. Creating Calculated Table in Data Modeling
You can conjointly produce a replacement calculated table in information modeling in Power atomic number 83. To form a replacement table, navigate to the information read tab on the left aspect of the screen. So, attend the Modeling possibility at the highest of the screen.
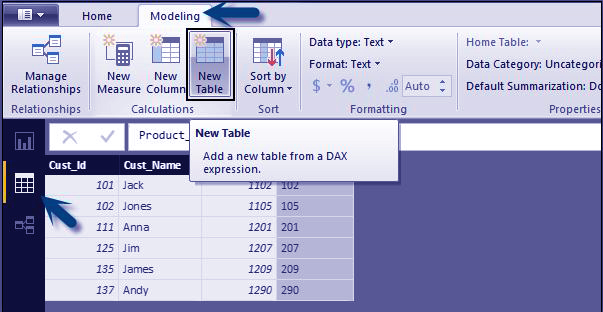
Step-1 Power Bi Data Modeling – Create Calculated Table
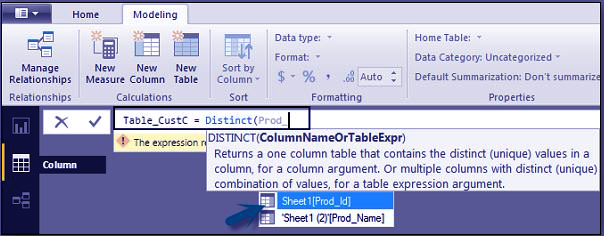
DAX expression employs to form the new table. You’ve got to enter the name of a replacement table on the left aspect of the equal sign and DAX formula to perform the calculation to make that table on the proper. Once the calculation is complete, the new table seems within the Fields pane in your model.
In the following example, allow us to outline a replacement table – Table_CustC that returns a 1 column table containing distinctive values in a very column in another table.
Step-2 How to Create Calculated Table in Data Modeling
A new table is value-added beneath the “Fields” section in Power atomic number 83 screen as shown within the following screenshot. Once the calculated column and calculated tables create as per your demand. You’ll able to use the fields within the Report tab in Power atomic number 83.
To add these objects, you’ve got to pick out a checkbox and a relationship is mechanically detect if potential. If not, then you’ll able to drag the columns that you simply wish to attach.
Let’s discuss some Power BI Issues
Step-3 How to Create Calculated Table in Data Modeling
To view the report, you navigate to the Report tab. You’ll able to see each “Calculated columns” and fields from the new “Calculated table” within the report read.
Step-4 How to Create Calculated Table in Data Modeling
6. Managing Time-Based Information
Power atomic number 83 permits to drill through time-based information by default. Once you add a date field in your analysis and alter drill on your information visual image. It takes you to a consecutive level of time-based information.
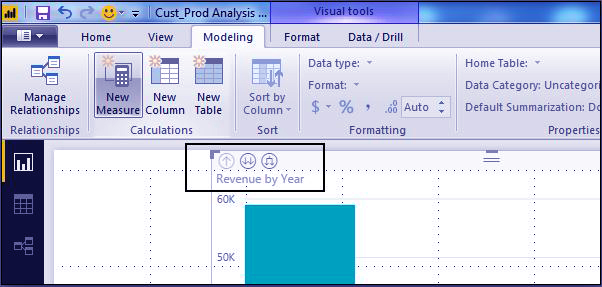
Step-1 Power Bi Data Modeling – Manage Time-Based Information
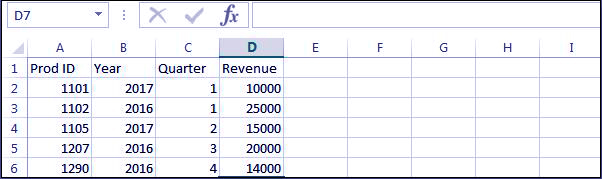
Let us think about we have a value-added Time-based table in Power atomic number 83 visual image. We’ve value-added Revenue and Year column in our report.
Step-2 How to Manage Time-Based Information
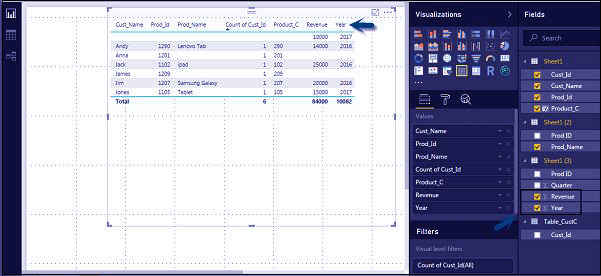
We can alter the drill feature in visualizations victimization the choice at the highest. Once we tend to alter the drill feature and click on the bars or lines within the chart. It drills all the way down to a consecutive level of your time hierarchy. Example: Years → Quarters → Months.
We can conjointly use attend consecutive level within the hierarchy choice to perform a Drill.
Also, Read Q & A in Power BI Desktop for Regular Dialect Inquiries
Step-3 Power Bi Data Modeling – Manage Time-Based Information
So, this was all about Power Bi Data Modeling. Hope you like our explanation.
7. Conclusion
Hence, in this tutorial, we studied Power Bi data modeling and how can we create a calculation table. In conclusion, we discussed how to create calculated columns and many other points related to the topic. Furthermore, if have any query regarding Power BI Data Modeling, feel free to ask in the comment section.
Related Topic – Power BI Archived Workspace
If you are Happy with DataFlair, do not forget to make us happy with your positive feedback on Google


Okay! I deciphered it.
Atomic number 83 = BI
Took me some time too but I figured it out… Bismuth…
Why are you doing that?
please provide related dataset with each tutorial.
Did anyone proof read before publishing? A lot of grammatical errors in this page makes it hard to read through….