Create Power BI Donut Chart – Easy & Simple Steps
Interactive Online Courses: Elevate Skills & Succeed Enroll Now!
1. Objective
In our last article, we discussed the Power BI Scatter Charts. Here, we will study, what is the Power BI Donut Chart. Along with introduction, we will learn the step by step procedure to create a Power BI Donut Chart.
So, let’s start to make Power BI Donut Chart.
Create Power BI Donut Chart – Easy & Simple Steps
2. Power BI Donut Chart
Information that is organized in sections or columns just on a worksheet can be plotted in a Donut Chart (diagram). Much the same as a pie graph, a Power BI Donut Chart outline demonstrates the relationship of parts to an entire, yet a donut chart can contain in excess of one information arrangement. Every datum arrangement that you plot in a donut outline adds a ring to the graph. The principal information arrangement is shown in the focal point of the outline.
Do you know How to Create Power BI Treemap
In view of their roundabout nature, Power BI donut chart outlines are difficult to peruse, particularly when they show various information arrangement. The extents of external rings and inward rings don’t speak to the measure of the information precisely — information focuses on external rings may seem bigger than information focuses on internal rings while their real qualities might be-littler. Showing esteems or rates in information names is exceptionally valuable in a donut outline, yet in the event that you need to analyze the information focuses one next to the other, you should utilize a stacked segment or stacked bar chart (diagram).
3. When to Utilize Power BI Donut Chart
Consider utilizing a Power BI donut chart (diagram) when:
- You have at least one information arrangement that you need to plot.
- None of the qualities that you need to plot is negative.
- None of the qualities that you need to plot is a zero (0) esteem.
- You don’t have in excess of seven classes for each information arrangement.
- The classifications speak to parts of entire in each ring of the donut diagram.
When you make Power BI donut chart (diagram), you can pick one of the accompanying donut graph subtypes:
Donut graphs show information in rings, where each ring speaks to an information arrangement. On the off chance that rates are shown in information marks, each ring will add up to 100%.
Read about Power BI Report Server Tutorial (Latest 2018)
4. How to Make an Intricate Donut Chart in Power BI
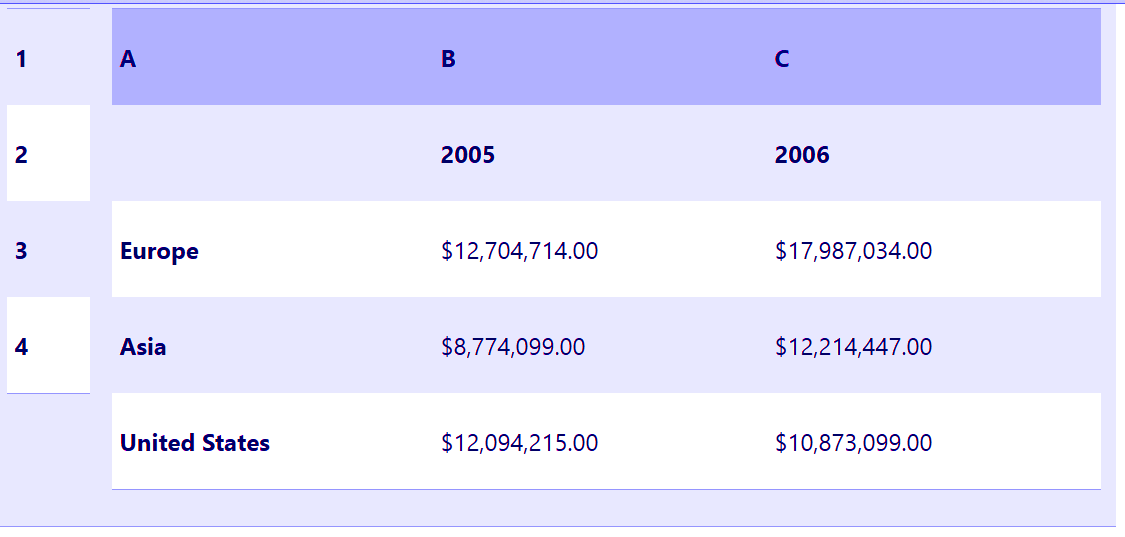
Things being what they are, how could we make this Power BI donut chart (diagram)? The accompanying strategy will enable you to make a donut outline with comparative outcomes. For this diagram, we utilized the case worksheet information. You can duplicate this information to your worksheet, or you can utilize your own information.
Open the worksheet that contains the information that you need to plot into a donut outline, or duplicate the illustration worksheet information into a clear worksheet.
The most effective method to duplicate the illustration worksheet information
- Make a clear exercise manual or worksheet.
- Select the case in the Help subject.
Note: Do not choose the line or section headers.
- Press CTRL+C.
- In the worksheet, select cell A1, and press CTRL+V.
Power BI Donut Chart
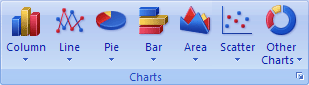
Step 1. On the Insert tab, in the Charts gathering, click Other Charts.
Step 2. Exceed expectations Ribbon Image.
Step 2- Power BI Donut Chart
Step 3. Tap the plot zone of the donut diagram.
Step 4. This shows the Chart Tools, including the Design, Layout, and Format tabs.
Let’s Create Basic Area Chart in Power BI
Step 5. On the Design tab, in the Chart Layouts gathering, select the format that you need to utilize.
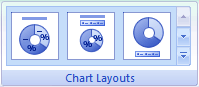
Step 5- Power BI Donut Chart
For our Power BI Donut Chart, we utilized Layout 6.
Format 6 shows a legend. On the off chance that your diagram has excessively numerous legend passages or if the legend sections are difficult to recognize, you might need to add information marks to the information purposes of the donut outline as opposed to showing a legend (Layout tab, Labels gathering, Data Labels catch).
Step 6. On the Design tab, in the Chart Styles gathering, tap the diagram style that you need to utilize.

Step 6- Power BI Donut Chart
For our donut chart, we utilized Style 26.
Step 7. To change the span of the graph, do the accompanying:
- Tap the outline.
- On the Format tab, in the Size gathering, enter the size that you need in the Shape Height and Shape Width box.
For our donut diagram, we set the shape stature to 4″ and the shape width to 5.5″.
Step 8. To change the span of the donut opening, do the accompanying:
- Snap an information arrangement, or select it from a rundown of diagram components (Format tab, Current Selection gathering, Chart Elements box).
Step 8- Power BI Donut Chart
- On the Format tab, in the Current Selection gathering, click Format Selection.
- Snap Series Options, and afterward under Doughnut Hole Size, drag the slider to the size that you need or sort a rate an incentive in the vicinity of 10 and 90 in the Percentage box.
Follow this link to know about Power BI Funnel Charts (Custom Visuals)
For our donut graph in Power BI, we utilized 20%.
Step 9. To make the information marks emerge better, do the accompanying:
- Snap an information mark once to choose the information names for a whole information arrangement, or select them from a rundown of graph components (Format tab, Current Selection gathering, Chart Elements box).
- On the Format tab, in the Shape Styles gathering, click More Button picture, and after that snap a shape style.
Step 9- Power BI Donut Chart
For our donut outline, we utilized Subtle Effect – Dark 1.
- Rehash these means to arrange the information marks of all information arrangement in your donut diagram.
Step 10. To change an arrangement the graph title, do the accompanying
- Tap the diagram title, or select it from a rundown of outline components (Format tab, Current Selection gathering, Chart Elements box).
- Sort the title that you need to utilize, and afterward press ENTER.
- On the Format tab, in the Shape Styles gathering, click More Button picture, and afterward click a shape style.
- For our donut outline, we utilized Moderate Effect – Accent 1.
Step 11. In the event that you need to change the situation of the title, drag it to the area that you need.
Read about How to Use Power BI Bookmark
Step 12. To change the arrangement of the legend, tap the legend, and after that select the style that you need in the Shape Styles box (Format tab, in the Shape Styles gathering, More Button picture catch).
- To include content marks with bolts that point to the donut rings, do the accompanying:
- On the Layout tab, in the Insert gathering, click Text Box.
- Tap on the outline where you need to put the content box, type the content that you need, and afterward press ENTER.
- Select the content box, and after that on the Format tab, in the Shape Styles gathering, tap the Dialog Box Launcher Button picture.
- Snap TextBox, and after that under Autofit, select the Resize shape to fit content check box and snap OK.
- In the Shape Styles gathering, select the style that you need to utilize.
- On the Layout tab, in the Insert gathering, click Shapes.
- Under Lines, click Arrow.
On the outline, draw the bolt from the edge of the content box to the donut ring that you need it to point to.
To change the arrangement of content boxes, click a content box, and afterward select the style that you need in the Shape Styles gathering (Format tab, Shape Styles gathering).
Rehash these means for all donut rings in your diagram.
Step 13. To change the foundation of the diagram, do the accompanying:
- Tap the outline territory, or select it from a rundown of graph components (Format tab, Current Selection gathering, Chart Elements box).
- On the Format tab, in the Shape Styles gathering, click More Button picture, and afterward click a shape style.
Step 14. For our Power BI Donut Chart, we utilized Subtle Effect – Accent 3.
- To round the edges of the graph foundation, do the accompanying:
- On the Format tab, in the Shape Styles gathering, tap the Dialog Box Launcher Button picture.
Let’s learn How to Create Power BI Combo Chart with Fundamental, Single-Pivot Charts
Step 15. Snap Border Styles, and after that select the Rounded corners check box.
- On the off chance that you need to utilize subject hues that are unique in relation to the default topic that is connected to your exercise manual, do the accompanying:
Step 15- Donut Chart
- On the Page Layout tab, in the Themes gathering, click Themes.
So, this was all about Power BI Donut Chart Tutorial. Hope you like our explanation.
5. Conclusion
Hence, in this article, we learned how to Create Power BI Donut Chart. In addition, we discussed when to utilize Donut Graphs in Power BI. Still, you have query, feel free to share with us.
Related Topic- Power Bi and Excel Integration
For reference
Did you like our efforts? If Yes, please give DataFlair 5 Stars on Google


