How to Shape and Join Information in Power BI Desktop
Expert-led Online Courses: Elevate Your Skills, Get ready for Future - Enroll Now!
1. Objective
In our last tutorial, we studied Power BI Free vs Pro Tutorial. Today, we are going to explore how to join information in Power BI. Moreover, we will discuss how to shape data in Power BI Desktop.
So, let’s start Shape and Join Information in Power BI Desktop.
How to Shape and Join Information in Power BI Desktop
2. Shape and Join Information in Power BI Desktop
With Power BI Desktop, you can associate with a wide range of sorts of information sources, at that point shape the information to address your issues, empowering you to make visual reports that you can impart to others. Forming information implies changing the information. For example, renaming sections or tables, changing content to numbers, expelling columns, setting the primary line as headers, et cetera. To Join information in Power BI, implies interfacing with at least two information sources, forming them as required. At that point uniting them into one helpful inquiry.
Do you know about Power BI Custom Visualization – Titles, Legends, Backgrounds
Here, in this Shape and Join Information in Power BI Desktop, we are going to explore this information:
- Shape information utilizing Query Editor.
- Interface with an information source.
- Interface with another information source.
- Consolidate those information sources, and make an information model to use in reports.
This Power BI tutorial shows how to shape an inquiry utilizing Power BI Desktop, featuring the absolute most basic undertakings. The question utilized here is depicted in more detail, including how to make the inquiry without any preparation, in Getting Started with Power BI Desktop.
It’s helpful to realize that the Query Editor in Power BI Desktop makes abundant utilization of right-click menus, and additionally the strip. The majority of what you can choose in the Transform lace is additionally accessible by right-clicking a thing, (for example, a segment) and looking over the menu that shows up.
3. How to Shape Information in Power BI?
When you shape information in Power BI in the Query Editor, you’re giving well-ordered guidelines (that Query Editor completes for you) to change the information as Query Editor loads and shows it. The first information source, not influences; just this specific perspective of the information is balanced or formed.
The means you determine, record by Query Editor, and each time this inquiry interfaces with the information source those means are complete. So, the information constantly moulded the way you indicate. This procedure happens at whatever point you utilize the Query Editor highlight of Power BI Desktop, or for any individual who utilizes your mutual question. For example, on the Power BI benefit. Those means are caught, consecutively, in the Query Settings sheet, under Applied Steps.
The accompanying picture demonstrates the Query Settings sheet for an inquiry that has been moulded – we’ll experience every one of those means in the following couple of sections.
Step.1 Shape Information in Power BI
Utilizing the retirement information from getting started with Power BI Desktop, which we found by associating with a Web information source, we should shape that information to fit our needs.
Read about Power BI Report Server in detail
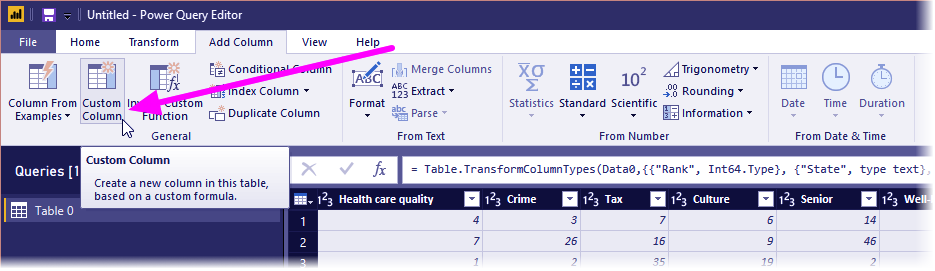
First of all, we should add a custom segment to compute rank in light of all information being equivalent factors and contrast this with the current segment Rank. Here’s the Add Column lace, with a bolt indicating the Custom Column catch, which gives you a chance to include a custom section.

Step.2 Shape Information in Power BI
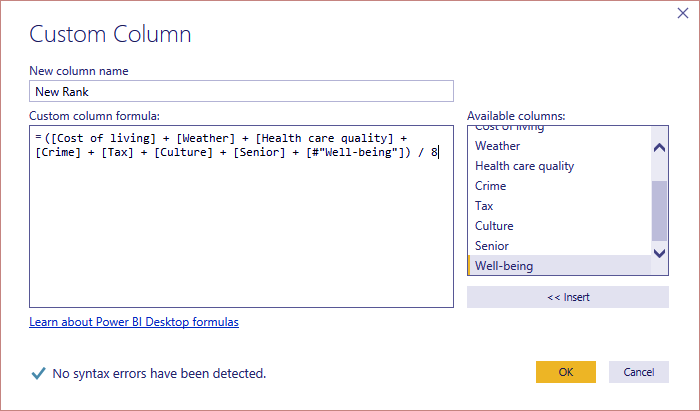
In the Custom Column discourse, in New section name, enter New Rank, and in Custom segment recipe, enter the accompanying:
Duplicate
([Cost of living] + [Weather] + [Health mind quality] + [Crime] + [Tax] + [Culture] + [Senior] + [#”Well-being”])/8
Ensure the status message peruses ‘No sentence structure mistakes have been distinguished.’ and click OK.
Step.3 Shape Information in Power BI
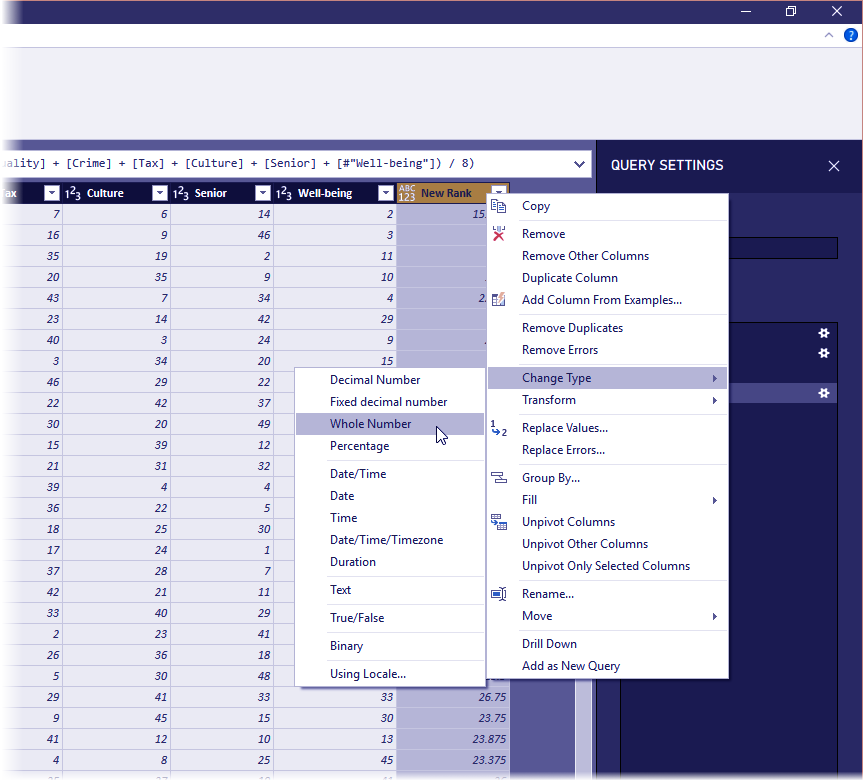
To keep segment information reliable, let’s change the new segment esteems to entire numbers. Without flaw tap the section header, and select Change Type > Whole Number to transform them.
In the event that you have to pick in excess of one segment, first select a segment at that point hold down SHIFT, select extra neighbouring segments, and afterwards right-click a section header to change every single chosen segment. You can likewise utilize the CTRL key to pick non-adjoining sections.
Let’s Create Hyperlink in Power BI in Dashboard & Excel Power Pivot
Step.4 Shape Information in Power BI
You can likewise change segment information composes from the Transform strip. Here’s the Transform strip, with a bolt indicating the Data Type catch, which gives you a chance to change the present information write to another.
Step.5 Shape Information in Power BI
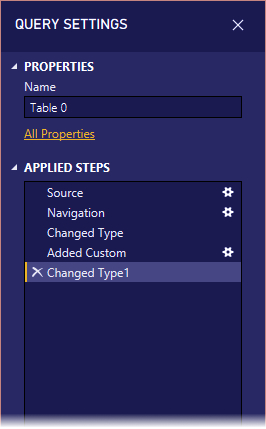
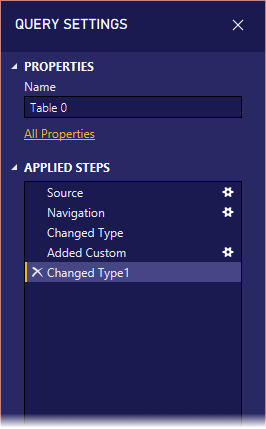
Note that in Query Settings, the Applied Steps mirror any forming advances connected to the information. On the off chance that I need to expel any progression from the forming procedure, I essentially select the X to one side of the progression. In the accompanying picture, Applied Steps mirrors the means up until now: interfacing with the site (Source); choosing the table (Navigation); and keeping in mind that stacking the table, Query Editor consequently changed content based number segments from Text to Whole Number (Changed Type). The last two stages demonstrate our past activities with Added Custom and Changed Type1.
Step.6 Shape Information in Power BI
Do you know the Difference Between Power BI Vs SSRS
Before we can work with this question, we have to roll out a couple of improvements to get its information where we need it:
- Change the rankings by expelling a section – We have chosen cost of living is a non-factor in our outcomes. In the wake of evacuating this segment, we discover the issue that the information stays unaltered, however, it’s anything but difficult to settle utilizing Power BI Desktop, and doing as such shows a cool component of Applied Steps in Query.
- Fix a couple of blunders – Since we evacuated a segment, we have to straighten out our computations in the New Rank segment. This includes changing a recipe.
- Sort the information – In light of the New Rank and Rank sections.
- Supplant information – We will feature how to supplant a particular esteem and the need of embeddings an applied Step.
- Change the table name – That Table 0 is certainly not a helpful descriptor, however transforming it is basic.
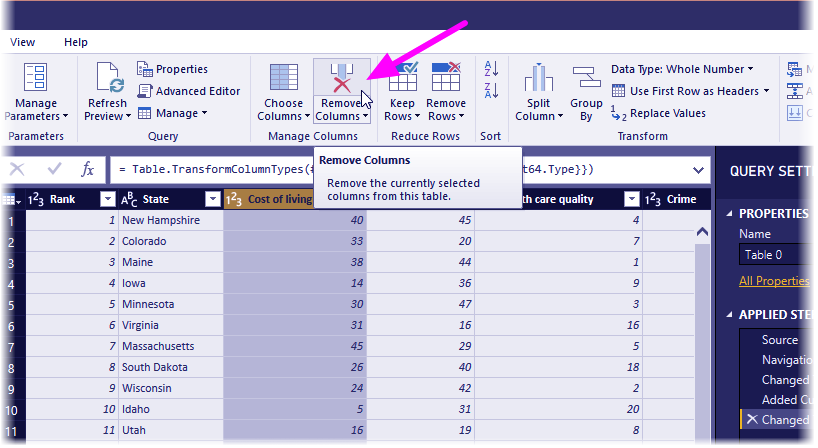
To evacuate the Cost of living segment. Basically, select the segment and pick the Home tab from the strip, at that point Remove Columns as appeared in the accompanying figure.
Step.7 Shape Information in Power BI
Notice the New Rank qualities have not changed; this is because of the requesting of the means. Since Query Editor records the means successively, yet autonomously of each other, you can move each Applied Step up or down in the arrangement. Without flaw click any progression, and Query Editor gives a menu that gives you a chance to do the accompanying: Rename, Delete, Delete Until End, Move Up, or Move Down. Simply ahead and climb the last advance Removed Columns to simply over the Added Custom advance.

Step.8 Shape Information in Power BI
Follow this link to know about Integration of Microsoft Flow and Power BI
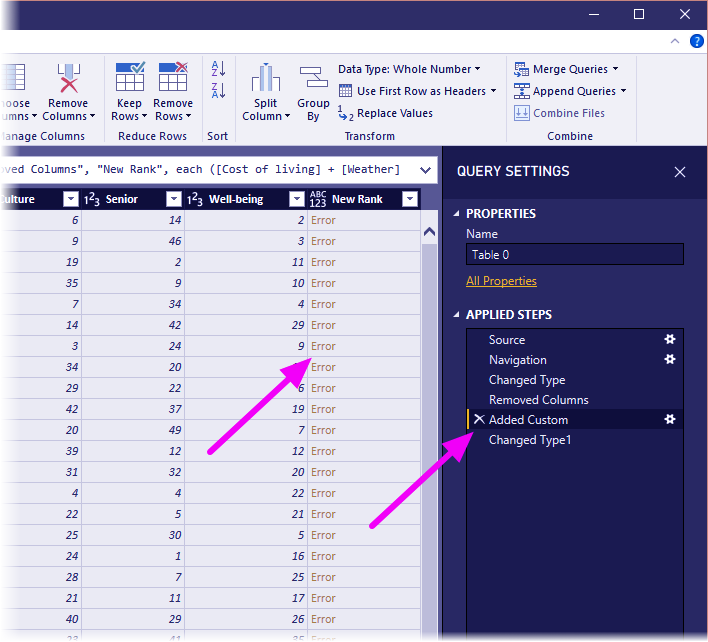
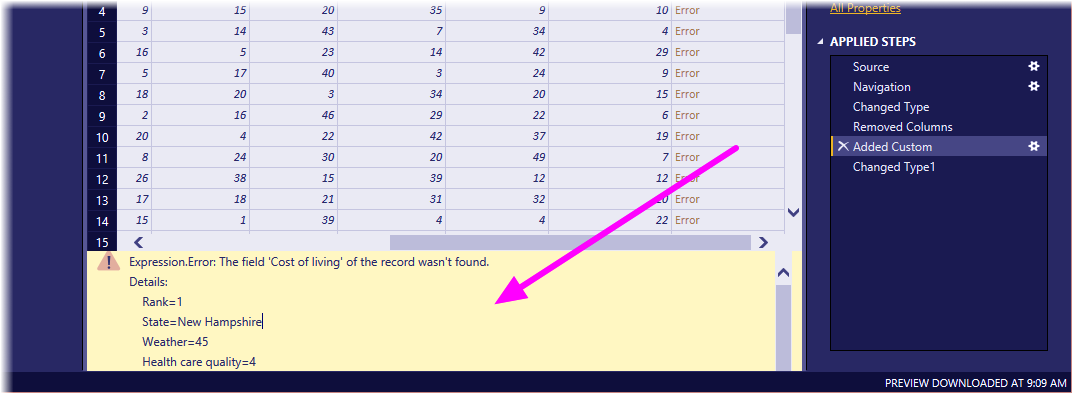
Next, select the Added Custom advance. Notice the information presently demonstrates Error which we should address.
Step.9 Shape Information in Power BI
There are a couple of approaches to get more data about every mistake. You can choose the cell (without tapping on the word Error), or tap the word Error straightforwardly. On the off chance that you select the cell without clicking specifically on the word Error, Query Editor shows the mistake data on the base of the window.
Step.10 Shape Information in Power BI
On the off chance that you tap the word Error specifically, Query makes an Applied Step in the Query Settings sheet and shows data about the mistake. We would prefer not to go this course, so select Cancel.
To settle the blunders, select the New Rank segment, at that point show the segment’s information recipe by opening the View lace and choosing the Formula Bar checkbox.
Let’s revise Data Sources for Power BI Benefit (Services) – Types
Presently you can expel the Cost of a living parameter and decrement the divisor, by changing the equation to the accompanying:
Duplicate
Table.AddColumn(#”Removed Columns”, “New Rank”, each ([Weather] + [Health mind quality] + [Crime] + [Tax] + [Culture] + [Senior] + [#”Well-being”])/7)
Select the green checkmark to one side of the recipe box or press Enter, and the information ought to supplant by overhauled values and the Added Custom advance should now total without any blunders.
Note – You can likewise Remove Errors (utilizing the strip or the right-click menu), which expels any lines that have mistakes. For this situation, it would’ve expelled every one of the lines from our information, and we would not like to do that – we like every one of our information, and need to keep it in the table.
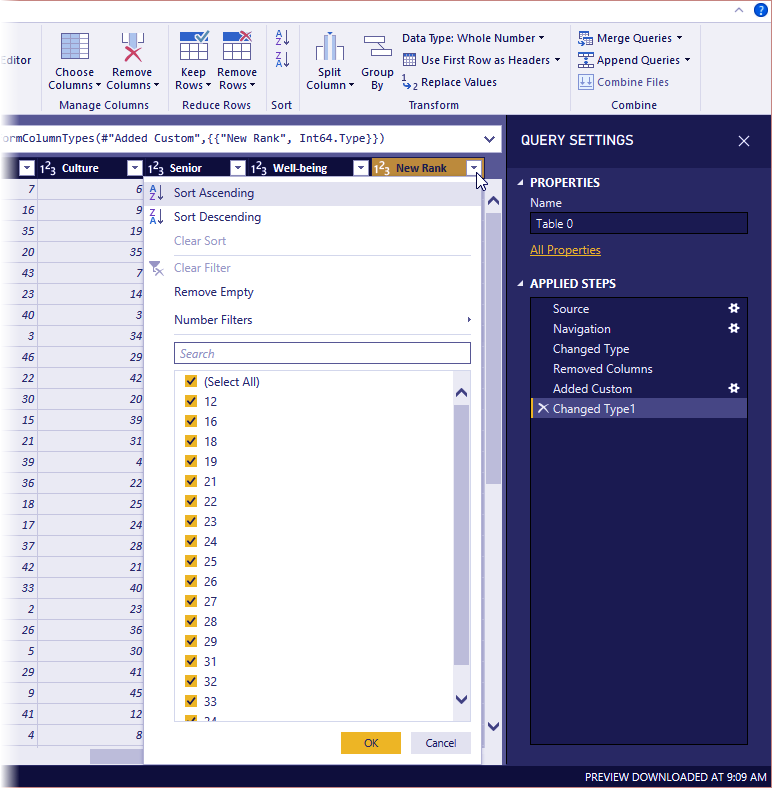
Presently we have to sort the information in light of the New Rank segment. To begin with select the last connected advance, Changed Type1 to get to the latest information. At that point, select drop-down situated alongside the New Rank section header and select Sort Ascending.
Step.11 Shape Information in Power BI
Notice the information is currently arranged by New Rank. In any case, on the off chance that you look in the Rank section, you will see the information isn’t arranged legitimately in situations where the New Rank esteem is a tie. To settle this, select the New Rank section and change the equation in the Formula Bar to the accompanying:
= Table.Sort(#”Changed Type1″,{{“New Rank”, Order.Ascending},{“Rank”, Order.Ascending}})
Select the green checkmark to one side of the recipe box or press Enter, and the columns should now request as per both New Rank and Rank.
What’s more, you can choose an Applied Step anyplace in the rundown, and keep forming the information by then in the grouping. Inquiry Editor will naturally embed another progression straightforwardly after the at present chosen Applied Step. How about we try that out.
Step.12 Shape Information in Power BI
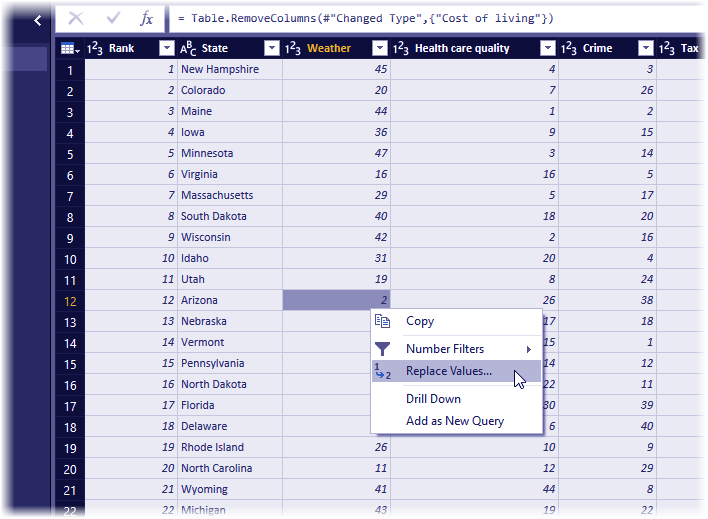
In the first place, select the Applied Step before including the custom segment; this would the Remove Columns step. Here we will supplant the estimation of the Weather positioning in Arizona. Right-tap the suitable cell that contains Arizona’s Weather positioning and selects Replace Values… from the menu that shows up. Note which Applied Step is as of now chose (the progression before the Added Custom advance).
Read about Power BI Archived Workspace – Moving Content & Office 365

Step.13 Shape Information in Power BI
Since we’re embeddings a stage, Query Editor cautions us about the threat of doing as such – ensuing advances could make the question break. We should cautious, and mindful! Since this is an instructional exercise, and we’re featuring an extremely cool element of Query Editor to exhibit how you can make, erase, embed, and reorder steps, we’ll push ahead and select Insert.
Change the incentive to 51 and the information for Arizona is supplant. When you make another Applied Step, Query Editor names it in light of the activity – for this situation, Replaced Value. When you have in excess of one stage with a similar name in your inquiry, Query Editor includes a number (in succession) to each ensuing Applied Step to separate between them.
Presently select the last Applied Step, Sorted Rows, and notice the information has changed in regards to Arizona’s new positioning. This is on account of we embedded the Replaced Value advance in the ideal place, before the Added Custom advance.
Approve that was somewhat included, however it was a decent case of how intense and flexible Query Editor can be.
Finally, we need to change the name of that table to something enlightening. When we get to making reports, it’s particularly helpful to have illustrative table names, particularly when we associate with various information sources, and they’re altogether recorded in the Fields sheet of the Report see.
Let’s Create Shape Map in Power BI Desktop
Changing the table name is simple: in the Query Settings sheet, under Properties, basically type in the new name of the table, has appeared in the accompanying picture, and hit Enter. We should call this table RetirementStats.
Approve, we’ve moulded that information to the degree we have to. Next, we should associate with another information source, and consolidate information.
4. How to Join Information in Power BI?
That information about different states is fascinating and will valuable for building extra examination endeavors and questions. Be that as it may, there’s one issue: most information out there utilizes a two-letter condensing for state codes, not the full name of the state. We require some approach to relate state names with their condensings.
We’re in luckiness: There’s another open information source that does only that, however, it needs a decent lot of forming before we can interface it to our retirement table. Here’s the Web asset for state shortened forms:
http://en.wikipedia.org/wiki/List_of_U.S._state_abbreviations
From the Home lace in Query Editor, we select New Source > Web and sort the address, select Connect, and the Navigator demonstrates what it found on that Web page.
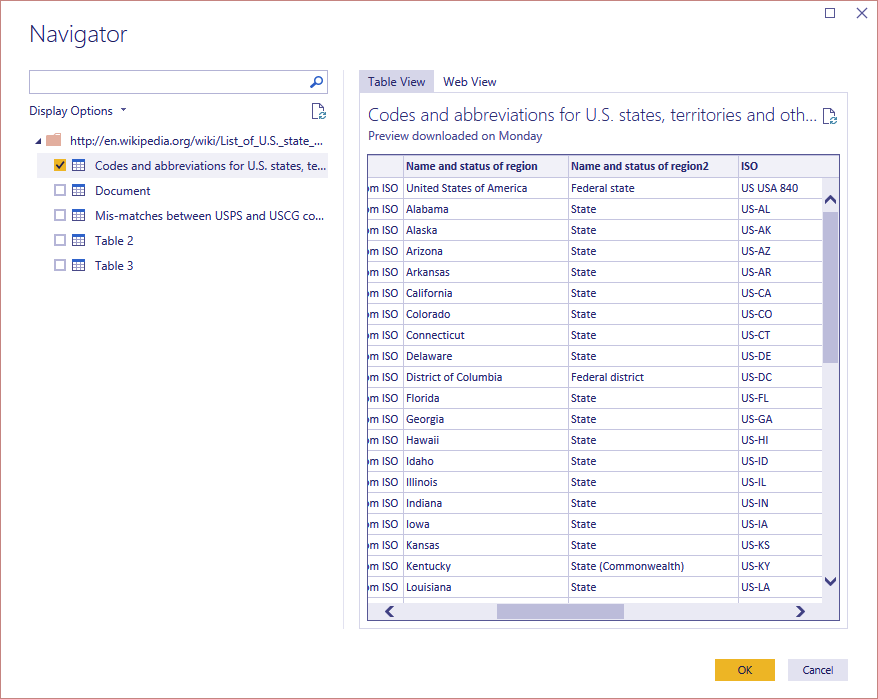
Step. 1 Join Information in Power BI Desktop
We select Codes and contractions. since that incorporates the information we need, yet it will take a considerable amount of molding to pare that table’s information down to what we need.
Tip – Is there a quicker or simpler approach to achieve the means beneath? Indeed, we could make a connection between the two tables, and shape the information in view of that relationship. The accompanying advances are still great to learn for working with tables, simply realize that connections can help you rapidly utilize information from different tables.
To get this information into shape, we make the accompanying strides:
- Expel the best line – It is an aftereffect of how Web page’s table was made, and we needn’t bother with it. From the Home lace, select Reduce Rows > Remove Rows > Remove Top Rows.
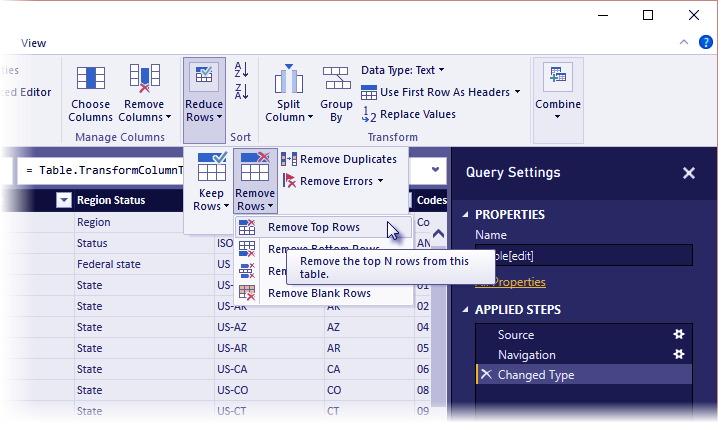
Step.2 Join Information in Power BI Desktop
The Remove Top Rows window shows up, giving you a chance to indicate what number of lines you need to evacuate.
Let’s explore the Types of Filters in Power BI
Note – In the event that Power BI coincidentally imports the table headers as a column in your information table. You can choose Use First Row As Headers from the Home tab, or from the Transform tab in the strip, to settle your table.
- Evacuate the last 26 lines – they’re every one of the domains, which we don’t have to incorporate. From the Home lace, select Reduce Rows > Remove Rows > Remove Bottom Rows.
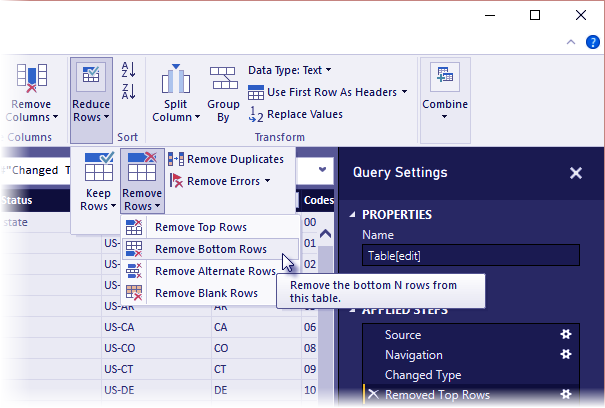
Step.3 Join Information in Power BI Desktop
Since the RetirementStats table doesn’t have data for Washington DC, we have to channel it from our rundown. Select the drop-down bolt close to the Region Status section, at that point clear the checkbox next to Federal area.
- Expel a couple of unneeded segments – we just need the mapping of state to its official two-letter contraction. So, we can evacuate the accompanying sections: Column1, Column3, Column4, and afterwards Column6 through Column11. To begin with select Column1, at that point hold down the CTRL key and select alternate segments to expel. From the Home tab on the strip, select Remove Columns > Remove Columns.
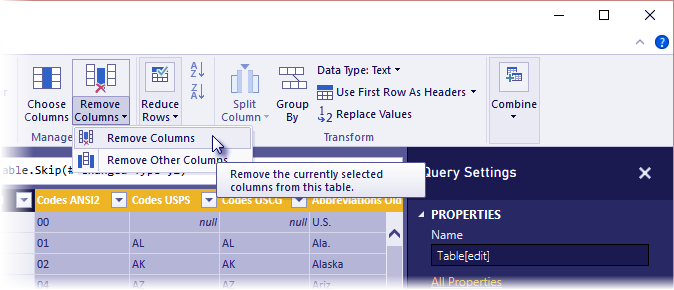
Step.4 Join Information in Power BI Desktop
Note – This is a decent time to call attention to that the grouping of connected strides in Query Editor is imperative. It can influence how the information is formed. It’s likewise critical to consider how one stage may affect another ensuing advance. On the off chance that you expel a stage from the Applied Steps, resulting steps may not carry on as initially proposed. On account of the effect of the question’s grouping of steps.
Do you know How to Create Power BI Waterfall Chart?
Note – When you resize the Query Editor window to make the width littler, some strip things are consolidated to influence the best utilization of unmistakable to space. When you increment the width of the Query Editor window, the lace things grow to make the most utilization of the expanded lace region.
- Rename the sections, and the table itself – obviously, there are a couple of approaches to rename a segment. First select the segment, at that point either select Rename from the Transform tab on the strip. Or right-click and select Rename… from the menu that shows up. The accompanying picture has bolts indicating the two alternatives; you just need to pick one.
How about we rename them to State Name and State Code. To rename the table, simply type the name into the Name confine the Query Settings sheet. How about we call this table StateCodes.
Since we’ve molded the StateCodes table the way we need. How about we consolidate these two tables, or inquiries, into one. Since the tables we presently have are a consequence of the questions we connected to the information. They’re frequently alluded to as inquiries.
There are two essential methods for joining questions – blending and affixing.
When you have at least one segments that you’d get a kick out of the chance to add to another inquiry, you blend the inquiries. When you have extra lines of information that you’d get a kick out of the chance to add to a current question, you attach the inquiry.
For this situation, we need to consolidate inquiries. To begin, from the left sheet of Query Editor we select the question into which we need the other inquiry to blend. Which for this situation is RetirementStats. At that point, select Combine > Merge Queries from the Home tab on the lace.
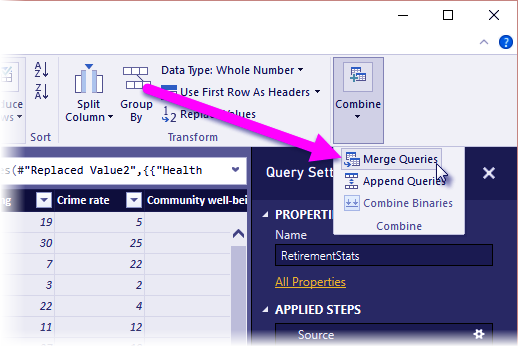
Step.5 Join Information in Power BI Desktop
You might incite to set the security levels. To guarantee the information is joined without including or exchanging information you didn’t need exchanged.
Next, the Merge window shows up, inciting us to choose which table we’d like converge into the chose table, and after that. The coordinating segments to use for the union. Select State from the RetirementStats table (inquiry). At that point, select the StateCodes question. When we select the right coordinating sections – State from RetirementStats, and State Name from StateCodes. The Merge window resembles the accompanying, and the OK catch empower.
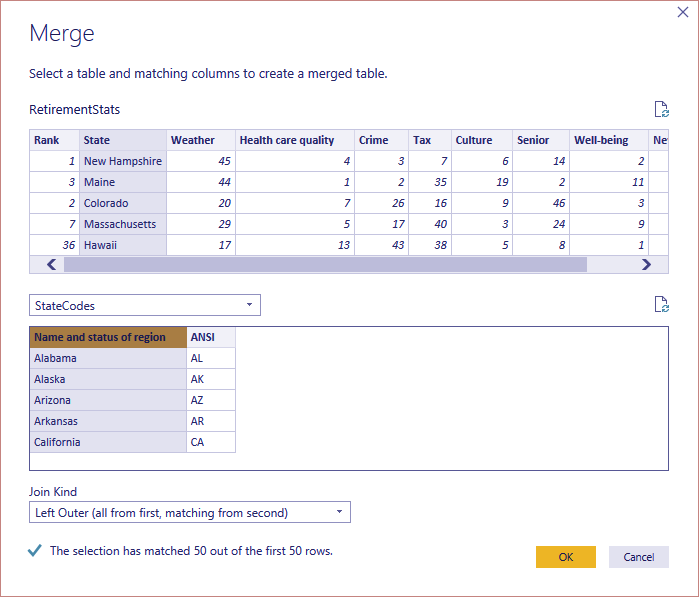
Step.6 Join Information in Power BI Desktop
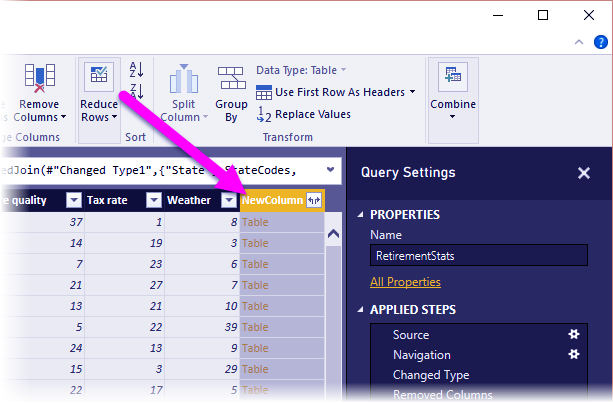
A NewColumn is made toward the finish of the question. Which is the substance of the table (inquiry) that converge with the current inquiry. All sections from the blend question are dense into the NewColumn. Yet you can choose to Expand the table, and incorporate whichever segments you need.
Follow this link to know about Power BI Slicer
Step.7 Join Information in Power BI Desktop
To Expand the combine table, and select which segments to incorporate, select the extend symbol (Expand). The Expand window shows up.

Setp.8 Join Information in Power BI Desktop
For this situation, we just need the State Code section. So, we select just that segment and after that select OK. We clear the checkbox from Use unique segment name as prefix since we don’t need or need that; in the event that we leave that chose, the combine segment would name NewColumn.State Code.
Note – Need to play around with how to acquire that NewColumn table? You can analyze a bit, and on the off chance that you don’t care about the outcomes. Simply erase that progression from the Applied Steps list in the Query Settings sheet; your question comes back to the state preceding applying that Expand step. It resembles a free do-over. Which you can do the same number of times as you like until the extend procedure looks the way you need it.
Let’s discuss Power BI Treemap
We currently have a solitary inquiry (table) that consolidated two information sources. Every one of which has been molded to address our issues. This question can fill in as a reason for bunches of extra, fascinating information associations. For example, lodging cost measurements, socioeconomics, or openings for work in any state.
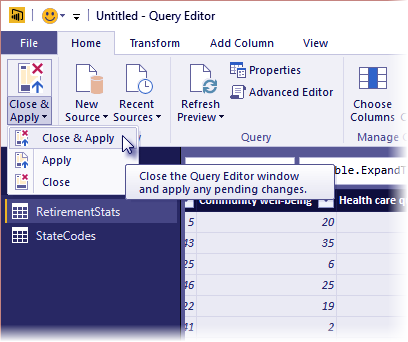
Step.9 Join Information in Power BI Desktop
To apply changes and close Query Editor, select Close and Apply from the Home strip tab. The changed dataset shows up in Power BI Desktop, prepared to utilize for making reports.
So, this was all about Shape and Join Information in Power BI Desktop. Hope you like our explanation.
5. Conclusion
Hence, in this Join Information in Power BI tutorial, we learned several setps to shape information and Join information in Power BI desktop. Hope this blog helps you. Share your feedback with us!
Related Topic – Power BI Bookmark
For Reference
If you are Happy with DataFlair, do not forget to make us happy with your positive feedback on Google


