Power BI Matrix Visualization – Subtotals & Stepped Layout
Job-ready Online Courses: Knowledge Awaits – Click to Access!
1. Objective
In our last session, we discussed the Power BI Time Series. Now, we are going to explore the Power BI Matrix Visualization. Moreover, we will understand how Power BI calculates total and drill-down with the Power Matrix visual. Along with this, we will study the stepped layout and subtotals with matrix visuals in Power BI.
So, let’s start the Power BI Matrix Visualization Tutorial.
Power BI Matrix Visualization – Subtotals & Stepped Layout
2. Power BI Matrix Visualization
With the Power BI Matrix visual element, you can make network visuals (now and then likewise alluded to as tables) in Power BI Desktop reports and cross-feature components inside the lattice with different visuals. What’s more, you can choose lines, sections, and even individual cells and cross-feature. In conclusion, to improve utilization of format space, the Power BI Matrix visual backings a ventured design.
There are numerous highlights related to the network, and we’ll experience them in the accompanying segments of this article.
Do you know the Architecture of Power BI?
Note – Starting with the July 2017 arrival of Power BI Desktop, framework and table visuals reflect styling (counting hues) from the connected Report Theme. These may not be the hues you expect for your network visual, which you can change in your Report Theme setup. See Use Report Themes in Power BI Desktop for more data about subjects.
3. Seeing How Power BI Ascertains Aggregates
Before hopping into how to utilize the Power BI Matrix visual, it’s vital to see how Power BI ascertains aggregate and subtotal esteems in tables and grids. For aggregate and subtotal pushes, the measure is assessed over all columns in the basic information – it isn’t only a basic expansion of the qualities in the obvious or showed lines. This implies you can wind up with various qualities in the aggregate line than you may anticipate.
Investigate the accompanying Power BI Matrix Visuals.
In this illustration, each column in the Matrix visual in Power BI, most distant to the privilege is demonstrating the amount for every sales representative/date blend. In any case, since a sales representative appears against different dates, the numbers can seem more than once. Along these lines, the exact aggregate from the fundamental information, and a straightforward expansion of the obvious qualities don’t liken. This is a typical example when the esteem you’re summing is on the ‘one’ side of a one-to-numerous relationship.
When taking a gander at aggregate and subtotals, recall that those qualities depend on the hidden information, and not exclusively in view of the unmistakable qualities.
4. Utilizing Drill-Down with Power BI Matrix Visual
With the Power BI Matrix drill down visual, you can do a wide range of intriguing drill-down exercises that weren’t accessible previously. This incorporates the capacity to bore down utilizing lines, segments, and even into singular segments and cells. Now we investigate how every one of these function.
a. Penetrate Down on Push Headers
In the Visualizations sheet, when you add different fields to the Rows segment of the Fields well, you empower bore down on the columns of the lattice visual. This is like making a chain of command, which at that point enables you to bore down (and after that move down) through that progressive system, and dissect the information at each level.
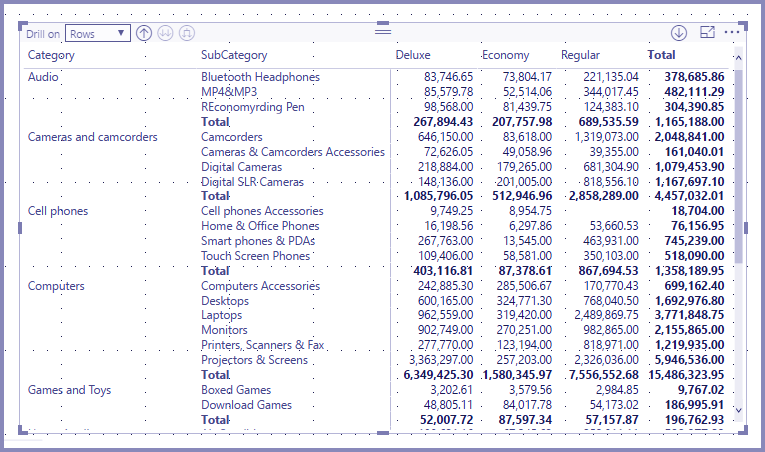
In the accompanying picture, the Rows segment contains Category and SubCategory, making a gathering (or chain of command) in the lines that we can penetrate through.
At the point when the visual has gathering made in the Rows area, the visual itself shows the bore and grow symbols in the upper left corner of the visual.
Like the penetrate and extend conduct in different visuals, choosing those catches gives us a chance to bore down (or go down) through the progressive system. For this situation, we can penetrate down from Category to SubCategory, as appeared in the accompanying picture, where the bore down one level symbol (the pitchfork) has been chosen.
Read about Power BI Data Modeling – Creating Calculated Columns
Notwithstanding utilizing those symbols, you can right-tap on any of those column headers and bore around choosing from the menu that shows up.
Notice there are a couple of choices from the menu that shows up, which produce diverse outcomes:
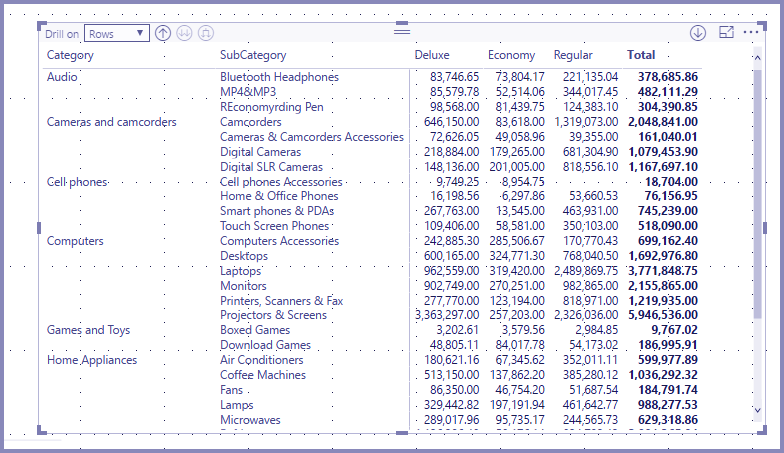
Choosing Drill Down grows the framework for that column level, barring all other line headings with the exception of the line header that was a correct click. In the accompanying picture, Computers correctly click, and Drill Down was chosen. Notice that other best level lines never again show up in the lattice. This is a valuable component and turns out to be particularly cool when we get to the cross-featuring area.
You can tap the Drill up symbol to return to the past best level view. On the off chance that you at that point select Show Next Level from the right-click menu, you get an in sequential order posting of all the following level things (for this situation, the SubCategory field), without the larger amount chain of command arrangement.
When you tap on the Drill up symbol in the upper-left corner to have the lattice demonstrate all best level classifications, at that point right-click again and select Expand to next level, you see the accompanying:
You can likewise utilize the Include and Exclude menu things to keep (or expel, individually) the right-clicked push (and any subcategories) from the framework.
b. Bore Down on Section Headers
Like the capacity to bore down on Rows, you can likewise bore down on Columns. The accompanying picture, you can see that there are two fields in the Columns field well, making a progression like what we utilized for the lines before in this article. In the Columns field well, we have Class and Color.
The Power BI Matrix visual, when we right-click a section, we see the choice to bore down. In the accompanying picture, we right-tap on Deluxe and select Drill Down.
When you select Drill Down, the following level of the section chain of importance for Deluxe showcases.
Whatever is left of the right-click menu things take a shot at segments similarly they improve the situation lines (see the past segment, Drill-down on push headers). You can Show Next Level, Expand to next level, Include, or Exclude your segments similarly as you can with lines.
Note – The penetrate down and bore up symbols in the upper-left of the framework visual just apply to lines. With a specific end goal to bore down on segments, you should utilize the right-click menu.
Follow this link to know about Power BI DAX Basics
5. Power BI Matrix Visuals – Ventured Design
The Power BI Matrix visual consequently indents subcategories in a progression underneath each parent, which is known as a Stepped design.
In the first form of the matrix visual, subcategories appear in a totally changed section, taking up substantially more space in the visual. The accompanying picture demonstrates the table in unique Matrix visual; see the subcategories in a totally isolated section.
In the accompanying picture, you see a Power BI Matrix visual, with a stepped format in real life. Notice the classification Computers has its subcategories (Computers Accessories, Desktops, Laptops, Monitors, et cetera) somewhat indented, giving a cleaner and considerably more dense visual.
You can without much of a stretch change the ventured design settings. With the Matrix visual chose, in the Format area (the paint roller symbol) of the Visualizations sheet, grow the Row headers segment. You have two choices: the Stepped design flip (which turns it on or off), and the Stepped format space (indicates the space sum, in pixels).
On the off chance that you kill the Stepped format. The subcategories appear in another section instead of indent underneath the parent classification.
6. Subtotals with Matrix Visuals in Power BI
You can turn subtotals on or off in network visuals, for the two lines and sections. In the accompanying picture, you can see that the line subtotals are set to on.
Subtotals with Matrix Visuals in Power BI
In the Format area of the Visualizations sheet, grow the Subtotals card and turn the Row subtotals slider to Off. When you do as such, the subtotals not appear.
Do you know How to Add Power BI Filter in Report & Types of Filters
Power BI Matrix Visualization – Subtotals
A similar procedure applies to section subtotals.
7. Cross-Featuring with Power BI Matrix Visuals
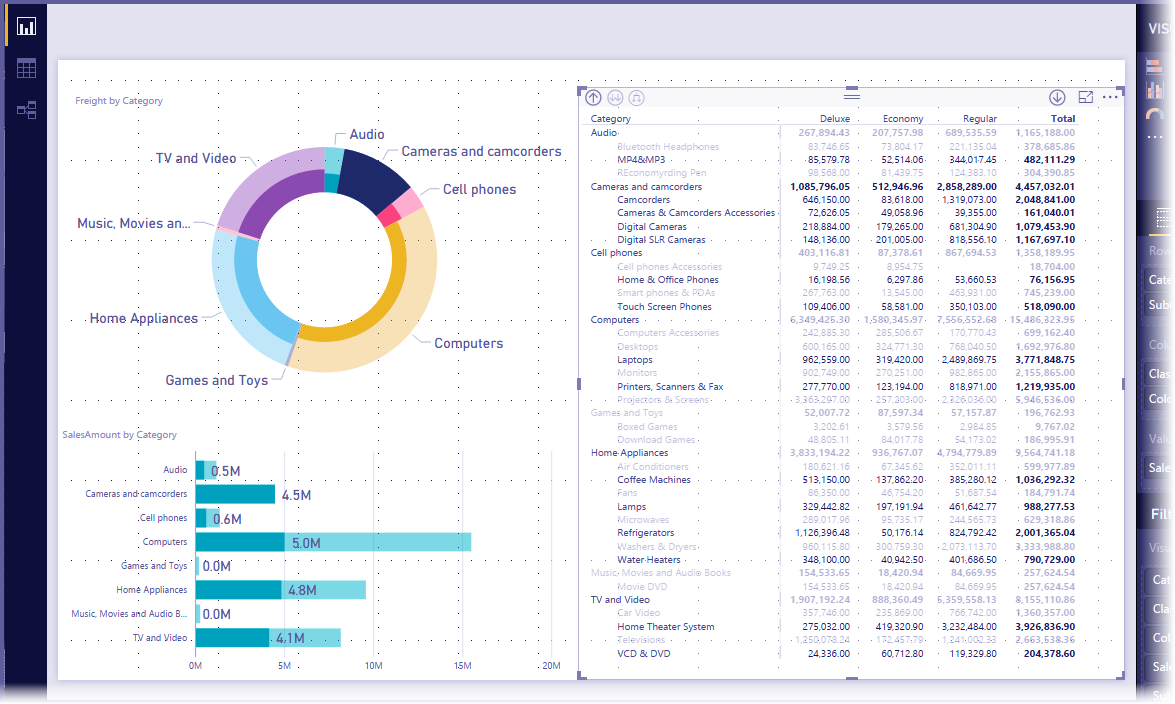
With the Power BI Matrix visual, you can choose any components in the lattice as the reason for cross-featuring. Select a section in a Matrix and that segment feature, just like some other visuals on the report page. This has been a typical component of different visuals and information point determinations. So, now the Matrix visual offers a similar capacity.
What’s more, utilizing Ctrl+Click likewise works for cross-featuring. In the accompanying picture, an accumulation of subcategories was chosen from the Matrix visual. Notice how things that weren’t chosen from the visual turn grey out. How alternate visuals on the page mirror the determinations made in the Matrix visual.
Cross-Featuring with Power BI Matrix Visuals
8. Shading & Textual Style Hues with Matrix Visuals
With the Power BI Matrix visual, you can apply conditional arranging to the foundation of cells inside the lattice. And you can apply restrictive organizing to the content and qualities themselves.
To apply restrictive designing, you can do both of the accompanyings when a grid visual is chosen:
In the Fields sheet, right-tap the Field, and select Conditional designing from the menu.
Or then again, in the Format sheet, extend the Conditional organizing card. For either Background shading scales or Font shading scales, turn the slider to On. Turning either alternative on shows a connection for Advanced controls. Which gives you a chance to modify the hues and qualities for the shading designing.
Let’s Revise how to Use Power BI Bookmark?
Either approach accomplishes a similar outcome. Choosing Advanced controls shows the accompanying discourse, which gives you a chance to make alterations.
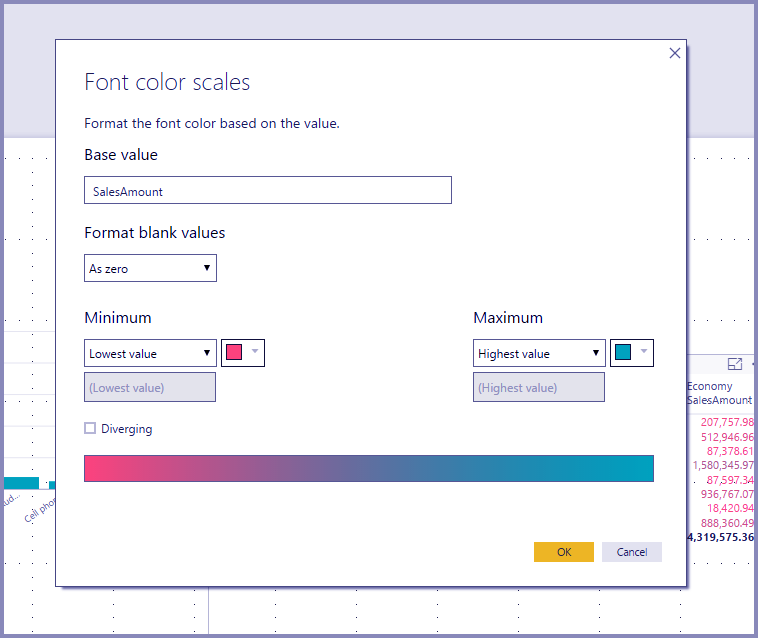
Power BI Matrix Visualization – Shading & Textual Style Hues
So, this was all about Power BI Matrix Visual Tutorial. Hope you like our explanation.
9. Conclusion
Hence, in this Power BI Matrix tutorial, we learned about using the Matrix visual in Power BI Desktop. Moreover, we would understand how Power BI calculates totals and drill-down with the Power Matrix visual. Along with this, we studied the stepped layout and subtotals with Power BI matrix visuals.
Related Topic- Power BI Report Server
For reference
Your opinion matters
Please write your valuable feedback about DataFlair on Google


The language of tutorial is tough. check the microsoft site the language is so easy to understand.
I agree, this isn’t very well written at all.