How to Create & Access R Matrix – 5 Operations that you Must Check!
Interactive Online Courses: Elevate Skills & Succeed Enroll Now!
A matrix in R is a two-dimensional rectangular data set and thus it can be created using vector input to the matrix function. R is a tool for expressing statistical and mathematical operations from which beginners will learn how to create and access the R matrix. And, by the end of this article, you will be able to perform addition, subtraction, multiplication, and division operations on R matrices.
Before diving into R matrix, brush up your skills for Vectors in R
What is R Matrix?
In a matrix, numbers are arranged in a fixed number of rows and columns and usually, the numbers are the real numbers. With the help of a matrix function, a memory representation of the matrix can be easily reproduced.
Therefore, all the data elements must share a common basic type.
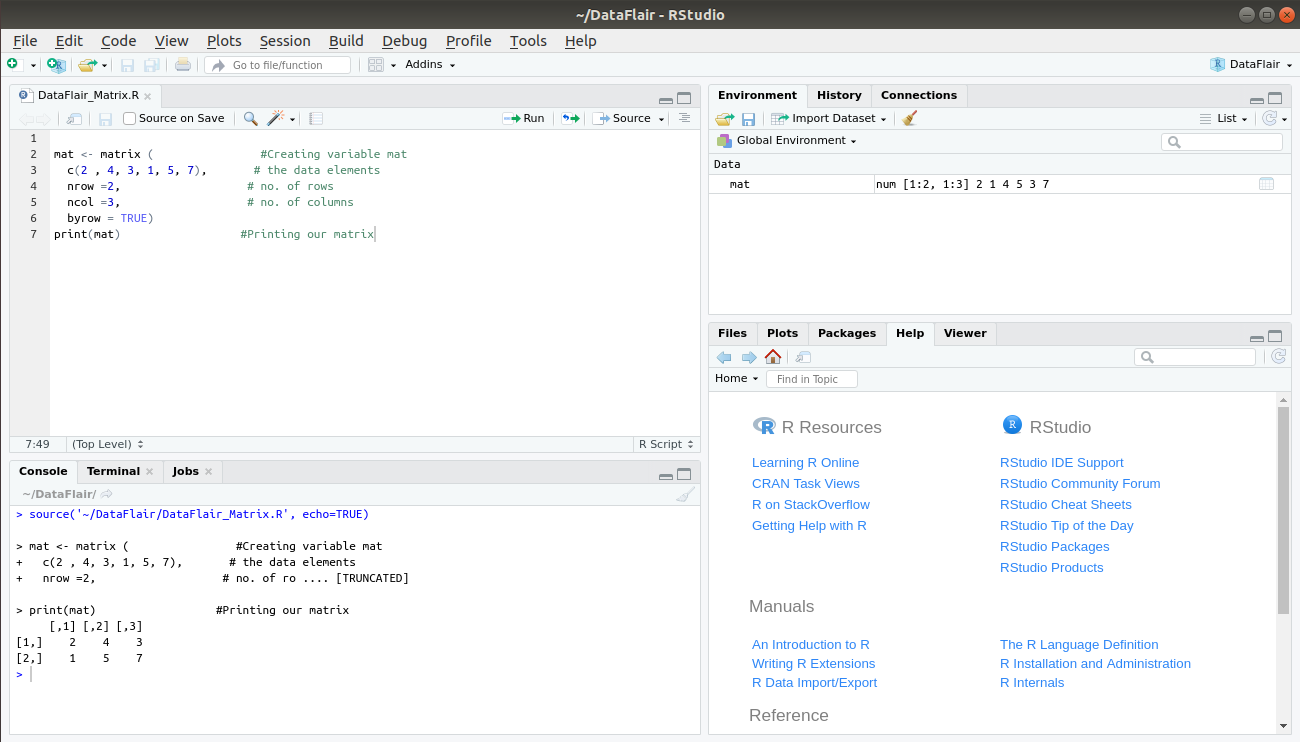
mat <- matrix (
c(2 , 4, 3, 1, 5, 7)       # the data elements
nrow =2,                   # no. of rows
ncol =3,                   # no. of columns
byrow = TRUE)
Output:
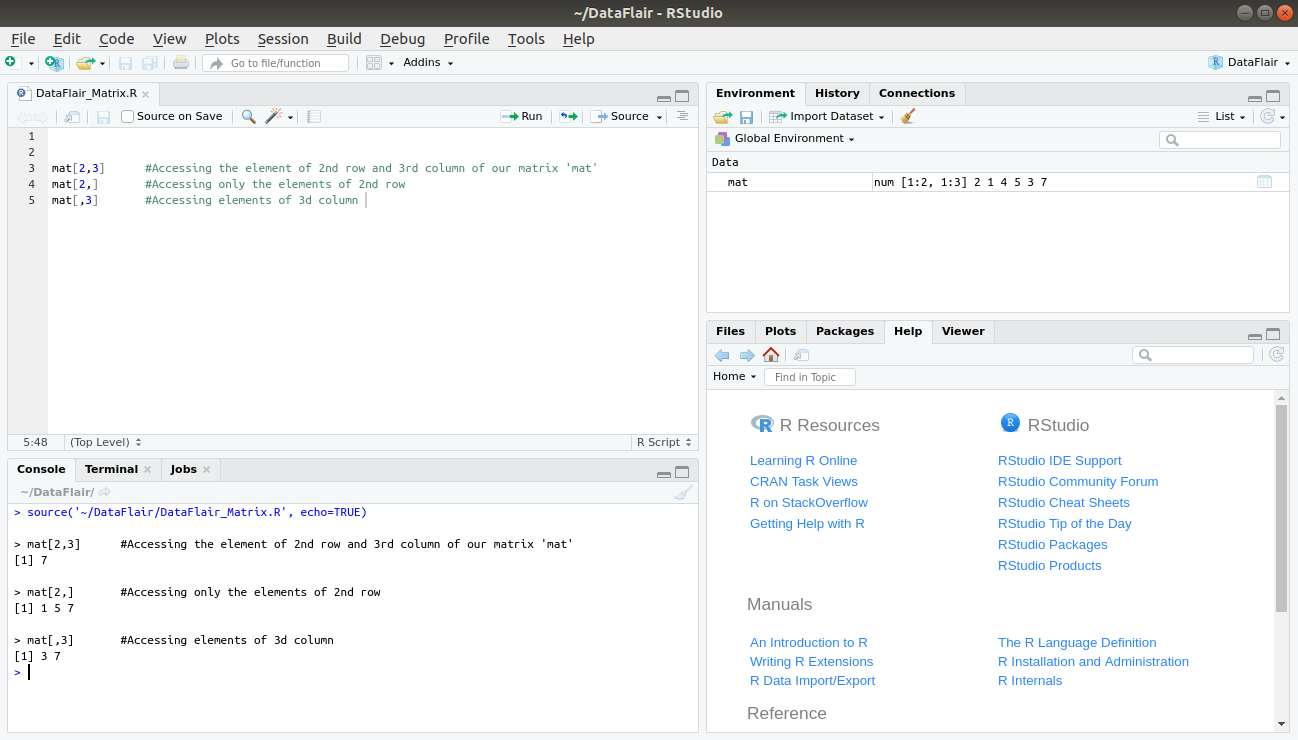
An element at the mth row and nth column of our matrix ‘mat’ can be created using this expression mat[m, n].
mat[2, 3]
To extract only the mth row of our matrix ‘mat’, we can use the expression, mat[m, ].
mat[2, ]
And, to extract only the nth column of our matrix ‘mat’, we use the expression mat[, n].
mat[ ,3]
Output:
History of Matrices in R
We can trace back the origins of matrices to ancient times! However, it was not until 1850, when the concept of the matrix was actually applied.
“Matrix” is the Latin word for womb. Generally, it can also mean any place in which something is formed or produced. The word has been used in unusual ways by at least two authors of historical importance. They proposed this axiom as a means to reduce any function to one of the lower types so that at the “bottom” (0order) the function is identical to its extension.
By using the process of generalisation, any possible function other than a matrix from the matrix holds true. However, it is only true if the proposition which asserts function in question is considered. Furthermore, it holds true for all or one of the value of argument when other argument(s) is undetermined.
Wait! Have you checked – R List Tutorial
How to Create Matrix in R?
Using the matrix() function, we will create our first matrix in R. The basic syntax for creating a matrix in R is as follows:
matrix(data, nrow, ncol, byrow, dimnames)
Where,
- Data is the input vector. This can also include a list or an expression.
- Nrow is the number of rows that we wish to create in our matrix.
- Ncol is the specification of the number of columns in our matrix.
- Byrow is a logical attribute which is FALSE by default. Setting it true will arrange the input vectors by row.
- Dimnames allows you to name rows and columns in a matrix.
Creating R matrix based on the variations in the attributes
- Creating R matrix through the arrangement of elements sequentially by row
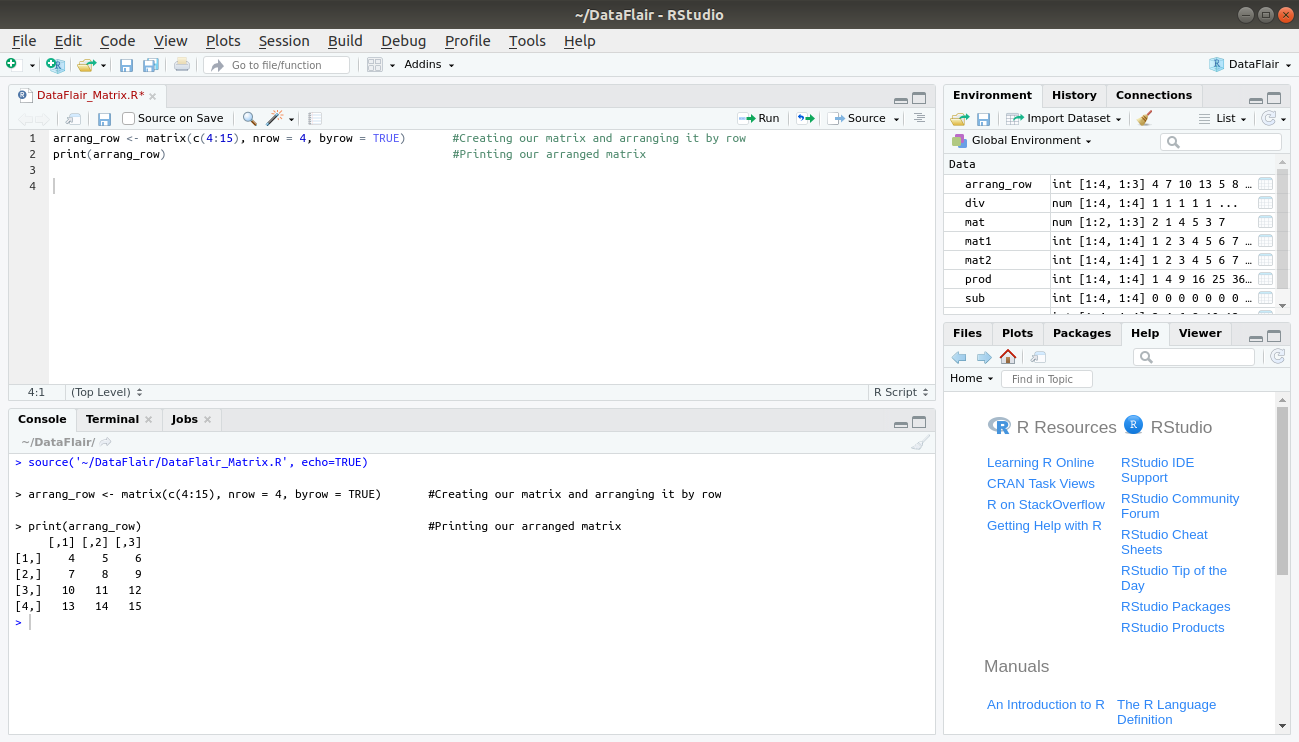
arrang_row <- matrix(c(4:15), nrow = 4, byrow = TRUE) #Creating our matrix and arranging it by row
print(arrang_row) #Printing our arranged matrix
In the above code, we specified the range for our array from 4 to 15 in the c() function. We specified the number of rows as 4 and arranged the elements sequentially.
Output:
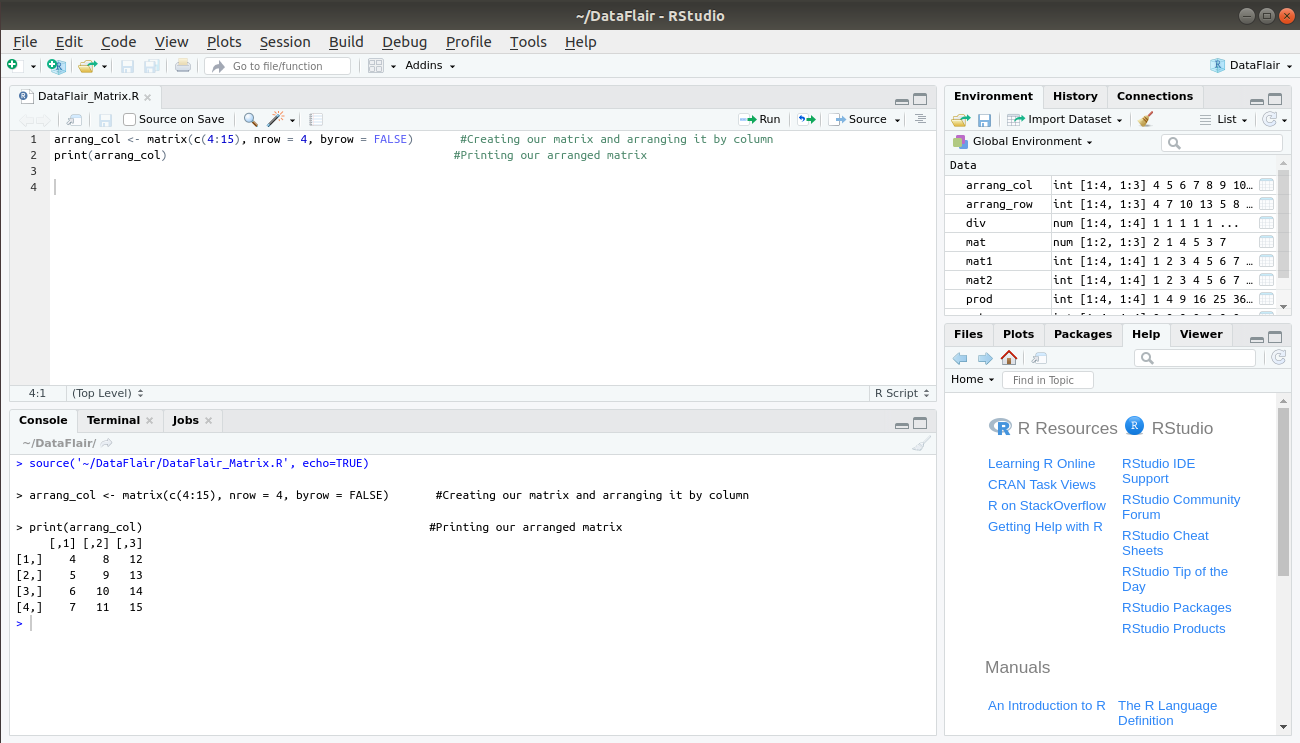
- Creating R matrix by arranging elements sequentially by column
arrang_col <- matrix(c(4:15), nrow = 4, byrow = FALSE)       #Creating our matrix and arranging it by column

print(arrang_col)    #Printing our arranged matrix
Output:
- Defining names of columns and rows in a matrix
In order to define rows and column names, you can create two vectors of different names, one for row and other for a column. Then, using the Dimnames attribute, you can name them appropriately:
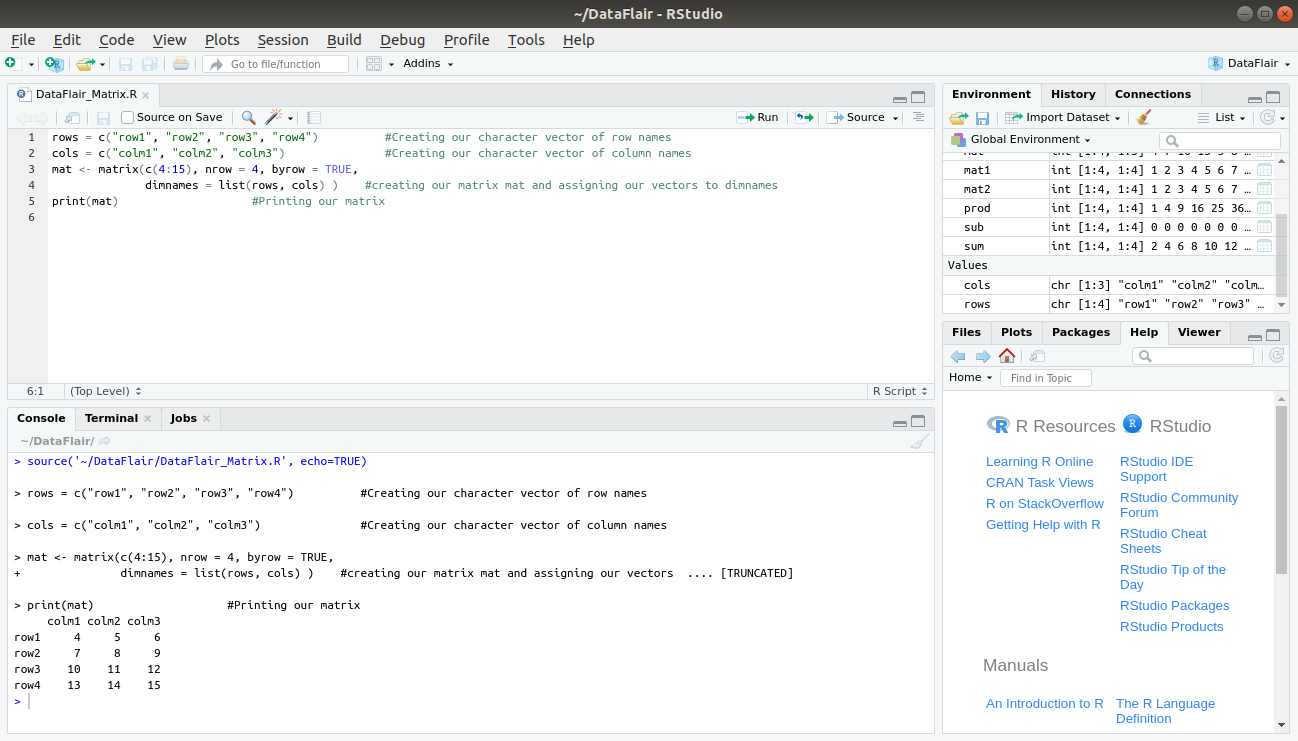
rows = c("row1", "row2", "row3", "row4")     #Creating our character vector of row names

cols = c("colm1", "colm2", "colm3")          #Creating our character vector of column names

mat <- matrix(c(4:15), nrow = 4, byrow = TRUE, dimnames = list(rows, cols) )
#creating our matrix mat and assigning our vectors to dimnames

print(mat)                    #Printing our matrix
Output:
Struggling with Factors in R? Get a complete guide to master it.
How to Access Elements of Matrix in R?
In this section, we will learn how to access elements of a matrix in R. For this, we will use the matrix ‘mat’ that we created before. We can access the elements of this matrix ‘mat’ in the following ways:
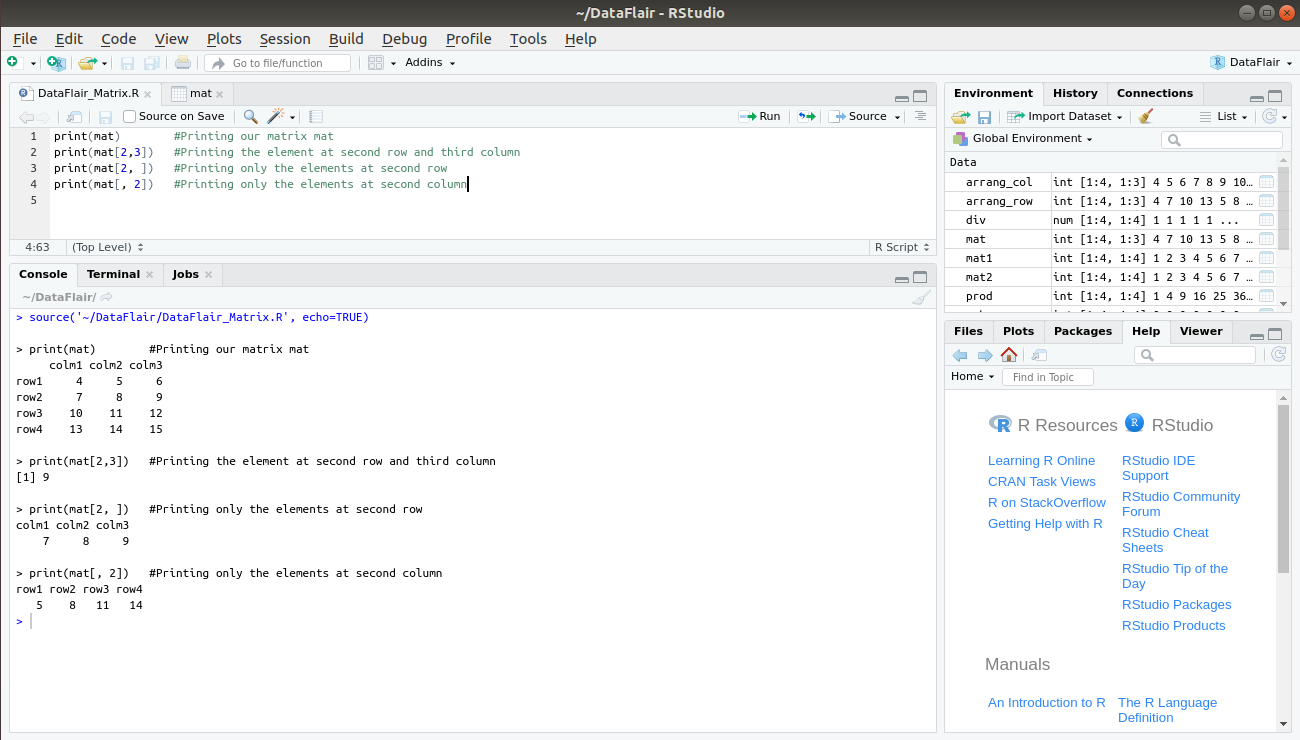
The syntax for accessing the element at the nth row of mth column of our matrix mat is – mat[n,m]
For example:
> print(mat[2,3])
Furthermore, to access only the elements of nth row, we use mat[n, ] such that
> print(mat[2, ])
And, to access only the elements of mth column, we use mat[ ,m]:
> print(mat[ , 2])
Output:
You must definitely check the Data Structures in R to enhance your skills
How to Modify Matrix in R?
In order to modify our matrix ‘mat’ in R, there are several methods:
- Assign a Single Element
The first method is to assign a single element to the position of the R matrix that will modify the original value.
The basic syntax for it – mat[n,m] <- y, where n and m are the rows and columns of the element respectively. And, y is the value that we assign to modify our matrix.
> mat    #Displaying values of matrix mat

> mat[2,3] <- 20  #Assigning value 20 to the element at 2nd row and 3rd column
> mat   		#Displaying our modified matrix.
Output:
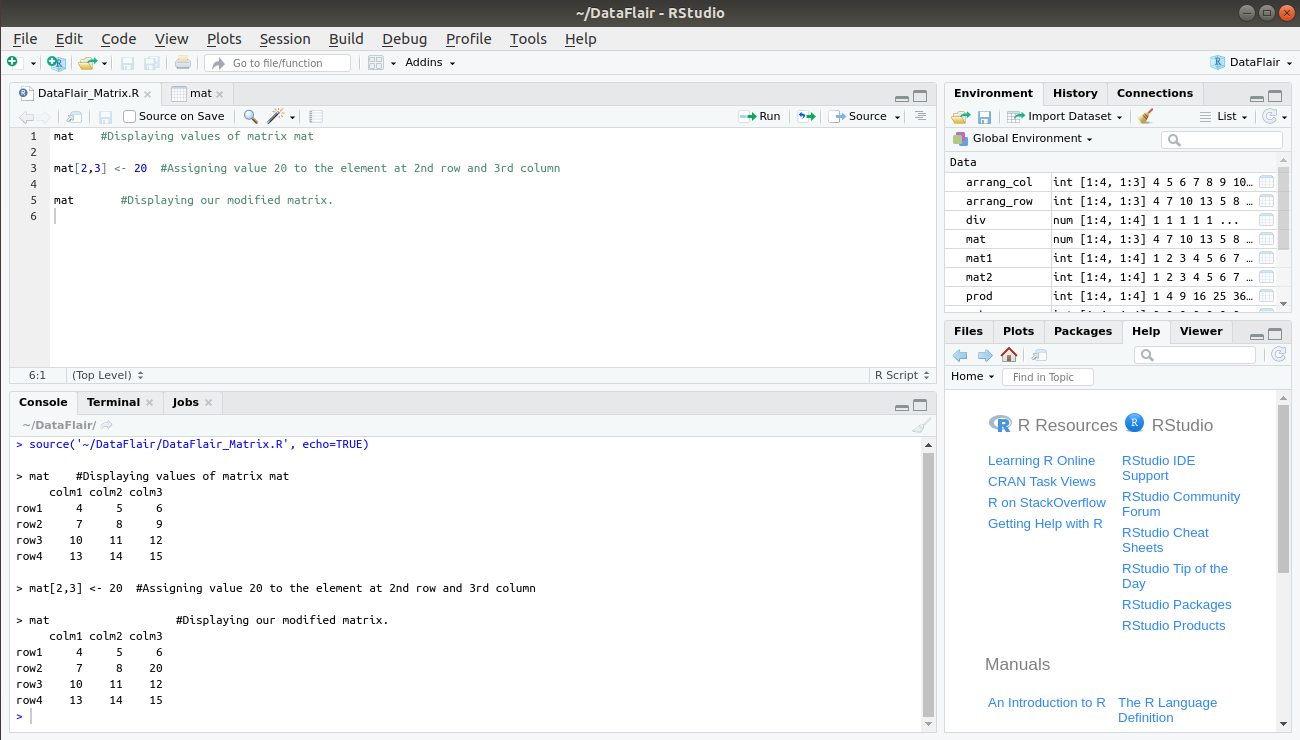
Here, we modify ‘mat’ by replacing the value at 2nd row and 3rd column, that is, 9 with 20.
- Use of Relation Operators
Another method of modifying is with the use of relational operators like >, <, ==.
> mat[mat == 4] <- 0     #Replacing elements that are equal to 4 with 0
> mat  			#Displaying our modified matrix ‘mat’
Output:

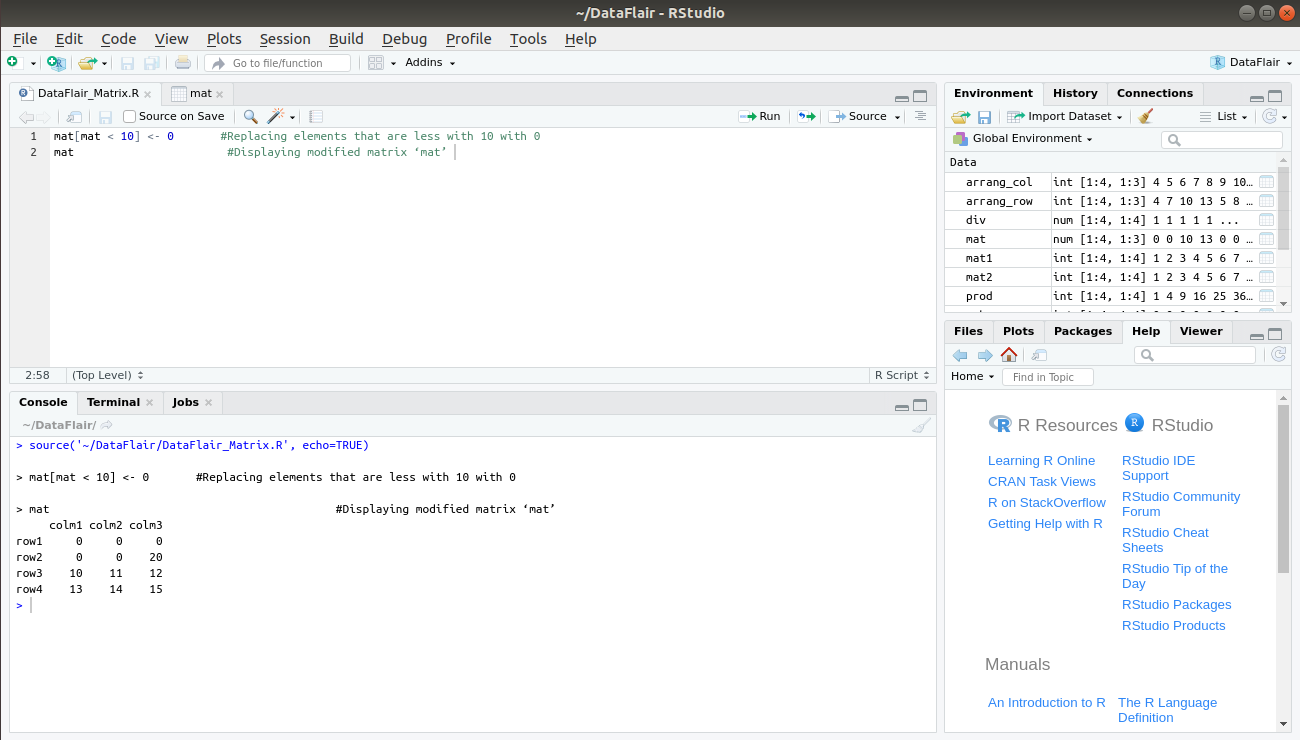
Here, we use == operator to replace the value that is equal to 4 with 0. Similarly, we can use < operator to replace values that are less than 10 with 0:
> mat[mat < 10] <- 0       #Replacing elements that are less with 10 with 0
> mat				#Displaying modified matrix ‘mat’
Output:
- Addition of Rows and Columns
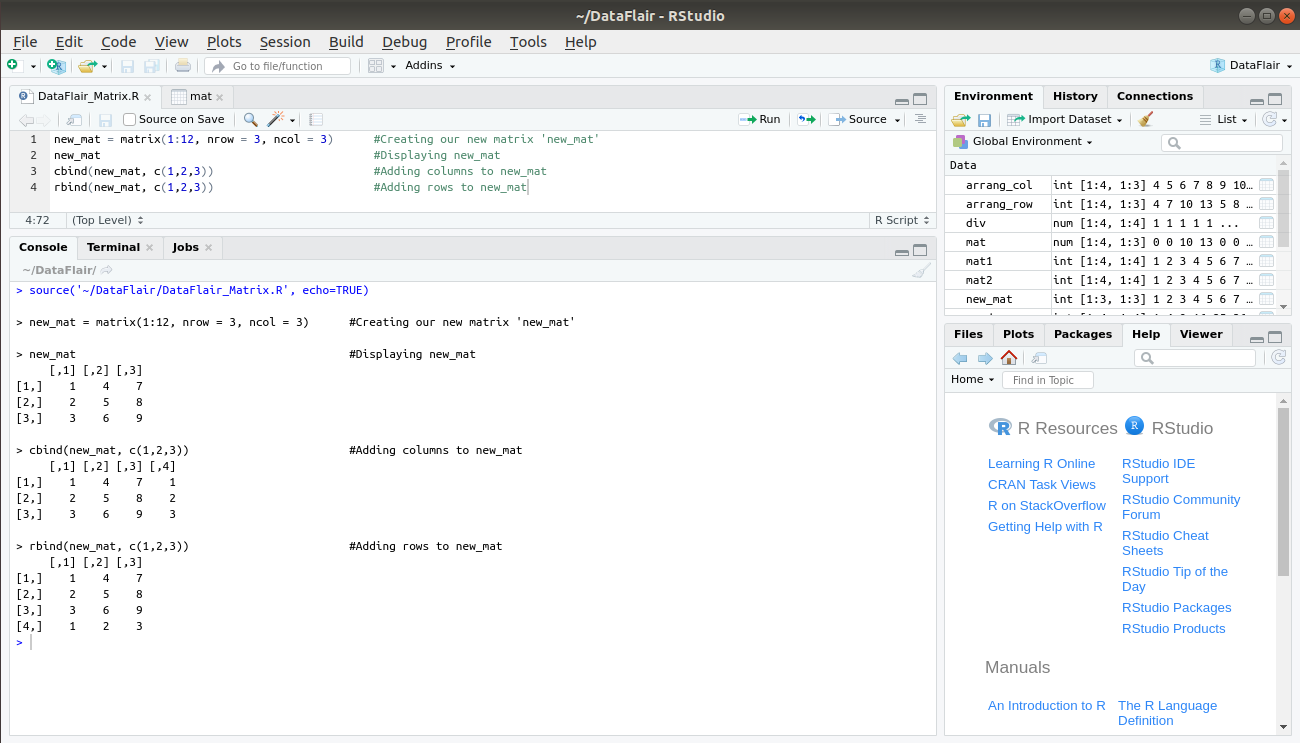
Another method of modifying an R matrix is through the addition of rows and columns using the rbind() and cbind() function respectively. For this, we create a new matrix ‘new_mat’ with 3 rows and 3 columns:
> new_mat = matrix(1:12, nrow = 3, ncol = 3)
> new_mat
Now, we will add a column to our matrix ‘new_mat’ using cbind() function as follows:
> cbind(new_mat, c(1,2,3))
We can also add a row using the rbind() function as follows:
> rbind(new_mat, c(1,2,3))
Output:
We can also modify the dimension of the matrix ‘new_mat’ using the dim() function as follows:
dim(new_mat) <- c(1,9)
new_mat
Output:
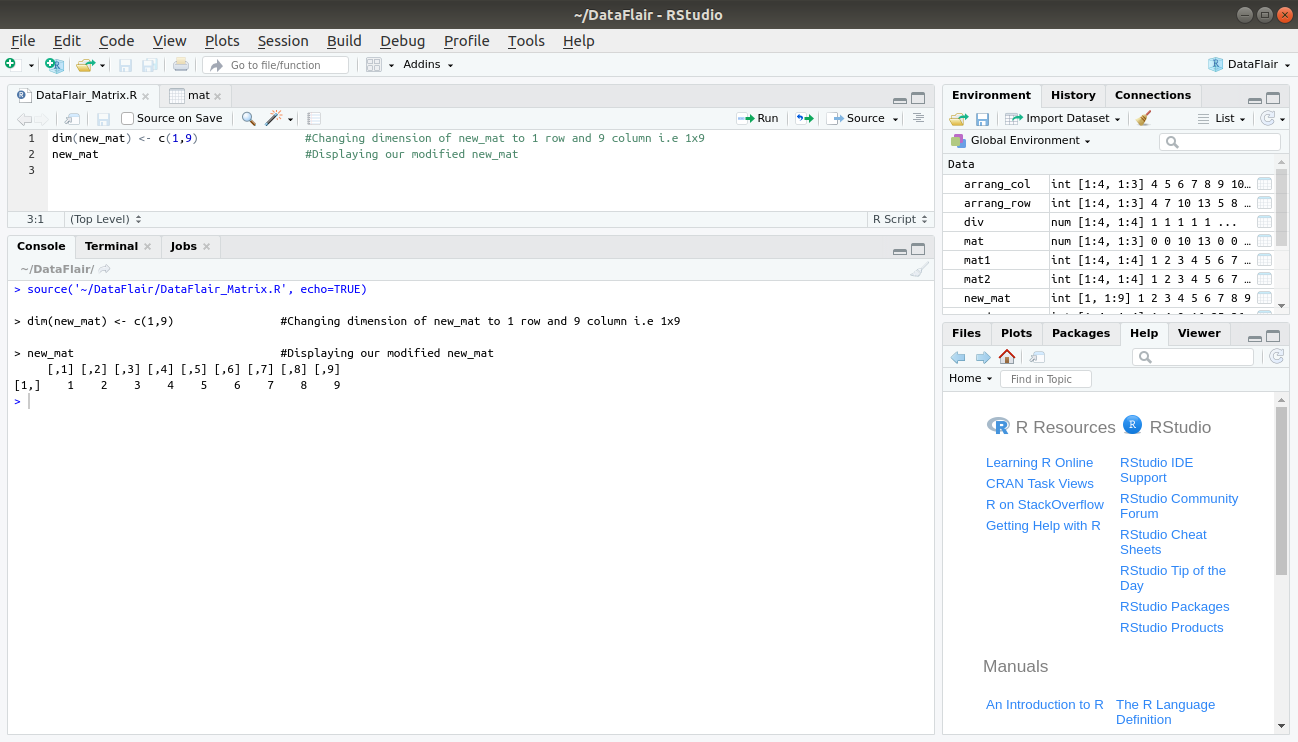
Here, we modified the original dimension of ‘new_mat’, which was 3 x 3 into 1 x 9.
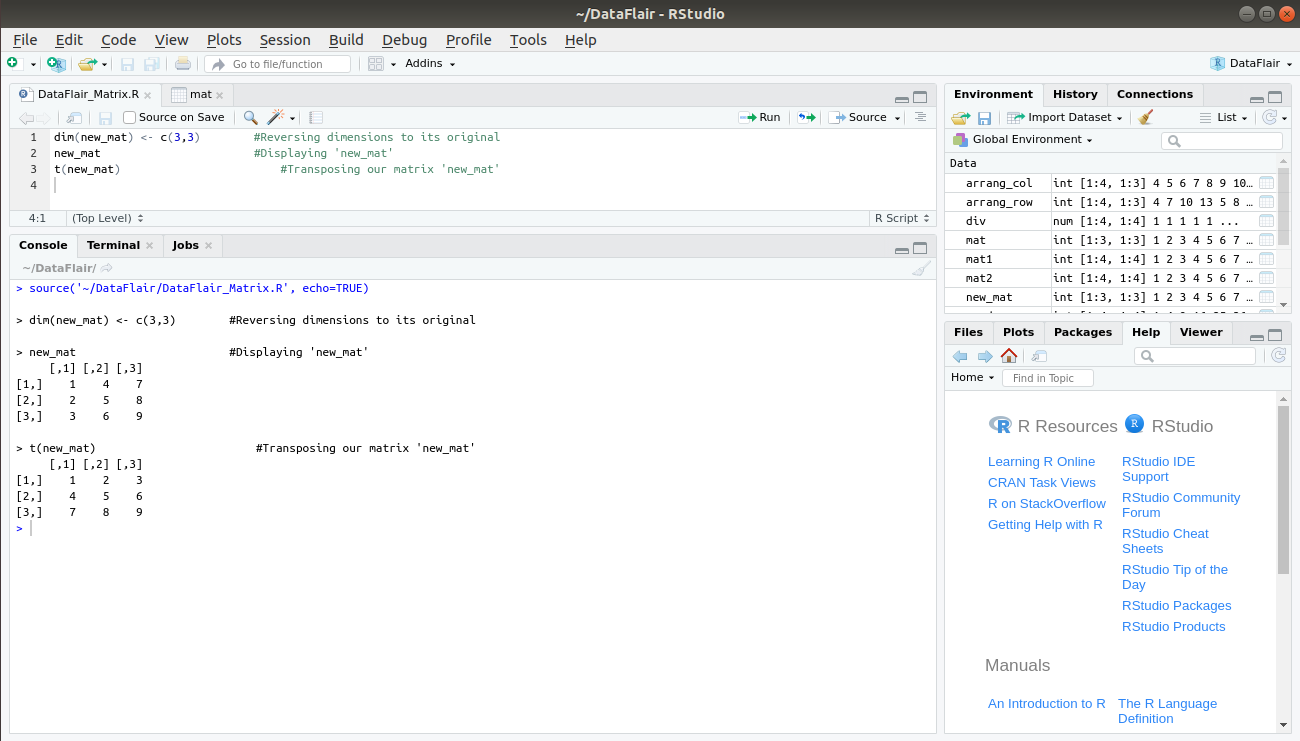
Since the dimensions of our new_mat matrix have been changed, we will reverse it to 3×3 using:
dim(new_mat) <- c(3,3)
We can also carry out the transpose of the matrix using the t() function:
> t(new_mat)
Output:
R Matrix Operations
There are several operations that we can perform on the R matrices to get desired results:
1. Addition (+)
In order to perform addition on matrices in R, we first create two matrices ‘mat1’ and ‘mat2’ with four rows and four columns as follows:
mat1 <- matrix(data = 1:8, nrow = 4, ncol = 4) #Creating our first matrix mat1
mat2 <- matrix(data = 1:16, nrow = 4, ncol = 4) #Creating our second matrix mat2
We will use these two matrices for all of our mathematical operations.
In order to perform addition on A and B, we simply use ‘+’ as follows:
sum <- mat1 + mat2 #Adding our two matrices
print(sum) #Printing the sum
Output:

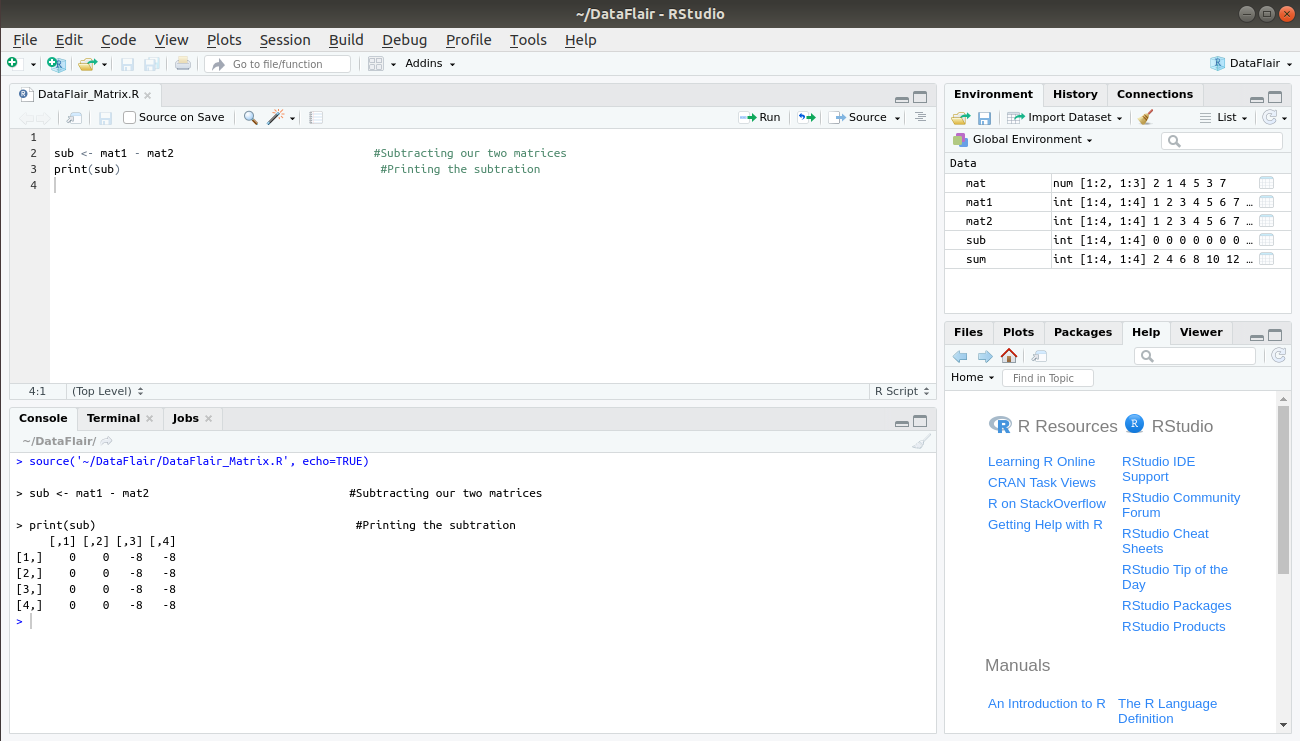
2. Subtraction (-)
In order to perform subtraction, we make use of ‘-’ as follows:
sub <- mat1 - mat2 #Adding our two matrices
print(sub) #Printing the sum
Output:
3. Matrix Multiplication (By Constant)
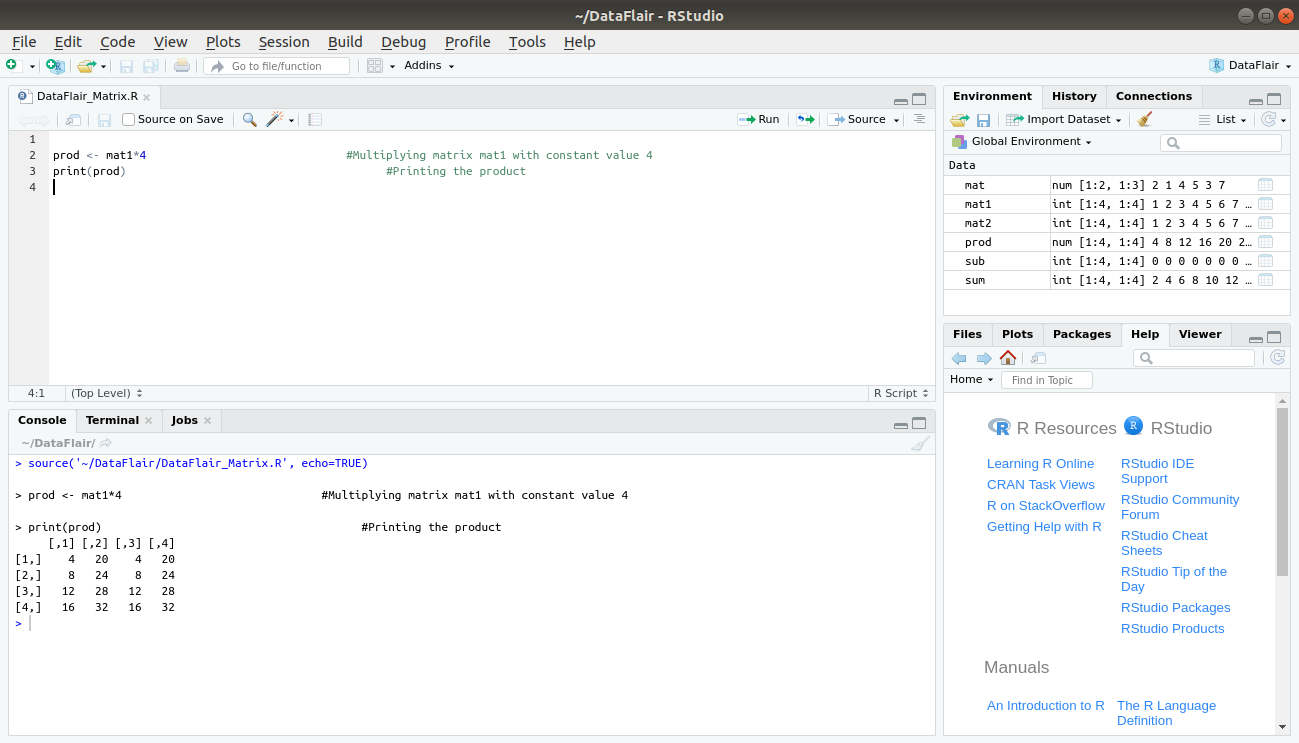
For multiplication with a constant, we simply take our mat1 matrix and multiply it with a constant. In this case, we multiply it by 4:
prod <- mat1*4 #Multiplying matrix mat1 with constant value 4
print(prod) #Printing the product
Output:
Uncover the Matrix Functions in R and master the concept
4. Multiplication (*)
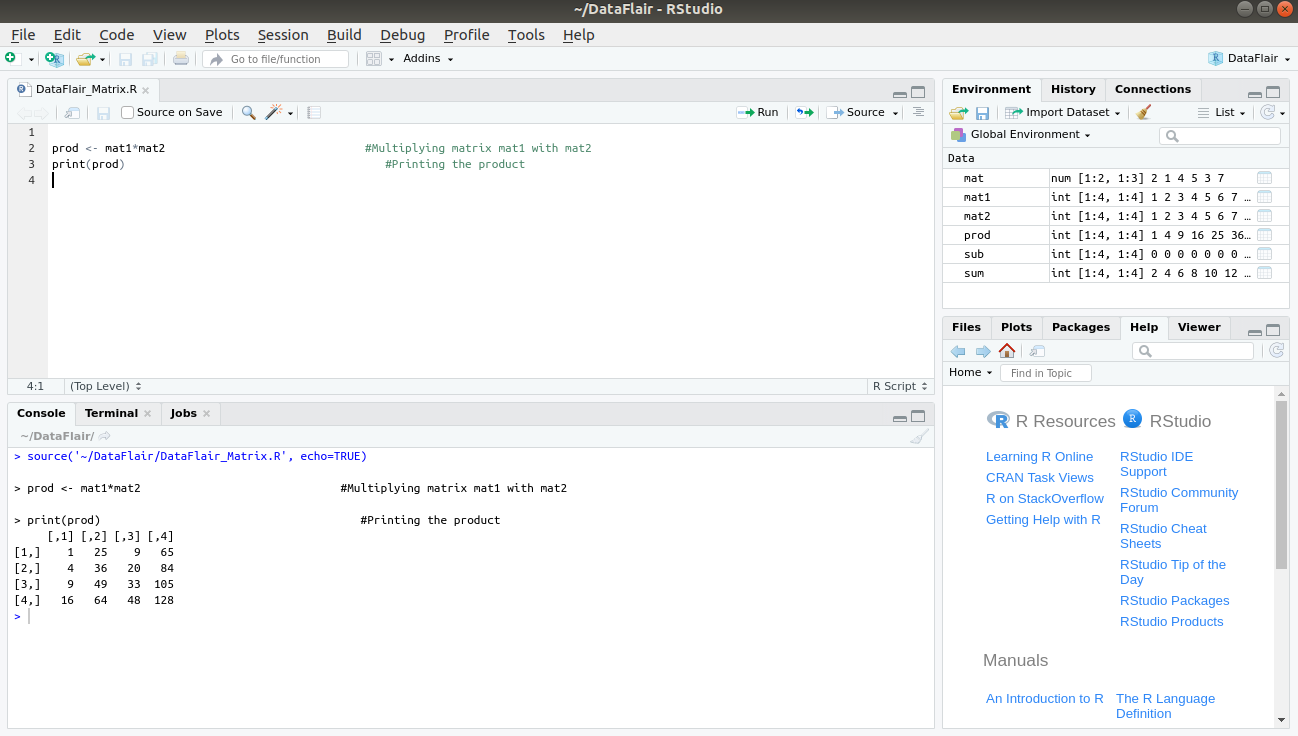
For the multiplication of two matrices, we multiply our matrices mat1 and mat2 as follows:
prod <- mat1*mat2 #Multiplying matrix mat1 with mat2
print(prod) #Printing the product
Output:
5. Division (/)
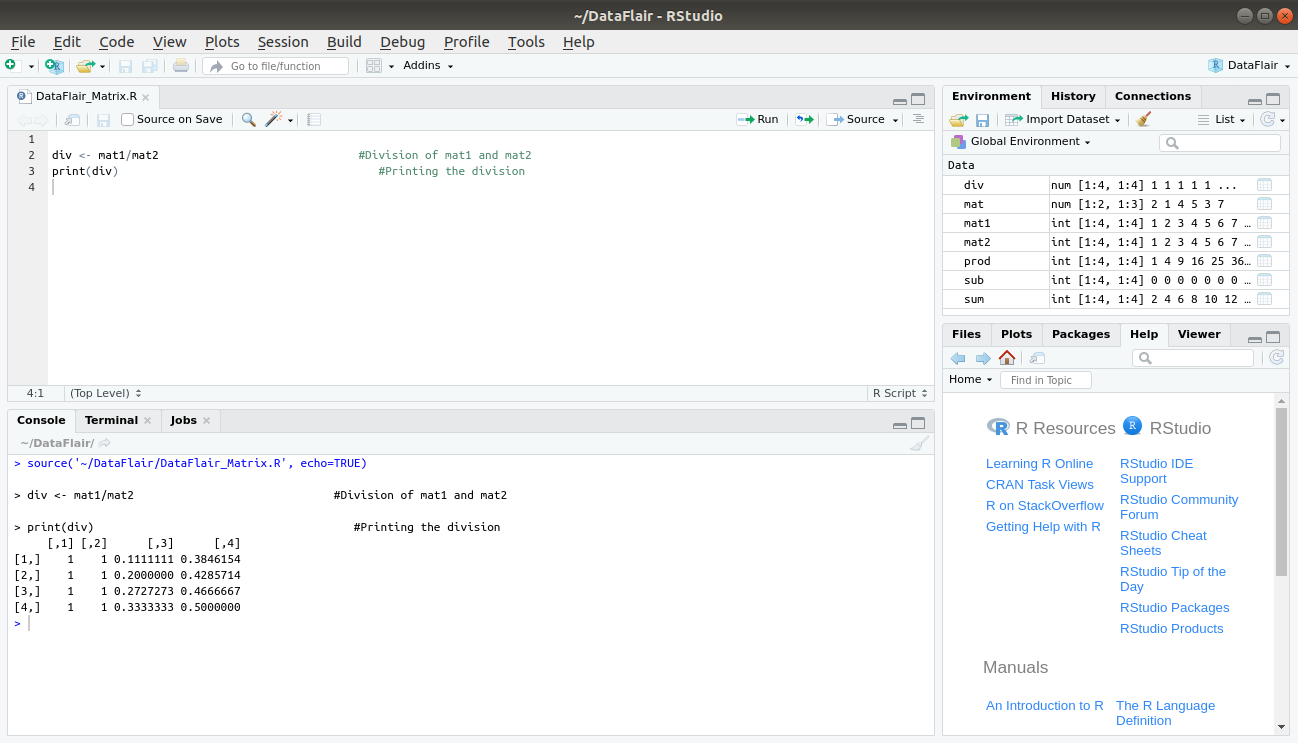
To perform division between our matrices, we use ‘/’ as follows:
div <- mat1/mat2 #Division of mat1 and mat2
print(div) #Printing the division
Output:
Applications of R Matrices
- In geology, matrices are used for taking surveys and also used for plotting graphs, statistics, and studies in different fields.
- To represent the real world data is like traits of people’s population. They are the best representation method for plotting common survey things.
- In robotics and automation, matrices are the best elements for the robot movements.
- Matrices are used in calculating the gross domestic products in Economics. Therefore, it helps in calculating the efficiency of goods and products.
- In computer-based application, matrices play a vital role in the projection of three-dimensional image into a two-dimensional screen, creating a realistic seeming motion.
- In physical related applications, matrices can be applied in the study of an electrical circuit.
Summary
We have studied in detail about R matrices. Moreover, we learned about the uses of matrices and operations which we perform on other matrices functions. So, I hope the above-mentioned information is sufficient enough to understand matrices and their uses.
It’s time to move further to our next article – R Array Function and Creation of Array
Any doubts related to R Matrix tutorial? Feel free to share in the comment section. See you!!
Did you like our efforts? If Yes, please give DataFlair 5 Stars on Google


I still don’t understand in what cases matrices might be more useful than vectors. It seems like you can multiply, divide, etc. vectors just as easily as matrices and matrices don’t necessarily put the values in any order that the vector doesn’t? So I don’t understand the purpose of making matrices out of vectors.
vector is one dimensional array and matrices are 2,,,,,
Sometimes you may have to wait further down the road to see how things that don’t make sense at the beginning might become clearer as you go deeper into the subject matter. I feel that they would not have created matrices if they had had no purpose. At this point, we probably don’t see them as being very useful, but I would suggest waiting until we learn a little bit more.