R Debug – Essential Principles and Functions that you can’t miss!
FREE Online Courses: Dive into Knowledge for Free. Learn More!
In this tutorial, we are going to explore a very interesting topic, that is, R debug. Here we will discuss about fundamental principles of R debugging and its different functions in R programming with the help of examples. We will also cover the debugging installed packages and error handling and recovery in detail.
So, let’s start the tutorial.
What is R Debug?
A grammatically correct program may give us incorrect results due to logical errors. In case, if such errors (i.e. bugs) occur, we need to find out why and where they occur so that you can fix them. The procedure to identify and fix bugs is called “debugging”.
There are a number of R debug functions, such as:
- traceback()
- debug()
- browser()
- trace()
- recover()
We will discuss the above-mentioned functions one-by-one in the later section of this article. Before that, let’s have a look at the core principles of debugging in R.
Wait a second! Have you checked – Bootstrapping in R Programming
Fundamental Principles of R Debugging
Programmers often find that they spend more time debugging a program than actually writing it. Therefore, good debugging skills are invaluable.
1. The Essence of Debugging
The principle of confirmation:
Fixing a bugging program is a process of confirming, one by one, that many things you believe to be true about code are actually true. When we find one of our assumptions is not true, we have found a clue to the location of a bug.
For example:
x <- y^2 + 3*g(z, 2)
w <- 28
if (w+q > 0) u <- 1 else v <- -10
2. Start Small
Stick to small simple test cases, at least at the beginning of the R debug process. Working with large data objects may make it harder to think about the problem. Of course, we should eventually test our code in large, complicated cases, but start small.
3. Debug in a Modular
Top-Down Manner:
Most professional software developers agree that code should be written in a modular manner. Our first-level code should not be long enough with much of it consisting of functions calls. And those functions should not be too lengthy and should call another function if necessary. This makes code easier at the writing stage and also for others to understand when the time comes for the code to be extended.
We should debug in a top-down manner. Suppose we have a set the debug status of our function f() and it contains this line.
For example:
Y <- g(x,8)
Presently, do not call debug (g). Execute the line and see if g() returns the value that we expect. If it does, then we have to just avoid the time-consuming process of single-stepping through g(). If g() returns the wrong value, then now is the time to call debug(g).
Take a deep insight into R Vector Functions
4. Antibugging
If we have a section of a code in which a variable x should be positive, then we can insert this line:
Stopifnot(x>0)
If there is a bug in the code earlier that renders x equals to, say -3, the call to stopifnot() will bring things right there, with an error message like this:
Error: x > 0 is not TRUE
R Debug Functions
Now we will discuss the above-mentioned functions for debugging in R:
1. traceback()
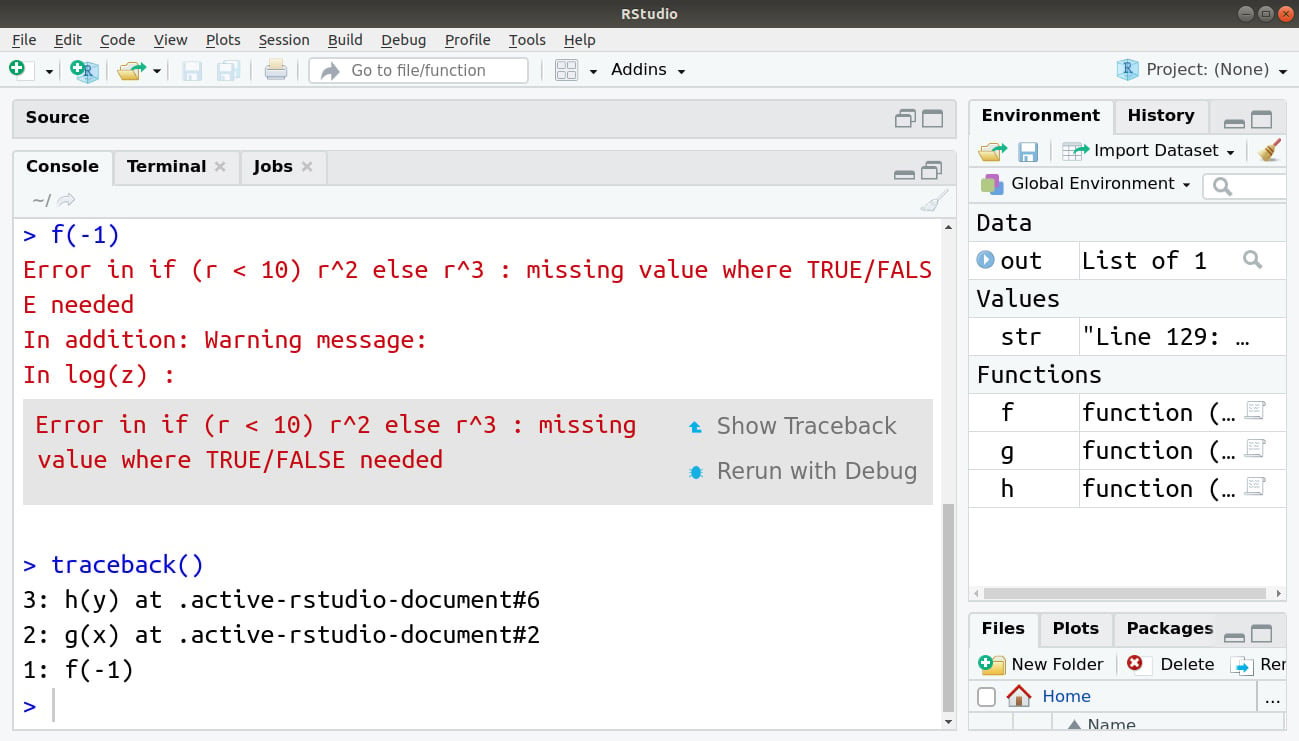
If our code has already crashed and we want to know where the offending line is, then try traceback(). This will (sometimes) show whereabouts in the code of the problem occurred.
When an R function fails, an error is printed to the screen. Immediately after the error, you can call traceback() to see in which function the error occurred. The traceback() function prints the list of functions that were called before the error occurred. The functions are printed in reverse order.
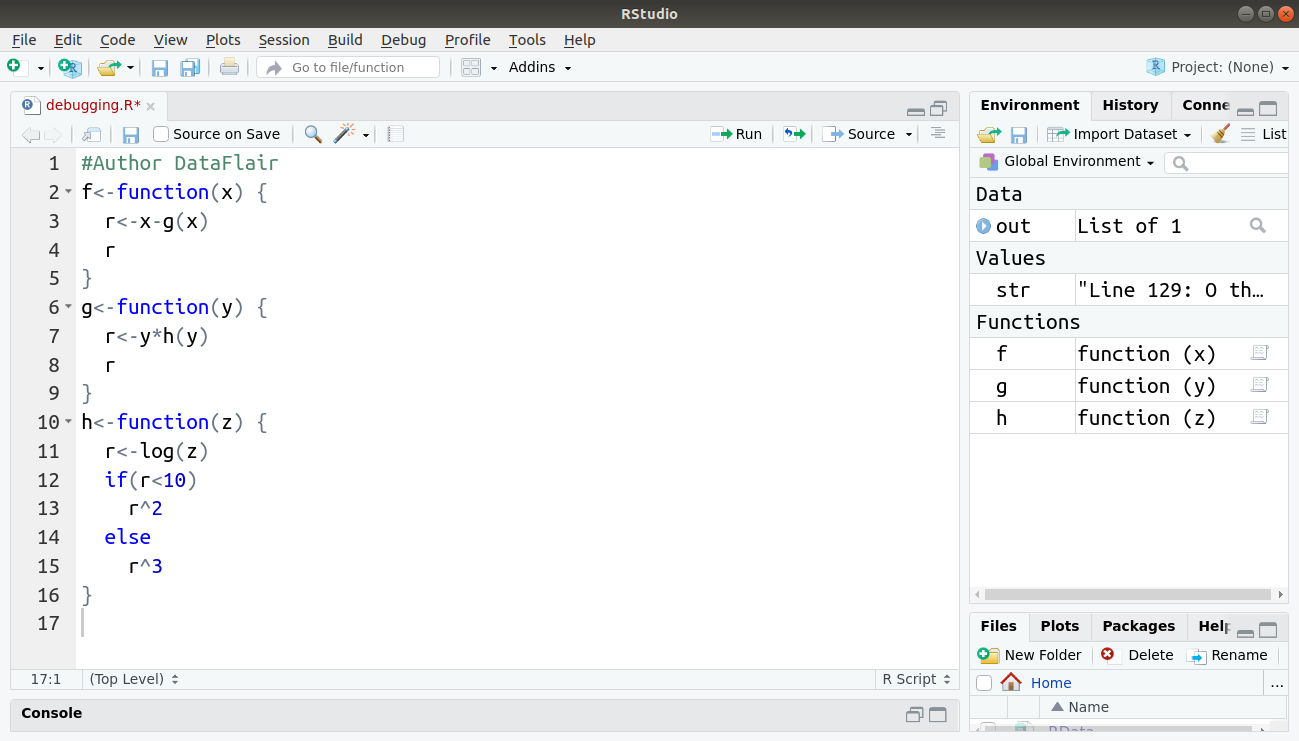
For example:
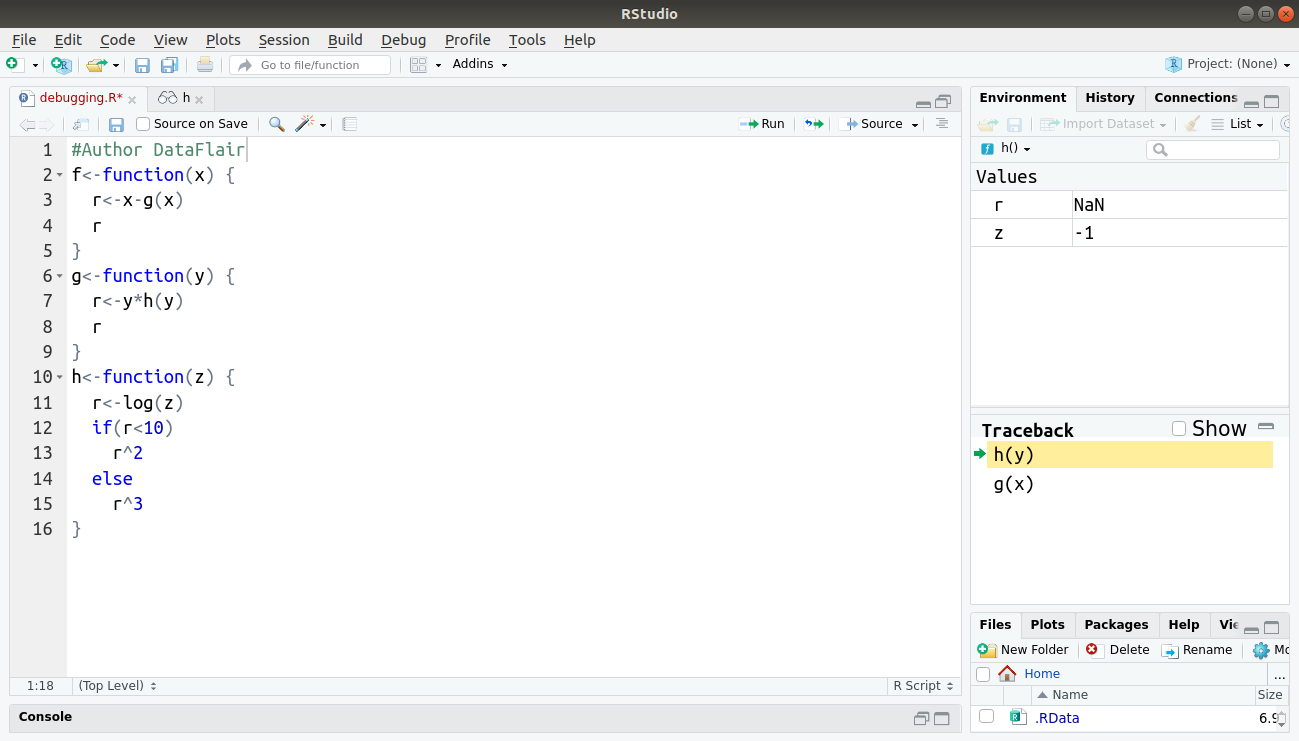
#Author DataFlair
f<-function(x) {
  r<-x-g(x)
  r
}
g<-function(y) {
  r<-y*h(y)
  r
}
h<-function(z) {
  r<-log(z)
  if(r<10)
    r^2
  else
    r^3
}
Code Display:
Output:
2. debug()
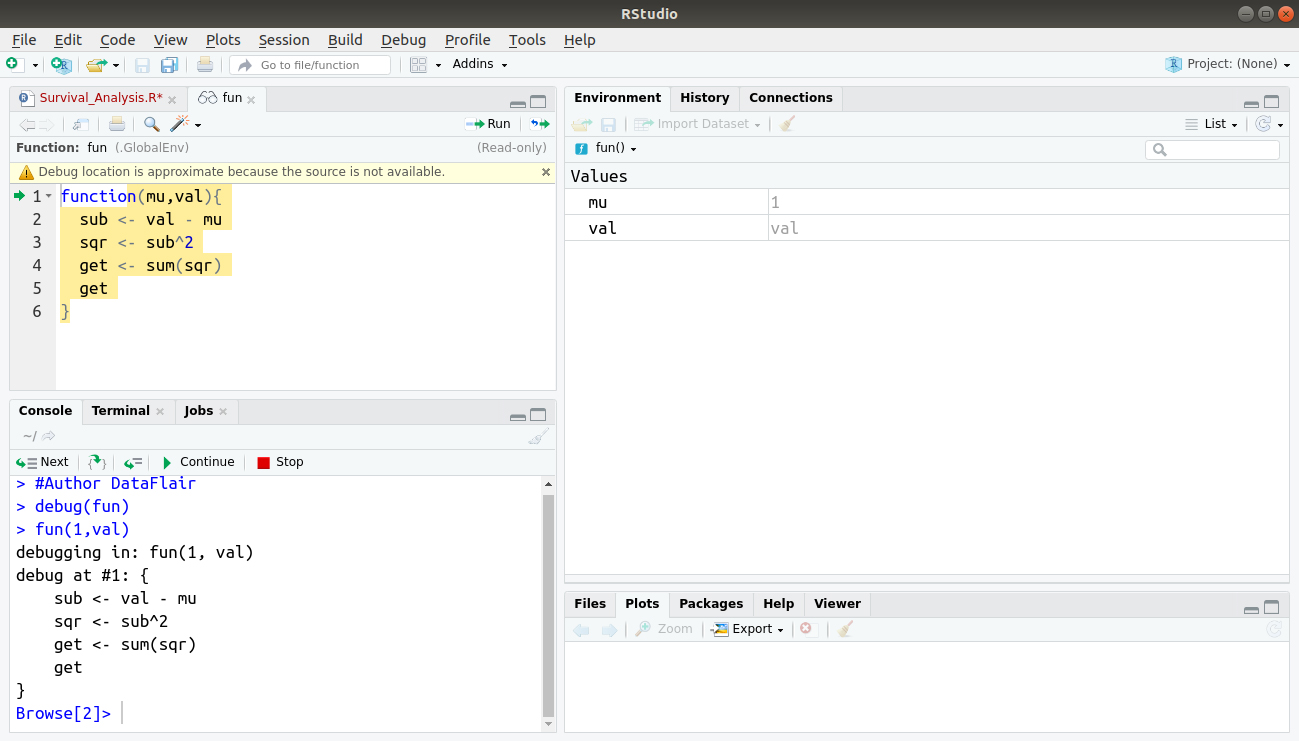
The function debug() in R allows the user to step through the execution of a function, line by line. At any point, we can print out values of variables or produce a graph of the results within the function. While debugging, we can simply type “c” to continue to the end of the current section of code. traceback() does not tell us where the error occurred in the function. In order to know which line causes the error, we will have to step through the function using debug().
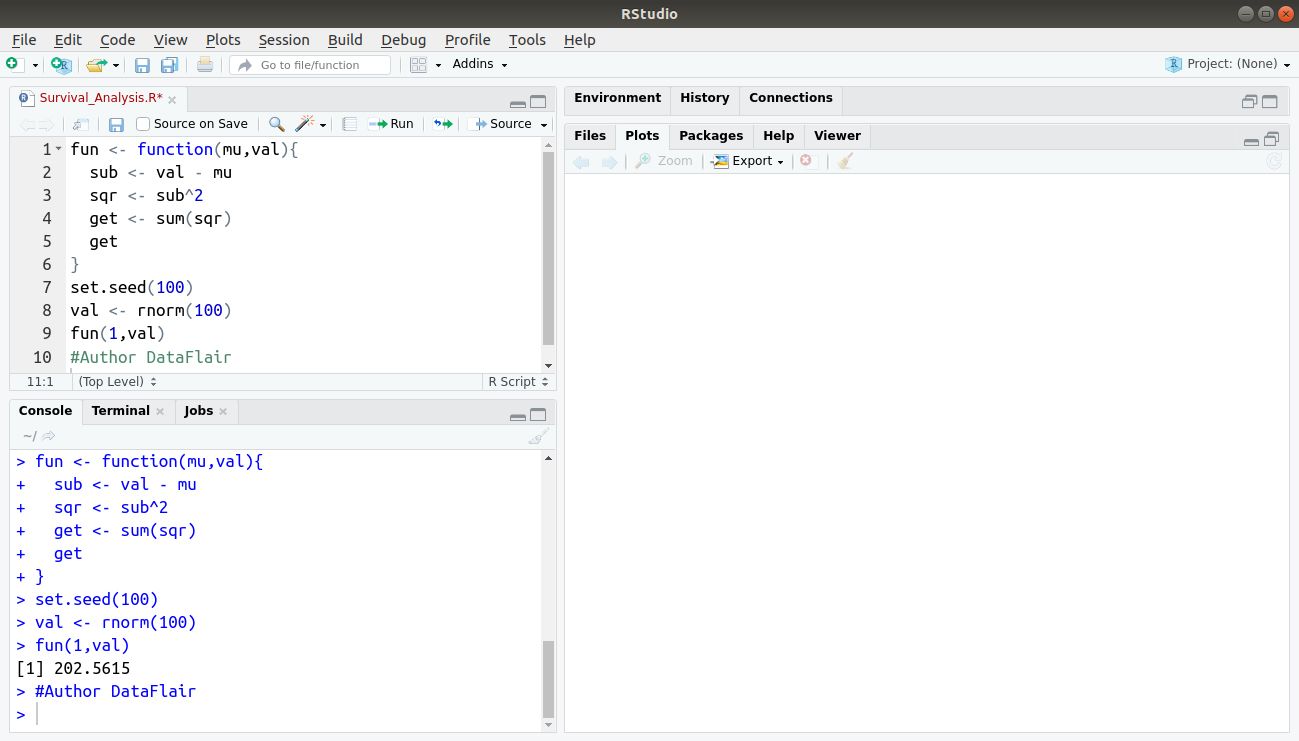
For example:
fun <- function(mu,val){
  sub <- val - mu
  sqr <- sub^2
  get <- sum(sqr)
  get
}
set.seed(100)
val <- rnorm(100)
fun(1,val)
#Author DataFlair
Output:
> #Author DataFlair
> debug(fun)
> fun(1,val)
Output:
After you see the “Browse[1]>” prompt, you can do different things:
- Typing n executes the current line and prints the next one;
- By typing Q, we can quit the debugging;
- Typing ‘where’ tells where you are in the function call stack;
- By typing ls(), we can list all objects in the local environment.
Typing an object name or print(<object name>) tells us current value of the object. If your object has name n, c or Q, we have to use print() to see their values.
Do you know about Object Oriented Programming in R
3. browser()
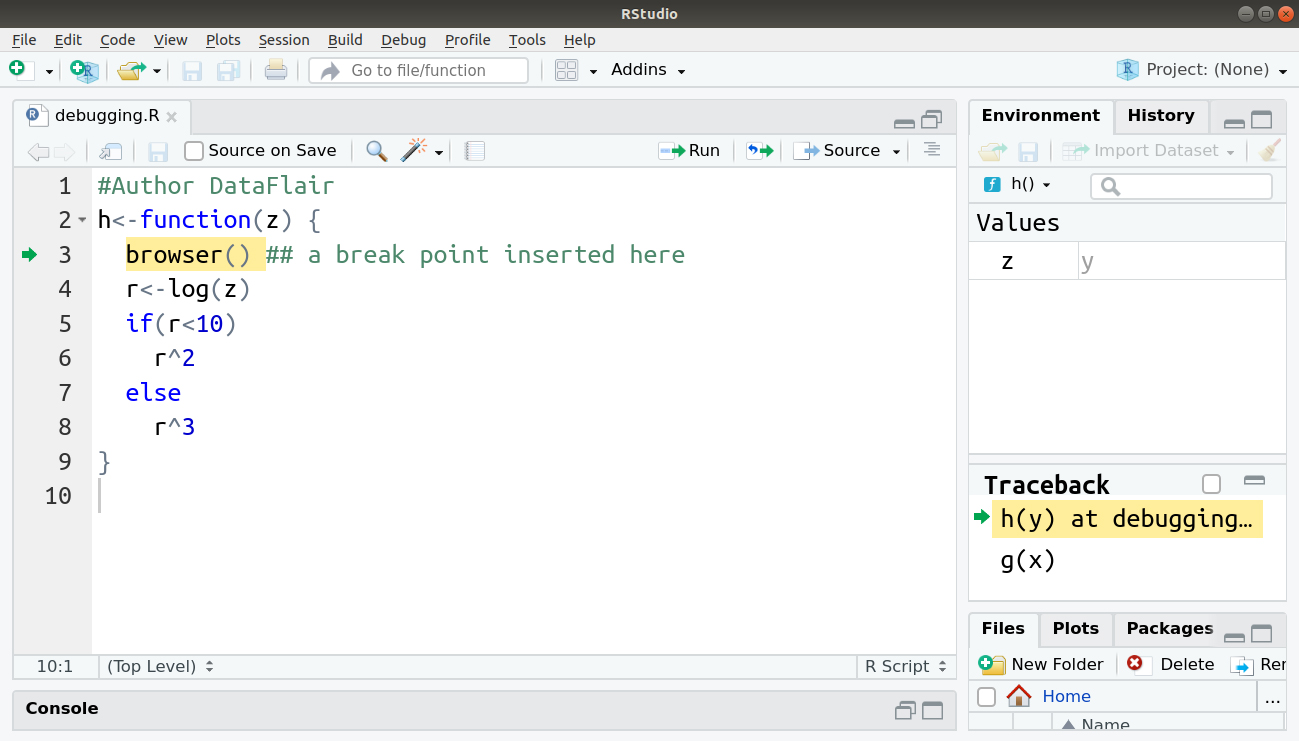
The R debug function browser() stops the execution of a function until the user allows it to continue. This is useful if we don’t want to step through the complete code, line-by-line, but we want it to stop at a certain point so we can check out what is going on. Inserting a call to the browser() in a function will pause the execution of a function at the point where the browser() is called. Similar to using debug() except we can control where execution gets paused.
For example:
#Author DataFlair
h<-function(z) {
  browser() ## a break point inserted here
  r<-log(z)
  if(r<10)
    r^2
  else
    r^3
}
Code Display:
Output:
4. trace()
Calling trace() on a function allows the user to insert bits of code into a function. The syntax for R debug function trace() is a bit strange for first-time users. It might be better off using debug().
For example:
#Author DataFlair
f<-function(x) {
  r<-x-g(x)
  r
}
g<-function(y) {
  r<-y*h(y)
  r
}
h<-function(z) {
  r<-log(z)
  if(r<10)
    r^2
  else
    r^3
}
Code Display:
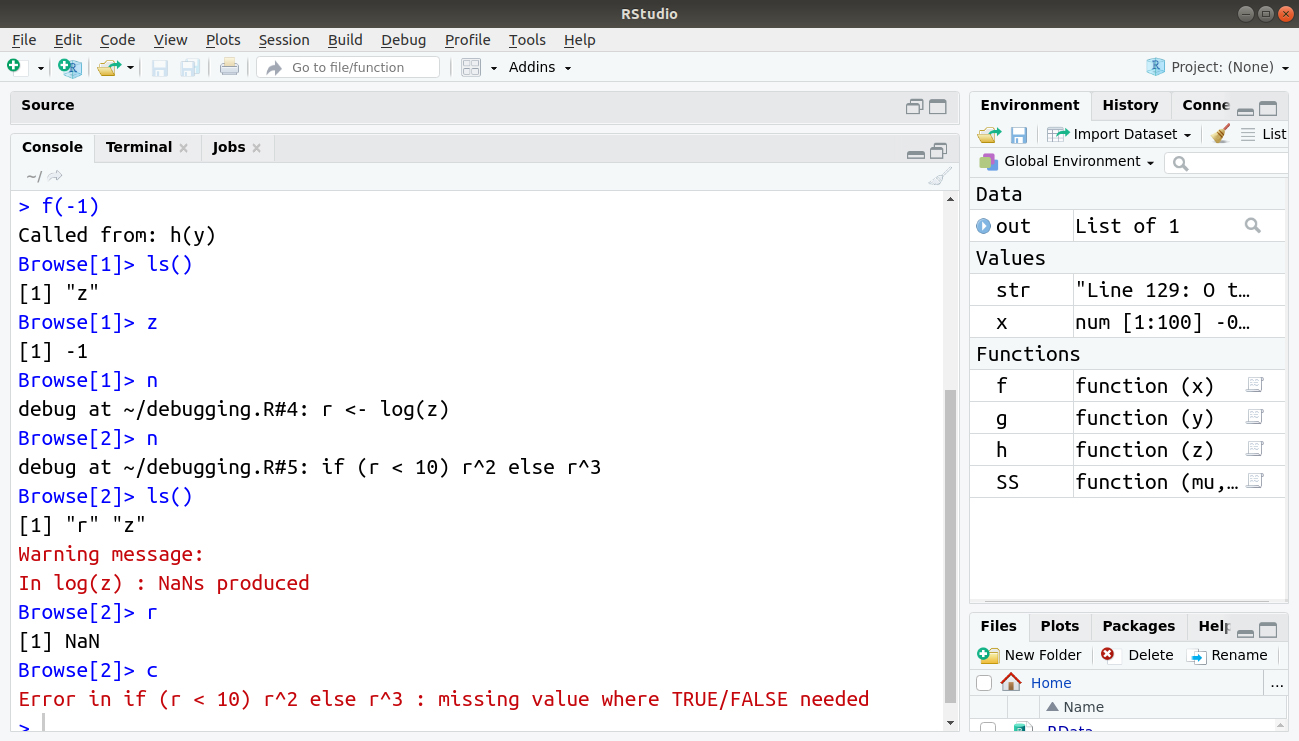
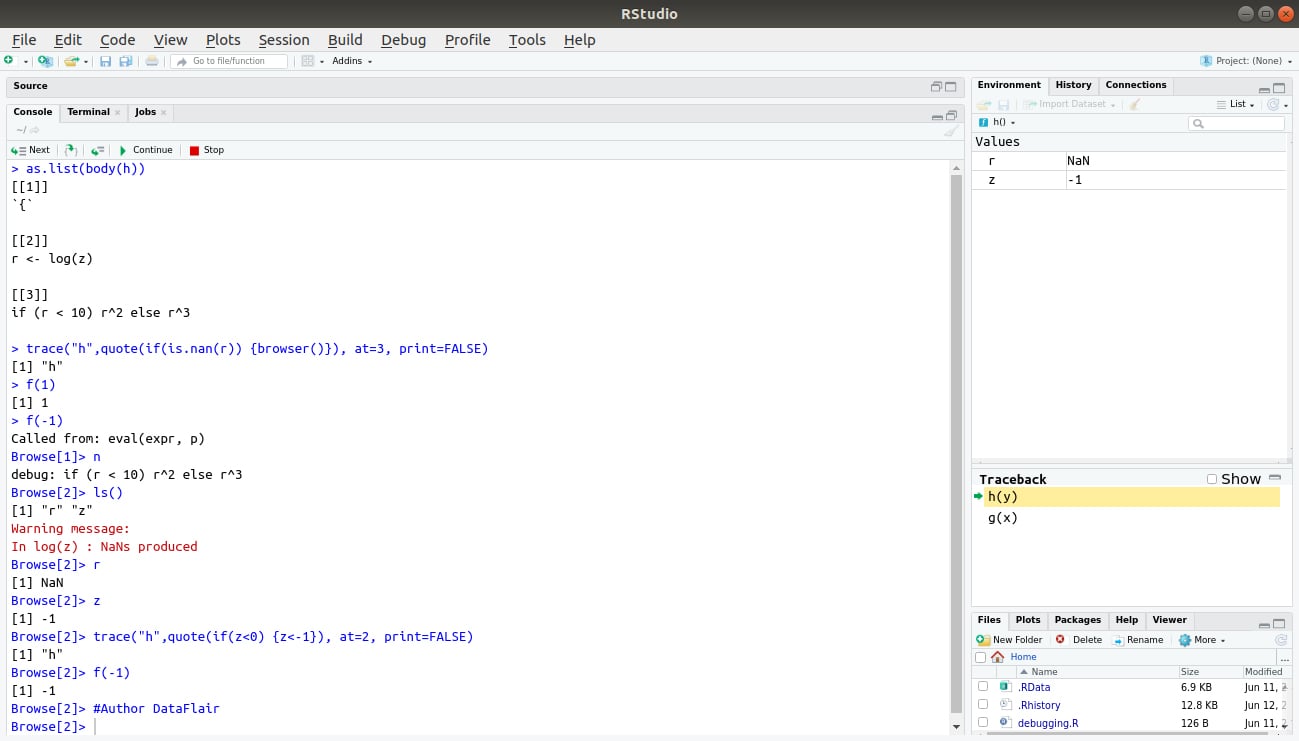
In the console, we type the following commands:
> as.list(body(h))
> trace("h",quote(if(is.nan(r)) {browser()}), at=3, print=FALSE)
> f(1)
> f(-1)
Browse[1]> n
Browse[2]> ls()
Warning message:
In log(z) : NaNs produced
Browse[2]> r
Browse[2]> z
Browse[2]> trace("h",quote(if(z<0) {z<-1}), at=2, print=FALSE)
Browse[2]> f(-1)
Output:
5. recover()
When we are debugging a function, recover() allows us to check variables in upper-level functions.
By typing a number in the selection, we are navigated to the function on the call stack and positioned in the browser environment.
- We can use recover() as an error handler, set using options() (e.g.options(error=recover)).
- When a function throws an error, execution is halted at the point of failure. We can browse the function calls and examine the environment to find the source of the problem.
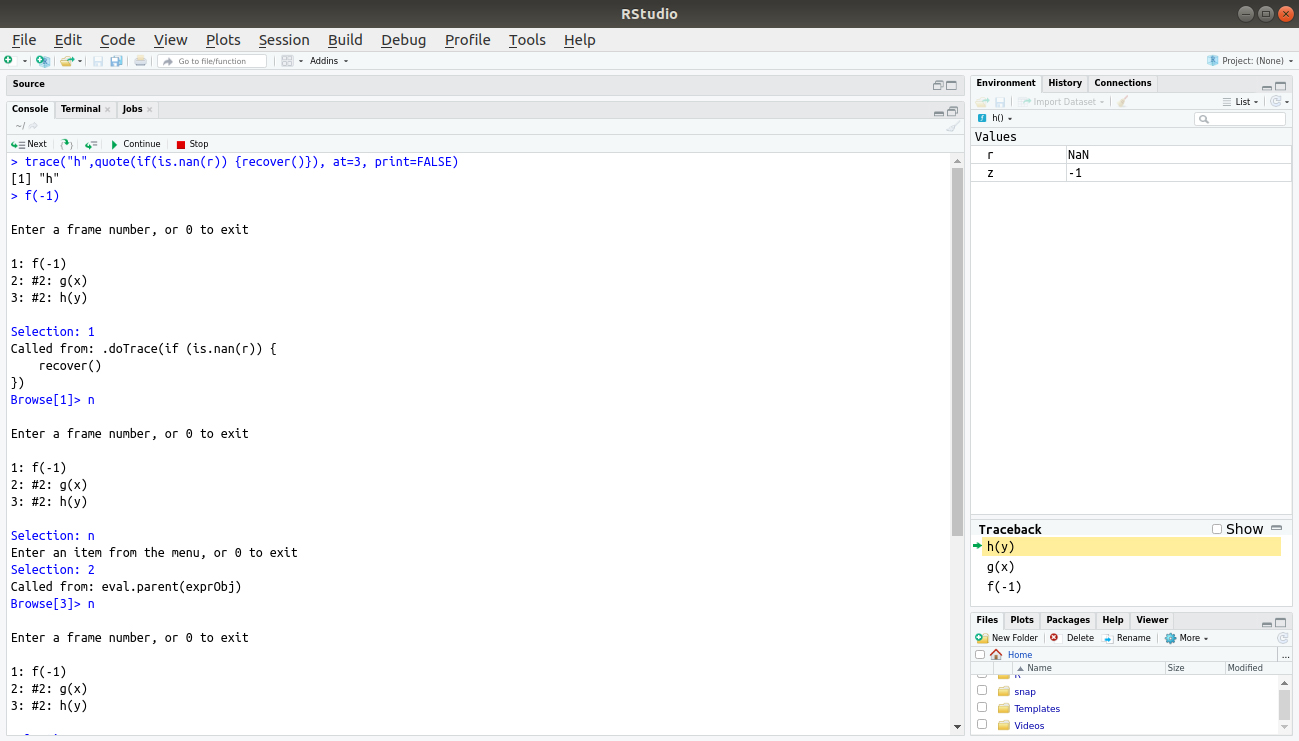
In recover, we use the previous f(), g() and h() functions for debugging.
> trace("h",quote(if(is.nan(r)) {recover()}), at=3, print=FALSE)
> f(-1)

Selection: 1
Browse[1]> n

Selection: n
Selection: 2
Browse[3]> n

Selection: n
Selection: 3
Browse[5]> n

Selection: n
Selection: 0
Browse[4]>
Output:
By typing a number in the selection, we are navigated to the function on the call stack and we are positioned in the browser environment.
Grab a complete tutorial on R Recursive Function
Debugging Installed Packages in R
There are possibilities of an error stemming from an installed R package. Some of the various ways to solve this problem are:
- Setting options(error = recover) and then going line by line through the code using n.
- When facing complicated problems, you can have a copy of the function code with you. Entering function name in R console will print out function code that can be copied into the text editor. You can then edit this, load it into the global workspace and then perform debugging.
- If issues are still not resolved, then download the source code. You can also use the devtools package and the install(), load_all() functions to make the process quicker.
Error Handling & Recovery in R
Exception or Error handling is a process of responding to anomalous occurrences in the code that disrupt the flow of the code. In general, the scope for the exception handlers begins with try and ends with a catch. R provides try() and trycatch() function for the same.
The try() function is a wrapper function for trycatch() which prints the error and then continues. On the other hand, trycatch() gives you the control of the error function and also optionally, continues the process of the function.
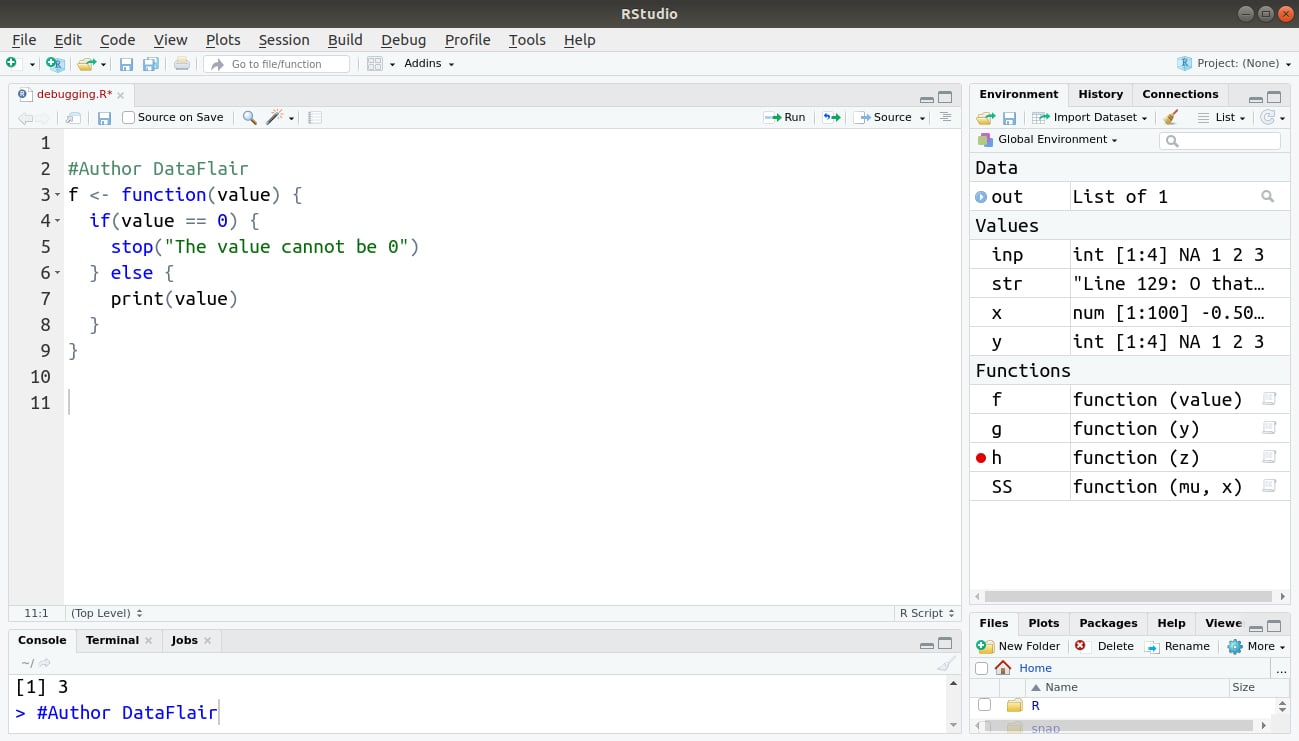
#Author DataFlair
f <- function(value) {
  if(value == 0) {
    stop("The value cannot be 0")
  } else {
    print(value)

}
Code Display:
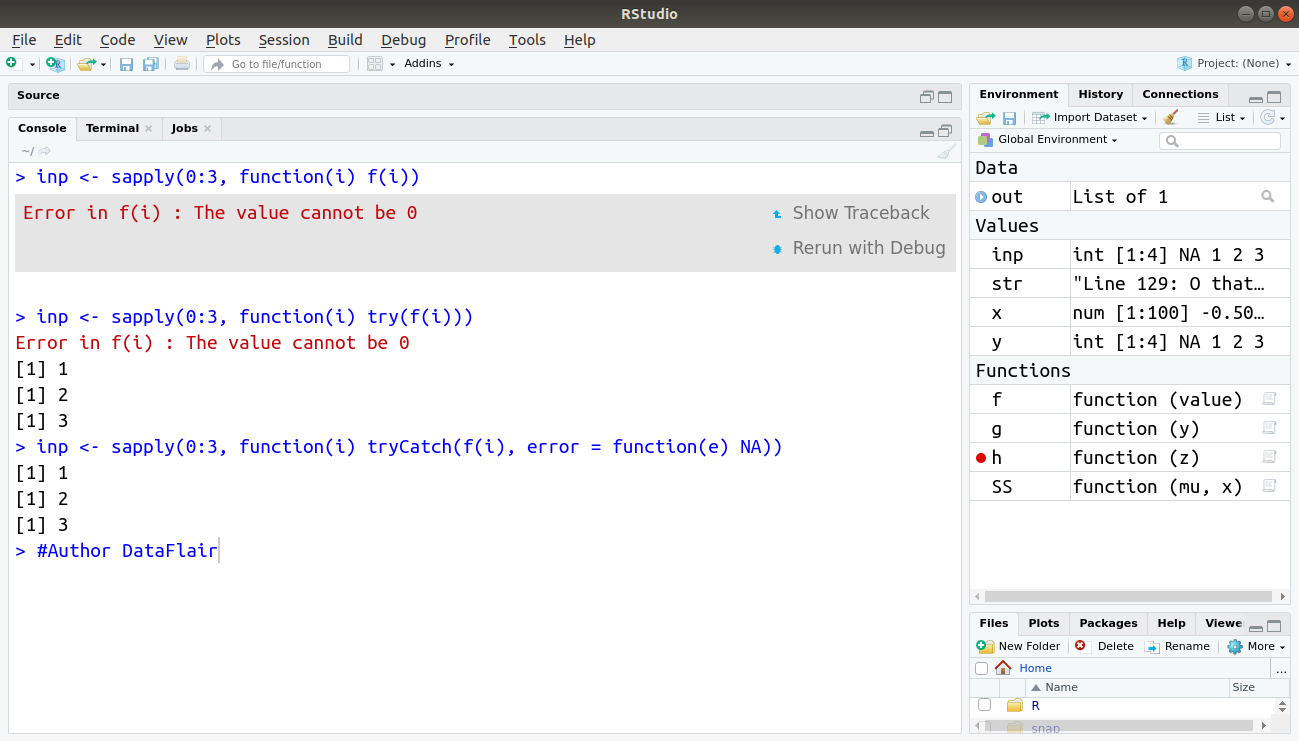
> inp <- sapply(0:3, function(i) f(i))
> inp <- sapply(0:3, function(i) try(f(i)))
> inp <- sapply(0:3, function(i) tryCatch(f(i), error = function(e) NA))
Output:
Summary
In this tutorial of R debug functions, we understood the concept of debugging in R along with their functions and examples. We also explored the debugging installed packages and error handling & recovery in R programming.
Take a deep dive into Input-Output Features in R Programming
If you have any query related to debugging in R, feel free to share with us. Hope we will help you out.
You give me 15 seconds I promise you best tutorials
Please share your happy experience on Google


I am performing a rainfall trend analysis using Mann-Kendall test with the help of R-software. I am a tenderfoot to this software and this is the first time to try this. Although I have managed to load and then plot the data, when I tried to perform the Mann-Kendall test, I was getting this particular error every time which is really difficult to debug. Can anyone please help me solve this??
> require(Kendall)
Loading required package: Kendall
> MannKendall(data)
Error in Kendall(1:length(x), x) : length(x)<3