Shared Preference in Android – Example and Implementation
Expert-led Courses: Transform Your Career – Enroll Now
Welcome back to Android DataFlair series. In this article, we’ll read about Preferences and Shared preference in Android. As android provides us with many ways to store data, One of the best ways of storing data provided by Android is Preferences. The reason is that it saves the data in the form of a Key-Value pair.
So let’s start learning this interesting concept.

Preferences in Android
First of all, we’ll begin with Android Preferences and then we’ll move towards Android Shared preferences. Preferences are basically used to keep track of the application along with the user preferences. A preference is a simple key-value pair with a specific data type for the value. The task of preference key is to uniquely identify a preference and on the other hand values store the preference values.
To understand it in a better way:
Suppose you want to store the Mobile Number of a user. For that you can consider choosing the data type of Integer. The key name can be “MobileNumber”. And the Value can be in Integers values, such as “7894561230” or “0278-471220”.
For preferences, The data types that can be chosen are as follows:
- Boolean Types
- Integer Types
- Float Types
- String Types
- Long Types
APIs for accessing Preferences in Android
There are three APIs from which one can be chosen to get access to the preferences. These three APIs are:
- getPreference(): It is used within the Activity, to access activity-specific preference.
- getSharedPreference(): It is used from the Activity or some other application context. Its use is to access application-level preferences.
- getDefaultSharedPreference(): It is used on the PreferenceManager, to get the shared preferences that goes with the overall Android preference framework.
Shared Preference in Android
Before getting started with it, let us first understand its meaning in a better way. So it comes with two words, Shared and Preferences. Here, Share means distributing the data and Preferences here means important or something that is preferable.
To use it, we need to call the method getSharedPreferences() that returns a SharedPreference instance pointing to the file containing the values of preferences. This is done as follows:
SharedPreferences sharedpreference_name = getSharedPreferences(String name, MODE_PRIVATE);
In this method, we’ve passed two parameters: the first parameter is the key name of the SharedPreference and the second parameter is the MODE. The mode by default is Private. Other than private mode, there are six modes in total that are as below:
1. MODE_APPEND
It appends new preferences in the pre-existing preferences.
2. MODE_ENABLE_WRITE_AHEAD _LOGGING
It enables write ahead logging by default, if it is set true. It is a database flag.
3. MODE_WORLD_READABLE
This mode sets read mode for other applications to read the preferences.
4. MODE_WORLD_WRITABLE
This mode sets write mode for other applications to write the preferences.
5. MODE_MULTI_PROCESS
It checks for modifications even if the preference instance is already loaded.
6. MODE_PRIVATE
It is the default mode. In this mode, we can access a file only by the calling application.
Android Shared Preferences methods
Let us now see the various methods in shared preferences in android:
- contains( String key): It checks if the preference contains a preference or not.
- edit(): It creates a new Editor for preferences, to enable modifications to the data and commit changes back to the SharedPreferences atomically.
- getAll(): It retrieves all the values from the preferences.
- getBoolean(String key, boolean defValue): It retrieves a boolean value from the preferences.
- getFloat(String key, float defValue): It retrieves a float value from the preferences.
- getInt(String key, int defValue): It retrieves an int value from the preferences.
- getLong(String key, long defValue): It retrieves a long value from the preferences.
- getString(String key, String defValue): It retrieves a String value from the preferences.
- getStringSet(String key, Set defValue): It retrieves a Set of String values from the preferences.
Differences between Preferences and Shared Preferences in Android
Let us now see the comparison between Android Preference and Shared Preference:
| Preferences | Shared Preferences |
| Preference is a package that provides classes for preferences management. | Shared preferences stores data values in the XML file. |
| This data is stored persistently in implementation- dependent backing store. | Android maintains these XML files for the users. |
| The data in preferences doesn’t change when the device reboots. | The data is not encrypted & changes as the device restarts. |
| Preferences are good for Sensitive Data. | Shared preference is not preferable for Sensitive Data. |
| Preferences pref = getPreferenceScreen().getPreference(); | SharedPreferences sp =getPreferenceScreen().getSharedPreference(); |
Shared preference in Android Step by Step Implementation
Now we’ll implement Shared Preferences using the following steps:
1. First of all, we’ll create a new project and name it.
2. Now we’ll write the following code in the activity_main.xml file.
<?xml version="1.0" encoding="utf-8"?>
<LinearLayout xmlns:android="http://schemas.android.com/apk/res/android"
   android:layout_width="match_parent"
   android:layout_height="match_parent"
   android:orientation="vertical">

   <TextView
       android:id="@+id/textView"
       android:layout_width="wrap_content"
       android:layout_height="wrap_content"
       android:layout_centerHorizontal="true"
       android:layout_marginLeft="90dp"
       android:layout_marginTop="30dp"
       android:text="DataFlair "
       android:textColor="#00574B"
       android:textSize="50dp"
       android:textStyle="bold" />

   <TextView
       android:id="@+id/text"
       android:layout_width="wrap_content"
       android:layout_height="wrap_content"
       android:layout_marginLeft="100dp"
       android:layout_marginTop="80dp"
       android:text="Enter your UserName" />

   <EditText
       android:id="@+id/Name"
       android:layout_width="wrap_content"
       android:layout_height="wrap_content"
       android:layout_marginLeft="100dp"
       android:ems="10" />

   <TextView
       android:id="@+id/text2"
       android:layout_width="wrap_content"
       android:layout_height="wrap_content"
       android:layout_marginLeft="100dp"
       android:text="Enter your Password" />

   <EditText
       android:id="@+id/password"
       android:layout_width="wrap_content"
       android:layout_height="wrap_content"
       android:layout_marginLeft="100dp"
       android:ems="10"
       android:inputType="textPassword" />

   <Button
       android:id="@+id/Login"
       android:layout_width="wrap_content"
       android:layout_height="wrap_content"
       android:layout_marginLeft="100dp"
       android:text="Login" />
</LinearLayout>
3. Now, write the following code in the MainActivity.java file.
package com.dataflair.mysharedpreference;
import android.content.Intent;
import android.content.SharedPreferences;
import android.os.Bundle;
import android.view.View;
import android.widget.Button;
import android.widget.EditText;
import android.widget.Toast;
import androidx.appcompat.app.AppCompatActivity;
public class MainActivity extends AppCompatActivity {
EditText username, pass;
Button Login_Button;
SharedPreferences Shared_pref;
Intent intent;
@Override
protected void onCreate(Bundle savedInstanceState) {
super.onCreate(savedInstanceState);
setContentView(R.layout.activity_main);
username = findViewById(R.id.Name);
pass = findViewById(R.id.password);
Login_Button = findViewById(R.id.Login);
Shared_pref = getSharedPreferences("details", MODE_PRIVATE);
intent = new Intent(MainActivity.this, secondActivity.class);
if (Shared_pref.contains("username") && Shared_pref.contains("password")) {
startActivity(intent);
}
Login_Button.setOnClickListener(new View.OnClickListener() {
@Override
public void onClick(View v) {
String username = MainActivity.this.username.getText().toString();
String password = pass.getText().toString();
if (username.equals("Akshita Shrivastava") && password.equals("00000000")) {
SharedPreferences.Editor editor = Shared_pref.edit();
editor.putString("username", username);
editor.putString("password", password);
editor.commit();
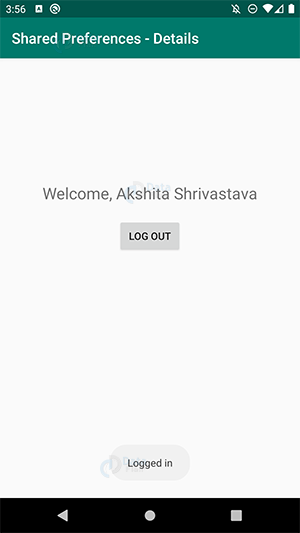
Toast.makeText(getApplicationContext(), "Logged in", Toast.LENGTH_SHORT).show();
startActivity(intent);
} else {
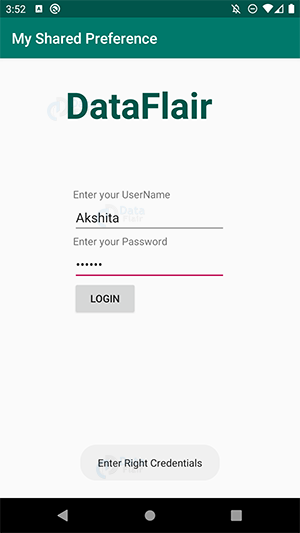
Toast.makeText(getApplicationContext(), "Enter Right Credentials", Toast.LENGTH_SHORT).show();
}
}
});
}
}
4. Now create a new layout file second.xml in the resource/ layout/. And write the following code there:
<?xml version="1.0" encoding="utf-8"?>
<LinearLayout xmlns:android="http://schemas.android.com/apk/res/android"
   android:layout_width="match_parent"
   android:layout_height="match_parent"
   android:orientation="vertical">

   <TextView
       android:id="@+id/res_text"
       android:layout_width="wrap_content"
       android:layout_height="wrap_content"
       android:layout_gravity="center"
       android:layout_marginTop="170dp"
       android:textSize="22dp" />

   <Button
       android:id="@+id/LogOut"
       android:layout_width="wrap_content"
       android:layout_height="wrap_content"
       android:layout_gravity="center"
       android:layout_marginTop="25dp"
       android:text="Log Out" />
</LinearLayout>
5. Create a new java file secondActivity.java in the same folder as that of MainActivity.java. Write the following code in the secondActivity.java file:
package com.dataflair.mysharedpreference;

import android.content.Intent;
import android.content.SharedPreferences;
import android.os.Bundle;
import android.view.View;
import android.widget.Button;
import android.widget.TextView;

import androidx.appcompat.app.AppCompatActivity;

public class secondActivity extends AppCompatActivity {
   SharedPreferences newPreference;
   Intent newIntent;

   @Override
   protected void onCreate(Bundle savedInstanceState) {
       super.onCreate(savedInstanceState);
       setContentView(R.layout.second);
       TextView result = findViewById(R.id.res_text);
       Button LogOut_btn = findViewById(R.id.LogOut);
       newPreference = getSharedPreferences("user_details", MODE_PRIVATE);
       newIntent = new Intent(secondActivity.this, MainActivity.class);
       result.setText("Welcome, " + newPreference.getString("username", null));
       LogOut_btn.setOnClickListener(new View.OnClickListener() {
           @Override
           public void onClick(View v) {
               SharedPreferences.Editor edit = newPreference.edit();
               edit.clear();
               edit.commit();
               startActivity(newIntent);
           }
       });
   }
}
6. Write the following in the Manifest.xml File:
<?xml version="1.0" encoding="utf-8"?>
<manifest xmlns:android="http://schemas.android.com/apk/res/android"
   package="com.dataflair.mysharedpreference">

   <application
       android:allowBackup="true"
       android:icon="@mipmap/ic_launcher"
       android:label="@string/app_name"
       android:roundIcon="@mipmap/ic_launcher_round"
       android:theme="@style/AppTheme">
       <activity android:name=".MainActivity">
           <intent-filter>
               <action android:name="android.intent.action.MAIN" />
               <category android:name="android.intent.category.LAUNCHER" />
           </intent-filter>
       </activity>
       <activity
           android:name=".secondActivity"
           android:label="Shared Preferences - Details"></activity>
   </application>
</manifest>
7. Write the following code in colors file present here res/values/colors.xml:
<?xml version="1.0" encoding="utf-8"?>
<resources>
   <color name="colorPrimary">#00796B</color>
   <color name="colorPrimaryDark">#01554B</color>
   <color name="colorAccent">#C2185B</color>
</resources>
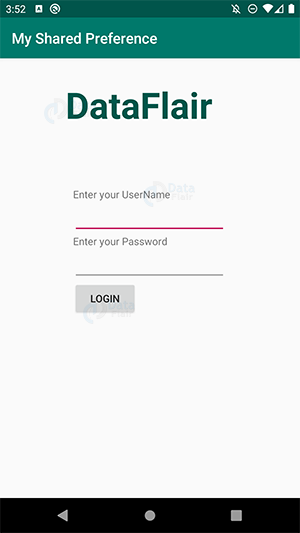
8. Now, run the code:
a. This is our application
b. First, we entered the wrong credentials and following came up:
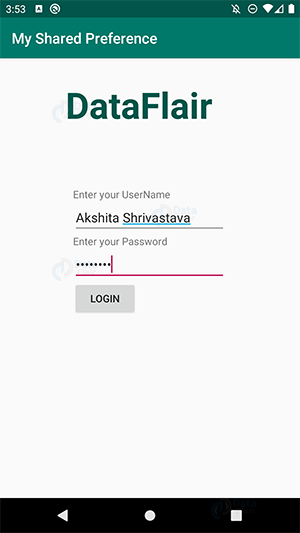
c. Then, enter the right credentials and press Login-
d. Successful login is done:
Summary
Finally, in this article, we have read about Android Preferences and Shared Preferences. While reading we covered many things about Shared Preference in Android. We saw how we can declare it and what are parameters we can pass in it. We then read its methods and the modes it works in. Then we also saw the differences between preferences and shared preferences. In the end, we implemented it and now it is your turn to implement preference in Android.
Your 15 seconds will encourage us to work even harder
Please share your happy experience on Google


