Android Fragment Tutorial – A Comprehensive Guide for Beginners
Job-ready Online Courses: Knowledge Awaits – Click to Access!
Moving further in our series of Android tutorials, now, it’s the turn for Android fragment. In this tutorial, we will learn about the working of Android fragment, its types, lifecycle, methods, and an example. In addition to this, we will also understand the process of adding fragments to activities, communication between fragment and activity and adding fragments within a fragment.
Let’s start with a basic understanding of fragments.
What is Android Fragment?
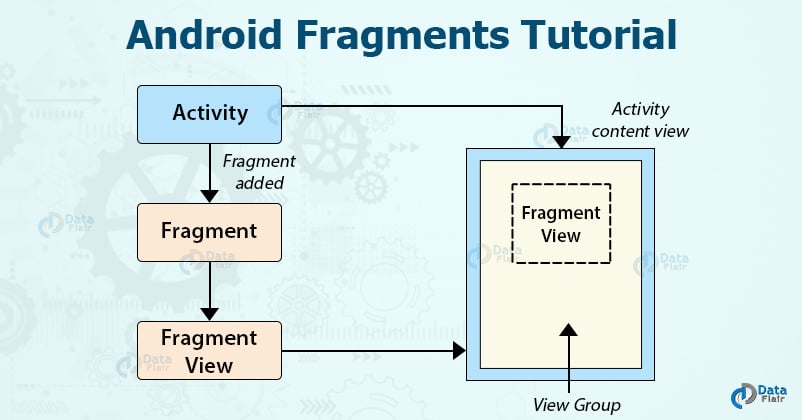
Android Fragment is a Graphical User Interface component of Android. It resides within the Activities of an Android application. It represents a portion of UI that the user sees on the screen. Android Fragments cannot exist outside an activity. Another name for Fragment can be Sub-Activity as they are part of Activities.
Fragments can be dynamically added and removed as per the requirements. Fragments improve the adaptability & user experience by making the UI flexible for all devices. All the Fragments contain their own Events.
Fragments generally provide us with a more flexible and wide range of options to make our Application more interactive. It can make different types of tab displays like scrolling, fixed or swiping tab. It also makes customizable action bars.
To understand how a fragment interacts with the Activity, consider the following:
Types of Android Fragments
1. Single Fragments
Single fragments show only a single view for the user on the screen. These are for handheld devices such as mobile phones.
2. List Fragments
List fragments are those that have a special list view feature. In this, there’s a list and the user can choose to see a Sub-Activity.
3. Fragment Transactions
Fragment transactions are for the transition from one fragment to another. It supports switching between two fragments.
How Fragment Interacts with Activity in Different Devices
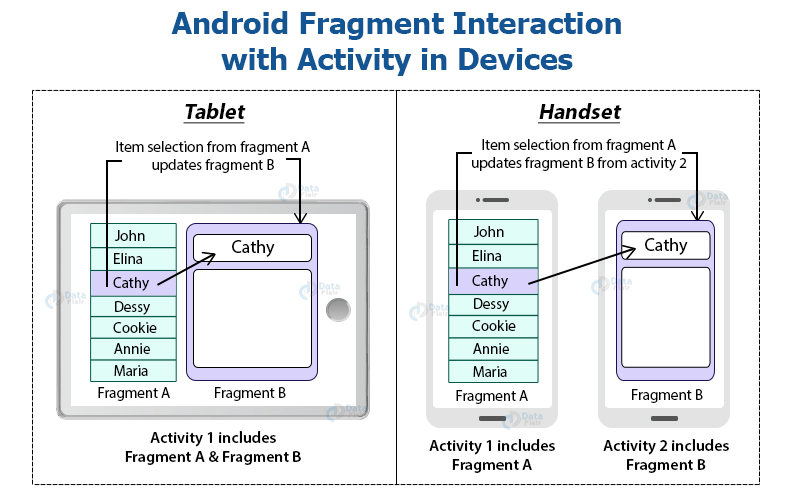
The above image depicts two devices; a Handset and a Tablet. Come we’ll understand both their functions:
In tablets, there is only one activity that is Activity 1. In Activity 1, there are two fragments, Fragment A and Fragment B. When we select an item from Fragment A, it gets open in Fragment B of the same activity.
In the case of mobiles, there are two activities that are:
Activity 1 with Fragment A and Activity 2 with Fragment B.
When we select an item from Fragment A, it gets open in the Fragment B of Activity 2.
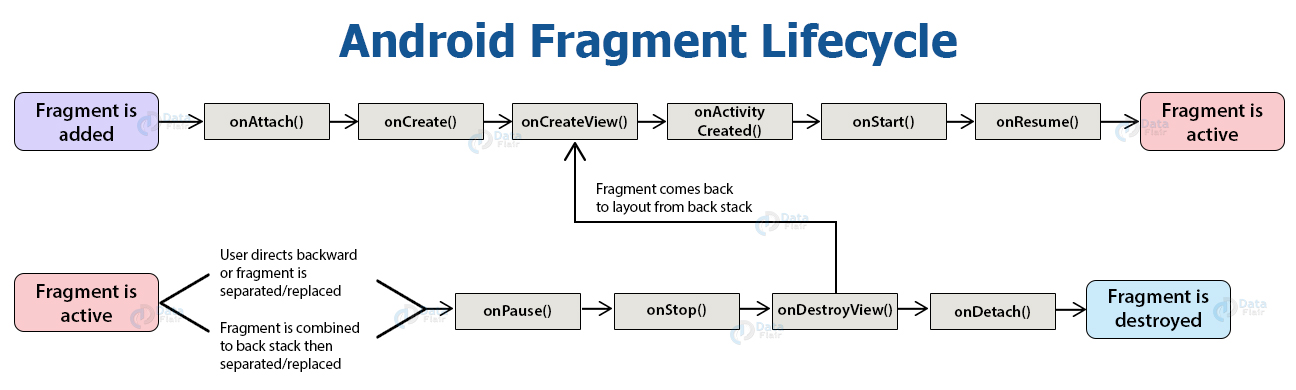
Android Fragment Lifecycle
The lifecycle of Android fragments strongly depends on the activity lifecycle and is similar to it. The fragment lifecycle is shown below:
Methods of Android Fragment
Our fragment class needs to implement the following methods for the fragments to work properly. Let us see them one by one:
1. onAttach
This method executes only once during the whole implementation that is when the fragment attaches to an Activity.
2. onCreate(Bundle)
This method is to create a Fragment. This is an important phase of implementation and all the attributes and components need to be added in this method itself.
3. onCreateView()
The system invokes this method when we need to create the user interface of the fragment. It is called when the UI first initializes and later when the fragment returns back from the back stack.
4. onActivityCreated()
The system invokes this method when an activity is created. During this, we can even access the fragments’ view using the methods findViewById().
5. onViewStateRestored()
It provides the fragments with the information that all the saved states of fragment view are restored.
6. onStart()
The system invokes the onStart() method when the fragment is visible on the user’s device. This method makes the fragments visible.
7. onResume()
This method makes the fragment interactive, which is on the user’s device.
8. onPause()
It’s invoked when the fragment is no longer interactive and the user is about to leave it.
9. onStop()
The system calls this method when the fragment is no longer visible on the user’s device.
10. onDestroyView()
When a fragment is about to get destroyed, the system calls this method to destroy it. It allows the fragment to clean up all the resources.
11. onDestroy()
This method is the final clean up of the fragment’s lifecycle. It allows the fragment to clean up the fragment state.
12. onDetach()
It is to detach the fragment from the activity. With the execution of this method, the fragment is no longer associated with the host Activity.
Android Fragment Example
Given below is a proper example of Android Fragments and Activity:
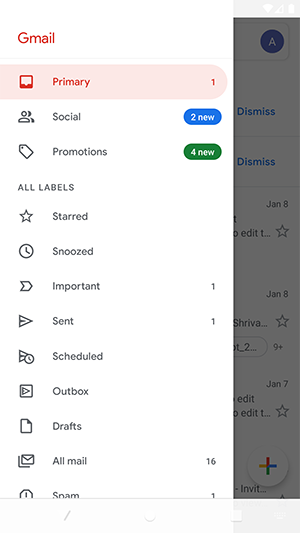
The above picture shows the Fragments on the main activity of Gmail.
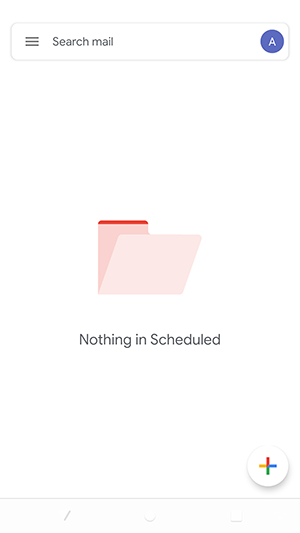
When we click on one of the options there like primary, snoozed, sent, or some other, another Fragment opens. For example, when we click on Scheduled the following Activity comes up:
Adding Fragments with Activities
Embedding Fragments with Activities means adding the Fragments to the respective Activity Layout. To embed any Fragments first ensure that the Activity extends FragmentActivity or AppCompatActivity. Now, there are two ways for adding multiple Fragments in one Activity:
1. Statically
To add the fragment statically, we need to mention it ourselves in the activity_main.xml file. For example:
<?xml version="1.0" encoding="utf-8"?>
<LinearLayout xmlns:android="http://schemas.android.com/apk/res/android"
    android:layout_width="match_parent"
    android:layout_height="match_parent"
    android:orientation="vertical" >

    <fragment
        android:name="com.DataFlair.android.MyFragment"
        android:id="@+id/MyFragment"
        android:layout_width="match_parent"
        android:layout_height="match_parent" />

</LinearLayout>
These fragments can’t be replaced during the execution as they are static.
2. Dynamically
This is another method for embedding Fragments with activities. In this, we embed our Fragment in Activities dynamically using FragmentManager. For example:
<?xml version="1.0" encoding="utf-8"?>
<LinearLayout xmlns:android="http://schemas.android.com/apk/res/android"
    android:layout_width="match_parent"
    android:layout_height="match_parent"
    android:orientation="vertical" >
  <FrameLayout
       android:id="@+id/df_placeholder"
       android:layout_width="match_parent"
       android:layout_height="match_parent">
  </FrameLayout>
</LinearLayout>
Unlike Static Fragment, in this, we can add, remove or replace the Fragments at the runtime itself. We create FragmentTransaction for this.
We’ll create FragmentTransaction as follows:
FragmentTransaction F_T =getSupportFragmentManager().beginTransaction();
F_T.replace(R.id.df_placeholder, new DataFlairFragment());
F_T.commit();
Finding Fragment Instance
We can look up for Fragment within an Activity layout. For this, we use any one of the following ways:
- ID: For this, we have findFragmentById.
- Tag: For this, we have findFragmentByName.
- Pager: For this, we have getRegisteredFragment.
Among all the above, we have FragmentManager for findFragmentById and findFragmentByName.
We have pagerAdapter for getRegisteredFragment.
Android Fragment and Activity Communication
Fragments are part of the activity and can only communicate with their Parent Activity. They need to communicate with other activities through the Parent Activity only. They should not communicate with each-other directly too.
There are three techniques in which Activity and fragments communicate, they’re as follows:
1. Listener
Fragments can use Event listeners to communicate with Activities. They can fire the listener via the interface.
Listeners are implemented as :
import androidx.fragment.app.Fragment;
public class DF_Fragment extends Fragment {
private MyListener listener;
public interface MyListener {
 public void ItemSelected(String link);
  }
 @Override
  public void onAttach(Context context) {
      super.onAttach(context);
      if (context instanceof MyListener) {
        listener = (MyListener) context;
      }
else
throw new ClassCastException(context.toString()+"implement DF_Fragment.MyListener");
  }
 public void onSomeClick(View v) {
     listener.ItemSelected("some link");
      }
}
Then after this, we’ll override the methods onCreate() and ItemSelected() method in the main activity:
@Override
    protected void onCreate(Bundle savedInstanceState) {
        super.onCreate(savedInstanceState);
        setContentView(R.layout.activity_rssfeed);
        fragment = (DetailFragment) getSupportFragmentManager()
            .findFragmentById(R.id.detailFragment);
  }

  @Override
  public void ItemSelected(String link) {
      if (fragment != null && fragment.isInLayout()) {
          fragment.setText(link);
      }
  }
2. Bundle
Another way is, where Fragments and their attributes are set by Activity.
To understand its implementation consider the following :
public class BundleMode extends Fragment {
public static BundleMode newInstance(int someInt, String someTitle){
        BundleMode Bundle_Frag = new BundleMode();
        Bundle args = new Bundle();
        args.putInt("someInt", someInt);
        BundleMode.setArguments(args);
        return BundleMode;
    }
}
With this, we’ve set the attribute which can be later used by using onCreate() as :
public class BundleMode extends Fragment {
    @Override
    public void onCreate(Bundle savedInstanceState) {
    super.onCreate(savedInstanceState);
    int SomeInt = getArguments().getInt("someInt", 0);
    }
}
Now we’ll load it dynamically as :
FragmentTransaction F_T =getSupportFragmentManager().beginTransaction();
BundleMode Bundle_Frag = BundleMode.newInstance(150);
F_T.replace(R.id.df_placeholder, BundleMode);
F_T.commit();
3. Methods
An activity can also communicate with the Fragment by calling methods on instances.
Its implementation can be seen through the following :
public class BundleMode extends Fragment {
public void actionPerform(String param) {
" //CODE HERE "
       }
}
To load it dynamically:
FragmentTransaction F_T= getSupportFragmentManager().beginTransaction();
    BundleMode Bundle_Frag = BundleMode.newInstance(150);
    F_T.replace(R.id.df_placeholder, BundleMode);
    F_T.commit();
Nesting Fragments within Fragment
It might happen many times where the need arises to add a fragment within a fragment. This action of embedding a fragment in another fragment is Fragment Nesting.
A fragment can contain a child fragment just like an Activity holds a Fragment. For this, consider:
<?xml version="1.0" encoding="utf-8"?>
<LinearLayout xmlns:android="http://schemas.android.com/apk/res/android"
    android:layout_width="match_parent"
    android:layout_height="match_parent"
    android:orientation="vertical" >
<TextView
        android:layout_width="wrap_content"
        android:layout_height="wrap_content"
        android:text="I’m parent" />
<FrameLayout
        android:id="@+id/child_fragment_container"
        android:layout_width="match_parent"
        android:layout_height="wrap_content" />
</LinearLayout>
In the above, we can add the child code implementation in @+id/child_fragment_container
Summary
So, by this time we’ve understood that fragments are the GUI components of Android. They play an essential role in making our Android Application interactive and user-friendly. Not to forget, Fragments are more like Activities when it comes to life-cycle. They can’t exist without Activities as they’re part of Activities.
Any queries in the Android Fragment Tutorial? Mention them in the comment section.
Did we exceed your expectations?
If Yes, share your valuable feedback on Google


