Android Styles and Themes – Personalise the look & feel of the app
Expert-led Online Courses: Elevate Your Skills, Get ready for Future - Enroll Now!
In this article, we are going to learn and implement Android Styles and Themes. Android styles and themes are used to change the View and appearances of the application according to requirement.
Android-style is basically a collection of attributes such as fonts size, font color, background color, margin, font type, etc. It generally specifies the attributes of a single view or window. Android provides us this facility to change the appearance and feel of the app so we can customize them. We define the styles in a separate XML resource file. Android styles are similar to CSS styles.
The android theme is a type of style that applies to the entire application and its components. Themes even apply to non-view elements as well. Non-view elements like – notification bar, status bar, and backgrounds.
Both android styles and themes are declared in a style resource file with name styles.xml. You can find them in res > values.
Android Styles and Themes
Let’s first talk about styles in android and later on, we will see what are themes in android.
What is Android Style?
While we define android styles in a separate file, we use that defined style for the views in the XML file that specifies the layout. Style definition needs a new XML in res>values directory of our project with <resources> as the root node.
To create Android Style, follow the following steps:
Step 1: Open style.xml in your project’s res/values/style.xml.
Step 2: In that, we need to add <style> element with a name that uniquely identifies our style.
Step 3: Now we would add attributes of style using <item> tag. We also need to add appropriate value to each item element.
Following is an example to define style in <style> tag using <item> tag.
<resources>
    <style name=”EditTextStyle">
      <item name="android:layout_width">fill_parent</item>
      <item name="android:layout_height">fill_parent</item>
      <item name="android:textSize">40dp</item>
      <item name="android:textStyle">bold</item>
      <item name="android:textSize">#009999</item>
    </style>
</resources>
How to Use Android Style?
After our Android style is ready, we can use it in our XML file using the Style attribute. To understand how we do it, consider the following:
<LinearLayout xmlns:android="http://schemas.android.com/apk/res/android"
   android:layout_width="fill_parent"
   android:layout_height="fill_parent"
   android:orientation="vertical" >
<EditText
    android:id="@+id/txtEdit"
    android:layout_width="fill_parent"
    android:layout_height="fill_parent"
    style="@style/EditTextStyle"
    android:text="Welcome to DataFlair"/>
</LinearLayout>
Android Style Inheritance
Android provides support for inheriting Android Style similar to CSS in web design. This inheritance can be used when we want to use an existing Android style.
<resources>
   <style name="DataFlairTheme" parent="android:style/Theme">
   <item name="android:textColorPrimary">#ffff0000</item>
   //add required styles
   </style>
</resources>
Now in AndroidManifest.xml, we can apply the theme to the activities we want to style. We can also add other styles as per our choice:
<activity
   android:name="com.dataflair.MyActivity"
   // add required attributes
   android:theme="@style/DataFlairTheme"
   />
Now, In DataFlair’s android styles and themes article, let’s discuss the themes in android.
What is Android Theme?
We know that a theme is a style that is applied throughout Android Activity or Application. When a style is applied as a theme, the view in the app is applied to all the attributes that support it. For example, if we apply EditTextStyle as a theme for an activity, the same style applies to the text of all the views in that activity.
To apply a theme in Android, do the following:
<color name="colorIt">#b0b0ff</color>
<style name="DataFlairTheme" parent="Theme.AppCompat.Light">
   <item name="android:windowBackground">@color/colorIt</item>
   <item name="android:colorBackground">@color/colorIt</item>
</style>
We can set the theme either for an activity or for entire application:
<activity android:theme="@android:style/CustomTheme"> // for Activity
<application android:theme="@android:style/CustomTheme"> //for Application
Example of Android Styles
Now we’ll implement Android Style and change the colors and use a different font for our Application UI View.
For this, we’ll follow the following steps and write the following code:
Step 1: The first step is to create a new project and name it.
Step 2: Now what you’ll do is, understand and write the code below:
Open apps/res/value/style.xml file. Here we’ll write and design the style the way we want.
<resources>
     <style name="AppTheme" parent="Theme.AppCompat.Light.DarkActionBar">
       <item name="colorPrimary">@color/colorPrimary</item>
       <item name="colorPrimayDark">@color/colorPrimaryDark</item>
       <item name="colorAccent">@color/colorAccent</item>
       <item name="android:windowBackground">@color/colorAccent</item>
   </style>
   <style name="TextviewStyle" parent="@android:style/Widget.TextView">
       <item name="android:layout_width">wrap_content</item>
       <item name="android:layout_height">wrap_content</item>
       <item name="android:layout_marginLeft">0dp</item>
       <item name="android:layout_marginTop">10dp</item>
       <item name="android:textColor">#86AD33</item>
       <item name="android:textStyle">bold</item>
       <item name="android:textSize">20dp</item>
   </style>
   <style name="ButtonStyle" parent="@android:style/Widget.Button">
       <item name="android:layout_width">wrap_content</item>
       <item name="android:layout_height">wrap_content</item>
       <item name="android:layout_marginLeft">20dp</item>
       <item name="android:layout_marginTop">10dp</item>
       <item name="android:textColor">@color/colorIt</item>
       <item name="android:textStyle">bold</item>
       <item name="android:textSize">30dp</item>
   </style>

   <string name="wlcmsg">Welcome to DataFlair</string>
</resources>
Step 3: Now that we have written the styling part, we’ll define the colors in color.xml:
Open app>res>value>color.xml file.
<?xml version="1.0" encoding="utf-8"?>
<resources>
   <color name="colorPrimary">#00cccc</color>
   <color name="colorPrimaryDark">#006666</color>
   <color name="colorIt">#188596</color>
   <color name="colorAccent">#BBF1F1</color>
   <color name="colorAccent1">#1397B1</color>
</resources>
Step 4: Now, we’ll design the layout using the style in style. Open activity_main.xml file and write the following code:
<?xml version="1.0" encoding="utf-8"?>
<LinearLayout xmlns:android="http://schemas.android.com/apk/res/android"
   android:layout_width="wrap_content"
   android:layout_height="wrap_content"
   android:layout_marginLeft="10dp"
   android:orientation="vertical">

   <TextView
       android:id="@+id/TextView1"
       android:layout_width="300dp"
       android:layout_height="50dp"
       android:layout_marginLeft="45dp"
       android:layout_marginTop="100dp"               android:gravity="center"
       android:fontFamily="@font/abhaya_libre_extrabold"
       android:text="@string/wlcmsg"
       android:textColor="@color/colorAccent1"
       android:textSize="25dp" />

   <TextView
       android:id="@+id/btnShow"
       style="@style/ButtonStyle"
       android:layout_marginLeft="35dp"
       android:layout_marginTop="200dp"
       android:fontFamily="@font/abhaya_libre_extrabold"
       android:gravity="center"
       android:text="Android Style of a View" />
</LinearLayout>
Step 5: Now we’ll run the application. You can make customizations the way you want. My application’s View is like the following: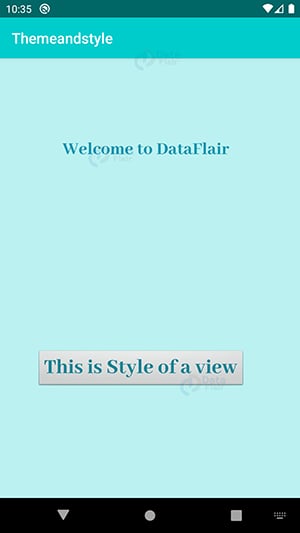
Summary
With this, we are completing the Android Styles and Themes article. In this, we have seen that android styles and themes that make our application interactive & different from others. We can completely change its appearance and make it user-friendly. We have also seen how to implement it. Now it’s your turn to implement it.
Do let us know your implementation and how you did it. Also, learn to create your first android app with DataFlair.
If you have any queries in DataFlair’s android styles and themes article, mention them in the comment section.
Happy Learning😃
We work very hard to provide you quality material
Could you take 15 seconds and share your happy experience on Google


