Android Broadcast Receiver Tutorial – A beginner-friendly guide
Expert-led Online Courses: Elevate Your Skills, Get ready for Future - Enroll Now!
In this tutorial, you will get a complete understanding of the Android broadcast receiver. You will learn about system-generated intents with their working, classes of broadcasts and implementation of broadcast receivers in Android studio.
What is Android Broadcast Receiver?
Android Broadcast Receiver is an Android component that is used to broadcast the messages to the system or other applications. The broadcast message is referred to as an Event or Intent. Broadcast receivers, unlike Activities, have no user interface. It’s working is similar to that of a publish-subscribe design pattern. It’s used for Asynchronous Inter-Process communication.
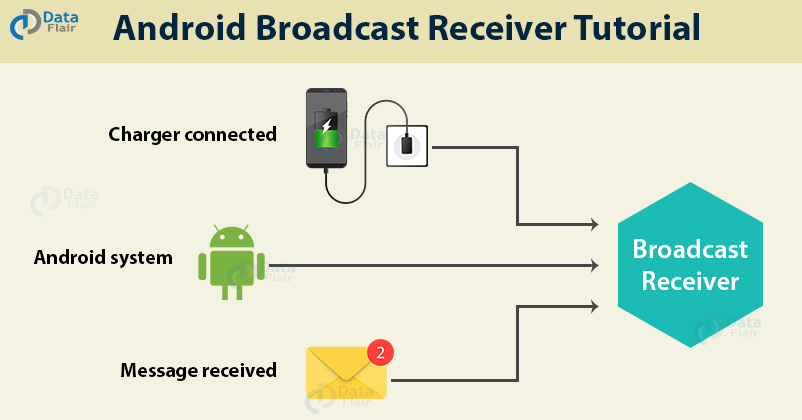
Some Android broadcast receiver examples – low battery notification in the notification bar by the system, notification to other applications when something downloads, so they can use it when required.
Let us get started with system-generated intents.
System-generated Intents
Let us see some system-generated Intents which are important and are generally used:
- android.intent.action.BATTERY_CHANGED – This keeps track of the battery’s charging state, percentage, and other information about the battery.
- android.intent.action.BATTERY_LOW – It indicates the low battery condition.
- android.intent.action.POWER_CONNECTED – It indicates that the power is connected to the device.
- android.intent.action.POWER_DISCONNECTED – The power is disconnected from the device.
- android.intent.action.BOOT_COMPLETED – This broadcast is shown only once when the device boots for the first time.
- android.intent.action.CALL – This intent is to perform a call to some specific person, according to data.
- android.intent.action.DATE_CHANGED – This means the date of the device has changed.
- android.intent.action.REBOOT – This means that the device has rebooted.
- android.intent.action.CONNECTIVITY_CHANGE – This shows the network connectivity of the device has changed.
- android.intent.action.BUG_REPORT – This reports the bugs if there is any.
- android.intent.action.CALL_BUTTON – The user pressed the call button to make a call, which takes them to an appropriate user interface.
Classes of Broadcast in Android
There are broadly two types of broadcast receivers in Android:
- Ordered Broadcasts
- Normal Broadcasts
1. Ordered Broadcasts
Ordered Broadcasts are synchronous broadcasts, and are done in proper order. This order is decided by the android:priority attribute. The broadcast with the highest priority would execute first and broadcasts with the same priority would not follow any order.
Ordered Broadcasts are done in proper order as they are assigned with some priority. The priority is assigned to the broadcasts using attribute android:priority. With the help of priority, the broadcast with the highest priority will execute first. If two broadcasts are found to have the same priority then there no order would be followed. Ordered broadcasts are also called as Synchronous Broadcasts.
In this, one broadcast is delivered only to one receiver at a time. When a receiver receives a broadcast it’s up to the receiver to pass or abort the broadcast. If a receiver wants, it passes the broadcast to the next receiver else the broadcast doesn’t reach the next receiver.
2. Normal Broadcasts
Normal broadcasts are asynchronous and unordered. These receivers run unorderly or all at a time, sometimes. That’s why they are efficient, but lack full utilization of the results. These broadcasts are sent using Context:sendBroadcast.
In normal broadcast, it’s possible that the system sends only one broadcast at a time in order to avoid overhead. It can also abort the broadcast, but those excluding APIs.
Notification that we receive from the applications can also be muted.
Implementation of Broadcast Receivers in Android
In order to build a good application, we need to take the utmost care of the Android broadcast receivers. If our application has perfectly working receivers, it’d be good and interactive.
Now to implement a receiver, we would need to register it, which could be done in the following two ways:
1. Context-registered
This is also known as the dynamically registering method. In this, the registration is done using Context.registerReceiver() method.
Let us see the implementation of Context-registered receiver:
IntentFilter filter = new IntentFilter();
intentFilter.addAction(getPackageName()+"android.net.conn.CONNECTIVITY_CHANGE");
MyReceiver myReceiver = new MyReceiver();
registerReceiver(myReceiver, filter);
2. Manifest-registered
This is also known as the statically registering method. In this, the registration is done in the manifest file, using <register> tags.
Let us see the implementation of Manifest-registered receiver:
<receiver android:name="DataFlairReceiver" >
                <intent-filter>
                     <action android:name="android.net.conn.CONNECTIVITY_CHANGE" />
                </intent-filter>
</receiver>
Okay, now we’ll see how to implement BroadcastReceivers in Android Studio.
First of all, we’ll create a new application in Android Studio, we’ll name it as BroadcastReceiver.
Within the java folder of BroadcastReceiver, create a java file named MyBroadcastReceiver.java.
Now write the code as follows:
1. Open AndroidManifest.xml in the folder BroadcastReceiver within apps. In that, write the following code:
<?xml version="1.0" encoding="utf-8"?>
<manifest xmlns:android="http://schemas.android.com/apk/res/android"
   package="com.dataflair.broadcastreceiver">

   <application
       android:allowBackup="true"
       android:icon="@mipmap/ic_launcher"
       android:label="@string/app_name"
       android:roundIcon="@mipmap/ic_launcher_round"
       android:supportsRtl="true"
       android:theme="@style/AppTheme">
       <activity android:name="com.dataflair.broadcastreceiver.MainActivity">
           <intent-filter>
               <action android:name="android.intent.action.MAIN" />

               <category android:name="android.intent.category.LAUNCHER" />
           </intent-filter>
       </activity>
       <receiver android:name="com.dataflair.broadcastreceiver.MyBroadcastReceiver">
           <intent-filter>
               <action android:name="com.dataflair.CUSTOM_INTENT"></action>
           </intent-filter>
       </receiver>
   </application>
</manifest>
2. In MainActivity.java, write the code below:
package com.dataflair.broadcastreceiver;

import android.content.Intent;
import android.os.Bundle;
import android.view.View;
import android.widget.EditText;

import androidx.appcompat.app.AppCompatActivity;

public class MainActivity extends AppCompatActivity {

   @Override
   protected void onCreate(Bundle savedInstanceState) {
       super.onCreate(savedInstanceState);
       setContentView(R.layout.activity_main);
   }

   public void onClickShowBroadcast(View view) {
       EditText st = findViewById(R.id.txtMsg);
       Intent intent = new Intent();
       intent.putExtra("msg", (CharSequence) st.getText().toString());
       intent.setAction("com.dataflair.CUSTOM_INTENT");
       sendBroadcast(intent);
   }
}
3. Then in activity_main(), write the following code:
<?xml version="1.0" encoding="utf-8"?>

<RelativeLayout xmlns:android="http://schemas.android.com/apk/res/android"
   xmlns:tools="http://schemas.android.com/tools"
   android:layout_width="match_parent"
   android:layout_height="match_parent"
   tools:context=".MainActivity">

   <TextView
       android:id="@+id/textView"
       android:layout_width="wrap_content"
       android:layout_height="wrap_content"
       android:layout_centerHorizontal="true"
       android:layout_marginLeft="100dp"
       android:layout_marginTop="150dp"
       android:text="DataFlair "
       android:textColor="#a4c639"
       android:textSize="50dp" />

   <EditText
       android:id="@+id/textMsg"
       android:layout_width="wrap_content"
       android:layout_height="wrap_content"
       android:layout_marginLeft="100dp"
       android:layout_marginTop="270dp"
       android:ems="10" />

   <Button
       android:id="@+id/buttonShow"
       android:layout_width="wrap_content"
       android:layout_height="wrap_content"
       android:layout_marginLeft="130dp"
       android:layout_marginTop="310dp"
       android:onClick="onClickShowBroadcast"
       android:text="Show Broadcast" />
</RelativeLayout>
4. Open the java class (MyBroadcastReceiver.java) that we created earlier and copy the following code:
package com.dataflair.broadcastreceiver;
import android.content.BroadcastReceiver;
import android.content.Context;
import android.content.Intent;
import android.widget.Toast;

public class MyBroadcastReceiver extends BroadcastReceiver {
   @Override
   public void onReceive(Context context, Intent intent){
       CharSequence iData = intent.getCharSequenceExtra("msg");
       Toast.makeText(context,"DataFlair Received Message: "+iData,Toast.LENGTH_LONG).show();
   }
}
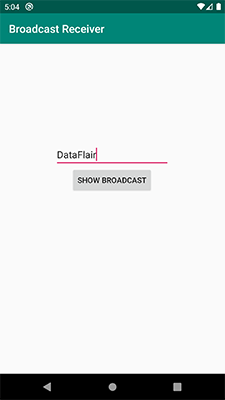
Then we’ll get the output on the emulator as follows:
Summary
With the end of this article, we have learned what broadcasts are and how important it is to implement broadcast receivers properly. Android Broadcast receivers allow us to register system or application events. They help us broadcast messages/ notifications to other applications and systems.
Did you face any difficulty in this Android broadcast receiver tutorial? Mention your queries in the comments.
We work very hard to provide you quality material
Could you take 15 seconds and share your happy experience on Google


