Progress Bar In Android – Effective way to show your progress
Job-ready Online Courses: Knowledge Awaits – Click to Access!
Welcome back to DataFlair android tutorial series, now this time we are heading towards the Progress bar in Android. So let’s see what is Android Progress Bar.
Progress bar is a user interface control that shows the progress of any operation. The operation includes downloading a file, copying a file or moving a file. It is like a graphical representation of an indicator that shows the progress of some process or operation. Basically, it displays how much completion of a task has taken place. A progress bar plays a very important role in providing an interactive and user-friendly interface.
Explore top UI Components with DataFlair
We can define a progress bar in the layout file as-
<ProgressBar
    android:id="@+id/p_Bar"
    style="?android:attr/progressBarStyleHorizontal"
    android:layout_width="wrap_content"
    android:layout_height="wrap_content"
    android:layout_marginLeft="100dp"
    android:layout_marginTop="200dp"
    android:max="100"
    android:progress="0" />
Attributes Of Progress bar in Android
- android: id– It uniquely identifies the progress bar.
- android: minHeight– It sets the height of the progress bar.
- android: minWidth– It sets the width of the progress bar.
- android: max– It sets the maximum value of the progress bar.
- android: progress– It sets the default progress of the progress bar, which can be set from 0 to max.
- android:interpolar– It is used to set an acceleration curve for the indeterminate progress bars.
- android: min– It defines the minimum value for the progress bar.
- android: progressTint– It applies Tint on progress indicator in the progress bar.
- android: indeterminate– It sets whether the progress bar is Determinate or Indeterminate. For this, there are two possible values that are True or False.
- android: animationResolution– It sets the timeout between frames of animation. Timeout is set in milliseconds.
Methods of Progress Bar
There are certain methods of Android Progress Bar, out of which the most used and important methods are listed below:
- getMax()– It returns the maximum value that can be there in the progress bar.
- incrementProgressBy(int increment_value)– It increments the progress in the bar with the increment value that is passed in its parameter.
- setIndeterminate(boolean indeterminate)– It sets the progress bar to be either determinate or indeterminate. Passing ‘true’ means Indeterminate and passing ‘false’ means Determinate.
- setMax(int max_value)– It sets the maximum value of the progress in the progress bar.
- setProgress(int prog_val)– It updates the progress to the progress value that is passed in it.
- show(Context context, CharSequence title, CharSequence msg)– It displays the progress bar. It is a static method.
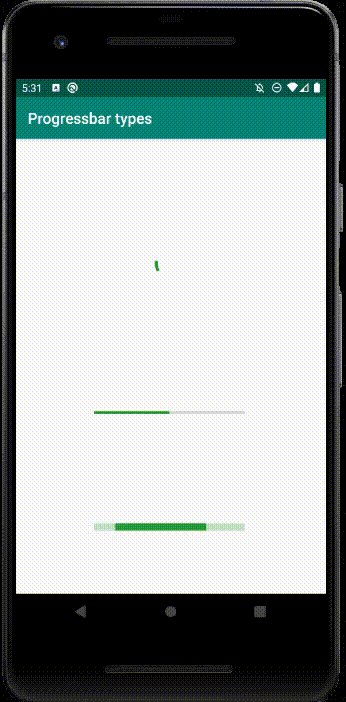
Types of Progress Bar in Android
These progress bars can be of different types like spinner wheel, determinate, and indeterminate. We will see these one by one-
Spinning Wheel Progress Bar
This one is android’s default progress bar. We define it by writing the following code:
<ProgressBar
   android:id="@+id/p_Bar"
   android:layout_width="wrap_content"
   android:layout_height="wrap_content"
   android:progress="50"/>
Horizontal Progress Bar
We will define horizontal progress bar, and to define it we write the following code.
style="?android:attr/progressBarStyleHorizontal"
It is of two types that are:
i) Determinate Progress Bar
This progress bar is used when we know how long the operation will take place. In this, the actual progress of the operation is shown. For this, we set –
android:indeterminate="false"
And the actual definition would be as follows:
<ProgressBar
   android:id="@+id/p_Bar1"
   style="?android:attr/progressBarStyleHorizontal"
   android:layout_width="wrap_content"
   android:layout_height="wrap_content"
   android:indeterminate="false"
   android:max="100"
   android:progress="0" />
ii) Indeterminate Progress Bar
This progress bar is used when we do not know for how long the operation will take place. In this, the actual progress is not indicated but it indicates that the progress is taking place. For this, we set –
android:indeterminate="true"
And the actual definition would be as follows:
<ProgressBar
   android:id="@+id/p_Bar2"
   style="?android:attr/progressBarStyleHorizontal"
   android:layout_width="wrap_content"
   android:layout_height="wrap_content"
   android:indeterminate="true"
   android:max="100"
   android:progress="0" />
These three progress bars are shown below :
Implementation of Android Progress Bar
Now we will move towards the implementation of the same. For this, we will follow the steps below:
1. First of all, we will create a new project and name it. I have named my project “My ProgressBar”.
2. Now we will write the code for the layout, in the activity_main.xml file.
<?xml version="1.0" encoding="utf-8"?>
<RelativeLayout xmlns:android="http://schemas.android.com/apk/res/android"
   android:layout_width="match_parent"
   android:layout_height="match_parent">

   <TextView
       android:id="@+id/textView"
       android:layout_width="wrap_content"
       android:layout_height="wrap_content"
       android:layout_centerHorizontal="true"
       android:layout_marginLeft="90dp"
       android:layout_marginTop="80dp"
       android:fontFamily="@font/alegreya_sc_bold"
       android:text="DataFlair "
       android:textColor="#00574B"
       android:textSize="50dp" />


   <ProgressBar
       android:id="@+id/p_Bar"
       style="?android:attr/progressBarStyleHorizontal"
       android:layout_width="wrap_content"
       android:layout_height="wrap_content"
       android:layout_marginLeft="100dp"
       android:layout_marginTop="200dp"
       android:indeterminate="false"
       android:max="100"
       android:minWidth="200dp"
       android:minHeight="50dp"
       android:progress="0" />

   <TextView
       android:id="@+id/tv"
       android:layout_width="wrap_content"
       android:layout_height="wrap_content"
       android:layout_below="@+id/p_Bar"
       android:layout_alignLeft="@+id/p_Bar" />

   <TextView
       android:id="@+id/txtview"
       android:layout_width="wrap_content"
       android:layout_height="wrap_content"
       android:layout_marginLeft="100dp"
       android:layout_marginTop="180dp"
       android:text="See Your Progress Here..." />

   <Button
       android:id="@+id/show_btn"
       android:layout_width="wrap_content"
       android:layout_height="wrap_content"
       android:layout_below="@+id/tv"
       android:layout_marginLeft="130dp"
       android:layout_marginTop="20dp"
       android:text="Start" />
</RelativeLayout>
3. After this, open the MainActivity.java file, and write the following code:
package com.DataFlair.myprogressbar;

import android.os.Bundle;
import android.os.Handler;
import android.view.View;
import android.widget.Button;
import android.widget.ProgressBar;
import android.widget.TextView;

import androidx.appcompat.app.AppCompatActivity;


public class MainActivity extends AppCompatActivity {
   private ProgressBar pbar;
   private int a = 0;
   private TextView textView;
   private Handler handler = new Handler();


   @Override
   protected void onCreate(Bundle savedInstanceState) {
       super.onCreate(savedInstanceState);
       setContentView(R.layout.activity_main);
       textView = findViewById(R.id.tv);
       pbar = findViewById(R.id.p_Bar);
       Button button = findViewById(R.id.show_btn);
       button.setOnClickListener(new View.OnClickListener() {
           @Override
           public void onClick(View v) {
               a = pbar.getProgress();
               new Thread(new Runnable() {
                   public void run() {
                       while (a < 100) {
                           a += 1;

                           handler.post(new Runnable() {
                               public void run() {
                                   pbar.setProgress(a);
                                   textView.setText(a + "/" + pbar.getMax());
                                   if (a == 100)
                                       textView.setText(" Your Progess has been Completed");
                               }
                           });
                           try {
                               // Sleep for 50 ms to show progress you can change it as well.
                               Thread.sleep(50);
                           } catch (InterruptedException e) {
                               e.printStackTrace();
                           }

                       }
                   }
               }).start();
           }
       });
   }
}
4. Finally, we will run the app and it will be as given below-
i) Initially it will be this-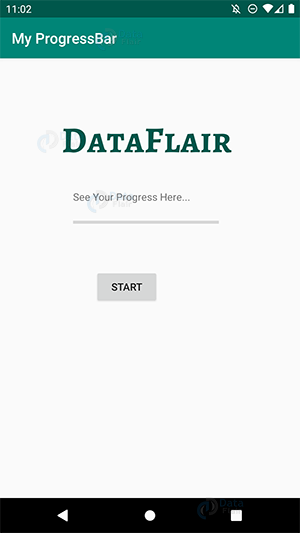
ii) Then we will tap start.
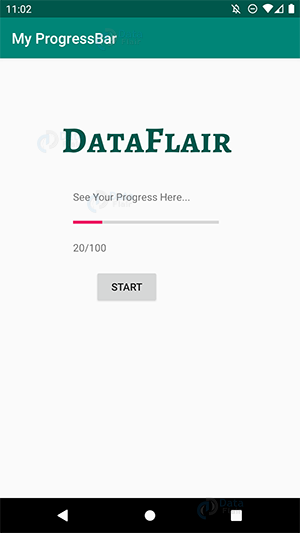
iii) We can see the progress now-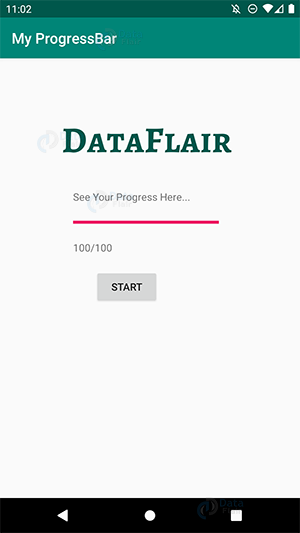
iv) Once it finishes, we can see it as –

Summary
In this tutorial, we have covered the Progress Bar in Android. We have also seen about the types of the Progress bar and how we can implement it in our app through example.
I hope you liked this DataFlair’s tutorial. Do rate us on google to read more such interesting android tutorials.
Did you like our efforts? If Yes, please give DataFlair 5 Stars on Google


