Send Email from Android – Study how to enable emails in your Android application
We offer you a brighter future with industry-ready online courses - Start Now!!
So coming to the third service of Android that is Email. At this point, we are now well aware of the other two services that are SMS and Call. If you haven’t seen the tutorials on SMS and Call, you can see them through. Okay coming back to the Email Service. So emails today play a crucial role in our lives. And we all are well aware of Emails, Right? Don’t worry if you are not. It’s just a message, that is, distributed by electronic means from one device to others over the network. In this article, we will learn to send email from Android.
So let us know that for email service also, we would need Intent. It carries data from one component to other components either within an application or outside it.
Know the concept of Intents with DataFlair’s Android Intent article.
Now to enable emails from our application, we can simply use an existing app provided by Android. We need not implement the whole email client from the start. Some of the default applications are Gmail, MS Outlook, Spark, etc. To use these applications, we will launch an Activity using Implicit Intent.
How to Use Intent to Send Email from Android?
Let us see first, how we are going to use the Intent for sending mails through our application.
1. Action in Intent to Send an Email
The action that we will use is ACTION_SEND.
And we will use the following syntax and write it like this to add Action Send.
Intent myIntent = new Intent(Intent.ACTION_SEND);
2. Data in Intent to Send an Email
To send the email, we will specify the email-Id using setData in mailto: as URI data. We will do it as follows:
myIntent.setData(Uri.parse("mailto:"));
myIntent.setType("text/plain");
putExtra() Method in Android
We use the method known as putExtra() to add some extra information in our Intent. It can add the following in the information as Extra:
- EXTRA_CC – It holds string[] of email addresses that should be carbon copied.
- EXRTA_BCC – It holds string[] of email addresses that should be blind carbon copied.
- EXTRA_SUBJECT – It is a constant string that holds the subject line of a message.
- EXTRA_EMAIL – It’s a string that holds an email to be delivered.
- EXTRA_TEXT – It is a string that associates with the Intent ACTION_SEND to supply literal data.
- EXTRA_HTML_TEXT – It is a string that associates with the Intent as an alternative to send EXTRA_TEXT in HTML.
How to Send Email from Android?
Now, let’s learn to send email from Android using our application. Let’s begin:
Step 1: First of all we will create a new project and fill in the details.
Then, we will define the details of the layout of our application in the activity_main.xml file. For this, we will write the following code:
<?xml version="1.0" encoding="utf-8"?>
<LinearLayout xmlns:android="http://schemas.android.com/apk/res/android"
   android:layout_width="match_parent"
   android:layout_height="match_parent"
   android:orientation="vertical"
   android:paddingLeft="20dp"
   android:paddingRight="20dp">

   <TextView
       android:id="@+id/tV1"
       android:layout_width="wrap_content"
       android:layout_height="wrap_content"
       android:layout_centerHorizontal="true"
       android:layout_marginLeft="90dp"
       android:layout_marginTop="60dp"
       android:fontFamily="@font/abril_fatface"
       android:text="DataFlair "
       android:textColor="@color/colorPrimaryDark"
       android:textSize="50dp" />

   <EditText
       android:id="@+id/textTo"
       android:layout_width="match_parent"
       android:layout_height="wrap_content"
       android:hint="Mail To" />

   <EditText
       android:id="@+id/textSubject"
       android:layout_width="match_parent"
       android:layout_height="wrap_content"
       android:hint="Subject:" />

   <EditText
       android:id="@+id/textMessage"
       android:layout_width="match_parent"
       android:layout_height="0dp"
       android:layout_weight="1"
       android:gravity="top"
       android:hint="Content:" />

   <Button
       android:id="@+id/buttonSend"
       android:layout_width="100dp"
       android:layout_height="wrap_content"
       android:layout_gravity="right"
       android:text="Send" />
</LinearLayout>
Step 2: After this, we will open the MainActivity.java file, and write the following code:
package com.DataFlair.sendemailexample;

import android.content.Intent;
import android.os.Bundle;
import android.view.View;
import android.widget.Button;
import android.widget.EditText;

import androidx.appcompat.app.AppCompatActivity;

public class MainActivity extends AppCompatActivity {

   private EditText mailTo;
   private EditText mailSubject;
   private EditText mailContent;
   private Button subbtn;

   @Override
   protected void onCreate(Bundle savedInstanceState) {
       super.onCreate(savedInstanceState);
       setContentView(R.layout.activity_main);
       mailTo = (EditText) findViewById(R.id.txtTo);
       mailSubject = (EditText) findViewById(R.id.txtSub);
       mailContent = (EditText) findViewById(R.id.txtMsg);
       subbtn = (Button) findViewById(R.id.btnSend);
       subbtn.setOnClickListener(new View.OnClickListener() {
           @Override
           public void onClick(View v) {
               Intent it = new Intent(Intent.ACTION_SEND);
               it.putExtra(Intent.EXTRA_EMAIL, new String[]{mailTo.getText().toString()});
               it.putExtra(Intent.EXTRA_SUBJECT, mailSubject.getText().toString());
               it.putExtra(Intent.EXTRA_TEXT, mailContent.getText());
               it.setType("message/rfc822");
               startActivity(Intent.createChooser(it, "Choose Mail App"));
           }
       });
   }
}
Step 3: Now, we will declare the following in the manifest file:
<?xml version="1.0" encoding="utf-8"?>
<manifest xmlns:android="http://schemas.android.com/apk/res/android"
   package="com.DataFlair.sendemailexample">

   <application
       android:allowBackup="true"
       android:icon="@mipmap/ic_launcher"
       android:label="@string/app_name"
       android:roundIcon="@mipmap/ic_launcher_round"
       android:supportsRtl="true"
       android:theme="@style/AppTheme">
       <activity android:name=".MainActivity">
           <intent-filter>
               <action android:name="android.intent.action.MAIN" />
               <category android:name="android.intent.category.LAUNCHER" />
               <action android:name="android.intent.action.SEND" />
               <category android:name="android.intent.category.DEFAULT" />
               <data android:mimeType="message/rfc822" />
           </intent-filter>
       </activity>
       <meta-data
           android:name="preloaded_fonts"
           android:resource="@array/preloaded_fonts" />
   </application>
</manifest>
Step 4: Now, we will run our code and following will be the output:
i) The application will look like this: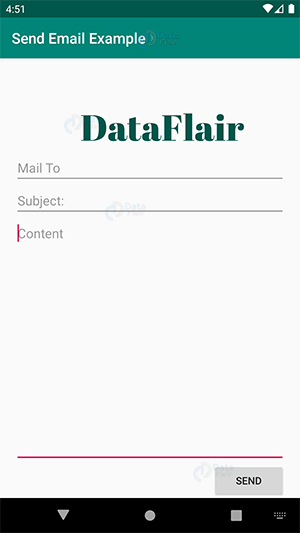
ii) Now we will enter the required details in the blanks above.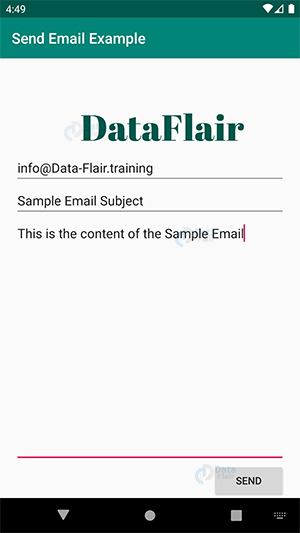
iii) Now we will click on send and select the application that we want to use for further details: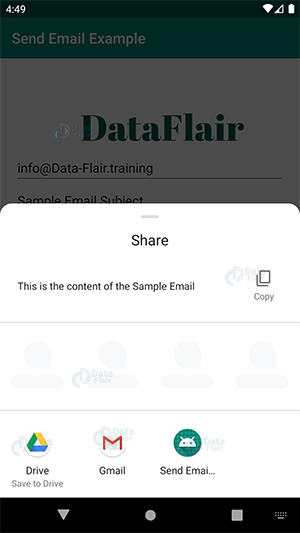
iv) And we will finally send the email, I chose Gmail.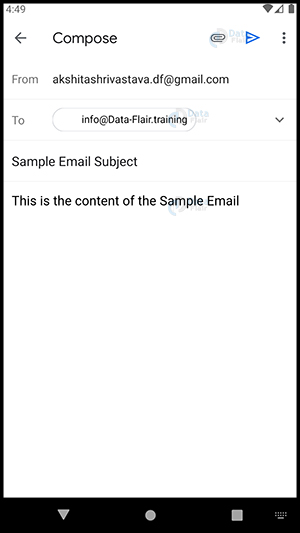
Summary
In this article we covered the third service of the three that were – SMS, Call, and Email. So here we have learned what is mail and how we can use it in our applications. We also implemented an example for it to learn it better. So yes, this was all for Send Email from Android article, we will catch up in the next article.
If you have any doubts in DataFlair’s Send Email from Android article, ask in the comment section.
Happy Learning😃
Did we exceed your expectations?
If Yes, share your valuable feedback on Google


