Calling App in Android – Know the required methods to enable call feature in your app
Job-ready Online Courses: Dive into Knowledge. Learn More!
The second important feature among the three features that we know is the Calling by Android. When we are at some distance from our near and dear ones and can’t be with them. All that we do is make a phone call to them.
Android provides us this facility to add the feature of call in our application. In this article, we will be discussing the feature of the Calling app in Android. Also, we will see how we can add this calling service in our Android Application with an example.
Android lets us place a call using the built-in application. This app is very easy to use and can make a call to whoever we want. Nonetheless, it also lets us provide users with the feature of placing calls through our app. We can make calls from our applications by using the built-in application Intent for calling. We use action Intent for this, which is ACTION_CALL.
Get to know in detail about Android Intents with DataFlair.
When we use the intent object ACTION_CALL and pass proper data to it, it helps us to launch the built-in phone call application to make a phone call. Did you ask How?
How to Make Calling App in Android?
Okay, that is quite as simple as I am showing in the following:
- Action in Intent to Make a Phone Call
We know the action that we will use is ACTION_CALL.
And we will use the following syntax and write it like this to add action call:
Intent myIntent = new Intent(Intent.ACTION_CALL); // this is for Action_call
Or we can also use ACTION_DIAL if we want to get the number from the user and then place a call.
Intent myDialIntent = new Intent(Intent.ACTION_DIAL); // this is for Action_Dial
- Data in Intent to Make a Phone Call
Now, suppose we want to make a phone call to a given number say -91-1234567890. We will set the number using setData in tel: as URI like shown below:
myIntent.setData(Uri.parse("tel:91-123-456-7890"));And if we want to take the number from the user, we will use the getData from the user
myIntent.setData(Uri.parse("tel:"+text_Phone.getText().toString()));
startActivity(myIntent);
Common Calling Scenarios

While we make use of ConntectionService API we also interact with some other classes of android.telecom package. Let us see some of the common calling scenarios and how apps use the API to handle them. There are three scenarios that are:
1. Answer the Call
To handle incoming calls we need to consider if other apps are on call or not. It’s so because the telecom subsystem establishes some constraints when there are active calls in other apps. Consider the following two cases:
A. No Other App on Call
- Your App receives a call.
- Call addNewIncomingCall(PhoneAccountHandle, Bundle) to inform the telecom subsystem about it.
- This subsystem binds to your app’s ConnectionService implementation. It then requests a new instance of the Connection class using, onCreateIncomingConnection(PhoneAccountHandle, ConnectionRequest).
- This subsystem informs the app to show incoming calls to users using onShowIncomingCallUi().
- Call setActive() if the user accepts the incoming call. If not, setDisconnected(DisconnectCause) specifying REJECTED as parameter, is followed by the Destroy() method.
B. Other App has Active Call that can’t be Put on Hold
To answer a call while a call that can’t be put on hold is going on, follow the following:
- Incoming call receives a new call.
- Call addNewIncomingCall(PhoneAccountHandle, Bundle) to inform the telecom subsystem about it.
- This subsystem binds to your app’s ConnectionService implementation. It then requests a new instance of the Connection object using, onCreateIncomingConnection(PhoneAccountHandle, ConnectionRequest).
- The telecom subsystem displays the incoming call on UI.
- If the user accepts the call, this subsystem invokes the onAnswer() method. To indicate the telecom subsystem, we will call setActive().
- If the user rejects the call, this subsystem invokes the onReject() method. We will call setDisconnected(DisconnectCause) and pass REJECTED as parameter.
- And we will call the Destroy() method.
2. Place a Call
While dealing with the process of placing a call, we need to handle the possibility that the call cannot be connected because of some constraints imposed by the telecom framework.
In order to place a call we need to follow the following:
A. Initiate a call from the application.
B. Use the method placeCall(call, bundle) and inform the telecom subsystem about the new call. Now pass the parameters as following:
- The Uri parameter represents the address of the callee. For numbers use tel:
- The Bundle: parameter provides information about the application. It’s done by adding the PhoneAccountHandle object of the app to EXTRA_PHONE_ACCOUNT_HANDLE extra.
- The Bundle: parameter can also specify if it includes video by specifying EXTRA_START_CALL_WITH_VIDEO_STATE .
- This telecom subsystem binds to the app’s ConnectService implementation.
a. If the app is unable to call, the subsystem invokes onCreateOutgoingConnectionFailed(PhoneAccountHandle, ConnectionRequest). It informs the app that the call can’t be placed.
b. If the app is able to call, it invokes onCreateOutgoingConnectionFailed(PhoneAccountHandle, ConnectionRequest). It informs the app that the call can’t be placed.
- After the call is active, invoke setActive() to inform the telecom subsystem about the same.
3. End a Call
After the call is connected we would need to end the call, and to end it:
- Call the method setDisconnected( DisconnectCause).
- If the call is terminated by the user LOCAL is passed as parameter. REMOTE is passed if the call is disconnected by a third party.
- After that call the destroy() method.
Implementation of Calling App in Android in Our Application
Step 1: First of all we will create a new project and fill in the details. Then we will open the activity_main.xml file, and define the layout as follow:
<?xml version="1.0" encoding="utf-8"?>
<LinearLayout xmlns:android="http://schemas.android.com/apk/res/android"
   xmlns:tools="http://schemas.android.com/tools"
   android:orientation="vertical"    android:layout_width="match_parent"
   android:layout_height="match_parent">

   <TextView
       android:id="@+id/textView2"
       android:layout_width="wrap_content"
       android:layout_height="wrap_content"
       android:layout_centerHorizontal="true"
       android:layout_marginLeft="100dp"
       android:layout_marginTop="100dp"
       android:fontFamily="@font/aclonica"
       android:text="DataFlair "
       android:textColor="@color/colorPrimaryDark"
       android:textSize="50dp" />

   <TextView
       android:id="@+id/fstTxt"
       android:layout_width="wrap_content"
       android:layout_height="wrap_content"
       android:layout_marginLeft="100dp"
       android:layout_marginTop="100dp"
       android:fontFamily="@font/acme"
       android:text="Please Enter the Mobile No"
       android:textColor="#0F8B80"
       android:textSize="20dp" />

   <EditText
       android:id="@+id/mblTxt"
       android:layout_width="wrap_content"
       android:layout_height="wrap_content"
       android:layout_marginLeft="100dp"
       android:ems="10"
       android:hint="Enter the number here"
       android:textColor="#84E2DB"
       tools:layout_marginTop="20dp"></EditText>

   <Button
       android:id="@+id/btnCall"
       android:layout_width="wrap_content"
       android:layout_height="wrap_content"
       android:layout_marginLeft="150dp"
       android:layout_marginTop="20dp"
       android:text="Dial" />
</LinearLayout>
Step 2: Now we will do the coding for the working in MainActivity.java file. We will write the following code:
package com.DataFlair.callexample;

import android.Manifest;
import android.content.Intent;
import android.content.pm.PackageManager;
import android.net.Uri;
import android.os.Build;
import android.os.Bundle;
import android.view.View;
import android.widget.Button;
import android.widget.EditText;
import androidx.appcompat.app.AppCompatActivity;
import androidx.core.app.ActivityCompat;

public class MainActivity extends AppCompatActivity {
   private EditText text_Phone;
   private Button b_utton;
   @Override
   protected void onCreate(Bundle savedInstanceState) {
       super.onCreate(savedInstanceState);
       setContentView(R.layout.activity_main);
       text_Phone = (EditText) findViewById(R.id.mblTxt);
      mybutton = (Button) findViewById(R.id.btnCall);
      mybutton.setOnClickListener(new View.OnClickListener() {
           @Override
           public void onClick(View v) {
               callPhoneNumber();
           }
       });
   }
   @Override
   public void onRequestPermissionsResult(int requestCode, String[] permissions, int[] grantResults) {
       if (requestCode == 101) {
           if (grantResults[0] == PackageManager.PERMISSION_GRANTED) {
               callPhoneNumber();
           }
       }
   }
   public void callPhoneNumber() {
       try {
           if (Build.VERSION.SDK_INT > 22) {
               if (ActivityCompat.checkSelfPermission(this, Manifest.permission.CALL_PHONE) !=PackageManager.PERMISSION_GRANTED) {
                   ActivityCompat.requestPermissions(MainActivity.this, new String[]{
                   Manifest.permission.CALL_PHONE}, 101);
                   return;
               }
               Intent callIntent = new Intent(Intent.ACTION_CALL);
               callIntent.setData(Uri.parse("tel:" + text_Phone.getText().toString()));
               startActivity(callIntent);
           } else {
               Intent callIntent = new Intent(Intent.ACTION_CALL);
               callIntent.setData(Uri.parse("tel:" + text_Phone.getText().toString()));
               startActivity(callIntent);
           }
       } catch (Exception ex) {
           ex.printStackTrace();
       }
   }
}
Step 3: Now we will update the Manifest.xml file, as follow:
<?xml version="1.0" encoding="utf-8"?>
<manifest xmlns:android="http://schemas.android.com/apk/res/android"
   package="com.DataFlair.callexample">
   <uses-permission android:name="android.permission.CALL_PHONE" />
   <application
       android:allowBackup="true"
       android:icon="@mipmap/ic_launcher"
       android:label="@string/app_name"
       android:roundIcon="@mipmap/ic_launcher_round"
       android:supportsRtl="true"
       android:theme="@style/AppTheme">
       <activity android:name=".MainActivity">
           <intent-filter>
               <action android:name="android.intent.action.MAIN" />
               <category android:name="android.intent.category.LAUNCHER" />
           </intent-filter>
       </activity>
       <meta-data
           android:name="preloaded_fonts"
           android:resource="@array/preloaded_fonts" />
   </application>
</manifest>
Step 4: Now we will run the application as follows:
i) The app will look like this: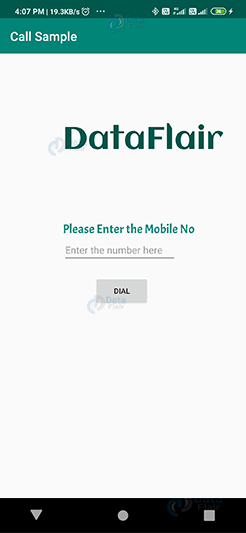
ii) Then we will enter a number: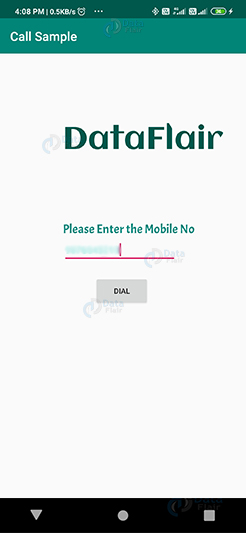
iii) As soon as we will press Dial, it will ask for permission and we will allow it.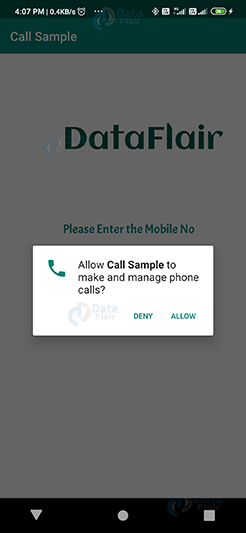
iv) After that, the Call would be placed.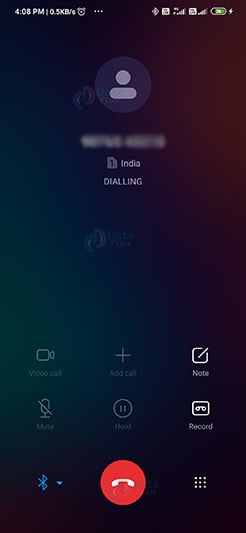
Summary
In this article, we are done with the feature of the Calling app in Android. We have seen how we can implement calling in our application. We have also seen the required methods for enabling the call feature in our app. Now it is your turn to implement and let me know. In the next article, we will see the email feature of Android.
If you have any queries regarding DataFlair’s Calling App in Android article, mention them in the comment section.
Happy Learning😃
Did you like this article? If Yes, please give DataFlair 5 Stars on Google


Dear sir thanks for providing huge information abut app to app calling. Dear sir I just asked is there any type of charges to make call app to app and should we required any third party service to build function in android app to call app to app.
Hola, quiero saber si hay manera de obtener fecha, hora inicial y hora finalizada de la llamada. ya que quiero guardar esa información en mi bd.
Very good app
you literally failed stackoverflow, greekforgeek, and many more I tried each of their code but doesn’t work for me, but only your work, thanks a lot 🙂
Where is PhoneAccountHandle and TelecomManager ? How to register PhoneAccount ?