Android Widgets – Implement your favourite widgets with ease
We offer you a brighter future with industry-ready online courses - Start Now!!
In this article, we will learn about Android Widgets. Widgets are the UI components that enable users to interact with the app while saving their time. These are actually one of the best features of the android app as they display the information to the users on their screen. To understand clearly, one can define them as small gadgets or controls of one application.
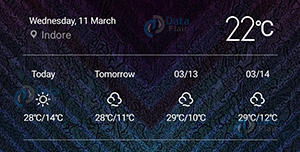
The best example of it can be the Weather forecast and the Clock, that is used by almost all the users of Android.
Explore Android Application Components with DataFlair
To create it, we need to define in its layout file as:
<appwidget-provider
xmlns:android="http://schemas.android.com/apk/res/android"
   android:initialLayout="@layout/activity_main"
   android:minWidth="200dp"
   android:minHeight="200dp">
</appwidget-provider>
After we have defined it, we would create a java file, where it is important to declare two things that are :
PendingIntent pending_intent = PendingIntent.getActivity(context, 0, intent_new, 0);
RemoteViews r_views = new RemoteViews(context.getPackageName(), R.layout.activity_main);
Following are certain methods, that are defined in this class which helps to customize the widgets:
- onDelete(): The system calls it when some AppWidgetProvider is deleted.
- onEnabled(): The system calls it when AppWidgetProvider is created.
- onDisabled(): The system calls it when the last instance of AppWidgetProvider is deleted.
- onReceive(): The system calls it to dispatch calls to different methods of the class.
Widget Components
There are three important components of Android Widgets:
- AppWidgetProviderInfo: It is the object that defines the metadata of the widget like its layout, updates, etc.
- AppWidgetProvider: It is for paging over a collection of objects where no. of pages is undefined.
- View Layout: It defines the initial layout of the Widget and is defined in the xml file.
Adding Widget to our application
To add a widget file in our application we need the following files:
- XML definition file: This file is required as it instantiates the widget and all the attributes that are required to support it. You can find it in app/ res/ values/.
- Java file: This file implements the behavior of the widgets. It is found in app/java/example/.
- Layout FIle: This file is optional and is present in app/ res/ layout/. It defines how the widget layout would look like.
Types of Android Widgets
Before getting into the implementation of the widgets, let us see its types:
1. Information Widgets: This type of widget are generally used to give some important information to the users. This information can be Time clocks or weather information.
2. Collection Widgets: These widgets are the types of widgets where many elements of the same type are shown as a collection. In the collection widget, the users can scroll vertically.

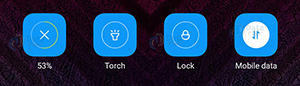
3. Control widgets: The control widgets are used for the purpose of display function that might be required by the users. Such as mobile data, torch, lock screen, WiFi, GPS, brightness, etc.
4. Hybrid Widgets: Hybrid widgets are those that tend to combine the two or more of the above types of widgets. Such as Music player, Keep note, etc.

Implementation of Android Widgets
Now see how you can implement it in your application. Following is the step-by-step process to implement it in your application:
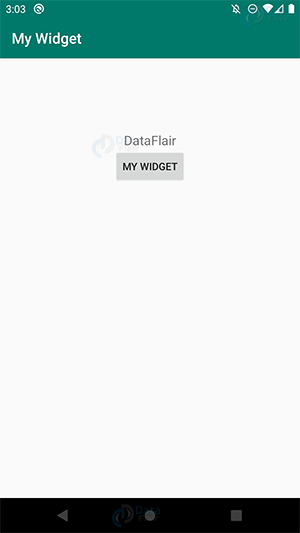
Step 1: First of all, create a new project and name it. I have named it “My Widget”.
Step 2: Next, you have to write the following in your activity_main.xml file:
<?xml version="1.0" encoding="utf-8"?>
<LinearLayout xmlns:android="http://schemas.android.com/apk/res/android"
   android:layout_width="match_parent"
   android:layout_height="match_parent"
   android:orientation="vertical">
   //This will be displayed in the widget
   <TextView
       android:id="@+id/text_view"
       android:layout_width="wrap_content"
       android:layout_height="wrap_content"
       android:layout_gravity="center"
       android:layout_marginTop="100dp"
       android:text="DataFlair"
       android:textSize="18dp" />
   //this is a button, with name
   <Button
       android:id="@+id/btn"
       android:layout_width="wrap_content"
       android:layout_height="wrap_content"
       android:layout_gravity="center"
       android:text="My Widget" />
</LinearLayout>
Step 3: Write the following in the MainActivity.java file:
package com.DataFlair.my_widget;

import android.os.Bundle;

import androidx.appcompat.app.AppCompatActivity;

public class MainActivity extends AppCompatActivity {
   @Override
   protected void onCreate(Bundle savedInstanceState) {
       super.onCreate(savedInstanceState);
       setContentView(R.layout.activity_main);
   }
}
Step 4: Write the following in the my_widget_activity.java file:
package com.DataFlair.my_widget;

import android.app.PendingIntent;
import android.appwidget.AppWidgetManager;
import android.appwidget.AppWidgetProvider;
import android.content.Context;
import android.content.Intent;
import android.net.Uri;
import android.widget.RemoteViews;
import android.widget.Toast;

public class my_widget_activity extends AppWidgetProvider {
   //This is onUpdate method, where we've passed AppWidgetManager and the Widget ID.
   public void onUpdate(Context context, AppWidgetManager appWidgetManager, int[] widgetIds) {
       //In this loop, Pending Intent is created which will take us to the URL that we’ve mentioned and a toast would be generated informing that the widget has been added.
       for (int i = 0; i < widgetIds.length; i++) {
           int my_widgetId = widgetIds[i];
           String url = "https://data-flair.training/";
           Intent intent_new = new Intent(Intent.ACTION_VIEW);
           intent_new.addFlags(Intent.FLAG_ACTIVITY_NEW_TASK);
           intent_new.setData(Uri.parse(url));
           PendingIntent pending_intent = PendingIntent.getActivity(context, 0, intent_new, 0);
           RemoteViews r_views = new RemoteViews(context.getPackageName(), R.layout.activity_main);
           r_views.setOnClickPendingIntent(R.id.btn, pending_intent);
           appWidgetManager.updateAppWidget(my_widgetId, r_views);
           Toast.makeText(context, "widget has been added", Toast.LENGTH_SHORT).show();
       }
   }
}
Step 5: Create a new folder xml in the resource folder, and in that create an xml layout file and name it widget.xml. After this, write the following in the widget.xml file:
<?xml version="1.0" encoding="utf-8"?>
<appwidget-provider
xmlns:android="http://schemas.android.com/apk/res/android"
   android:initialLayout="@layout/activity_main"
   android:minWidth="200dp"
   android:minHeight="200dp"
   android:updatePeriodMillis="0">
</appwidget-provider>
Step 6: And add the following the manifest.xml file:
<?xml version="1.0" encoding="utf-8"?>
<manifest xmlns:android="http://schemas.android.com/apk/res/android"
   package="com.DataFlair.my_widget">

   <application
       android:allowBackup="true"
       android:icon="@mipmap/ic_launcher"
       android:label="@string/app_name"
       android:roundIcon="@mipmap/ic_launcher_round"
       android:supportsRtl="true"
       android:theme="@style/AppTheme">
       <activity android:name="com.DataFlair.my_widget.MainActivity">
           <intent-filter>
               <action android:name="android.intent.action.MAIN" />
               <category android:name="android.intent.category.LAUNCHER" />
           </intent-filter>
       </activity>
       <receiver android:name="com.DataFlair.my_widget.my_widget_activity">
           <intent-filter>
               <action android:name="android.appwidget.action.APPWIDGET_UPDATE"></action>
           </intent-filter>
           <meta-data
               android:name="android.appwidget.provider"
               android:resource="@xml/widget"></meta-data>
       </receiver>
       <meta-data
           android:name="preloaded_fonts"
           android:resource="@array/preloaded_fonts" />
   </application>
</manifest>
This is what our application would look like:
a) This is the application-
b) This is the widget of our application-

c) This is how the intent will be working-

Summary
Coming to the end, we have discussed Android Widgets in this article. We have seen how we can declare widgets in the xml file, and important methods to customize it. Also, we have implemented it in our application. Now that you are well-aware of it, it is your turn to implement and see how interesting it can be.
I hope you like this article and understood about Android Widgets, do rate us on google for more such interesting blogs.
Keep Learning 
If you are Happy with DataFlair, do not forget to make us happy with your positive feedback on Google


