Android RadioButton, RadioGroup, and CheckBox – A Complete Guide
Expert-led Courses: Transform Your Career – Enroll Now
In this tutorial, we will learn about the concept of Android RadioButton, RadioGroup, and Android checkbox with their implementation.
Introduction to Android RadioButton
Beginning with Android RadioButton, A RadioButton is a button that has two states, that are either check or uncheck. This means if we click on a RadioButton it gets into Checked state and by default, it comes in Unchecked State.
In the Android Radio button, one thing to be noted is, once it gets into the checked state we cannot undo it. Generally, we use them in our application to let the users select one option from a set of options. Radio Button is one of the important Android UI controls, as it provides an interactive User Interface for the users.
Learn to use UI controls to create an attractive design for your application.
To create it, we define it in our layout file as:
<RadioButton
      android: text= “I am a button”
      android: id= “@+id/rdb”
      // other attributes
>
Attributes of Android RadioButton
Some of the attributes that we can use to customize the RadioButton in Android are as follows:
- android: id – It set a unique identity.
- android: checked – It specifies the current state of the button.
- android: gravity – It sets the alignment of the text.
- android: text – It sets the text for the Radio Button.
- android:textColor – It sets the color of the text.
- android:textSize – It sets the size of the text.
- android:textStyle – It sets the style of the text, like – bold, italics.
- android: background – It sets the color for the background of the button.
- android: padding – It sets the padding from left, right bottom or the top.
- android:onClick – It invokes the method onClick() when the button is clicked.
- android: visibility – It controls the visibility of the Radio Button.
RadioGroup in Android
Radio Group in Android is a group that contains a set of radio buttons. They contain Radio buttons in a group or in separate groups according to the requirement. The specialty of a Radio group is, among all the available Radio buttons inside it, only one can be chosen. After selecting a Radio button if we select some other Radio button, then the previous one gets deselected.
Their need is basically to select one right option among all the other available options. For example, Multiple Choice Questions.
To define it in our layout file, we will write the following:
<RadioGroup
      android:layout_width="fill_parent"
      android:layout_height="90dp">

      <RadioButton
         android:id="@+id/rdb"
         android:layout_width="wrap_content"
         android:layout_height="55dp"
         android:text="RadioButton1"
         android:textSize="25dp" />

      <RadioButton
         android:id="@+id/rdb1"
         android:layout_width="wrap_content"
         android:layout_height="wrap_content"
         android:text="RadioButton2"
         android:textSize="25dp" />
   </RadioGroup>
CheckBox in Android
CheckBox is also a two-state button, it can have either checked state or unchecked state. The major difference between Android CheckBox and Android RadioButton is that checkboxes can be unchecked manually.
- Check means ON or True
- Uncheck means OFF or False
Android CheckBox is mostly useful when there are multiple options & the users are allowed to choose all the options that are applicable.
To define it in the layout file, we will write the code as follows:
<CheckBox
         android:id="@+id/myCheckBoxl"
         android:layout_width="wrap_content"
         android:layout_height="wrap_content"
         android:layout_marginLeft="100dp"
         android:onClick="onCheckboxClicked"
         android:padding="10dp"
         android:text="Check Box" />
Attributes of Android CheckBox
We can also set attributes on CheckBox to customize it in our way, using the following attributes:
- android: id – It set a unique identity
- android: checked – It specifies the current state of the CheckBox.
- android: gravity – It sets the alignment of the CheckBox.
- android: text – It sets the text for the Radio CheckBox.
- android:textColor – It sets the color of the text in the CheckBox.
- android:textSize – It sets the size of the text in CheckBox.
- android:textStyle – It sets the style of the text, like – bold, italics.
- android: background – It sets the color for the background of the CheckBox.
- android: padding – It sets the padding from left, right bottom or the top.
- android:onClick – It invokes the method onClick() when the button is clicked.
- android: visibility – It controls the visibility of the CheckBox.
Implementation of Android RadioButton and Android RadioGroup
Let us see the implementation of the Android Radio Button and Android Radio Group through the following example:
Step 1. First of all, we will create a new project and name it. After this, we will define the layout in activity_main.xml file:
<?xml version="1.0" encoding="utf-8"?>
<RelativeLayout xmlns:android="http://schemas.android.com/apk/res/android"
   android:layout_width="match_parent"
   android:layout_height="match_parent">

   <TextView
       android:id="@+id/textView"
       android:layout_width="wrap_content"
       android:layout_height="wrap_content"
       android:layout_centerHorizontal="true"
       android:layout_marginLeft="100dp"
       android:layout_marginTop="80dp"
       android:fontFamily="@font/"
       android:text="DataFlair "
       android:textColor="#169179"
       android:textSize="50dp"
       android:textStyle="bold" />

   <TextView
       android:id="@+id/txtView"
       android:layout_width="wrap_content"
       android:layout_height="wrap_content"
       android:layout_marginLeft="100dp"
       android:layout_marginTop="150dp"
       android:text="Which city is Capital of India"
       android:textSize="18dp" />

   <RadioGroup
       android:id="@+id/rdGroup"
       android:layout_width="match_parent"
       android:layout_height="wrap_content"
       android:layout_below="@+id/txtView"
       android:orientation="vertical">

       <RadioButton
           android:id="@+id/rbDelhi"
           android:layout_width="wrap_content"
           android:layout_height="wrap_content"
           android:layout_marginLeft="100dp"
           android:onClick="onRadioButtonClicked"
           android:padding="10dp"
           android:text="Delhi" />

       <RadioButton
           android:id="@+id/rbmum"
           android:layout_width="wrap_content"
           android:layout_height="wrap_content"
           android:layout_marginLeft="100dp"
           android:onClick="onRadioButtonClicked"
           android:padding="10dp"
           android:text="Mumbai" />

       <RadioButton
           android:id="@+id/rbBhop"
           android:layout_width="wrap_content"
           android:layout_height="wrap_content"
           android:layout_marginLeft="100dp"
           android:onClick="onRadioButtonClicked"
           android:padding="10dp"
           android:text="Bhopal" />

       <RadioButton
           android:id="@+id/rbbang"
           android:layout_width="wrap_content"
           android:layout_height="wrap_content"
           android:layout_marginLeft="100dp"
           android:onClick="onRadioButtonClicked"
           android:padding="10dp"
           android:text="Bangalore" />
   </RadioGroup>

   <Button
       android:id="@+id/showbtn"
       android:layout_width="wrap_content"
       android:layout_height="wrap_content"
       android:layout_below="@+id/rdGroup"
       android:layout_marginLeft="100dp"
       android:layout_marginTop="12dp"
       android:text="Show the correct answer" />

</RelativeLayout>
Step 2. Now the thing we will do is, writing the following code in MainActivity.java file:
package com.dataflair.myradioandcheckbox;

import android.os.Bundle;
import android.view.View;
import android.widget.Button;
import android.widget.RadioButton;
import android.widget.Toast;

import androidx.appcompat.app.AppCompatActivity;

public class MainActivity extends AppCompatActivity {
   RadioButton Bhopal, Delhi, Bangalore, Mumbai;

   @Override
   protected void onCreate(Bundle savedInstanceState) {
       super.onCreate(savedInstanceState);
       setContentView(R.layout.activity_main);
       Bhopal = findViewById(R.id.rbBhop);
       Bangalore = findViewById(R.id.rbbang);
       Delhi = findViewById(R.id.rbDelhi);
       Mumbai = findViewById(R.id.rbmum);
       Button showbtn =        findViewById(R.id.showbtn);
       showbtn.setOnClickListener(new View.OnClickListener() {
           @Override
           public void onClick(View v) {
               String Res = " Right Answer is Delhi, ";
               Res += (Bhopal.isChecked()) ? " not Bhopal" : (Bangalore.isChecked()) ? " not Bangalore" : (Delhi.isChecked()) ? " Bravo " : (Mumbai.isChecked()) ? " not Mumbai" : "";
               Toast.makeText(getApplicationContext(), Res, Toast.LENGTH_SHORT).show();

           }
       });
   }

   public void onRadioButtonClicked(View view) {
       boolean checked = ((RadioButton) view).isChecked();
       String msg = "";
       // We'll check which radiobutton is clicked
       switch (view.getId()) {
           case R.id.rbBhop:
               if (checked)
                   msg = "You Clicked Bhopal";
               break;
           case R.id.rbbang:
               if (checked)
                   msg = "You Clicked Bangalore ";
               break;
           case R.id.rbDelhi:
               if (checked)
                   msg = "You Clicked Delhi ";
               break;
           case R.id.rbmum:
               if (checked)
                   msg = "You Clicked Mumbai";
               break;
       }
       Toast.makeText(getApplicationContext(), msg, Toast.LENGTH_SHORT).show();
   }
}
Step 3. Now we will run this:
i) This is the implementation of the Radio Button and Radio Group.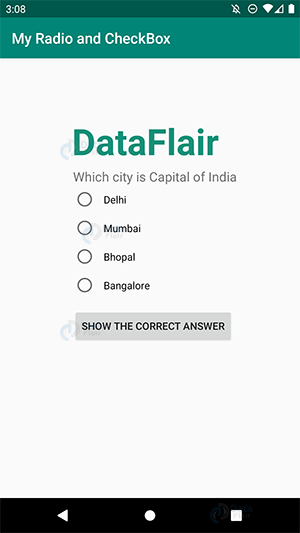
ii) Here, I clicked Mumbai and then pressed the button.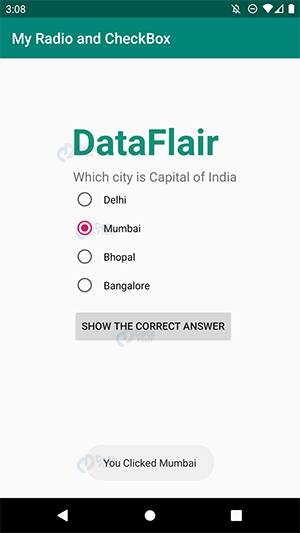
iii) After I pressed the button, It generated a toast message.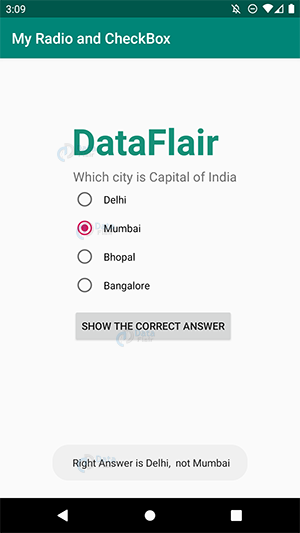
iv) This is where Radio Group works. Earlier Mumbai was checked, as soon as I checked Delhi, Mumbai got unchecked.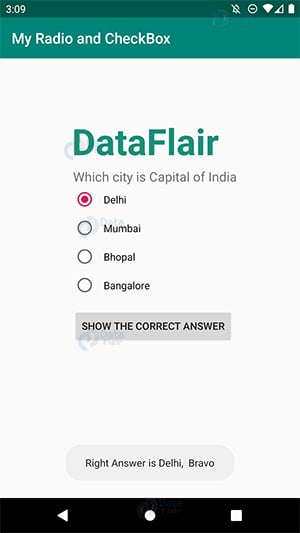
v) To see how Radio Group works, see this: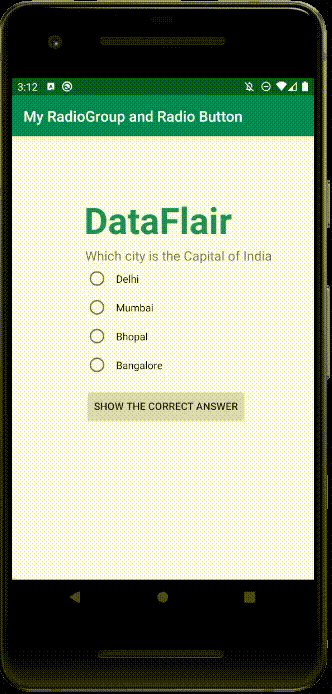
Implementation of CheckBox in Android
Let us now see the example for the implementation of CheckBox in our application:
Step 1: To implement it as always, we will first create a new project. Now we will define the CheckBox in activity_main.xml file as follows:
<?xml version="1.0" encoding="utf-8"?>
<LinearLayout xmlns:android="http://schemas.android.com/apk/res/android"
   android:layout_width="match_parent"
   android:layout_height="match_parent"
   android:orientation="vertical">


   <TextView
       android:id="@+id/textView"
       android:layout_width="wrap_content"
       android:layout_height="wrap_content"
       android:layout_centerHorizontal="true"
       android:layout_marginLeft="100dp"
       android:layout_marginTop="80dp"
       android:fontFamily="@font/"
       android:text="DataFlair "
       android:textColor="#169179"
       android:textSize="50dp"
       android:textStyle="bold" />

   <TextView
       android:layout_width="wrap_content"
       android:layout_height="wrap_content"
       android:layout_marginLeft="100dp"
       android:text="Choose your favourite cities "
       android:textColor="#169179"
       android:textSize="15dp"
       android:textStyle="bold" />

   <CheckBox
       android:id="@+id/myDel"
       android:layout_width="wrap_content"
       android:layout_height="wrap_content"
       android:layout_marginLeft="100dp"
       android:onClick="onCheckboxClicked"
       android:padding="10dp"
       android:text="Delhi" />

   <CheckBox
       android:id="@+id/myBang"
       android:layout_width="wrap_content"
       android:layout_height="wrap_content"
       android:layout_marginLeft="100dp"
       android:onClick="onCheckboxClicked"
       android:padding="10dp"
       android:text="Bangalore" />

   <CheckBox
       android:id="@+id/myPun"
       android:layout_width="wrap_content"
       android:layout_height="wrap_content"
       android:layout_marginLeft="100dp"
       android:onClick="onCheckboxClicked"
       android:padding="10dp"
       android:text="Pune" />

   <CheckBox
       android:id="@+id/mymum"
       android:layout_width="wrap_content"
       android:layout_height="wrap_content"
       android:layout_marginLeft="100dp"
       android:onClick="onCheckboxClicked"
       android:padding="10dp"
       android:text="Mumbai" />
   <CheckBox
       android:id="@+id/myShimla"
       android:layout_width="wrap_content"
       android:layout_height="wrap_content"
       android:layout_marginLeft="100dp"
       android:onClick="onCheckboxClicked"
       android:padding="10dp"
       android:text="Shimla" />

   <Button
       android:id="@+id/showBtn"
       android:layout_width="wrap_content"
       android:layout_height="wrap_content"
       android:layout_marginLeft="100dp"
       android:text="show me" />
</LinearLayout>
Step 2: Now we will write the following code in MainActivity.java file:
package com.DataFlair.mycheckbox;

import android.os.Bundle;
import android.view.View;
import android.widget.Button;
import android.widget.CheckBox;
import android.widget.Toast;

import androidx.appcompat.app.AppCompatActivity;

public class MainActivity extends AppCompatActivity {
   CheckBox Pun, Del, Mum, Bang, Shim;

   @Override

   protected void onCreate(Bundle savedInstanceState) {
       super.onCreate(savedInstanceState);
       setContentView(R.layout.activity_main);
       Pun = findViewById(R.id.myPun);
       Mum = findViewById(R.id.mymum);
       Del = findViewById(R.id.myDel);
       Bang = findViewById(R.id.myBang);
       Shim = findViewById(R.id.myShimla);
       Button showbtn = findViewById(R.id.showBtn);
       showbtn.setOnClickListener(new View.OnClickListener() {
           @Override
           public void onClick(View v) {
               String Res = "Favourite cities";
               if (Pun.isChecked()) {
                   Res += "\n Pune";
               }
               if (Mum.isChecked()) {
                   Res += "\n Mumbai";
               }
               if (Del.isChecked()) {
                   Res += "\n Delhi";
               }
               if (Bang.isChecked()) {
                   Res += "\n Bangalore";
               }
               if (Shim.isChecked()) {
                   Res += "\n Shimla";
               }
               Toast.makeText(getApplicationContext(), Res, Toast.LENGTH_SHORT).show();
           }
       });
   }

   public void onCheckboxClicked(View view) {
       boolean checked = ((CheckBox) view).isChecked();
       String msg = "";
       switch (view.getId()) {
           case R.id.myPun:
               msg = checked ? "Pune Selected" : "Pune Deselected";
               break;
           case R.id.mymum:
               msg = checked ? "Mumbai Selected" : "Mumbai Deselected";
               break;
           case R.id.myDel:
               msg = checked ? "Delhi Selected" : "Delhi Deselected";
               break;
           case R.id.myBang:
               msg = checked ? "Bangalore Selected" : "Bangalore Deselected";
               break;
           case R.id.myShimla:
               msg = checked ? "Shimla Selected" : "Shimla Deselected";
               break;
       }
       Toast.makeText(getApplicationContext(), msg, Toast.LENGTH_SHORT).show();
   }
}
Step 3: Now we will run the code as follows:
i) The following would be the CheckBox in our app: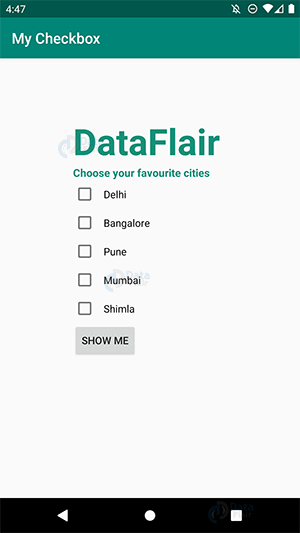
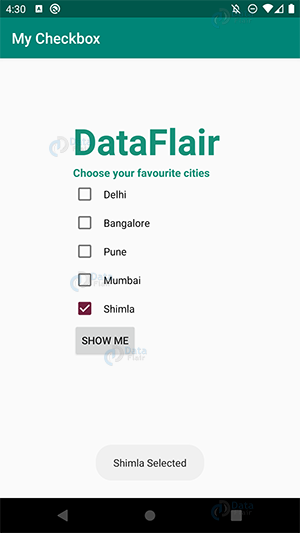
ii) We will select the cities now:
b. Since it is a Checkbox, we will select Mumbai as well: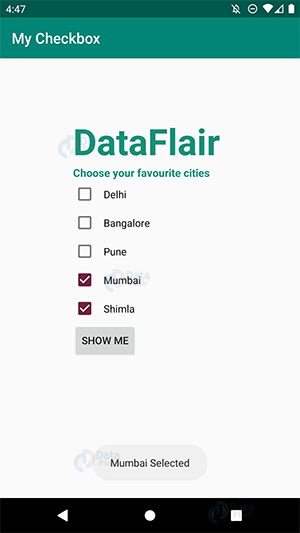
iii) As we can select more than one option as well, here are the selected cities. For that, click on “SHOW ME” –

Summary
In this tutorial, we saw quite a good number of interesting things including Android Radiobutton, Radio Group, and CheckBox. We saw how we can customize them and how well we can use them in our application. Then, we also implemented an example of those to understand them better. So, now it is your time to implement them in your applications.
I hope you liked the tutorial, if you have any queries about the Android Radiobutton, RadioGroup & CheckBox, please ask in the comment section. Our experts will get back to you.
Happy Learning😃
Your 15 seconds will encourage us to work even harder
Please share your happy experience on Google


