Location-Based Services in Android – Time to locate our device accurately
Placement-ready Courses: Enroll Now, Thank us Later!
Android provides the developers with its location API. This makes it easy for us to make applications that support location. Location-based services in android are those services that deal with the device’s geographical location.
The best live example is finding restaurants, petrol pumps or stores near you. In this article, we will learn how we can get an accurate location using Location-Based Services (LBS) in android. Also, we will see how to implement it.
The topics that we are going to cover in this article are:
- Introduction and Components
- The Location Object
- Location QoS
- GeoDecoder
- Implementation
What are Location-Based Services in Android?
Location-Based Services in Android provides us with this feature to help us in various ways. It enables us to create an application that is capable of detecting the current location of our devices. Android makes use of information from GPS and WiFi networks to get the location of the device on this Earth.
So LBS is the feature that Android provides us using the Location Framework. This framework provides us basically with certain classes and interfaces, which are key components. These components make it easier for us to implement the location feature in our application.
Time to have complete knowledge of Android features with DataFlair.
Components of Location-Based Services in Android
- LocationManager Class – It helps to get the location service of the System.
- LocationListener Interface – It receives notification from the Manager.
- LocationProvider – Devices provide a location from a set of providers.
- Location Class – It represents the geographic location at a particular time.
Location Object
The location object stores the geographic location of the device in terms of Longitude, Latitude, Altitude, velocity, etc. Let us see some important methods that give locations specific information:
1. float distanceTo(Location destination)
It returns an approx. distance between the destination and current location (in meters).
2. float getAccuracy()
It returns an estimated accuracy of location (in meters).
3. double getAltitude()
It returns altitude from the sea level (in meters).
4. double getLatitude()
It returns the Latitude (in degrees).
5. double getLongitude()
It returns the Longitude (in degrees).
6. float getSpeed()
It tells the speed, if applicable (meters/second).
7. void setAccuracy(float accuracy)
It lets us set an estimated accuracy of Location in meters.
8. void setAltitude(double altitude)
It lets us set Altitude of Location above the sea (in meters).
9. void setBearing(float bearing)
It lets us set the Bearing (in degrees).
10. void setLatitude(double Latitude)
It lets us set the Latitude (in degrees).
11. void setLongitude(double longitude)
It lets us set the Longitude (in degrees).
12. void setSpeed(float speed)
It lets us set the speed (in meters per second).
13. void reset()
It resets the location content.
14. boolean hasAccuracy()
It checks if the Location has Accuracy. If yes, returns “True”.
15. boolean hasAltitude()
It checks if the Location has Altitude. If yes, returns “True”.
16. boolean hasSpeed()
If the location has a speed it returns “True”.
17. boolean hasBearing()
It checks if the Location has Bearing. If yes, returns “True”.
Location Quality of Service
For a Quality of Service (QoS), a LocationRequest object is used to get location updates from LocationClient. There are certain set methods to maintain QoS. Let us see a few of them as follows:
- setPriority(int priority) – It sets the priority of the request.
- setInterval(long millisecond) – It sets intervals for location updates.
- setExpirationDuration(long millisecond) – It sets the duration of the location request.
- setExpirationTime(long millisecond) – It sets the expiry time of the request.
- setNumUpdates(int number) – It sets a number of updates for the location.
Geocoders
The location of a device is passed in either of the following two ways, which are:
- Longitude and latitude
- Human-readable address
To understand better, consider the address #267, southeast, Thane, Maharashtra. Did you understand this? Could you understand it if it were, latitude-37.65824 and longitude-122.58742. The answer is no, right?
So, Geocoder does the task of translating a location from long/lat to an address. And geocoding is the method of transforming a location in Longitude and Latitude to a descriptive address.
Geocoder does two services that are:
1. Forward Geocoding
Forward geocoding is translating from address to Longitude and Latitude.
2. Reverse Geocoding
A reverse geocoder is translating from Longitude and Latitude to a readable address.
Implementation of Location-Based Services in Android
Now we will implement location-based services in android using the following steps:
Step 1: We will, first of all, create a new project and fill all the required fields.
Open Activity_main.xml file and write the following content.
<?xml version = "1.0" encoding = "utf-8"?>
<LinearLayout xmlns:android = "http://schemas.android.com/apk/res/android"
   android:layout_width = "fill_parent"
   android:layout_height = "fill_parent"
   android:orientation = "vertical" >

   <TextView
       android:id="@+id/textView2"
       android:layout_width="wrap_content"
       android:layout_height="wrap_content"
       android:layout_centerHorizontal="true"
       android:layout_marginLeft="100dp"
       android:layout_marginTop="125dp"
       android:fontFamily="@font/abril_fatface"
       android:text="DataFlair "
       android:textColor="@color/colorPrimaryDark"
       android:textSize="50dp" />

   <Button
       android:id="@+id/button"
       android:layout_width="wrap_content"
       android:layout_height="wrap_content"
       android:layout_marginLeft="150dp"
       android:layout_marginTop="175dp"
       android:text="getlocation" />

</LinearLayout>
Step 2: Then we will enter the following code in MainActivity.java file
package com.DataFlair.locationservice;

import android.Manifest;
import android.app.Activity;
import android.content.pm.PackageManager;
import android.os.Bundle;
import android.view.View;
import android.widget.Button;
import android.widget.Toast;
import androidx.core.app.ActivityCompat;


public class MainActivity extends Activity {

   private static final int REQUEST_CODE_PERMISSION = 2;
   Button btnShowLocation;
   String mPermission = Manifest.permission.ACCESS_FINE_LOCATION;
   Location_Tracker gps;

   @Override
   public void onCreate(Bundle savedInstanceState) {
       super.onCreate(savedInstanceState);
       setContentView(R.layout.activity_main);

       try {
           if (ActivityCompat.checkSelfPermission(this, mPermission) != PackageManager.PERMISSION_GRANTED) {

               ActivityCompat.requestPermissions(this, new String[]{mPermission},
                       REQUEST_CODE_PERMISSION);

           }
       }
       catch (Exception e) {
           e.printStackTrace();
       }

       btnShowLocation = (Button) findViewById(R.id.button);
       // we will show the location button click event
       btnShowLocation.setOnClickListener(new View.OnClickListener() {

           @Override
           public void onClick(View arg0) {
               // we will create a class object
               gps = new Location_Tracker(MainActivity.this);
               // Now we will check if GPS is enabled
               if (gps.canGetLocation()) {
                   double latitude = gps.getLatitude();
                   double longitude = gps.getLongitude();
                   Toast.makeText(getApplicationContext(), "This is your Location : \nLatitude: " + latitude + "\nLongitude: " + longitude, Toast.LENGTH_LONG).show();
               }
               else {
                   gps.showSettings();
               }
           }
       });
   }
}
Step 3: Now we will create a java class and name it as Location_Track.java. We will write the following code:
package com.DataFlair.locationservice;

import android.app.AlertDialog;
import android.app.Service;
import android.content.Context;
import android.content.DialogInterface;
import android.content.Intent;
import android.location.Location;
import android.location.LocationListener;
import android.location.LocationManager;
import android.os.Bundle;
import android.os.IBinder;
import android.provider.Settings;
import android.util.Log;

public class Location_Tracker extends Service implements LocationListener {


   private static final long MIN_DISTANCE_CHANGE_FOR_UPDATES = 5; //It updates the location for a distance difference of 5 meters.
   private static final long MIN_TIME_BW_UPDATES = 1000 * 60 * 1; // 1 minute is the time interval for updation
   private final Context mContext;
   protected LocationManager locationManager; // This is the location Manager
   boolean isGPSEnabled = false; // GPS status
   boolean isNetworkEnabled = false; //Network status
   boolean canGetLocation = false; // status if location can be found
   Location location; // location
   double latitude; // latitude
   double longitude; // longitude

   public Location_Tracker(Context context) {
       this.mContext = context;
       getLocation();
   }
   public Location getLocation() {
       try {
           locationManager = (LocationManager) mContext.getSystemService(LOCATION_SERVICE);
           // getting GPS status
           isGPSEnabled = locationManager.isProviderEnabled(LocationManager.GPS_PROVIDER);
           // getting network status
           isNetworkEnabled = locationManager.isProviderEnabled(LocationManager.NETWORK_PROVIDER);
           if (!isGPSEnabled && !isNetworkEnabled) {

           }
           else {
               this.canGetLocation = true;
               //get location from the provider
               if (isNetworkEnabled) {
               locationManager.requestLocationUpdates(LocationManager.NETWORK_PROVIDER, MIN_TIME_BW_UPDATES, MIN_DISTANCE_CHANGE_FOR_UPDATES, this);
               Log.d("Network", "Network");

               if (locationManager != null) {
                  location = locationManager.getLastKnownLocation(LocationManager.NETWORK_PROVIDER);

                   if (location != null) {
                           latitude = location.getLatitude();
                           longitude = location.getLongitude();
                       }
                   }
               }

               if (isGPSEnabled) {
                   if (location == null) {
                   locationManager.requestLocationUpdates(LocationManager.GPS_PROVIDER, MIN_TIME_BW_UPDATES, MIN_DISTANCE_CHANGE_FOR_UPDATES, this);

                       Log.d("GPS Enabled", "GPS Enabled");
                       if (locationManager != null) {
                           location = locationManager.getLastKnownLocation(LocationManager.GPS_PROVIDER);
                           if (location != null) {
                               latitude = location.getLatitude();
                               longitude = location.getLongitude();
                           }
                       }
                   }
               }
           }

       }
       catch (Exception e) {
           e.printStackTrace();
       }

       return location;
   }

   // This method will help finding the Latitude
   public double getLatitude() {
       if (location != null) {
           latitude = location.getLatitude();
       }

       return latitude;
   }

   // This method will help finding the Latitude
   public double getLongitude() {
       if (location != null) {
           longitude = location.getLongitude();
       }

       return longitude;
   }

   //This method is to check if GPS is enabled
   public boolean canGetLocation() {
       return this.canGetLocation;
   }

   //This will launch settings
   public void showSettings() {
       AlertDialog.Builder alertDialog = new AlertDialog.Builder(mContext);
       alertDialog.setTitle("GPS is settings");
       alertDialog.setMessage("GPS is not enabled. Do you want to go to settings menu?");
       alertDialog.setPositiveButton("Settings", new DialogInterface.OnClickListener() {
           public void onClick(DialogInterface dialog, int which) {
               Intent intent = new Intent(Settings.ACTION_LOCATION_SOURCE_SETTINGS);
               mContext.startActivity(intent);
           }
       });

       alertDialog.setNegativeButton("Cancel", new DialogInterface.OnClickListener() {
           public void onClick(DialogInterface dialog, int which) {
               dialog.cancel();
           }
       });

       // Showing Alert Message
       alertDialog.show();
   }

   @Override
   public void onLocationChanged(Location location) {
   }

   @Override
   public void onProviderDisabled(String provider) {
   }

   @Override
   public void onProviderEnabled(String provider) {
   }

   @Override
   public void onStatusChanged(String provider, int status, Bundle extras) {
   }

   @Override
   public IBinder onBind(Intent arg0) {
       return null;
   }
}
Step 4: Now we will enter the following code in Manifest.xml file.
<?xml version = "1.0" encoding = "utf-8"?>
<manifest xmlns:android = "http://schemas.android.com/apk/res/android"
   package = "com.DataFlair.locationservice">
   <uses-permission android:name = "android.permission.ACCESS_FINE_LOCATION" />
   <uses-permission android:name = "android.permission.INTERNET" />
   <application
       android:allowBackup="true"
       android:icon="@mipmap/ic_launcher"
       android:label="@string/app_name"
       android:roundIcon="@mipmap/ic_launcher_round"
       android:supportsRtl="true"
       android:theme = "@style/AppTheme">

       <activity android:name = ".MainActivity">
           <intent-filter>
               <action android:name = "android.intent.action.MAIN" />
               <category android:name = "android.intent.category.LAUNCHER" />
           </intent-filter>
       </activity>
       <meta-data
           android:name="preloaded_fonts"
           android:resource="@array/preloaded_fonts" />
   </application>

</manifest>
Step 5: Now we will run the code. The following will be the output.
i) The following will be the first page of the Application.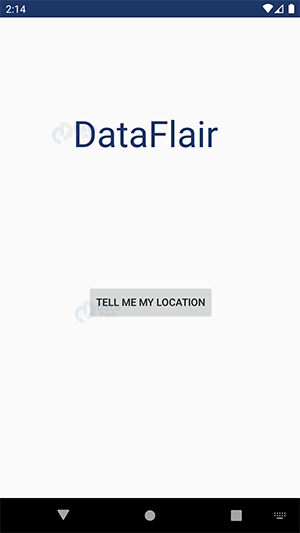
ii) Now click on “Tell me my location”.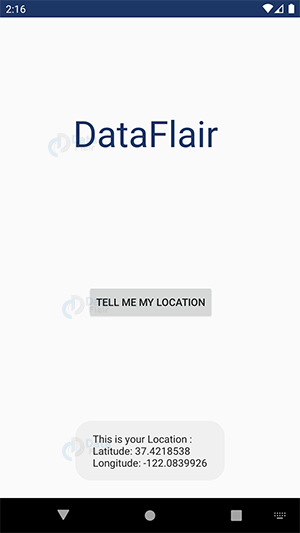
Summary
So in this article, we have learned about the Location-based services in Android. We read its important methods and the Location object. Then we also saw how to maintain the Quality of Location and keep the users updated with this. We also implemented an example of it. Now it is your turn to do the same. We will meet in the next article.
I hope you liked DataFlair’s Location-Based Services in Android article. If you have any queries mention them in the comment section.
Happy Learning😃
Did you like this article? If Yes, please give DataFlair 5 Stars on Google


How to set up a Location based services? Is it something free or how much it costs?