Android Telephony and Telephony Manager Implementation
Placement-ready Courses: Enroll Now, Thank us Later!
What is Android Telephony?
Android Telephony framework provides us the functionalities of the mobile. It gives us information about functionalities like calls, SMS, MMS, network, data services, IMEI number, and so on.
For better understanding, you can consider Dialer, Browser, Sim App toolkit, Broadcast receivers, and so on.
Architecture of Android Telephony
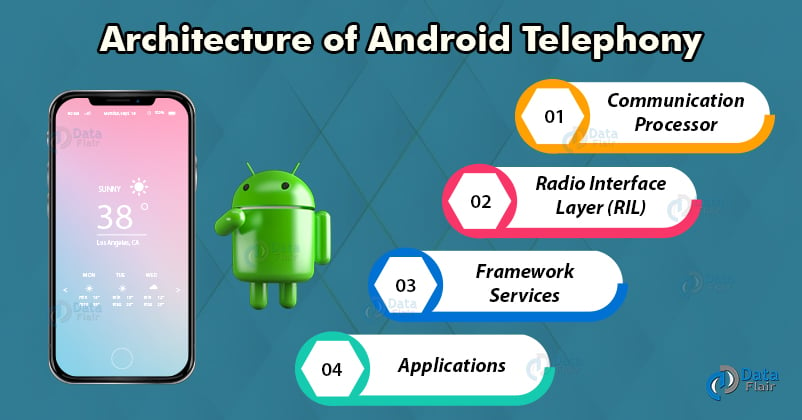
Android Telephony architecture works in 4 layers that are :
- Communication Processor
- Radio Interface Layer (RIL)
- Framework Services
- Applications
Let us try to understand them briefly one by one :
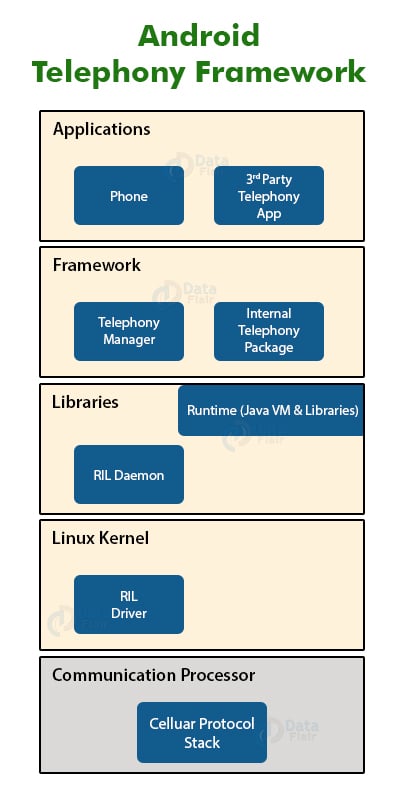
1. Communication Processor
It is an input/output processor to distribute and collect data from a number of remote terminals. It is a specialized processor designed to communicate with the data communication network.
2. Radio Interface Layer
It is a bridge between the hardware and Android phone framework services. Rather we say, it is a protocol stack for Telephone. It has two main components that are:
- RIL Daemon– It starts when the android system starts. It reads the system properties to find a library that is to be used for Vendor RIL.
- Vendor RIL– It is also known as RIL Driver. It can be understood as a library that is specific to each modem.
3. Framework Services
The telephony Framework starts and initializes along with the system. All the queries by Application API are directed to RIL using these services.
4. Application
These are the Application UI related to telephony such as Dialer, SMS, MMS, Call tracker, etc. These applications start with the android system boot up. These are tied with framework services of telephony.
Android Telephony Framework consists of two types of packages that are:
1. Internal Telephony Packages: This is generally the used for default telephony app.apk.
2. Open Technology Packages: This is for third-party apps.
These are 4 layers of Android Telephony
Implementation of Android Telephony
We will now implement it in Android Studio using the following steps:
1. At first, create a new project and name it.
2. Now, open the layout file, and define the following:
Open the main_activity.xml file –
<?xml version="1.0" encoding="utf-8"?>

<RelativeLayout xmlns:android="http://schemas.android.com/apk/res/android"
   xmlns:tools="http://schemas.android.com/tools"
   android:layout_width="match_parent"
   android:layout_height="match_parent"
   android:label="Telephony"
   android:paddingLeft="1dp"
   android:paddingTop="1dp"
   android:paddingRight="1dp"
   android:paddingBottom="1dp"
   tools:context=".MainActivity">

   <TextView
       android:id="@+id/textView"
       android:layout_width="wrap_content"
       android:layout_height="wrap_content"
       android:layout_alignParentLeft="true"
       android:layout_alignParentTop="true"
       android:layout_marginLeft="30dp"
       android:layout_marginTop="150dp"
       android:fontFamily="adamina"
       android:text="Mobile Details:"
       android:textSize="20dp" />

</RelativeLayout>
3. Now open the MainActivity.java file and write the following code there:
package com.DataFlair.androidtelephony;

import android.app.Activity;
import android.content.Context;
import android.os.Bundle;
import android.telephony.TelephonyManager;
import android.widget.TextView;

public class MainActivity extends Activity {
package com.DataFlair.androidtelephony;

import android.app.Activity;
import android.content.Context;
import android.os.Bundle;
import android.telephony.TelephonyManager;
import android.widget.TextView;

public class MainActivity extends Activity {
   TextView tv;

   @Override
   protected void onCreate(Bundle savedInstanceState) {
       super.onCreate(savedInstanceState);
       setContentView(R.layout.activity_main);

       tv = findViewById(R.id.textView);


       //instance of TelephonyManager
       TelephonyManager tele_man = (TelephonyManager) getSystemService(Context.TELEPHONY_SERVICE);

       String nwcountryISO =        tele_man.getNetworkCountryIso();
       String SIMCountryISO = tele_man.getSimCountryIso();

       String PhoneType = ""; // it'll hold the type of phone i.e CDMA / GSM/ None
       int phoneType = tele_man.getPhoneType();

       switch (phoneType) {
           case (TelephonyManager.PHONE_TYPE_CDMA):
               PhoneType = "CDMA";
               break;
           case (TelephonyManager.PHONE_TYPE_GSM):
               PhoneType = "GSM";
               break;
           case (TelephonyManager.PHONE_TYPE_NONE):
               PhoneType = "NONE";
               break;
       }

       // true or false for roaming or not
       boolean checkRoaming = tele_man.isNetworkRoaming();

       String data = "Your Mobile Details are enlisted below: \n";
       data += "\n Network Country ISO is - " + nwcountryISO;
       data += "\n SIM Country ISO is - " + SIMCountryISO;
       data += "\n Network type is - " + PhoneType;
       data += "\n Roaming on is - " + checkRoaming;
       //Now we'll display the information
       tv.setText(data);
   }


}
4. Now we will write the following code in the Manifest.xml file.
<?xml version="1.0" encoding="utf-8"?>
<manifest xmlns:android="http://schemas.android.com/apk/res/android"
   package="com.DataFlair.androidtelephony"
   android:versionCode="1"
   android:versionName="1.0">

   <uses-sdk android:targetSdkVersion="17" />

   <uses-permission android:name="android.permission.READ_PHONE_STATE" />

   <application
       android:allowBackup="true"
       android:icon="@drawable/ic_launcher_background"
       android:label="@string/app_name"
       android:paddingLeft="1dp"
       android:paddingTop="1dp"
       android:paddingRight="1dp"
       android:paddingBottom="1dp"
       android:theme="@style/AppTheme">
       <activity
           android:name="com.DataFlair.androidtelephony.MainActivity"
           android:label="@string/app_name">
           <intent-filter>
               <action android:name="android.intent.action.MAIN" />
               <category android:name="android.intent.category.LAUNCHER" />
           </intent-filter>
       </activity>
       <meta-data
           android:name="preloaded_fonts"
           android:resource="@array/preloaded_fonts" />
   </application>

</manifest>
5. Now we will RUN the application and following would be the Output.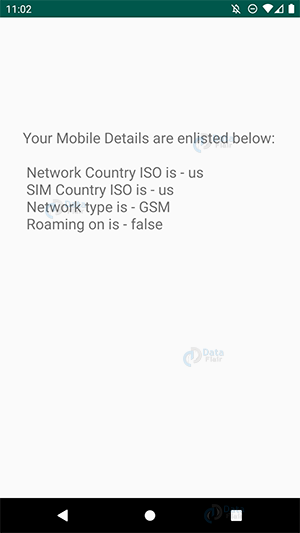
Summary
In this DataFlair Android tutorial, we went through the Android Telephony and Android TelephonyManager. We also saw Telephony architecture, framework and learned the layers that it has. We also implemented it in our Application.
Now it is your turn to implement it. We will catch up with you in the next article. Meanwhile let us know feedback in the comment section.
Did you know we work 24x7 to provide you best tutorials
Please encourage us - write a review on Google


Good
i am being driven in sane andeveryoneof you engaging with the feed back althoughyou may ot know but it is all part of a very bad narcissisticabuse and i am the targeso if somebodyout there cares to lend a hand to help me it wouldmean the world to me . i am so broken and afraidand it doesn’tstop every day of my life for over 3 years now have been a ginny pig and a doormat everythingi touch is not what i think it is ive had my bank account robbed ive been spit on and im so so tired … no matter what i do it gets worse . i have no control… please help if you can. and it all revolves around these builds , ads commercials and stories… fairy land