Installing Android Studio – Steps to Install Android Studio
Job-ready Online Courses: Click, Learn, Succeed, Start Now!
In this article, we will learn what is Android Studio, why we need Android Studio and the installation process of Java JDK for Windows 10 and the process of installing Android Studio for Windows, Mac, Linux. As discussed earlier there are many frameworks for the development of Android applications and Android Studio is the first and basic step for Android development. Firstly, we will discuss what is Android Studio.

Installing Android Studio Contents
1. What is Android Studio?
Android Studio is the Integrated Development Environment for the development of an Android application. It is based on IntelliJ IDEA. IntelliJ provides static code analysis, coding assistance, error analysis and ergonomic design, which makes development more productive. Android Studio supports Gradle based build system, emulator, code, lint tools, templates, ProGuard and GitHub integration. Also, it has modalities like Android app modules, Library Modules, Google app engine modules.
Moreover, it is a replacement for Eclipse Android Development tools. Android Studio was announced on 16 May 2013 and the stable version was released in Dec 2014. The current stable version is 3.3 released in Jan 2019. Android Studio can be downloaded from its official website for free which makes the application development process, cheaper.
2. Why Android Studio?
Android Studio is built to make android application development more fast and easy. It provides us with various features. Android Studio provides us with advanced code completion, which provides us with precise results. The user interface is easy to use and provides more customizations.
Android Studio has a drag and drop feature which is very helpful for the developers.
Also, Android Studio requires only 30 sec approx for building the project. It is really fast. Hence, beginners in Android development should opt for Android Studio.
Before we proceed further with the installations, let’s take a look at the software required for the development of the Android application.
- Java JDK
- Android Studio
These tools are easily available on the internet and are free of cost.
3. Installation Steps of JAVA JDK
It is mandatory to download the Java JDK. There are only seven steps for the installation process of Java JDK which are as follows:
1. Firstly, click on the following link to download JDK. https://www.oracle.com/technetwork/java/javase/downloads/index.html
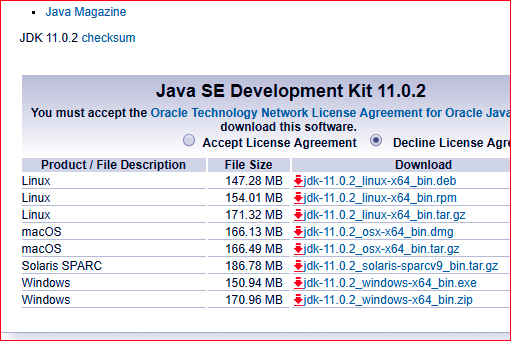
Installation of JAVA JDK
2. By clicking on the link given above you will be directed to the ORACLE page, there will be some links as depicted in the above picture.
3. After that, click on Accept Agreement License.
4. Then, download the link as per your operating system that is Windows, Mac, Linux.
5. After downloading the file, click on the downloaded file and install JDK.
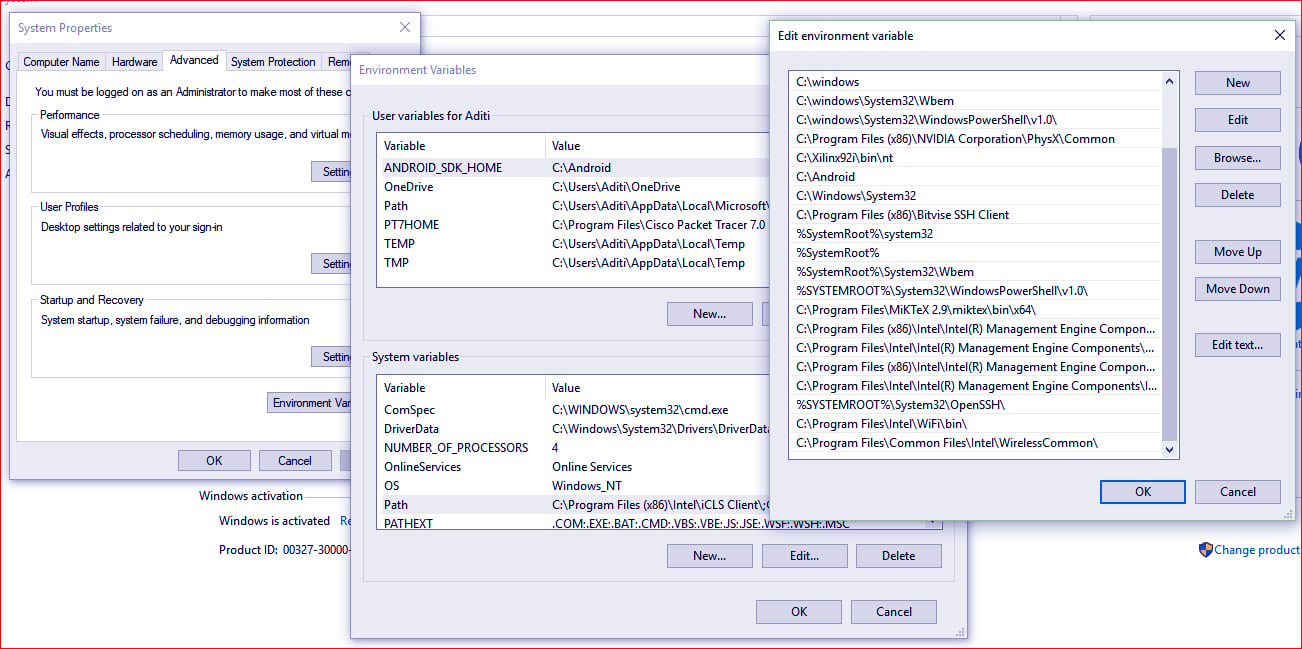
6. Now, after installation, we need to set the environment variable
7. Lastly, to set environment variable, follow this, Control Panel->System and Security-> System-> Advanced setting->Environment variable -> Add new path.
By following these steps you will successfully add the environment variable. Now, we will see the installation process of Android studio for Windows, Mac and Linux.
4. Installation Steps of Android Studio for Windows
There are just three steps for installing Android studio for windows which are as follows:
Android Studio Installation
1. Firstly, to download Android Studio click on the link given below,
https://developer.android.com/studio/?gclid=CjwKCAiA4t_iBRApEiwAn-vt-76uWkKeOmcrZxTYZ-got8ljyDlBQS28wg8w9S4kLUmbHKn4Wb0DwBoCzm8QAvD_BwE
This will direct you to the official website of Android Studio.
2. Then, click on download Android Studio as shown.

Android Studio Download
3. Lastly, click on the downloaded file and packages will install, automatically.
We are done with installation for windows and now you can start making your application using Android Studio.
5. Installation Steps of Android Studio for Mac
Following are the steps for installing Android studio for Mac:
1. By clicking the below link you will direct to the official page of Android Studio where you will get an option to download Android Studio.
https://developer.android.com/studio/?gclid=CjwKCAiA4t_iBRApEiwAn-vt-76uWkKeOmcrZxTYZ-got8ljyDlBQS28wg8w9S4kLUmbHKn4Wb0DwBoCzm8QAvD_BwE#downloads
2. After that, click on the button and dmg file will download.
3. Open the dmg file by double-clicking on it.
Drag & Drop Android Studio Icon
4. Then, drag and drop the Android Studio icon in the application folder. This will copy all the files of Android Studio in the applications folder and you will be able to see the Android Studio icon in the application.
6. Installation Steps of Android Studio for Linux
Just follow these three steps to download Android Studio for Linux:
- Click on the following link and download Android Studio file.
https://developer.android.com/studio/?gclid=CjwKCAiA4t_iBRApEiwAn-vt-76uWkKeOmcrZxTYZ-got8ljyDlBQS28wg8w9S4kLUmbHKn4Wb0DwBoCzm8QAvD_BwE#downloads - Now, unzip and extract the downloaded file.
- Now to run Android Studio, open terminal and then open bin directory and execute the studio.sh command on the terminal.
- And then you can build your Android applications on your Linux system as well.
7. Conclusion
This comes to the end of our article on Android Studio and its installation steps for Windows, Mac, and Linux. As we saw, it is very easy to download and install Android Studio on any of the operating systems. And, you just have to keep in mind before installing Android Studio, the machine should have JDK installed and a good supply of internet while downloading Android Studio. Also, we would love to hear from you, just comment your query or feedback in the comment box, below.
If you are Happy with DataFlair, do not forget to make us happy with your positive feedback on Google


There are two files listed for Windows for Java SE Development Kit 16 Downloads. Do I download one or both? If one, which one?
What is the name and value of the environment variable to be added in the following steps:
6. Now, after installation, we need to set the environment variable
7. Lastly, to set environment variable, follow this, Control Panel->System and Security-> System-> Advanced setting->Environment variable -> Add new path.
By following these steps you will successfully add the environment variable.
good guide.
thank you.