Android Event Handling – Manage the Action of Users Interaction
Interactive Online Courses: Elevate Skills & Succeed Enroll Now!
Event handling comes with Event and Handling. The event here is nothing but an Action. Handling here means managing. In the whole Android Event Handling, all we do is manage the actions. These actions are related to the user’s interaction. These Events collect data about the user’s interaction using interactive components.
For example, when you click on some button, onClick() is invoked. All the events in Android are stored in a Queue using First In First Out (FIFO) scheduling.
Today in this article, we will learn about Event Handling in Android. But first, let’s get familiar with the concept of Android Application Components.
Android Event Handling
To include the Event Handler in your application, you should know the following three concepts:
- Event Listeners
- Event Handlers
- Event Listener Registration
1. Event Listeners
An event listener is an interface in the View class of Android. It has a single callback method. This method will be called when the View that is registered with the Listener is activated by the user’s action.
Following are some of the important Event Listeners:
| Event Listeners | Event listener Description |
| onClick() | This event occurs when the user clicks on an item on the screen in touch more or focuses on an item using a trackball or navigation-keys. |
| onLongClick() | This event occurs when a user clicks on an item or screen for more than 1 second. |
| onFocusChange() | This event occurs when a user navigates away from an item that was on focus. |
| onKey() | This event occurs when a user focuses and clicks on an item. |
| onTouch() | This event occurs when a user touches a particular range of an item with gestures or simple touch or tap. |
| onCreateContextMenu() | This event occurs when a Context Menu is built. |
| onMenuItemClick() | It occurs when a user clicks or selects an item from a menu. |
2. Event Handlers
Event handles are the actual methods that have the action that is to be taken. After an event has happened and event listeners are registered, event listeners call Event Handler. These are useful to define some callback methods.
Following are some of the important Event Handlers:
| Event Handler | Event Handler Description |
| onKeyUp() | The system invokes this method when a new key event occurs. |
| onKeyDown() | The system invokes this method when a key down event occurs. |
| onTrackballEvent() | The system invokes this method when a trackball motion event occurs. |
| onTouchEvent() | The system invokes this method when some touch event occurs. |
| onFocusChange() | The system invokes this method when an item gets into focus or loses focus. |
3. Event Listener Registration
Event Registration is the process in which Event Listeners are registered with Event Handlers. This is important as Handler will work only after the Listener fires an Event.
Android Event Listener registration can be done in the following three ways:
- The first method to register event listeners is by directly mentioning them in activity_main.xml.
- We can also register event listeners by using Activity class that implements a listener interface.
- The last method is by using an Anonymous class.
The following is an example to demonstrate Event Listener Registration:
@Override
protected void onCreate(Bundle savedInstanceState) {
   Button button = (Button)findViewById(R.id.btn1);

   button.setOnTouchListener(buttonListener);
// code
}
// Anonymous implementation of OnTouchListener
private View.OnTouchListener buttonListener = new View.OnTouchListener() {
   public void onTouchEvent(View v) {
    // define the action
    }
};
Touch mode
While a user interacts with the device they roll the screen over. Therefore it’s necessary to focus on the items that are actionable. In the devices with touch functionality, and the user begins interacting with it then it is not important to give focus on touchable items. This mode of interaction is “Touch Mode”. Once a user touches the screen, the device enters in touch mode and then onwards the actionable icons and buttons are kept on focus like – navigation button or home button.
Handling Focus
The framework handles the focus movement according to user input. Handling the focus includes adding and removing the focus according to the user input movements. Focus changes with the help of Views. You can check if the View is set to be in focusable mode or not using isFocusable(). And we can also change the focus mode by using setFocusable().
We can set the focus of view in touch mode as well, using setFocusInTouchMode(). To check if a view allows focus in touch mode use isFocusableInTouchMode().
Implementing Android Event Handling
Now we will move towards the implementation of Event Handling. We will implement and see how it works. Here I will show you how to implement onClick().
Without any delay let’s start it:
Step 1: Open New Project and fill in all the required details.
Step 2: After doing this open your project and we will set the layout and the required Id of the elements so we can call them easily.
Open the activity_main.xml file. The following code is to be written in this file.
<?xml version="1.0" encoding="utf-8"?>
<LinearLayout xmlns:android="http://schemas.android.com/apk/res/android"
   android:layout_width="match_parent"
   android:layout_height="match_parent"
   android:orientation="vertical" >

<TextView
   android:id="@+id/textView2"
   android:layout_width="wrap_content"
   android:layout_height="wrap_content"
   android:layout_centerHorizontal="true"
   android:layout_marginLeft="100dp"
   android:fontFamily="@font/arya_bold"
   android:text="DataFlair "
   android:textColor="@color/colorPrimaryDark"
   android:textSize="50dp" />

<Button
   android:id="@+id/btnClick"
   android:layout_width="wrap_content"
   android:layout_height="wrap_content"
   android:layout_marginLeft="150dp"
   android:layout_marginTop="100dp"
   android:fontFamily="@font/arya_bold"
   android:text="Click Event" />

<TextView
   android:id="@+id/txtResult"
   android:layout_width="wrap_content"
   android:layout_height="wrap_content"
   android:textColor="#009999"
   android:layout_marginLeft="150dp"
   android:textSize="20dp"
   android:textStyle="bold"
   android:layout_marginTop="12dp"/>

<TextView
   android:id="@+id/textView"
   android:layout_width="match_parent"
   android:layout_height="match_parent"
   android:layout_below="@+id/button2"
   android:layout_centerHorizontal="true"
   android:fontFamily="@font/arya_bold"
   android:gravity="center"
   android:text="See me!"
   android:textColor="#009999"
   android:textSize="25dp" />
</LinearLayout>
Step 3: After writing the code of activity.xml. We will now write the code for main_activity.java as follows:
package com.DataFlair.dataflaireventhandling;

import android.os.Bundle;
import android.view.Gravity;
import android.view.View;
import android.widget.Button;
import androidx.appcompat.app.AppCompatActivity;
import android.widget.TextView;

public class MainActivity extends AppCompatActivity {
   Button btn;
   TextView tView;
   @Override
   protected void onCreate(Bundle savedInstanceState) {
      super.onCreate(savedInstanceState);
      setContentView(R.layout.activity_main);
      btn = (Button)findViewById(R.id.btnClick);
      tView = (TextView)findViewById(R.id.txtResult);
      btn.setOnClickListener(new View.OnClickListener() {
         @Override
         public void onClick(View v) {
            TextView txtView = (TextView) findViewById(R.id.textView);
            txtView.setText("You've Clicked \n The Event has taken place");
            txtView.setTextSize(25);
            txtView.setGravity(Gravity.CENTER);
            txtView.setTextColor(R.color.colorAccent);
         }
      });
    }
}
Step 4: Now open color.xml in this order – app > src>main>res>values>colors.xml
<?xml version="1.0" encoding="utf-8"?>
<resources>
   <color name="colorPrimary">#008577</color>
   <color name="colorPrimaryDark">#00574B</color>
   <color name="colorAccent">#D81B60</color>

</resources>
Step 5: After writing the above codes, we can happily run the application.
After you run the application, the following would be as follows:
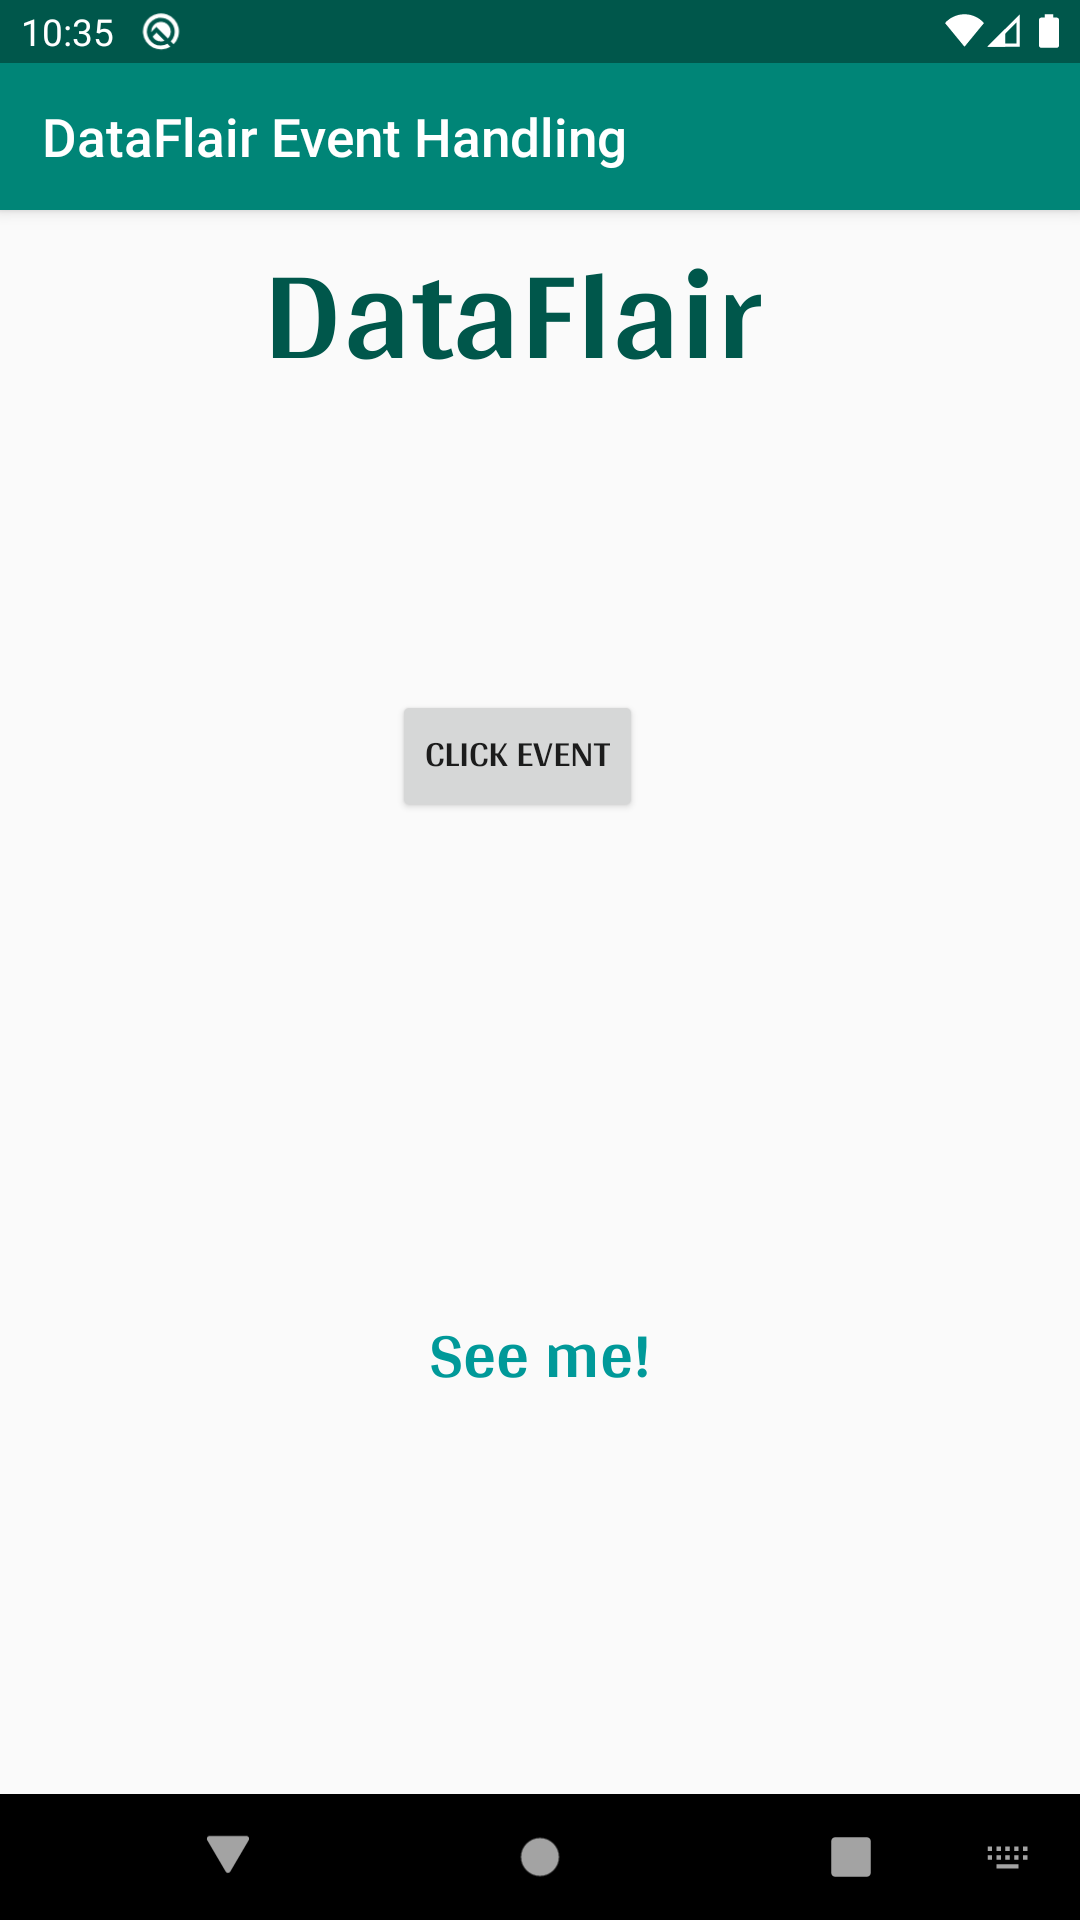
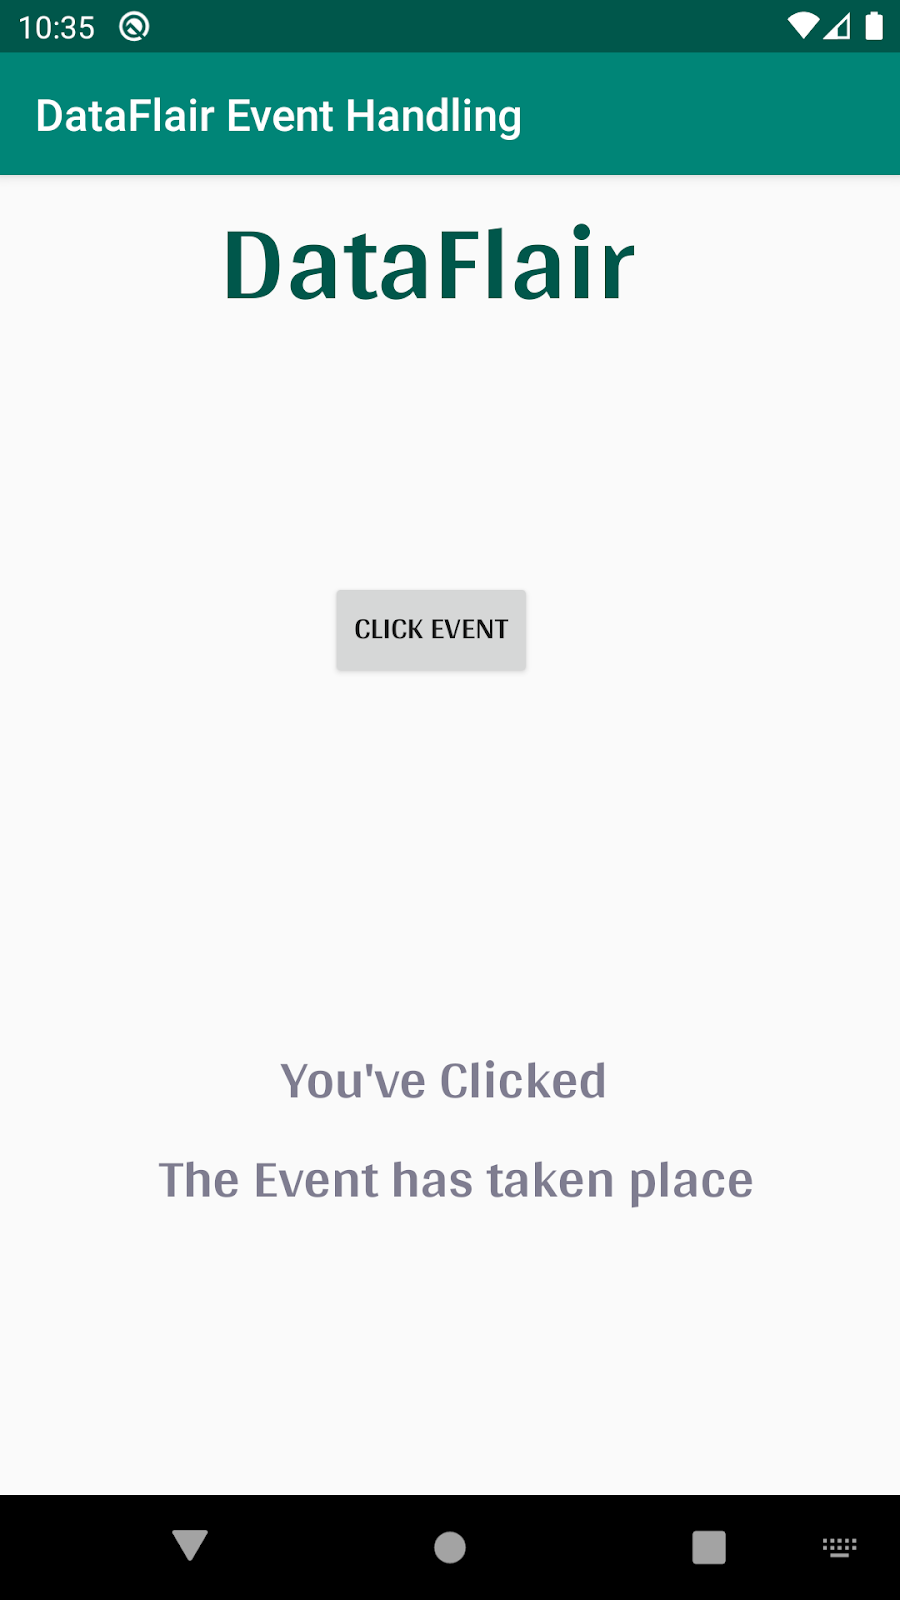
Now, we will click and see how the onClick() method reacts when we click.
Summary
Here we come to the end of our article. We have completed another topic of Android that was Event Handling. I hope you have understood it pretty well. I would also like you all to try and make an application on your own as well. Event Handling is such fun. In this article, we learned about the three main concepts of Event Handling as well as the callback methods. I hope you all liked it.
Thank you for reading our article. Do share your feedback through the comment section below.
Your 15 seconds will encourage us to work even harder
Please share your happy experience on Google


