Python Chatbot Project – Learn to build your first chatbot using NLTK & Keras
Free Machine Learning courses with 130+ real-time projects Start Now!!
Hey Siri, What’s the meaning of Life?
As per all the evidence, it’s chocolate for you.
Soon as I heard this reply from Siri, I knew I found a perfect partner to savour my hours of solitude. From stupid questions to some pretty serious advice, Siri has been always there for me.
How amazing it is to tell someone everything and anything and not being judged at all. A top class feeling it is and that’s what the beauty of a chatbot is.
This is the 9th project in the 20 Python projects series by DataFlair and make sure to bookmark other interesting projects:
- Fake News Detection Python Project
- Parkinson’s Disease Detection Python Project
- Color Detection Python Project
- Speech Emotion Recognition Python Project
- Breast Cancer Classification Python Project
- Age and Gender Detection Python Project
- Handwritten Digit Recognition Python Project
- Chatbot Python Project
- Driver Drowsiness Detection Python Project
- Traffic Signs Recognition Python Project
- Image Caption Generator Python Project
What is Chatbot?
A chatbot is an intelligent piece of software that is capable of communicating and performing actions similar to a human. Chatbots are used a lot in customer interaction, marketing on social network sites and instantly messaging the client. There are two basic types of chatbot models based on how they are built; Retrieval based and Generative based models.
1. Retrieval based Chatbots
A retrieval-based chatbot uses predefined input patterns and responses. It then uses some type of heuristic approach to select the appropriate response. It is widely used in the industry to make goal-oriented chatbots where we can customize the tone and flow of the chatbot to drive our customers with the best experience.
2. Generative based Chatbots
Generative models are not based on some predefined responses.
They are based on seq 2 seq neural networks. It is the same idea as machine translation. In machine translation, we translate the source code from one language to another language but here, we are going to transform input into an output. It needs a large amount of data and it is based on Deep Neural networks.
About the Python Project – Chatbot
In this Python project with source code, we are going to build a chatbot using deep learning techniques. The chatbot will be trained on the dataset which contains categories (intents), pattern and responses. We use a special recurrent neural network (LSTM) to classify which category the user’s message belongs to and then we will give a random response from the list of responses.
Let’s create a retrieval based chatbot using NLTK, Keras, Python, etc.
Download Chatbot Code & Dataset
The dataset we will be using is ‘intents.json’. This is a JSON file that contains the patterns we need to find and the responses we want to return to the user.
Please download python chatbot code & dataset from the following link: Python Chatbot Code & Dataset
Prerequisites
The project requires you to have good knowledge of Python, Keras, and Natural language processing (NLTK). Along with them, we will use some helping modules which you can download using the python-pip command.
pip install tensorflow, keras, pickle, nltk
How to Make Chatbot in Python?
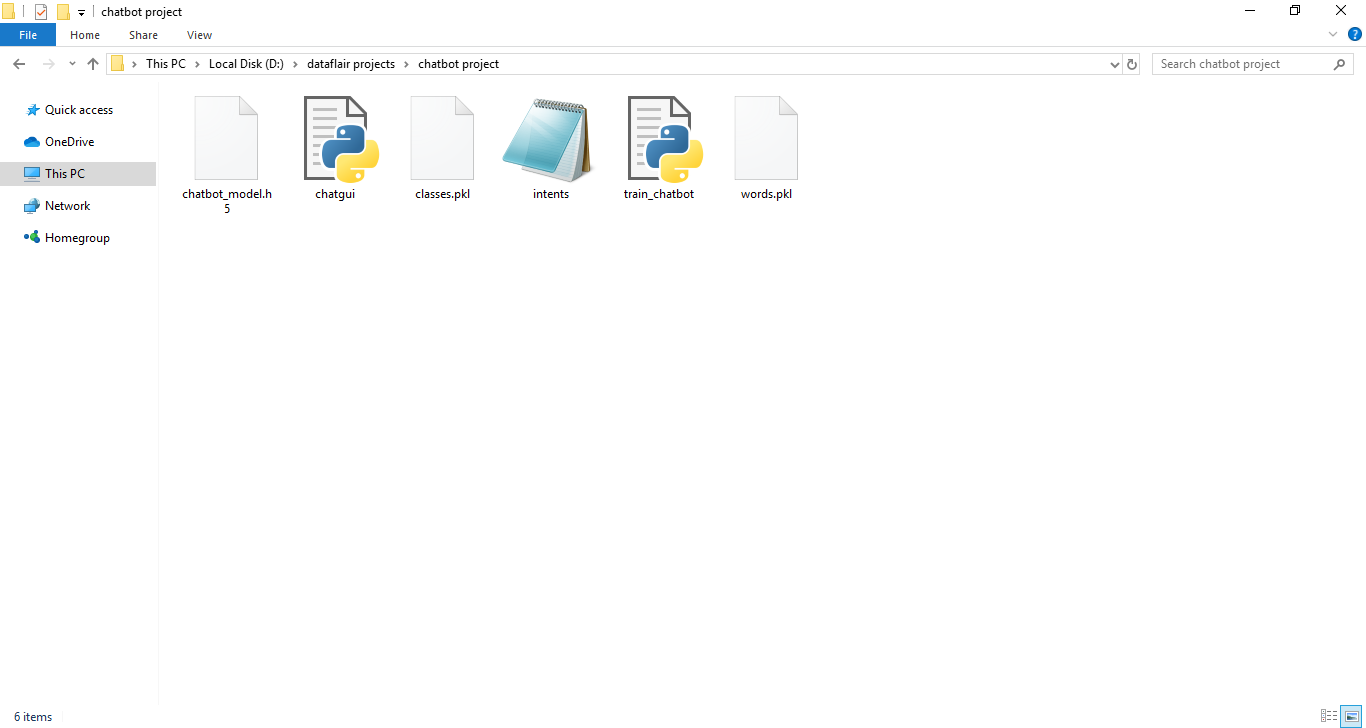
Now we are going to build the chatbot using Python but first, let us see the file structure and the type of files we will be creating:
- Intents.json – The data file which has predefined patterns and responses.
- train_chatbot.py – In this Python file, we wrote a script to build the model and train our chatbot.
- Words.pkl – This is a pickle file in which we store the words Python object that contains a list of our vocabulary.
- Classes.pkl – The classes pickle file contains the list of categories.
- Chatbot_model.h5 – This is the trained model that contains information about the model and has weights of the neurons.
- Chatgui.py – This is the Python script in which we implemented GUI for our chatbot. Users can easily interact with the bot.
Here are the 5 steps to create a chatbot in Python from scratch:
- Import and load the data file
- Preprocess data
- Create training and testing data
- Build the model
- Predict the response
1. Import and load the data file
First, make a file name as train_chatbot.py. We import the necessary packages for our chatbot and initialize the variables we will use in our Python project.
The data file is in JSON format so we used the json package to parse the JSON file into Python.
import nltk
from nltk.stem import WordNetLemmatizer
lemmatizer = WordNetLemmatizer()
import json
import pickle

import numpy as np
from keras.models import Sequential
from keras.layers import Dense, Activation, Dropout
from keras.optimizers import SGD
import random

words=[]
classes = []
documents = []
ignore_words = ['?', '!']
data_file = open('intents.json').read()
intents = json.loads(data_file)
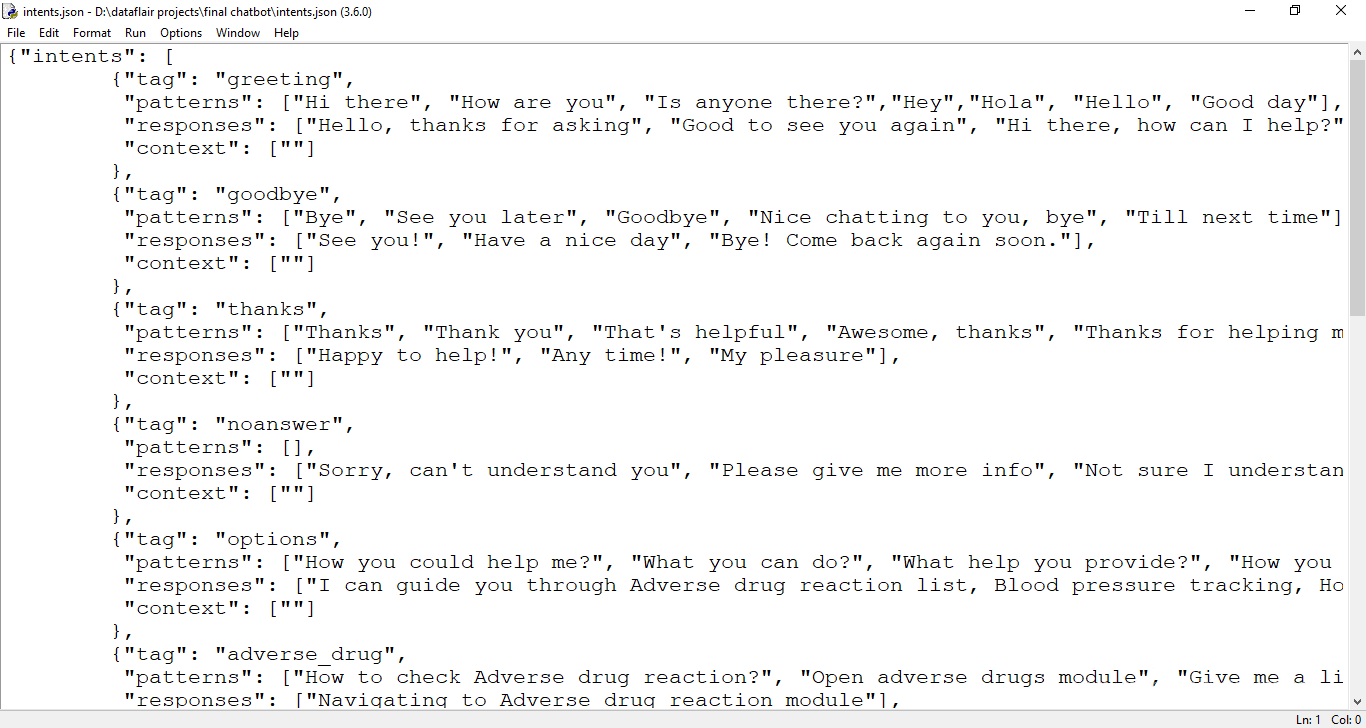
This is how our intents.json file looks like.
2. Preprocess data
When working with text data, we need to perform various preprocessing on the data before we make a machine learning or a deep learning model. Based on the requirements we need to apply various operations to preprocess the data.
Tokenizing is the most basic and first thing you can do on text data. Tokenizing is the process of breaking the whole text into small parts like words.
Here we iterate through the patterns and tokenize the sentence using nltk.word_tokenize() function and append each word in the words list. We also create a list of classes for our tags.
for intent in intents['intents']:
    for pattern in intent['patterns']:

        #tokenize each word
        w = nltk.word_tokenize(pattern)
        words.extend(w)
        #add documents in the corpus
        documents.append((w, intent['tag']))

        # add to our classes list
        if intent['tag'] not in classes:
            classes.append(intent['tag'])
Now we will lemmatize each word and remove duplicate words from the list. Lemmatizing is the process of converting a word into its lemma form and then creating a pickle file to store the Python objects which we will use while predicting.
# lemmatize, lower each word and remove duplicates
words = [lemmatizer.lemmatize(w.lower()) for w in words if w not in ignore_words]
words = sorted(list(set(words)))
# sort classes
classes = sorted(list(set(classes)))
# documents = combination between patterns and intents
print (len(documents), "documents")
# classes = intents
print (len(classes), "classes", classes)
# words = all words, vocabulary
print (len(words), "unique lemmatized words", words)

pickle.dump(words,open('words.pkl','wb'))
pickle.dump(classes,open('classes.pkl','wb'))
3. Create training and testing data
Now, we will create the training data in which we will provide the input and the output. Our input will be the pattern and output will be the class our input pattern belongs to. But the computer doesn’t understand text so we will convert text into numbers.
# create our training data
training = []
# create an empty array for our output
output_empty = [0] * len(classes)
# training set, bag of words for each sentence
for doc in documents:
    # initialize our bag of words
    bag = []
    # list of tokenized words for the pattern
    pattern_words = doc[0]
    # lemmatize each word - create base word, in attempt to represent related words
    pattern_words = [lemmatizer.lemmatize(word.lower()) for word in pattern_words]
    # create our bag of words array with 1, if word match found in current pattern
    for w in words:
        bag.append(1) if w in pattern_words else bag.append(0)

    # output is a '0' for each tag and '1' for current tag (for each pattern)
    output_row = list(output_empty)
    output_row[classes.index(doc[1])] = 1

    training.append([bag, output_row])
# shuffle our features and turn into np.array
random.shuffle(training)
training = np.array(training)
# create train and test lists. X - patterns, Y - intents
train_x = list(training[:,0])
train_y = list(training[:,1])
print("Training data created")
4. Build the model
We have our training data ready, now we will build a deep neural network that has 3 layers. We use the Keras sequential API for this. After training the model for 200 epochs, we achieved 100% accuracy on our model. Let us save the model as ‘chatbot_model.h5’.
# Create model - 3 layers. First layer 128 neurons, second layer 64 neurons and 3rd output layer contains number of neurons
# equal to number of intents to predict output intent with softmax
model = Sequential()
model.add(Dense(128, input_shape=(len(train_x[0]),), activation='relu'))
model.add(Dropout(0.5))
model.add(Dense(64, activation='relu'))
model.add(Dropout(0.5))
model.add(Dense(len(train_y[0]), activation='softmax'))

# Compile model. Stochastic gradient descent with Nesterov accelerated gradient gives good results for this model
sgd = SGD(lr=0.01, decay=1e-6, momentum=0.9, nesterov=True)
model.compile(loss='categorical_crossentropy', optimizer=sgd, metrics=['accuracy'])

#fitting and saving the model
hist = model.fit(np.array(train_x), np.array(train_y), epochs=200, batch_size=5, verbose=1)
model.save('chatbot_model.h5', hist)

print("model created")
5. Predict the response (Graphical User Interface)
To predict the sentences and get a response from the user to let us create a new file ‘chatapp.py’.
We will load the trained model and then use a graphical user interface that will predict the response from the bot. The model will only tell us the class it belongs to, so we will implement some functions which will identify the class and then retrieve us a random response from the list of responses.
Again we import the necessary packages and load the ‘words.pkl’ and ‘classes.pkl’ pickle files which we have created when we trained our model:
import nltk
from nltk.stem import WordNetLemmatizer
lemmatizer = WordNetLemmatizer()
import pickle
import numpy as np

from keras.models import load_model
model = load_model('chatbot_model.h5')
import json
import random
intents = json.loads(open('intents.json').read())
words = pickle.load(open('words.pkl','rb'))
classes = pickle.load(open('classes.pkl','rb'))
To predict the class, we will need to provide input in the same way as we did while training. So we will create some functions that will perform text preprocessing and then predict the class.
def clean_up_sentence(sentence):
    # tokenize the pattern - split words into array
    sentence_words = nltk.word_tokenize(sentence)
    # stem each word - create short form for word
    sentence_words = [lemmatizer.lemmatize(word.lower()) for word in sentence_words]
    return sentence_words
# return bag of words array: 0 or 1 for each word in the bag that exists in the sentence

def bow(sentence, words, show_details=True):
    # tokenize the pattern
    sentence_words = clean_up_sentence(sentence)
    # bag of words - matrix of N words, vocabulary matrix
    bag = [0]*len(words)
    for s in sentence_words:
        for i,w in enumerate(words):
            if w == s:
                # assign 1 if current word is in the vocabulary position
                bag[i] = 1
                if show_details:
                    print ("found in bag: %s" % w)
    return(np.array(bag))

def predict_class(sentence, model):
    # filter out predictions below a threshold
    p = bow(sentence, words,show_details=False)
    res = model.predict(np.array([p]))[0]
    ERROR_THRESHOLD = 0.25
    results = [[i,r] for i,r in enumerate(res) if r>ERROR_THRESHOLD]
    # sort by strength of probability
    results.sort(key=lambda x: x[1], reverse=True)
    return_list = []
    for r in results:
        return_list.append({"intent": classes[r[0]], "probability": str(r[1])})
    return return_list
After predicting the class, we will get a random response from the list of intents.
def getResponse(ints, intents_json):
    tag = ints[0]['intent']
    list_of_intents = intents_json['intents']
    for i in list_of_intents:
        if(i['tag']== tag):
            result = random.choice(i['responses'])
            break
    return result

def chatbot_response(text):
    ints = predict_class(text, model)
    res = getResponse(ints, intents)
    return res
Now we will develop a graphical user interface. Let’s use Tkinter library which is shipped with tons of useful libraries for GUI. We will take the input message from the user and then use the helper functions we have created to get the response from the bot and display it on the GUI. Here is the full source code for the GUI.
#Creating GUI with tkinter
import tkinter
from tkinter import *


def send():
    msg = EntryBox.get("1.0",'end-1c').strip()
    EntryBox.delete("0.0",END)

    if msg != '':
        ChatLog.config(state=NORMAL)
        ChatLog.insert(END, "You: " + msg + '\n\n')
        ChatLog.config(foreground="#442265", font=("Verdana", 12 ))

        res = chatbot_response(msg)
        ChatLog.insert(END, "Bot: " + res + '\n\n')

        ChatLog.config(state=DISABLED)
        ChatLog.yview(END)

base = Tk()
base.title("Hello")
base.geometry("400x500")
base.resizable(width=FALSE, height=FALSE)

#Create Chat window
ChatLog = Text(base, bd=0, bg="white", height="8", width="50", font="Arial",)

ChatLog.config(state=DISABLED)

#Bind scrollbar to Chat window
scrollbar = Scrollbar(base, command=ChatLog.yview, cursor="heart")
ChatLog['yscrollcommand'] = scrollbar.set

#Create Button to send message
SendButton = Button(base, font=("Verdana",12,'bold'), text="Send", width="12", height=5,
                    bd=0, bg="#32de97", activebackground="#3c9d9b",fg='#ffffff',
                    command= send )

#Create the box to enter message
EntryBox = Text(base, bd=0, bg="white",width="29", height="5", font="Arial")
#EntryBox.bind("<Return>", send)


#Place all components on the screen
scrollbar.place(x=376,y=6, height=386)
ChatLog.place(x=6,y=6, height=386, width=370)
EntryBox.place(x=128, y=401, height=90, width=265)
SendButton.place(x=6, y=401, height=90)

base.mainloop()
6. Run the chatbot
To run the chatbot, we have two main files; train_chatbot.py and chatapp.py.
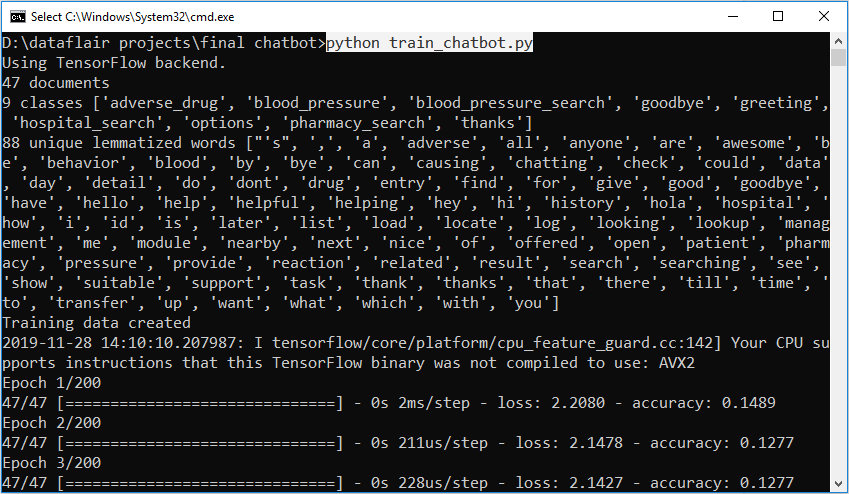
First, we train the model using the command in the terminal:
python train_chatbot.py
If we don’t see any error during training, we have successfully created the model. Then to run the app, we run the second file.
python chatgui.py
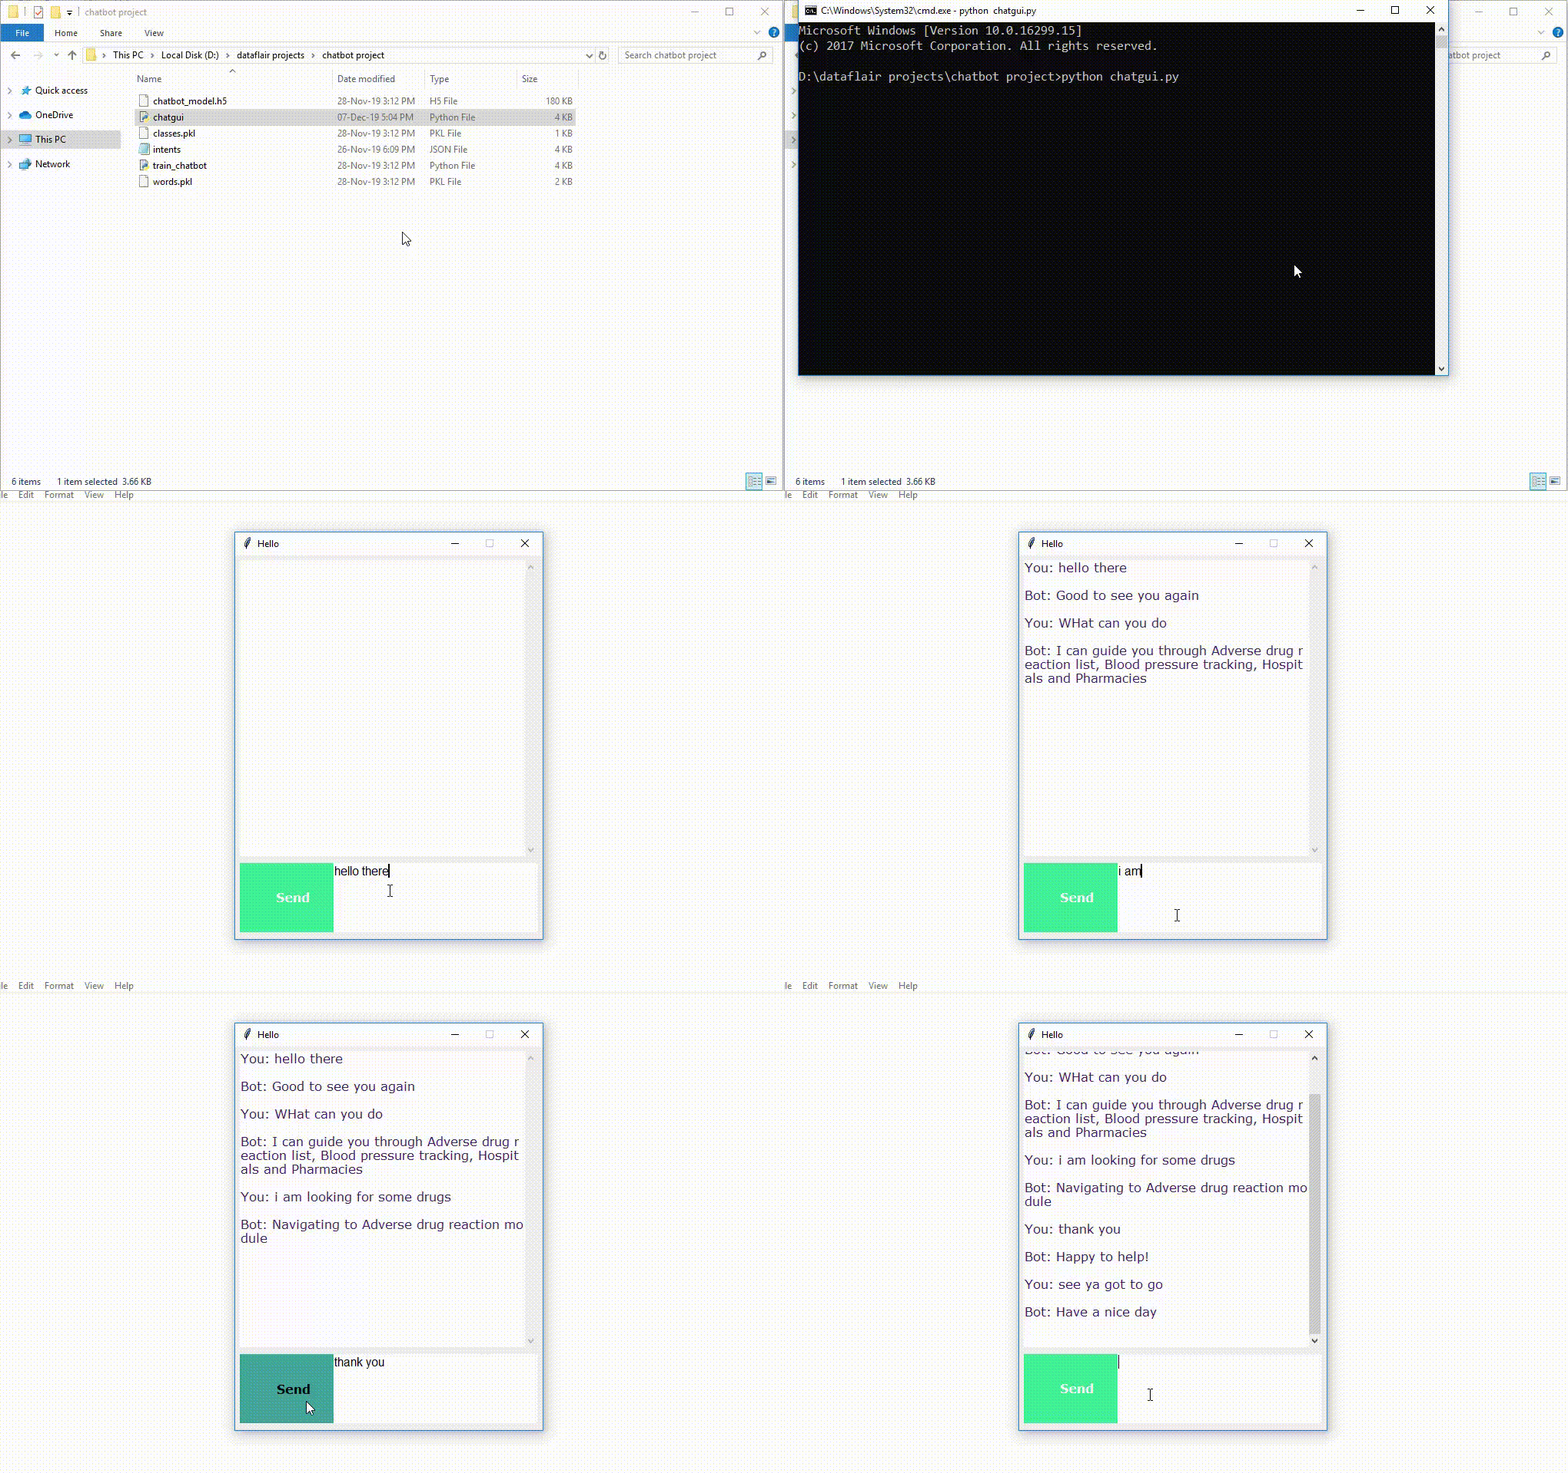
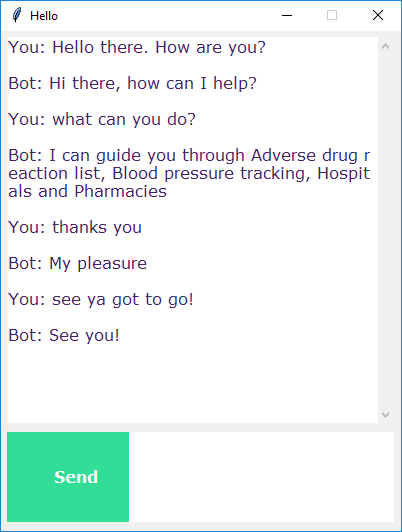
The program will open up a GUI window within a few seconds. With the GUI you can easily chat with the bot.
Screenshots:
Summary
In this Python data science project, we understood about chatbots and implemented a deep learning version of a chatbot in Python which is accurate. You can customize the data according to business requirements and train the chatbot with great accuracy. Chatbots are used everywhere and all businesses are looking forward to implementing bot in their workflow.
I hope you will practice by customizing your own chatbot using Python and don’t forget to show us your work. And, if you found the article useful, do share the project with your friends and colleagues.
We work very hard to provide you quality material
Could you take 15 seconds and share your happy experience on Google


Time to make my own chat bot then:)
I am getting an error telling
name ‘chatbot_respons” is not defined
Exception in Tkinter callback
Traceback (most recent call last):
File “C:\Users\manoj\miniconda3\envs\tensorflow\lib\tkinter\__init__.py”, line 1705, in __call__
return self.func(*args)
File “”, line 14, in send
res = chatbot_response(msg)
NameError: name ‘chatbot_response’ is not defined
I’m getting the same error , did you find the solution to it ?
Thank you
I am getting an error like:
Exception in Tkinter callback
Traceback (most recent call last):
File “C:\Users\manoj\miniconda3\envs\tensorflow\lib\tkinter\__init__.py”, line 1705, in __call__
return self.func(*args)
File “”, line 14, in send
res = chatbot_response(msg)
NameError: name ‘chatbot_response’ is not defined
Hello, thanks for sharing
Can you explain where LSTM applied on codes? And why you the technique belong to RNN LSTM?
I need your response to learning more about this and develop this model.
Thank you so much
LSTM is applied in Generative based Chatbots which needs a large amount of data and it is based on Deep Neural networks, this is a Retrieval based Chatbot. Recurrent neural network (RNN) is revolutionary DNN algorithm for sequential data and are used by many virtual assistants like Amazon Alexa and Google’s voice search. The algorithm remembers the input dataset, which makes it a good choice for machine learning problems that involve sequential data.
Now, If we talk about moving from RNN to LSTM, tons of controlling knobs are introduced, to control the flow and mixing of Inputs as per trained Weights. So, LSTM gives us the Control-ability, customization, and better results. But if we talk about the con, it’s more complex and operating cost is lil high.
hi ,
I have just started the chatbot project which looks very interesting. But I cannot install the pickle library, so I have stuck now. I am using Python 3.7 with Anaconda latest version.
I appreciate if you can help. thanks.
Please try to run below command:
pip install pickle-mixin
Hi ,
Can you also help with error message:
File “C:\Users\mm\Anaconda3\lib\site-packages\nltk\corpus\reader\panlex_lite.py”, line 15, in
import sqlite3
File “C:\Users\mm\Anaconda3\lib\sqlite3\__init__.py”, line 23, in
from sqlite3.dbapi2 import *
File “C:\Users\mm\Anaconda3\lib\sqlite3\dbapi2.py”, line 27, in
from _sqlite3 import *
ImportError: DLL load failed: The specified module could not be found.
PS C:\Python\python-project-chatbot-codes>
I have looked up the error and some suggest that I don’t have sqlite3.dll install. can someone direct me please?
thanks
Please install sqlite again:
pip install db-sqlite3
In case if the issue persists, please post the stacktrace
hi! anyone knows how to save the responses inside mysql. I only need to save the responses make by the user. Hope an answer. Thank you
Have you figure out how to do this? Thanks.
Hey, have you figured out how to do this yet? Thanks.
Hello,
Regarding the error with the pickle library in python 3.x. I found that if you do pip install pickle-mixin it works just fine. You might get errors from nltk, missing wordnet and some other package. If you do, just follow the instructions the error comes with. I also recommend using venv.
Exception in Tkinter callback
Traceback (most recent call last):
File “C:\Users\ashit\Anaconda3\lib\tkinter\__init__.py”, line 1705, in __call__
return self.func(*args)
File “”, line 13, in send
res = chatbot_response(msg)
NameError: name ‘chatbot_response’ is not defined
Can someone help me out here??
It would be great if we can have web crawler option for the bot to go and check on a specific sharepoint site or website. Also, any possibility for the bot to find for files in a folder which is maintained internally.
I am getting an error saying : “name ‘msg’ is not defined.”…Please help.
if condition should come inside def send():
We have updated the code, please run the chatbot project again, it will run successfully. In case of any issues please post the stacktrace
I am getting the same error :
“name ‘msg’ is not defined.”
Did u get the solution for this error !
if condition should come inside def send():
def send():
msg = EntryBox.get(“1.0”,’end-1c’).strip()
EntryBox.delete(“0.0″,END)
if msg != ”:
ChatLog.config(state=NORMAL)
ChatLog.insert(END, “You: ” + msg + ‘\n\n’)
ChatLog.config(foreground=”#442265″, font=(“Verdana”, 12 ))
res = chatbot_response(msg)
ChatLog.insert(END, “Bot: ” + res + ‘\n\n’)
ChatLog.config(state=DISABLED)
ChatLog.yview(END)
We have updated the code in the article
Indentation Error. Leave a space.
def send():
msg = EntryBox.get(“1.0”,’end-1c’).strip()
EntryBox.delete(“0.0″,END)
if msg != ”:
ChatLog.config(state=NORMAL)
ChatLog.insert(END, “You: ” + msg + ‘\n\n’)
ChatLog.config(foreground=”#442265″, font=(“Verdana”, 12 ))
though we leave space do the indentation part well its showing msg name not defined!! any help??
if condition should come inside def send():
We have updated the code in the article
Please correct the indentation issue, code snippet should look:
def send():
msg = EntryBox.get(“1.0”,’end-1c’).strip()
EntryBox.delete(“0.0″,END)
if msg != ”:
ChatLog.config(state=NORMAL)
ChatLog.insert(END, “You: ” + msg + ‘\n\n’)
ChatLog.config(foreground=”#442265″, font=(“Verdana”, 12 ))
res = chatbot_response(msg)
ChatLog.insert(END, “Bot: ” + res + ‘\n\n’)
ChatLog.config(state=DISABLED)
ChatLog.yview(END)
After entering the pharmacy name how do we get the next output.
Chatbot says “Good to see you again”.
How to process the pharmacy name and get the details?
After entering the pharmacy names in the dataset retrain the model and run chatbot gui. You can also increase the error threshold to get more specific results.
the if msg!=” should be inside the send function
Thanks for helping the community. Keep Learning 🙂
Hello. the bot only answers one thing. what is the fix? please reply
Use larger amount of dataset during the training and increase the error threshold.
how can the performance of the chatbot be assessed?
To improve the accuracy of chatbot, review the training data to make sure there is consistent mapping of utterances and volume of data should be on a higher side.
Now, to further improve recall of an intent classification & precision, you need to add more training utterances that map to that intent.
Calculating the accuracy is also tricky. It is critical to rely on well-defined ml performance metrics (accuracy, precision, recall, AUC, etc…). You should not get stuck on specific inconsistencies.
Using measurable metrics helps guide accurate delivery and it also helps in updates of your chatbot.
Hi, I want to make a chatbot for my school project. I really appreciate the code here but I’d like to make the bot on my own, what do you suggest I learn? BTW, I already know a little bit of python and how to make GUIs. thanks
To develop your own chatbot, you should learn NLP & machine learning. Machine learning is as big as an ocean, you need to choose specific libraries & algorithms required for your project. In this project, we mainly used Keras and NLTK
bring that if into that def(),it is out of that
def()
….
..
if msg…this is the mistake
we need to make it
def()
…..
….
if msg…
this is who i got it solved
res = chatbot_response(msg)
How is this function from other file called in chatgui.py?
I am getting error stating
“File “chatgui.py”, line 14, in send
res = chatbot_response(msg)
NameError: name ‘chatbot_response’ is not defined”
HI. I need to create a chat bot that can pull reports from power BI. Please help.
Power BI does not allow any third-party applications to interact with power bi contents.
Although Power BI Q&A provides out of the box way to import data in various forms like plain text, comma-delimited, excel, database, etc. (mostly structured) directly into its dashboard. Now, we need to train the chatbot based on requirements. It’s little tricky and need efforts to prepare training data according to requirements.
Power BI Q&A offers natural language queries in native English only whereas according to business needs chatbots can be trained and developed on different languages.
Hello the gui will not work for me. The window pops up, the buttons are all there, but I can’t type anything out to the bot. The installation and training was successful, so I don’t know what could be wrong.
Same problem for me. Is it solved?
Please post the error message and complete stacktrace, we will look into the issue.
It seems issue is with the Tkinter
Traceback (most recent call last):
File “C:\Program Files\Sublime Text 3\chatbot\train_chatbot.py”, line 33, in
words = [lemmatizer.lemmatize(w.lower()) for w in words if w not in ignore_words]
File “C:\Program Files\Sublime Text 3\chatbot\train_chatbot.py”, line 33, in
words = [lemmatizer.lemmatize(w.lower()) for w in words if w not in ignore_words]
TypeError: lemmatize() missing 1 required positional argument: ‘word’Traceback (most recent call last):
File “C:\Program Files\Sublime Text 3\chatbot\train_chatbot.py”, line 33, in
words = [lemmatizer.lemmatize(w.lower()) for w in words if w not in ignore_words]
File “C:\Program Files\Sublime Text 3\chatbot\train_chatbot.py”, line 33, in
words = [lemmatizer.lemmatize(w.lower()) for w in words if w not in ignore_words]
TypeError: lemmatize() missing 1 required positional argument: ‘word’
Please help!!!
Traceback (most recent call last):
File “C:\Program Files\Sublime Text 3\chatbot\train_chatbot.py”, line 33, in
words = [lemmatizer.lemmatize(w.lower()) for w in words if w not in ignore_words]
File “C:\Program Files\Sublime Text 3\chatbot\train_chatbot.py”, line 33, in
words = [lemmatizer.lemmatize(w.lower()) for w in words if w not in ignore_words]
TypeError: lemmatize() missing 1 required positional argument: ‘word’
Please help!!!
Is there any way to increase the accuracy of the chatbot if we have 1000+ patterns in intents.json?
Yes, you can increase the error threshold.
Apart from this, with more data, it will give better accuracy.
Is there any way to increase the accuracy of responses If we are using 1000+ tickets.
Hey I am facing a problem that Everything is fine but after that when I open my chatgui that’s opening but problem is that it’s not taking any input which i am trying to give it through my keyboard.
Please post the error message and complete stacktrace, we will look into the issue.
You can compare your code with the code provided in the article. Also, check whether tkinter is installed properly
How can i use else statement, so that if the pattern doesn’t match it will say “I don’t understand”
fimport re
import sys
prog = re.compile(*) # the * needs to be your desired pattern
while True:
line = sys.stdin.readline()
if not line: break
if prog.match(line):
print ‘matched’
else:
print ‘not matched’
# note that this isn’t the only way to do this. It kinda depends on what you want.
import re
name = [“R2D2”, “abcd”, “C3P0”, “R2D4”, “jodi”,”wA7T”]
# Match names.
for element in name:
match = re.match(“(^[A-Z]\d[A-Z]\d)”, element)
if m:
print(match.groups())
else:
print(no_match.groups())
I am a bit new to this and trying to do this off hand without my computer that has python on it.
Increase the error threshold for example 0.75 then give an if else condition when we get an empty result list. Finally use try except in get response for any user input that doesn’t match the pattern and the bot replies “I don’t understand”.
def predict_class(sentence, model):
# filter out predictions below a threshold
p = bow(sentence, words,show_details=False)
res = model.predict(np.array([p]))[0]
ERROR_THRESHOLD = 0.75
results = [[i,r] for i,r in enumerate(res) if r>ERROR_THRESHOLD]
# sort by strength of probability
results.sort(key=lambda x: x[1], reverse=True)
return_list = []
for r in results:
return_list.append({“”intent””: classes[r[0]], “”probability””: str(r[1])})
return_list = {“”intent””: “”I don’t understand!””} if len(return_list) == 0 else return_list
return return_list
def getResponse(ints, intents_json):
try:
tag = ints[0][‘intent’]
list_of_intents = intents_json[‘intents’]
for i in list_of_intents:
if i[‘tag’] == tag:
result = random.choice(i[‘responses’])
break
return result
except:
return ints[‘intent’]
I have made few changes in the threshold, condition in return_list & try except in getResponse, You can replace the above def functions with the original code to get desired response from the bot.
I was able to run it successfully. Very nice project.
Can you please help to run this project. I am getting unnecessary errors.
Please post the error message and complete stacktrace, we will look into the issue.
Whatever I write gives this answer Please provide hospital name or location how can I fix this error?
Usually, Chatbots respond to the associated patterns and can’t go beyond the pattern.
It can be fixed by either training the model with large dataset or by increasing the error threshold for example 0.75 then give an if else condition when we get empty result list. Finally use try except in get response for any user input that doesn’t match the pattern and the bot replies “I don’t understand”.
Please help me the chatbot is responding “please provide the hospital name or location” to anything I type. Please help me solve this
Can you upload the download links for this project’s file? Like all the files? It would be really helpful.