Image Segmentation with Machine Learning
Machine Learning courses with 100+ Real-time projects Start Now!!
Work on an intermediate-level Machine Learning Project – Image Segmentation
You might have wondered, how fast and efficiently our brain is trained to identify and classify what our eyes perceive. Somehow our brain is trained in a way to analyze everything at a granular level. This helps us distinguish an apple in a bunch of oranges.
Computer vision is a field of computer science that enables computers to identify and process objects in videos and images just the way we humans do. Although computer vision might seem like not a very old concept but it dates back to the late 1960s when the first digital image scanner which transformed images into grids of numbers was invented.
What is Image Segmentation?
You would have probably heard about object detection and image localization. When there is a single object present in an image, we use image localization technique to draw a bounding box around that object. In the case of object detection, it provides labels along with the bounding boxes; hence we can predict the location as well as the class to which each object belongs.
Image segmentation results in more granular information about the shape of an image and thus an extension of the concept of Object Detection.
We segment i.e. divide the images into regions of different colors which helps in distinguishing an object from the other at a finer level
Types of Image Segmentation
Image Segmentation can be broadly classified into two types:
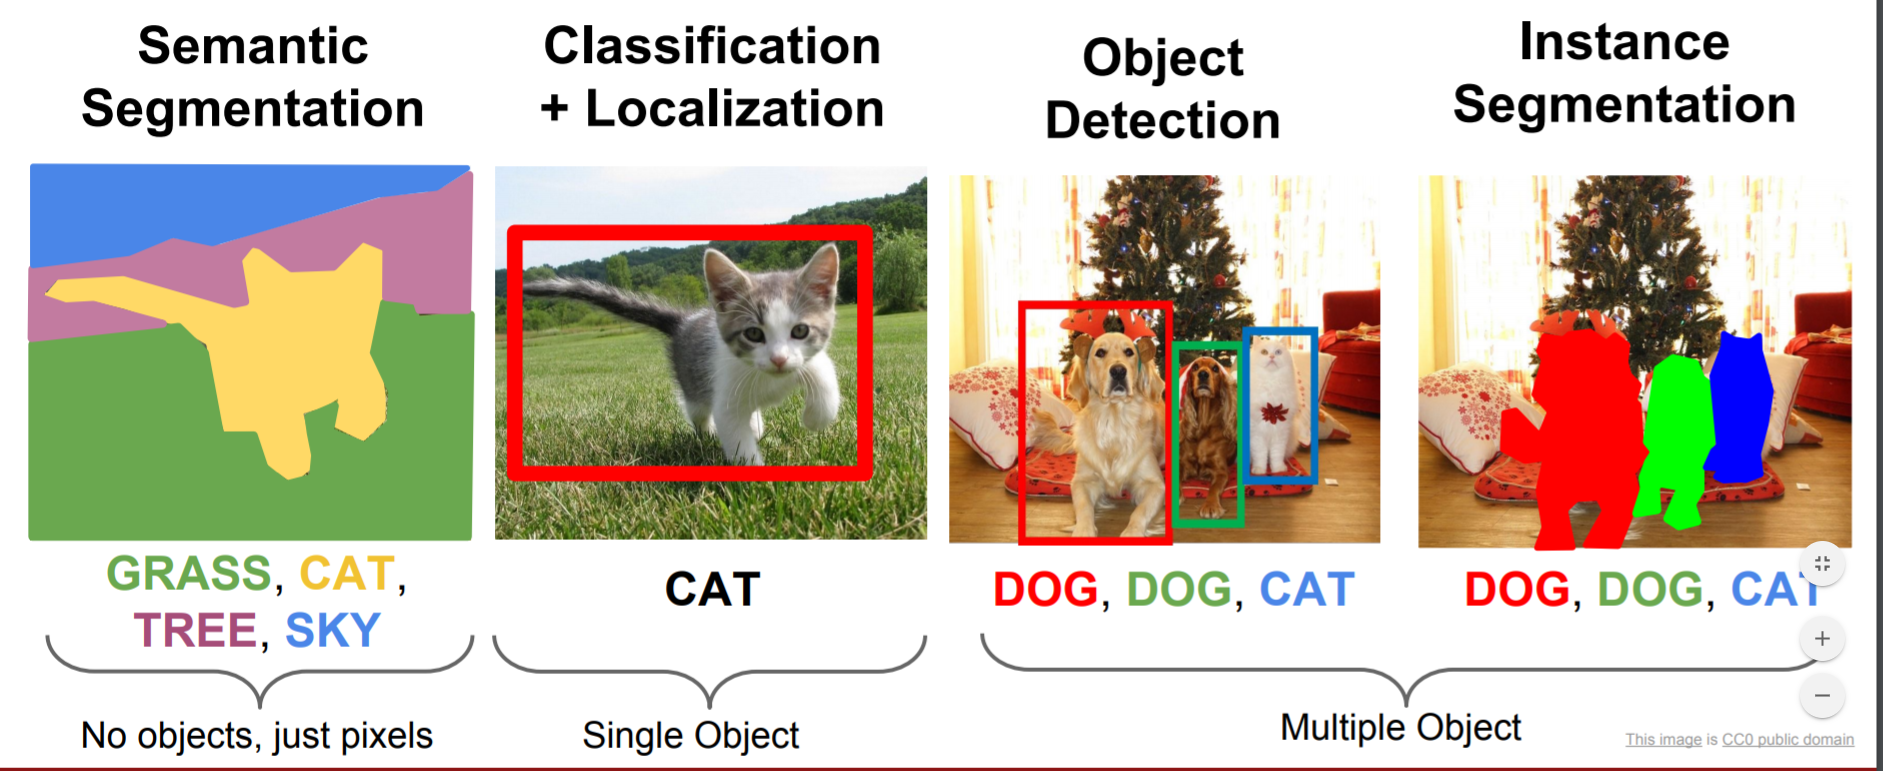
1. Semantic Segmentation
Semantic Segmentation is the process of segmenting the image pixels into their respective classes. For example, in the figure above, the cat is associated with yellow color; hence all the pixels related to the cat are colored yellow. Multiple objects of the same class are considered as a single entity and hence represented with the same color.
2. Instance Segmentation
Instance segmentation is being more thorough and usually comes into picture when dealing with multiple objects. The difference here is, the detected object is masked with a color hence all the pixels associated with the image are given the same color. Multiple objects of the same class are treated as distinct entities and hence represented with different colors.
Image Segmentation Applications
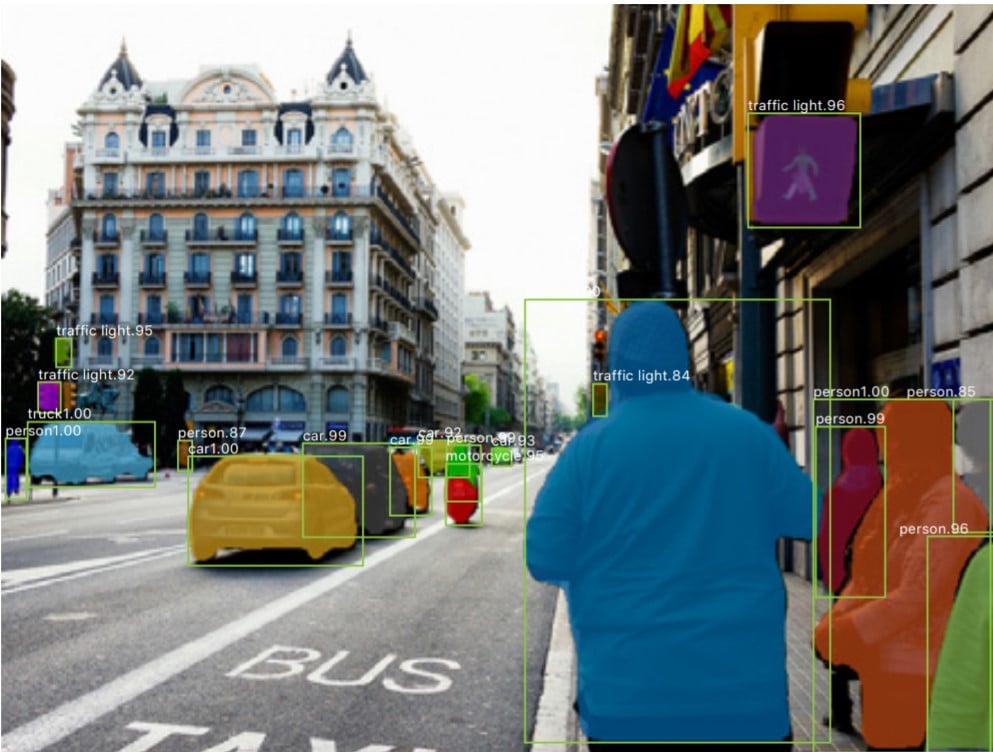
1. Self-driving cars
Image segmentation can be used in self-driving cars for giving easy distinctions between various objects. Be it traffic signals, signboards, humans, and cars. It can help the driving instruction algorithm to better assess the surrounding before generating the next instruction.
2. Circuit Board Defect Detection
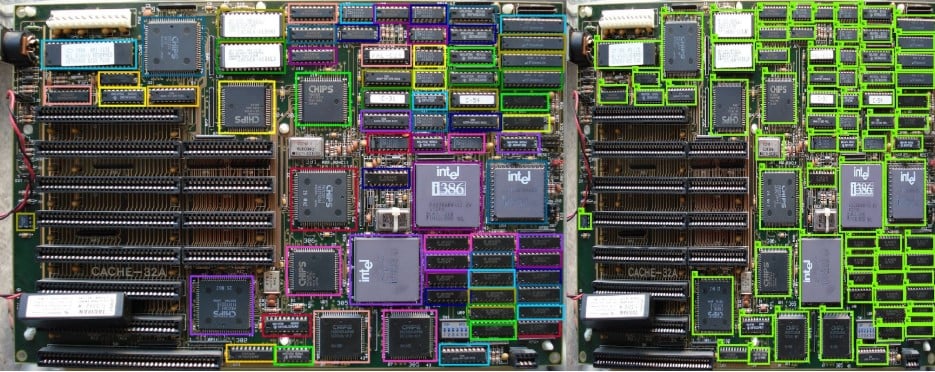
A company has to bear the responsibility of defected devices. If a camera backed with an Image Segmentation model keeps scanning for defects produced in the final product, a lot of money and time can be saved in fixing a defective device.
3. Face detection
Nowadays, we have observed that the majority of cameras in phones support portrait mode. Portrait mode is technically an outcome of Image Segmentation. Apart from this, security surveillance will be much more effective when the faces are distinguishable from noisy objects.
4. Medical Imaging

Image segmentation can be used to extract clinically relevant information from medical reports. For example, image segmentation can be used to segment tumors.
Mask R-CNN
We are going to perform image segmentation using the Mask R-CNN architecture. It is an extension of the Faster R-CNN Model which is preferred for object detection tasks.
The Mask R-CNN returns the binary object mask in addition to class label and object bounding box. Mask R-CNN is good at pixel level segmentation.
How does Mask R-CNN work?
Mask R-CNN uses an architecture similar to its predecessor Faster R-CNN and also utilizes Fully Convolutional Network for pixel-wise segmentation.
1. Feature Extraction
We utilize the ResNet 101 architecture to extract features from the input image. As a result, we get feature maps which are transmitted to Region Proposed Network
2. Region Proposed Network (RPN)
After obtaining the feature maps, bounding box candidates are determined and thus RPN extracts RoI (Region of Interest)
3. RoI Pool
Faster R-CNN uses an RoI Pool layer to compute features from the obtained proposals in order to infer the class of the object and bounding box coordinates.
4. RoI Align
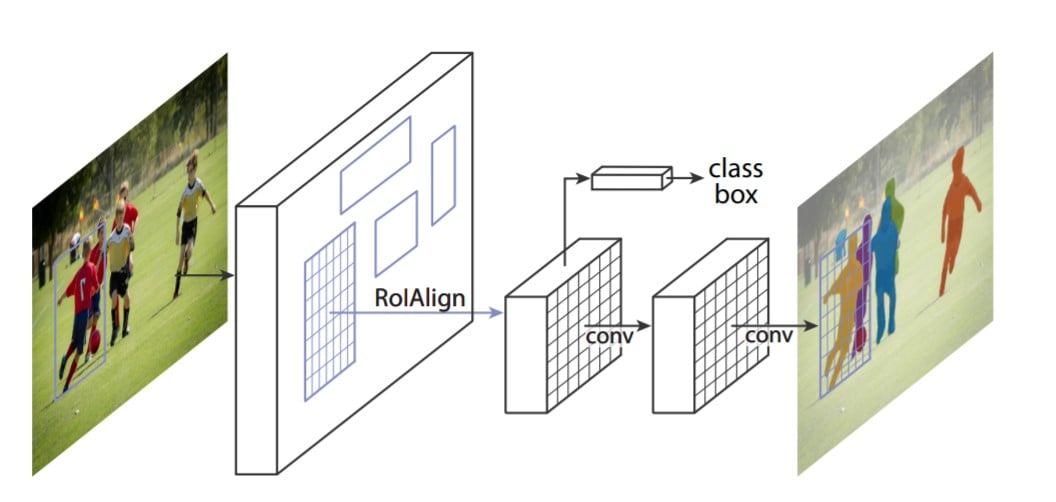
RoI pool led to misalignments in getting the Region of Interest due to quantization of RoI coordinates. Since pixel-level segmentation required specificity hence authors of the Faster R-CNN cleverly solved it by implementing the RoI Align.
Masking is done by a small fully-connected network applied to each RoI, which predicts a segmentation mask in a pixel-to-pixel manner.
Steps to develop Image Segmentation Project
Download Image Segmentation Project Code
Please download the source code of image segmentation: Image Segmentation with Machine Learning
1. Clone Mask R-CNN Github Repository
Now, primarily we download the architecture of the model which we are going to implement. Use the following command:
git clone: https://github.com/matterport/Mask_RCNN.git
Note : If you do not have git installed on your computer, then simply download the file in zip and extract the folder in your desired directory.
2. Library Dependencies
Now, since we need certain libraries in order to make it work as you might not have all the necessary libraries.
Here’s the list,
- numpy
- scipy
- pillow
- cython
- matplotlib
- scikit-image
- tensorflow
- keras
- opencv-python
- h5py
- imgaug
- ipython
3. Pre Trained Weights
Since training a model takes hours and sometimes a day or more, hence it may not be feasible to train a model right now. Hence, we will utilize the pre-trained model to generate predictions on our input image.
Download Pretrained model from github
Follow this link, and you will see a list of the releases of Mask-RCNN. You can try for the latest release but since there were discrepancies, I have used Mask R-CNN 2.0. You can directly download the h5 file and save it in the samples folder of the Mask R-CNN repository we cloned in the first step.
4. Make a new Jupyter Notebook
So far, we have assembled the engine, it’s time to utilize the power of our engine and drive all the way to our segmented image.
Now, we will make a new Jupyter Notebook under the samples folder in Mask R-CNN repository, you can use any other IDE but Jupyter Notebook gives the ease to execute code cell by cell.
If you do not have a powerful system, you can use google colab for running the code, but make sure to upload the repo and h5 file correctly.
5. Importing the Necessary Libraries
import os
import sys
import random
import math
import numpy as np
import skimage.io
import matplotlib
import matplotlib.pyplot as plt

# Fetching the root directory
ROOT_DIR = os.path.abspath("../")

import warnings
warnings.filterwarnings("ignore")

# Importing Mask RCNN
sys.path.append(ROOT_DIR)  # To find local version of the library
from mrcnn import utils
import mrcnn.model as modellib
from mrcnn import visualize

# Heading to the coco directory
sys.path.append(os.path.join(ROOT_DIR, "samples/coco/"))
#importing coco.py
import coco
%matplotlib inline
Note 1: If you are confused or stuck in locating the directory, type in print (ROOT_DIR) to get the idea of the directory you are referring to.
Note 2: You might get an error associated with ‘pycocotools’. In case you are unable to successfully install ‘pycocotools’ in ‘Windows’ then try to install this as it worked for me.
6. The path for pretrained weights
# Directory to save logs and trained model
MODEL_DIR = os.path.join(ROOT_DIR, "logs")

# Local path to trained weights file
COCO_MODEL_PATH = os.path.join('', "mask_rcnn_coco.h5")

# Directory of images to run detection on
DIR_IMAGE = os.path.join(ROOT_DIR, "images")
7. Inference class to infer the Mask R-CNN Model
class InferenceConfig(coco.CocoConfig):
    # Setting batch size equal to 1 since we'll be running inference on
    # one image at a time. Batch size = GPU_COUNT * IMAGES_PER_GPU
    GPU_COUNT = 1
    IMAGES_PER_GPU = 1

config = InferenceConfig()
config.display()
Output:
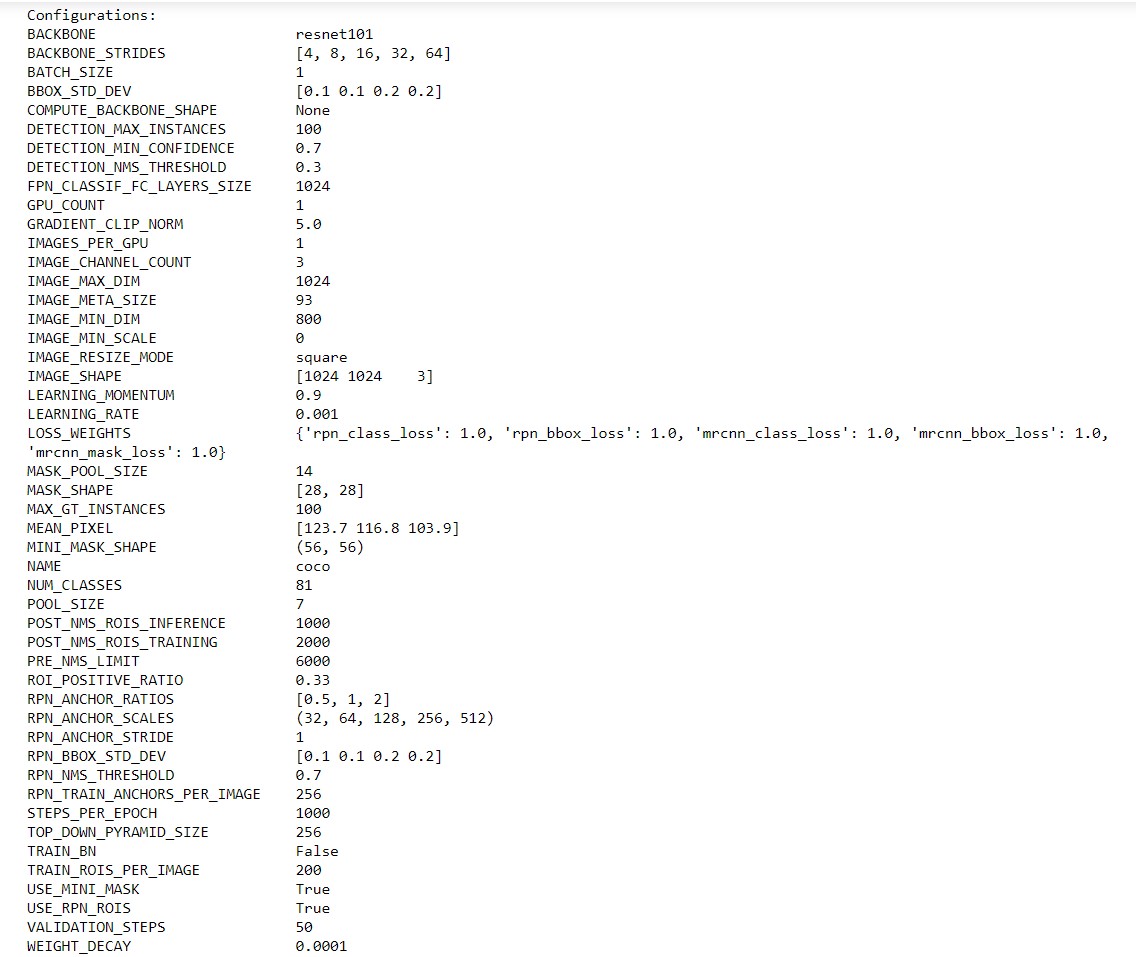
What you are seeing is the specification of the Mask R-CNN model we are going to use. The backbone is resnet101 which helps in extracting features from the image.
Next important thing to observe here is the mask shape which is 28×28 as it is trained on the COCO dataset and we have a total of 81 classes.
This means that there are 81 possible prediction classes in which an object may fall into.
8. Loading the Weights
# Create model objects in inference mode.
model = modellib.MaskRCNN(mode="inference", model_dir='mask_rcnn_coco.hy', config=config)

# Load weights trained on MS-COCO
model.load_weights('mask_rcnn_coco.h5', by_name=True)
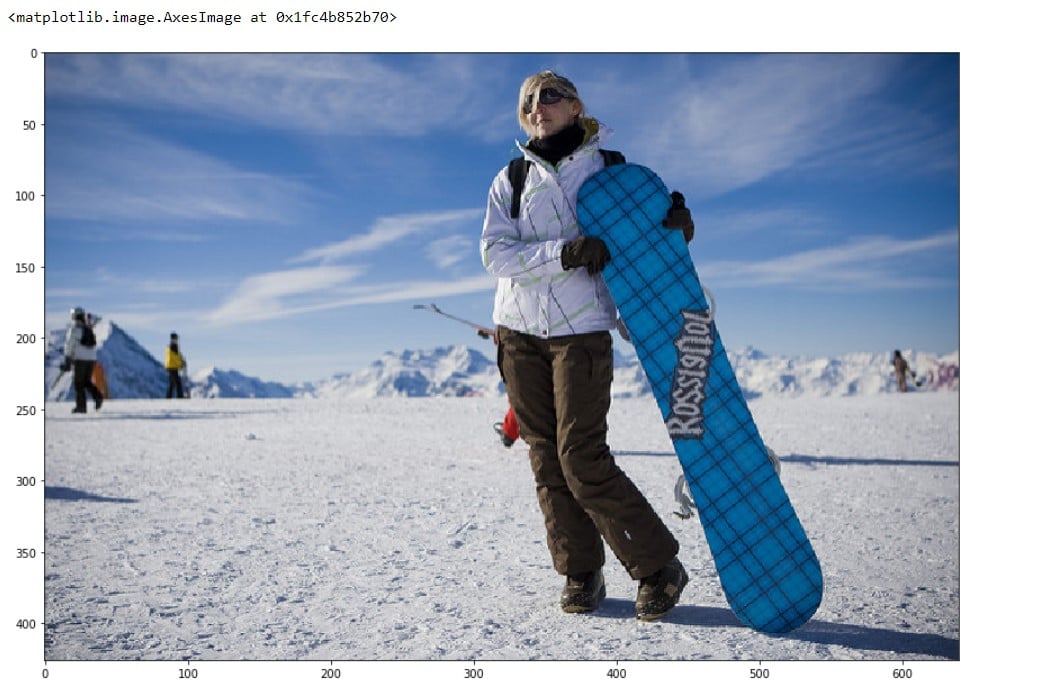
9. Loading an Image to Test the Model
image = skimage.io.imread('../images/4410436637_7b0ca36ee7_z.jpg')

# original image
plt.figure(figsize=(12,10))

skimage.io.imshow(image)
Output:
10. Sending Image to Model to Generate Predict
# Run detection
results = model.detect([image], verbose=1)
12. Masking the Results to our Image
# Visualize results
r = results[0]
visualize.display_instances(image, r['rois'], r['masks'], r['class_ids'],
The Time you were Desperately waiting, here comes our Output:
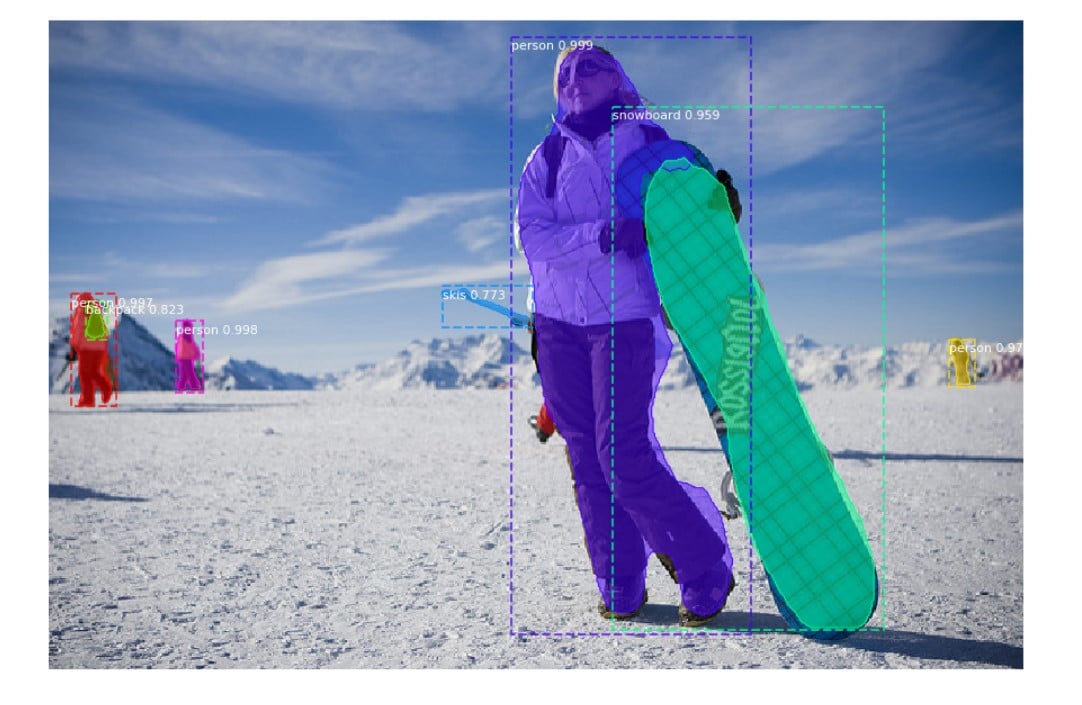
Hooray.! We have successfully segmented the image and we can see our code has performed pretty well. So cheers to you if you made it through.
13. Number of Detected Objects
Now, if you are curious, to detect the number of objects we were successfully able to detect, just type in
mask = r['masks']
mask = mask.astype(int)
mask.shape
Output:
(426, 640, 7)
Here, we can see that there are a total of 7 objects detected by our model on the image.
NOTE: Image & Video Source: Cornell University, Stanford University, Github
Summary
Image segmentation is the process of dividing an image into different parts or regions. It helps the machine understand which areas belong to what object. For example, in a photo of a person and a car, segmentation separates the two clearly. This is very helpful in medical imaging, satellite analysis, and self-driving cars. It is more advanced than simple object detection because it gives detailed pixel-level understanding of images.
We hope we were able to lead you towards the solution of your first image segmentation problem. we discussed the process and if you are curious to know the details there is plenty of information available on the internet.
We would suggest you read and understand various architectures including the Mask R-CNN we implemented. It will help you analyze things better and also help you to generate new ideas to solve complex problems.
Did you like this article? If Yes, please give DataFlair 5 Stars on Google


I forgot to add that this is being executed on CPU as you can infer from the early log messages
can you please give a small explaination to appy this image segentation for brain tumor detection
https://github.com/Sanket758/Machine-Learning-Projects/blob/master/Healthcare_AI.ipynb
anyone please help me to do this project
Hi, I am looking for “Circuit Board Defect Detection” solution. Can you please provide any sugestion on how to start this?
hi i am getting error !
code :
# Create model object in inference mode.
model = modellib.MaskRCNN(mode=”inference”, model_dir=MODEL_DIR, config=config)
# Load weights trained on MS-COCO
model.load_weights(COCO_MODEL_PATH, by_name=True)
this code is for step 7
error:
AttributeError Traceback (most recent call last)
in
1 # Create model object in inference mode.
—-> 2 model = modellib.MaskRCNN(mode=”inference”, model_dir=MODEL_DIR, config=config)
3
4 # Load weights trained on MS-COCO
5 model.load_weights(COCO_MODEL_PATH, by_name=True)
~\Desktop\imiage-segmentation\Mask_RCNN\mrcnn\model.py in __init__(self, mode, config, model_dir)
1835 self.model_dir = model_dir
1836 self.set_log_dir()
-> 1837 self.keras_model = self.build(mode=mode, config=config)
1838
1839 def build(self, mode, config):
~\Desktop\imiage-segmentation\Mask_RCNN\mrcnn\model.py in build(self, mode, config)
2036 config.POOL_SIZE, config.NUM_CLASSES,
2037 train_bn=config.TRAIN_BN,
-> 2038 fc_layers_size=config.FPN_CLASSIF_FC_LAYERS_SIZE)
2039
2040 # Detections
~\Desktop\imiage-segmentation\Mask_RCNN\mrcnn\model.py in fpn_classifier_graph(rois, feature_maps, image_meta, pool_size, num_classes, train_bn, fc_layers_size)
923 # Shape: [batch, num_rois, POOL_SIZE, POOL_SIZE, channels]
924 x = PyramidROIAlign([pool_size, pool_size],
–> 925 name=”roi_align_classifier”)([rois, image_meta] + feature_maps)
926 # Two 1024 FC layers (implemented with Conv2D for consistency)
927 x = KL.TimeDistributed(KL.Conv2D(fc_layers_size, (pool_size, pool_size), padding=”valid”),
E:\Python\lib\site-packages\keras\backend\tensorflow_backend.py in symbolic_fn_wrapper(*args, **kwargs)
73 if _SYMBOLIC_SCOPE.value:
74 with get_graph().as_default():
—> 75 return func(*args, **kwargs)
76 else:
77 return func(*args, **kwargs)
E:\Python\lib\site-packages\keras\engine\base_layer.py in __call__(self, inputs, **kwargs)
487 # Actually call the layer,
488 # collecting output(s), mask(s), and shape(s).
–> 489 output = self.call(inputs, **kwargs)
490 output_mask = self.compute_mask(inputs, previous_mask)
491
~\Desktop\imiage-segmentation\Mask_RCNN\mrcnn\model.py in call(self, inputs)
388 # e.g. a 224×224 ROI (in pixels) maps to P4
389 image_area = tf.cast(image_shape[0] * image_shape[1], tf.float32)
–> 390 roi_level = log2_graph(tf.sqrt(h * w) / (224.0 / tf.sqrt(image_area)))
391 roi_level = tf.minimum(5, tf.maximum(
392 2, 4 + tf.cast(tf.round(roi_level), tf.int32)))
~\Desktop\imiage-segmentation\Mask_RCNN\mrcnn\model.py in log2_graph(x)
339 def log2_graph(x):
340 “””Implementation of Log2. TF doesn’t have a native implementation.”””
–> 341 return tf.log(x) / tf.log(2.0)
342
343
AttributeError: module ‘tensorflow’ has no attribute ‘log’
How can we use this to predict whether the given image is cancerous or not??
Hi. I am from the construction industry and looking out for codes for detecting and segmenting defects in the construction works. In case a code is available for the same, can the same be shared.
I got the error “No module named ‘tensorflow.compat’ ”
please help
how to run this shit
are you run this code can you tell how to run this code after download from github repository
Have u figured it out ?! It’s been 2yrs ?! Could u share the GitHub link for this ?!