Python Project – Real-time Human Detection & Counting
Master Python with 70+ Hands-on Projects and Get Job-ready - Learn Python
In this python project, we are going to build the Human Detection and Counting System through Webcam or you can give your own video or images. This is an intermediate level deep learning project on computer vision, which will help you to master the concepts and make you an expert in the field of Data Science. Let’s build an exciting project.
Human Detection with Computer Vision
Project Prerequisites
The project in Python requires you to have basic knowledge of python programming and the OpenCV library. We will be needing following libraries:
- OpenCV: A strong library used for machine learning
- Imutils: To Image Processing
- Numpy: Used for Scientific Computing. Image is stored in a numpy array.
- Argparse: Used to give input in command line.
To install the required library, run the following code in your terminal.
pip install opencv-python
pip install imutils
pip install numpy
Download Project Code
Before proceeding ahead, please download the source of real-time human detection project: Human Detection & Counting Project
Histogram of Oriented Gradient Descriptor
HOG is a feature descriptor used in computer vision and image processing for the purpose of object detection. This is one of the most popular techniques for object detection, to our fortune, OpenCV has already been implemented in an efficient way to combine the HOG Descriptor algorithm with Support Vector Machine or SVM.
Steps To Build Human Detection Project
1. Import the libraries:
import cv2
import imutils
import numpy as np
import argparse
2. Create a model which will detect Humans:
As discussed earlier, We will use HOGDescriptor with SVM already implemented in OpenCV. Below code will do this work:
HOGCV = cv2.HOGDescriptor()
HOGCV.setSVMDetector(cv2.HOGDescriptor_getDefaultPeopleDetector())
cv2.HOGDescriptor_getDefaultPeopleDetector() calls the pre-trained model for Human detection of OpenCV and then we will feed our support vector machine with it.
3. Detect() method:
Here, the actual magic will happen.
Video: A video combines a sequence of images to form a moving picture. We call these images as Frame. So in general we will detect the person in the frame. And show it one after another that it looks like a video.
That is exactly what our Detect() method will do. It will take a frame to detect a person in it. Make a box around a person and show the frame..and return the frame with person bounded by a green box.
def detect(frame):
    bounding_box_cordinates, weights =  HOGCV.detectMultiScale(frame, winStride = (4, 4), padding = (8, 8), scale = 1.03)

    person = 1
    for x,y,w,h in bounding_box_cordinates:
        cv2.rectangle(frame, (x,y), (x+w,y+h), (0,255,0), 2)
        cv2.putText(frame, f'person {person}', (x,y), cv2.FONT_HERSHEY_SIMPLEX, 0.5, (0,0,255), 1)
        person += 1

    cv2.putText(frame, 'Status : Detecting ', (40,40), cv2.FONT_HERSHEY_DUPLEX, 0.8, (255,0,0), 2)
    cv2.putText(frame, f'Total Persons : {person-1}', (40,70), cv2.FONT_HERSHEY_DUPLEX, 0.8, (255,0,0), 2)
    cv2.imshow('output', frame)

    return frame
Everything will be done by detectMultiScale(). It returns 2-tuple.
- List containing Coordinates of bounding Box of person.
Coordinates are in form X, Y, W, H.
Where x,y are starting coordinates of box and w, h are width and height of box respectively. - Confidence Value that it is a person.
Now, We have our detect method. Let’s Create a Detector.
4. HumanDetector() method
There are two ways of getting Video.
- Web Camera
- Path of file stored
In this deep learning project, we can take images also. So our method will check if a path is given then search for the video or image in the given path and operate. Otherwise, it will open the webCam.
def humanDetector(args):
    image_path = args["image"]
    video_path = args['video']
    if str(args["camera"]) == 'true' : camera = True
    else : camera = False

    writer = None
    if args['output'] is not None and image_path is None:
        writer = cv2.VideoWriter(args['output'],cv2.VideoWriter_fourcc(*'MJPG'), 10, (600,600))

    if camera:
        print('[INFO] Opening Web Cam.')
        detectByCamera(ouput_path,writer)
    elif video_path is not None:
        print('[INFO] Opening Video from path.')
        detectByPathVideo(video_path, writer)
    elif image_path is not None:
        print('[INFO] Opening Image from path.')
        detectByPathImage(image_path, args['output'])
5. DetectByCamera() method
def detectByCamera(writer):
    video = cv2.VideoCapture(0)
    print('Detecting people...')

    while True:
        check, frame = video.read()

        frame = detect(frame)
        if writer is not None:
            writer.write(frame)

        key = cv2.waitKey(1)
        if key == ord('q'):
            break

    video.release()
    cv2.destroyAllWindows()
cv2.VideoCapture(0) passing 0 in this function means we want to record from a webcam. video.read() read frame by frame. It returns a check which is True if this was able to read a frame otherwise False.
Now, For each Frame, we will call detect() method. Then we write the frame in our output file.
6. DetectByPathVideo() method
This method is very similar to the previous method except we will give a path to the Video. First, we check if the video on the provided path is found or not.
Note – A full path must be given.
def detectByPathVideo(path, writer):

    video = cv2.VideoCapture(path)
    check, frame = video.read()
    if check == False:
        print('Video Not Found. Please Enter a Valid Path (Full path of Video Should be Provided).')
        return

    print('Detecting people...')
    while video.isOpened():
        #check is True if reading was successful
        check, frame =  video.read()

        if check:
            frame = imutils.resize(frame , width=min(800,frame.shape[1]))
            frame = detect(frame)

            if writer is not None:
                writer.write(frame)

            key = cv2.waitKey(1)
            if key== ord('q'):
                break
        else:
            break
    video.release()
    cv2.destroyAllWindows()

def detectByCamera(writer):
    video = cv2.VideoCapture(0)
    print('Detecting people...')

    while True:
        check, frame = video.read()

        frame = detect(frame)
        if writer is not None:
            writer.write(frame)

        key = cv2.waitKey(1)
        if key == ord('q'):
                break

    video.release()
    cv2.destroyAllWindows()
The implementation is similar to the previous function except for each frame we will check that it successfully reads the frame or not. At the end when the frame is not read we will end the loop.
7. DetectByPathimage() method
This method is used if a person needs to be detected from an image.
def detectByPathImage(path, output_path):
    image = cv2.imread(path)

    image = imutils.resize(image, width = min(800, image.shape[1]))

    result_image = detect(image)

    if output_path is not None:
        cv2.imwrite(output_path, result_image)

    cv2.waitKey(0)
    cv2.destroyAllWindows()
8. Argparse() method
The function argparse() simply parses and returns as a dictionary the arguments passed through your terminal to our script. There will be Three arguments within the Parser:
- Image: The path to the image file inside your system
- Video: The path to the Video file inside your system
- Camera: A variable that if set to ‘true’ will call the cameraDetect() method.
def argsParser():
    arg_parse = argparse.ArgumentParser()
    arg_parse.add_argument("-v", "--video", default=None, help="path to Video File ")
    arg_parse.add_argument("-i", "--image", default=None, help="path to Image File ")
    arg_parse.add_argument("-c", "--camera", default=False, help="Set true if you want to use the camera.")
    arg_parse.add_argument("-o", "--output", type=str, help="path to optional output video file")
    args = vars(arg_parse.parse_args())

    return args
9. Main function
We have reached the end of our project.
if __name__ == "__main__":
    HOGCV = cv2.HOGDescriptor()
    HOGCV.setSVMDetector(cv2.HOGDescriptor_getDefaultPeopleDetector())

    args = argsParser()
    humanDetector(args)
Instead of declaring our model above, we can declare it in our main function.
Run the Human Detection Project
To run the human detection deep learning project, please run below-mentioned commands as per requirements
1. To give video file as input:
python main.py -v ‘Path_to_video’
2. To give image file as input:
python main.py -i ‘Path_to-image’
3. To use the camera:
python main.py -c True
4. To save the output:
Python main.py -c True -o ‘file_name’
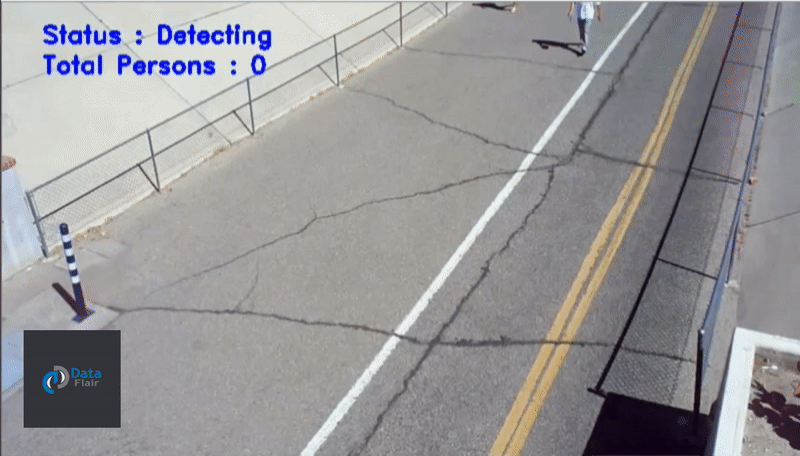
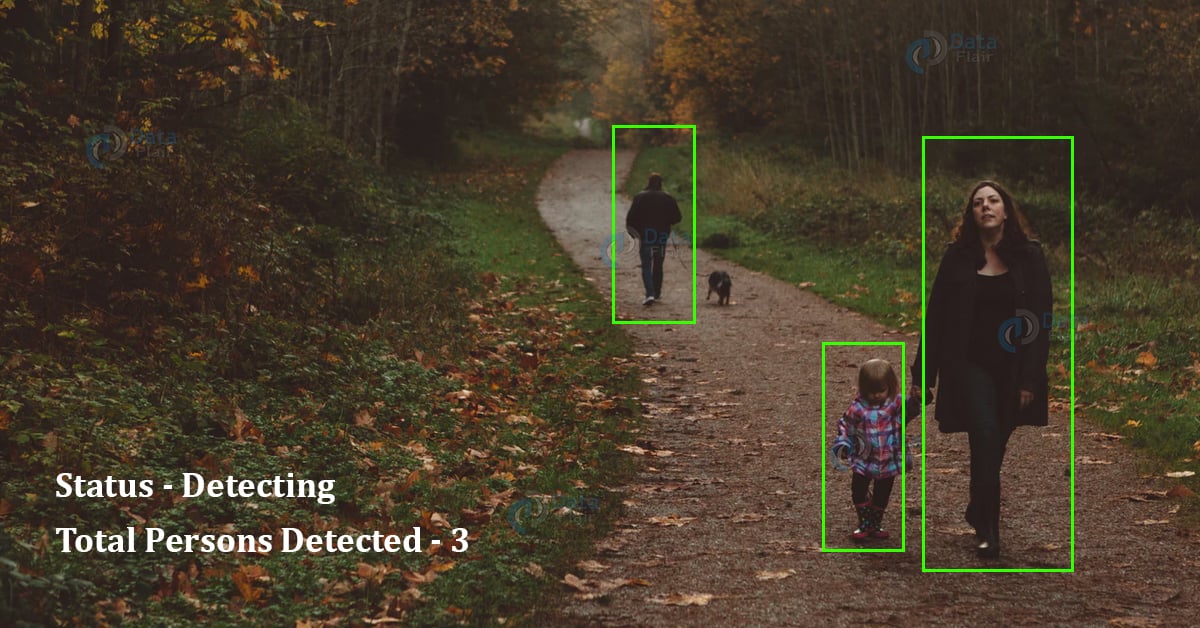
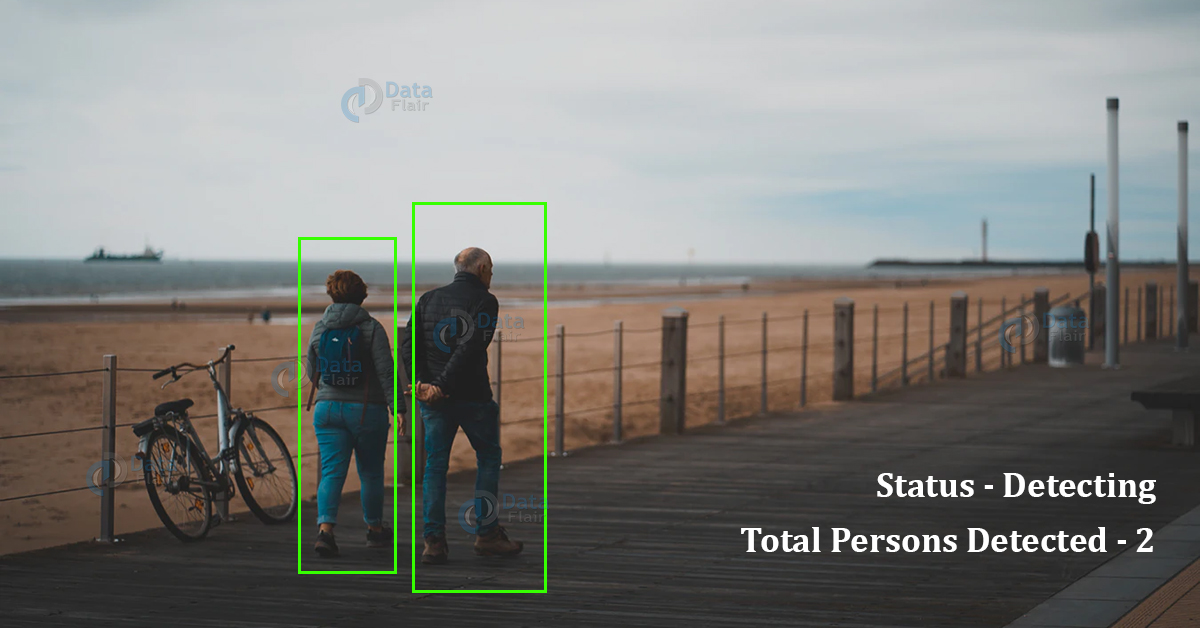
Project Output
Now, after running the human detection python project with multiple images and video, we will get:
Summary
In this deep learning project, we have learned how to create a people counter using HOG and OpenCV to generate an efficient people counter. We developed the project where you can supply the input as: video, image, or even live camera. This is an intermediate level project, which will surely help you in mastering python and deep learning libraries.
Did you like this article? If Yes, please give DataFlair 5 Stars on Google


hi can i know the process to execute the code
this code is not working
i was getting an error when i execute the last code
if __name__ == “__main__”:
HOGCV = cv2.HOGDescriptor()
HOGCV.setSVMDetector(cv2.HOGDescriptor_getDefaultPeopleDetector())
args = argsParser()
humanDetector(args)
SystemExit: 2
I am not getting the output of the following code can you help plz
I am not getting the output of the following code can you help plz……..
What exactly is the error
Hey, I’m not getting any output when I try to run for webcam, though it is working fine for images and videos. I’m trying this in Pycharm in local system. Please help me.
Bhupesh , is the webcam worked or not ?
please help me to run the code
where to run the code
accuracy is too low its counting tables and chairs as person
Respected sir, how you give the input file to the code.. Would you please tell me sir?
camera is not open
the same probleme
is the problem resolve ?
if yes , then what you did ?