Python Project – Create a Calorie Calculator in Django
Python course with 57 real-time projects - Learn Python
In this article, we will develop a Django project – Calorie Calculator. This is a nice intermediate level project to master Django and Python
What is a Calorie Calculator?
”Health is wealth” Obviously, you have heard it a thousand times but as we grow older we often realize it’s true and this app provides an interesting way to get started with the very boring term “dieting” as we already know “FITNESS START WITH WHAT WE EAT”.
Let’s develop an interesting project – Calorie Calculator to record and estimate number of calories we need to consume daily. This app can also provide guidelines for gaining or losing weight.
Calorie Calculator in Python – Django Project
This exciting python project will be developed using a python Django. Django framework provides inbuilt libraries for web development. We can develop any kind of web app using Django.
Project Prerequisites
To implement this app we will use :
- Basic concepts of Python
- HTML
- CSS
- Bootstrap
- Django framework
To install required libraries, use pip installer from the command line: (Django filters are used and explained later)
pip install django
pip install django-filters
Final product
Below is the final GUI of Calorie Calculator Project
Download Project Code
Before proceeding ahead, please download the calorie calculator project source code: Calorie Calculator in Python
Steps to Build a Python Project – Calorie calculator
Now we will make a new project CalorieCalc and an app inside it named ‘Fityfeed’
django-admin startproject CalorieClac
cd  CalorieClac
django-admin startapp Fityfeed
1. Writing Models: models.py
To access databases, we will need the model.
In Fityfeed/models.py, create these models.
Code:
from django.db import models
from django.contrib.auth.models import User

# Create your models here.
class Customer(models.Model):
    user = models.OneToOneField(User, null=True, on_delete=models.CASCADE)
    name=models.CharField(max_length=200,null=True)
    email=models.CharField(max_length=200,null=True)
    date_created=models.DateTimeField(auto_now_add=True,null=True)

    def __str__(self):
        return str(self.name)

class Category(models.Model):
    options=(
        ('breakfast','breakfast'),
        ('lunch','lunch'),
        ('dinner','dinner'),
        ('snacks','snacks'),
    )
    name=models.CharField(max_length=50,choices=options)
    def __str__(self):
        return self.name

class Fooditem(models.Model):
    name = models.CharField(max_length=200)
    category = models.ManyToManyField(Category)
    carbohydrate = models.DecimalField(max_digits=5,decimal_places=2,default=0)
    fats = models.DecimalField(max_digits=5,decimal_places=2,default=0)
    protein = models.DecimalField(max_digits=5,decimal_places=2,default=0)
    calorie=models.DecimalField(max_digits=5,decimal_places=2,default=0,blank=True)
    quantity = models.IntegerField(default=1,null=True,blank=True)

    def __str__(self):
        return str(self.name)

#for user page-------------------------------------------------------------
class UserFooditem(models.Model):
    customer = models.ManyToManyField(Customer ,blank=True)
    fooditem=models.ManyToManyField(Fooditem)
Our models will store:
- Customers
- All available food items
- Category of food items we offer
- Consumed food items
We are using simple model fields for that purpose. The __str__() method will return the string representation of the object. These are simple Django concepts.
2. Authentication: decorators.py
Code:
from django.http import HttpResponse
from django.shortcuts import redirect

def unauthorized_user(view_func):
    def wrapper_func(request,*args,**kwargs):
        if request.user.is_authenticated:
            return redirect('home')
        else:
            return view_func(request,*args,**kwargs)
    return wrapper_func

def allowed_users(allowed_roles=[]):
    def decorator(view_func):
        def wrapper_func(request,*args,**kwargs):
            group=None
            if request.user.groups.exists():
                group=request.user.groups.all()[0].name
            if group in allowed_roles:
                return view_func(request,*args,**kwargs)
            else:
                return HttpResponse("<h1>You are not allowed to access this page</h1>")
        return wrapper_func
    return decorator

def admin_only(view_func):
    def wrapper_func(request,*args,**kwargs):
        group=None
        if request.user.groups.exists():
            group=request.user.groups.all()[0].name
        if group=='user':
            return redirect('userPage')
        if group=='admin':
            return view_func(request,*args,**kwargs)
    return wrapper_func
This will take care of all access privileges so that the customer and the admin cannot access each other’s data. Also, it will make sure that the logged-in user can’t go to the login/register page, unauthorized users can’t access any page except login and registration page.
3. Search feature: filers.py
Code:
import django_filters
from .models import *

class fooditemFilter(django_filters.FilterSet):
    class Meta:
        model = Fooditem
        fields = ['name']
This includes a small code which enables search filter for the user.
4. Creating and updating models: forms.py
Code:
from django.forms import ModelForm
from .models import *
from django.contrib.auth.forms import UserCreationForm

class fooditemForm(ModelForm):
    class Meta:
        model=Fooditem
        fields="__all__"

class addUserFooditem(ModelForm):
    class Meta:
        model=UserFooditem
        fields="__all__"

class createUserForm(UserCreationForm):
    class Meta:
        model=User
        fields=['username','email','password1','password2']
Above mentioned code is required to create, update models which we have created earlier in models.py (for CRUD functionality)
5. To create/update models from django admin site: admin.py
Code:
from django.contrib import admin
from .models import *

# Now, Register the models here.

class foodAdmin(admin.ModelAdmin):
    class Meta:
        model=Fooditem
    list_display=['name']
    list_filter=['name']

admin.site.register(Customer)
admin.site.register(UserFooditem)
admin.site.register(Category)
admin.site.register(Fooditem,foodAdmin)
It will register all our models to admin site, Now we can easily create/update on following UI: http://127.0.0.1:8000/admin/
NOTE: Create a superuser and apply all migrations:
py manage.py makemigrations
py manage.py migrate
py manage.py createsuperuser
It will ask for your username, email, password.
And then boom! You are more than halfway towards reaching your goal.
6. Let’s work with urls.py
First, we need to make a new file urls.py in our app and include it in ‘CalorieCalc/urls.py’ so that it finally contains
from django.contrib import admin
from django.urls import path, include

urlpatterns = [
    path('admin/', admin.site.urls),
    path('',include('Fityfeed.urls')),
]
Now let’s work with Fityfeed/urls.py
Code:
from django.urls import path,include
from . import views
from django.contrib.auth import views as auth_views

urlpatterns = [
    path('',views.home,name='home'),
    path('user/',views.userPage,name='userPage'), #userPage
    path('product/',views.fooditem,name='fooditem'),
    path('createfooditem/',views.createfooditem,name='createfooditem'),
    path('register/',views.registerPage,name='register'),
    path('login/',views.loginPage,name='login'),
    path('logout/',views.logoutUser,name='logout'),
    path('addFooditem/',views.addFooditem,name='addFooditem'),
     path('reset_password/',
         auth_views.PasswordResetView.as_view(),
         name="reset_password"),

    path('reset_password_sent/',
         auth_views.PasswordResetDoneView.as_view(),
         name="password_reset_done"),

    path('reset/<uidb64>/<token>/',
         auth_views.PasswordResetConfirmView.as_view(),
         name="password_reset_confirm"),

    path('reset_password_complete/',
         auth_views.PasswordResetCompleteView.as_view(),
         name="password_reset_complete"),
]
It contains a lot more than we’ve discussed right. No worries, we’ll get it as soon as we step further.
7. Let’s finally set our ‘views.py’
Code:
from django.shortcuts import render,redirect
from django.http import HttpResponse
from django.contrib.auth.models import User
from .models import *
from .forms import *
from django.contrib import messages
from django.contrib.auth import authenticate,login,logout
from django.contrib.auth.decorators import login_required
from .decorators import *
from django.contrib.auth.models import Group
from .filters import fooditemFilter
# Create your views here.
@login_required(login_url='login')
@admin_only
def home(request):
breakfast=Category.objects.filter(name='breakfast')[0].fooditem_set.all()[:5]
lunch=Category.objects.filter(name='lunch')[0].fooditem_set.all()[:5]
dinner=Category.objects.filter(name='dinner')[0].fooditem_set.all()[:5]
snacks=Category.objects.filter(name='snacks')[0].fooditem_set.all()[:5]
customers=Customer.objects.all()
context={'breakfast':breakfast,
'lunch':lunch,
'dinner':dinner,
'snacks':snacks,
'customers':customers,
}
return render(request,'main.html',context)
@login_required(login_url='login')
@allowed_users(allowed_roles=['admin'])
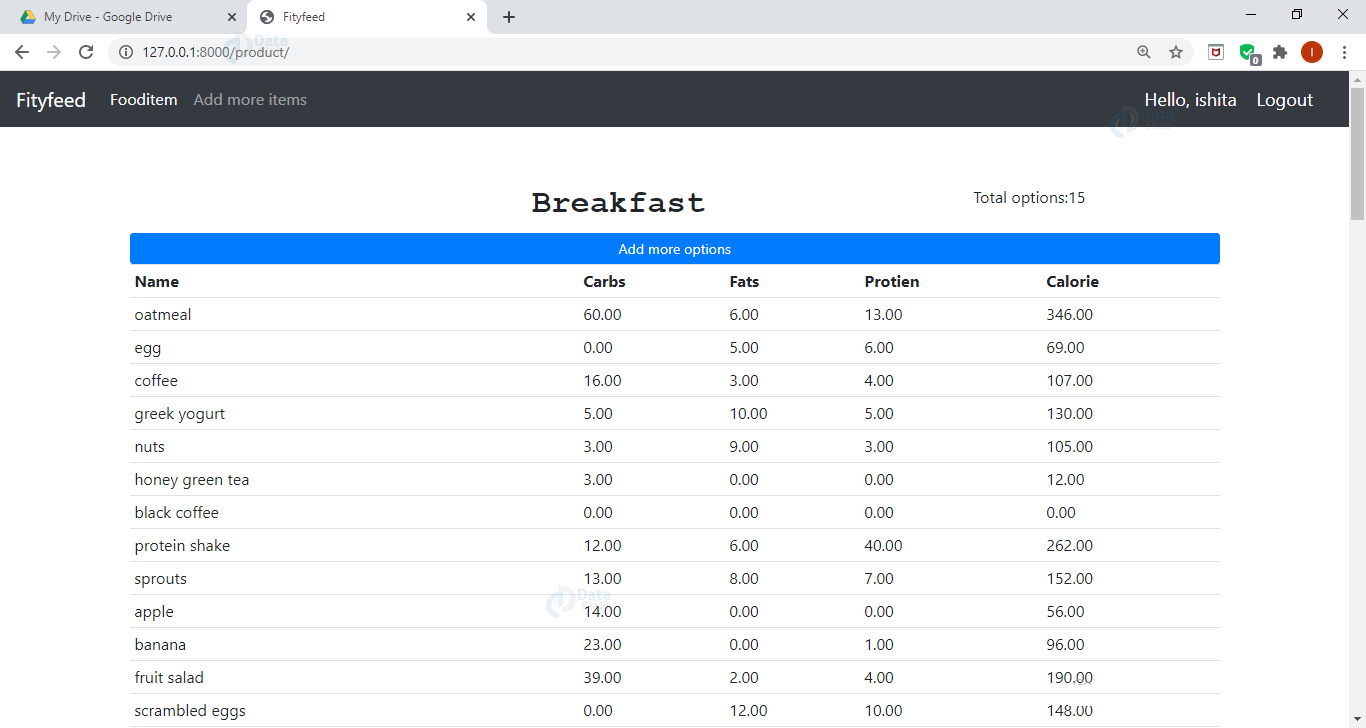
def fooditem(request):
breakfast=Category.objects.filter(name='breakfast')[0].fooditem_set.all()
bcnt=breakfast.count()
lunch=Category.objects.filter(name='lunch')[0].fooditem_set.all()
lcnt=lunch.count()
dinner=Category.objects.filter(name='dinner')[0].fooditem_set.all()
dcnt=dinner.count()
snacks=Category.objects.filter(name='snacks')[0].fooditem_set.all()
scnt=snacks.count()
context={'breakfast':breakfast,
'bcnt':bcnt,
'lcnt':lcnt,
'scnt':scnt,
'dcnt':dcnt,
'lunch':lunch,
'dinner':dinner,
'snacks':snacks,
}
return render(request,'fooditem.html',context)
@login_required(login_url='login')
@allowed_users(allowed_roles=['admin'])
def createfooditem(request):
form = fooditemForm()
if request.method == 'POST':
form = fooditemForm(request.POST)
if form.is_valid():
form.save()
return redirect('/')
context={'form':form}
return render(request,'createfooditem.html',context)
@unauthorized_user
def registerPage(request):
form=createUserForm()
if request.method=='POST':
form=createUserForm(request.POST)
if form.is_valid():
user=form.save()
username=form.cleaned_data.get('username')
group=Group.objects.get(name='user')
user.groups.add(group)
email=form.cleaned_data.get('email')
Customer.objects.create(user=user, name=username,email=email)
messages.success(request,'Account created for '+username)
return redirect('login')
context={'form':form}
return render(request,'register.html',context)
@unauthorized_user
def loginPage(request):
if request.method=='POST':
username=request.POST.get('username')
password=request.POST.get('password')
user=authenticate(request,username=username,password=password)
if user is not None:
login(request,user)
return redirect('home')
else:
messages.info(request,'username or password is invalid')
return render(request,'login.html')
@login_required(login_url='login')
def logoutUser(request):
logout(request)
return redirect('login')
def userPage(request):
user=request.user
cust=user.customer
fooditems=Fooditem.objects.filter()
myfilter = fooditemFilter(request.GET,queryset=fooditems)
fooditems=myfilter.qs
total=UserFooditem.objects.all()
myfooditems=total.filter(customer=cust)
cnt=myfooditems.count()
querysetFood=[]
for food in myfooditems:
querysetFood.append(food.fooditem.all())
finalFoodItems=[]
for items in querysetFood:
for food_items in items:
finalFoodItems.append(food_items)
totalCalories=0
for foods in finalFoodItems:
totalCalories+=foods.calorie
CalorieLeft=2000-totalCalories
context={'CalorieLeft':CalorieLeft,'totalCalories':totalCalories,'cnt':cnt,'foodlist':finalFoodItems,'fooditem':fooditems,'myfilter':myfilter}
return render(request,'user.html',context)
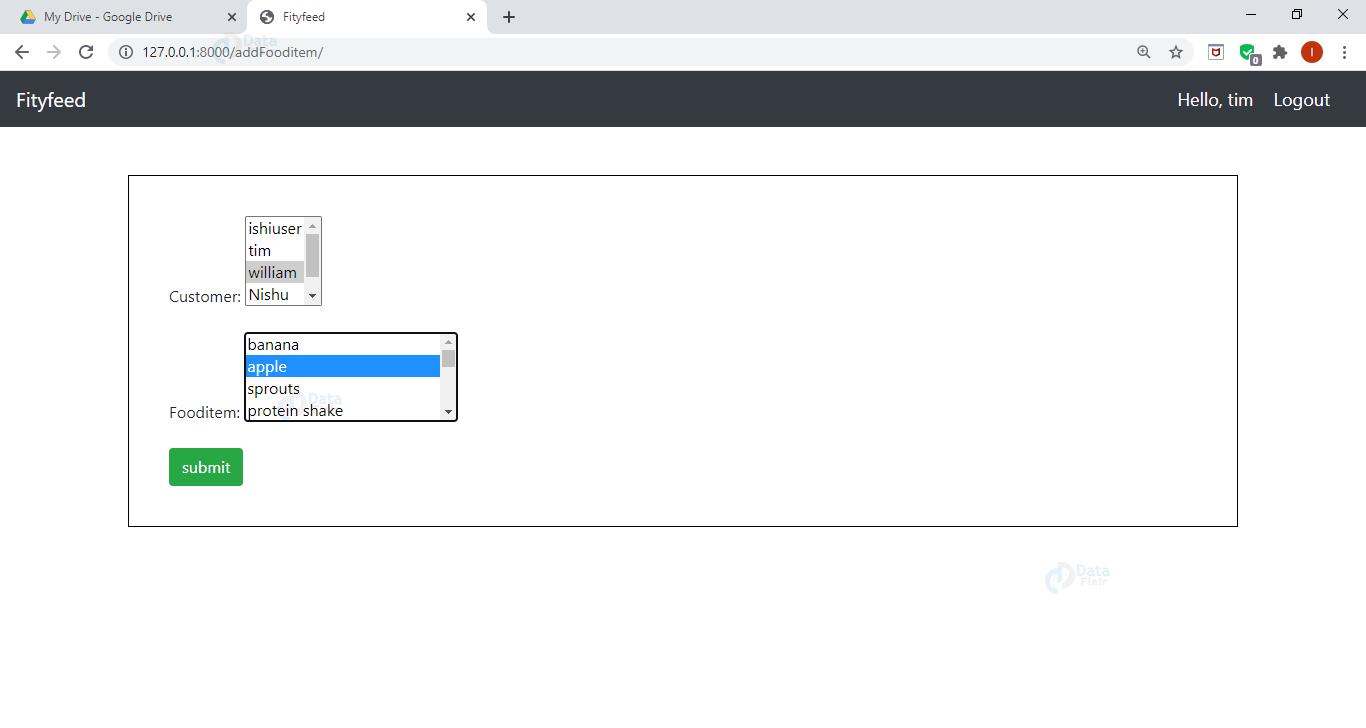
def addFooditem(request):
user=request.user
cust=user.customer
if request.method=="POST":
form =addUserFooditem(request.POST)
if form.is_valid():
form.save()
return redirect('/')
form=addUserFooditem()
context={'form':form}
return render(request,'addUserFooditem.html',context)
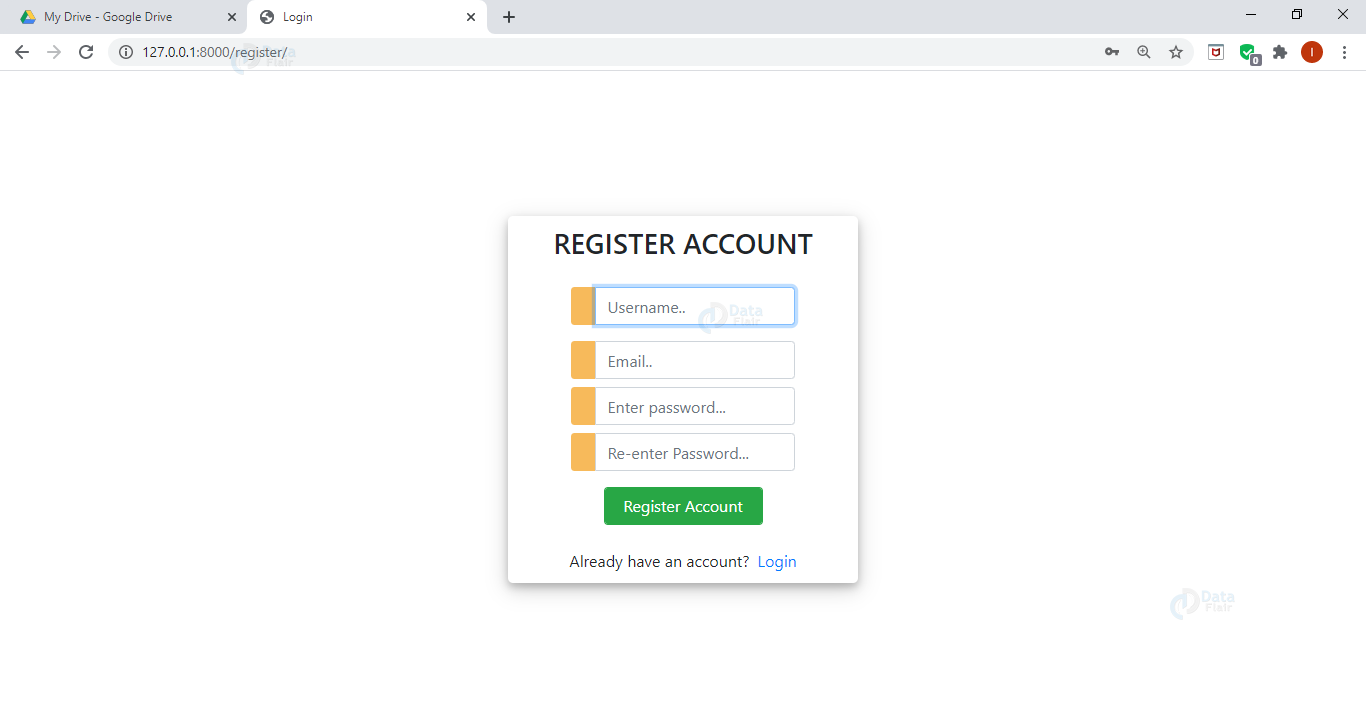
Registration Page:
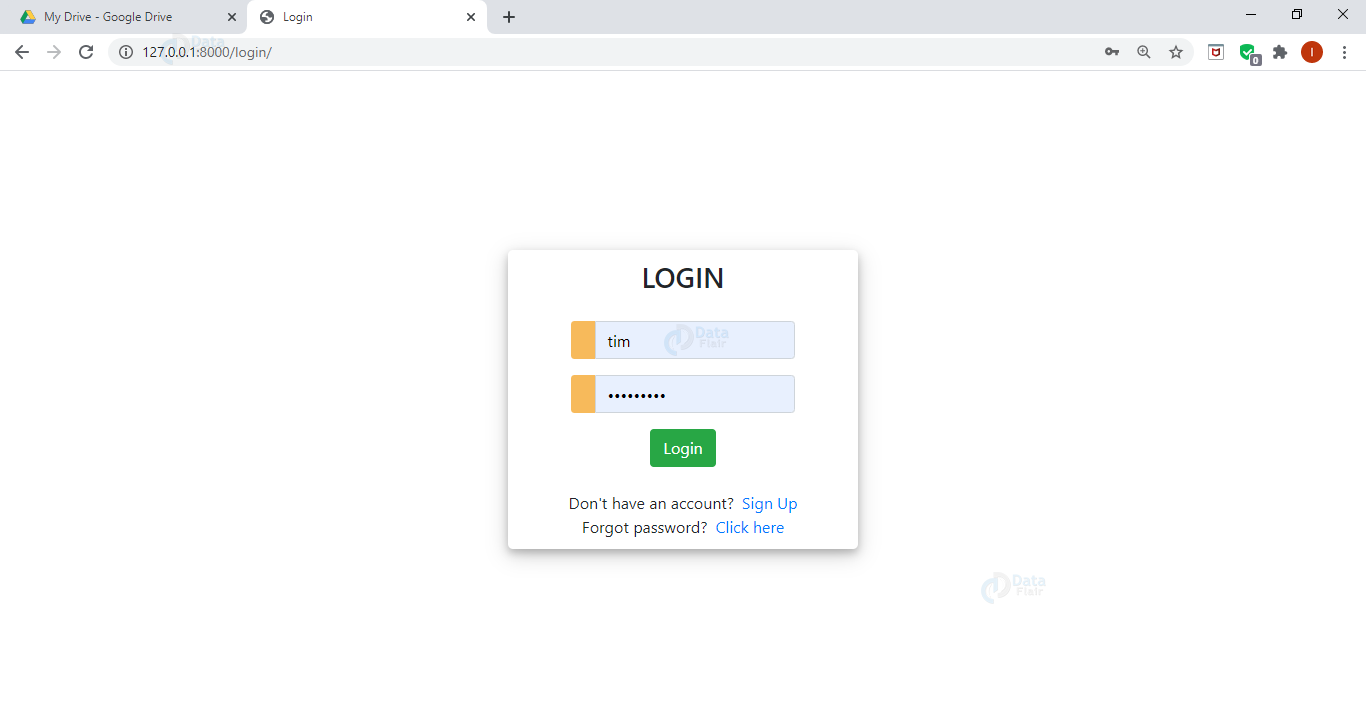
Login Page:
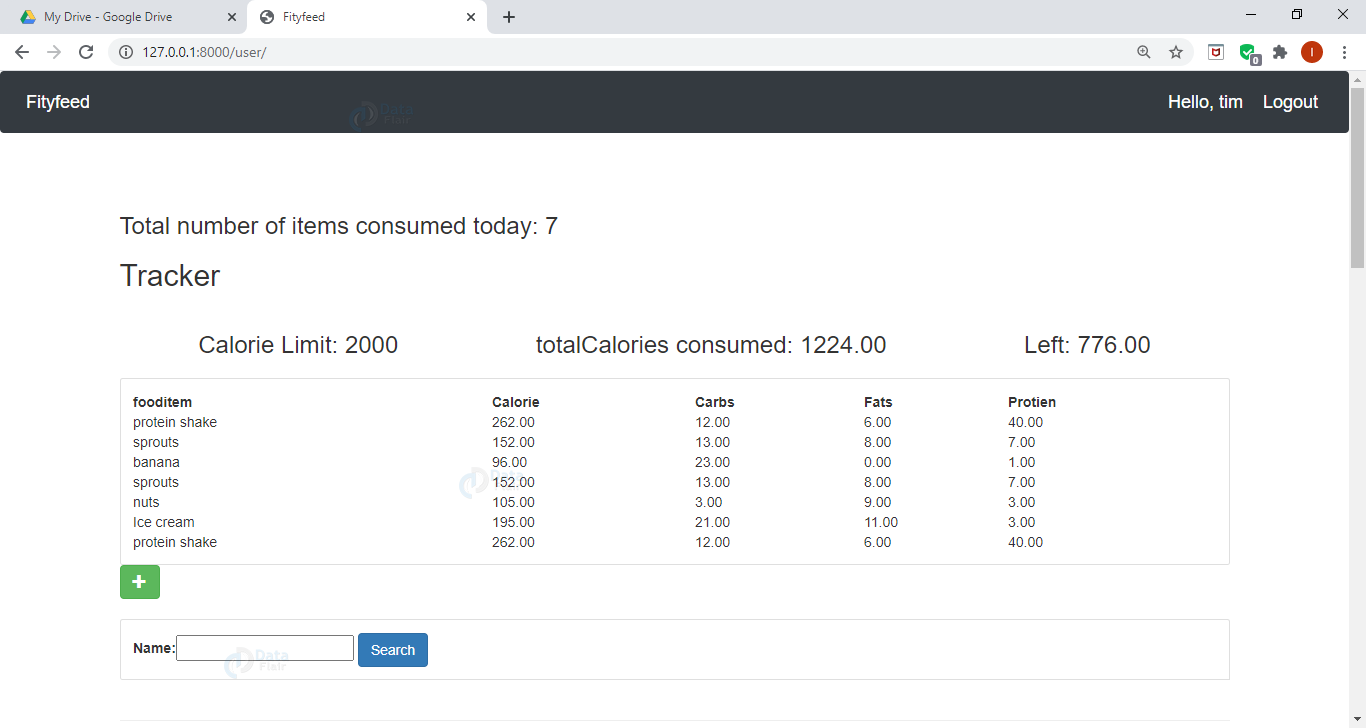
User Page:
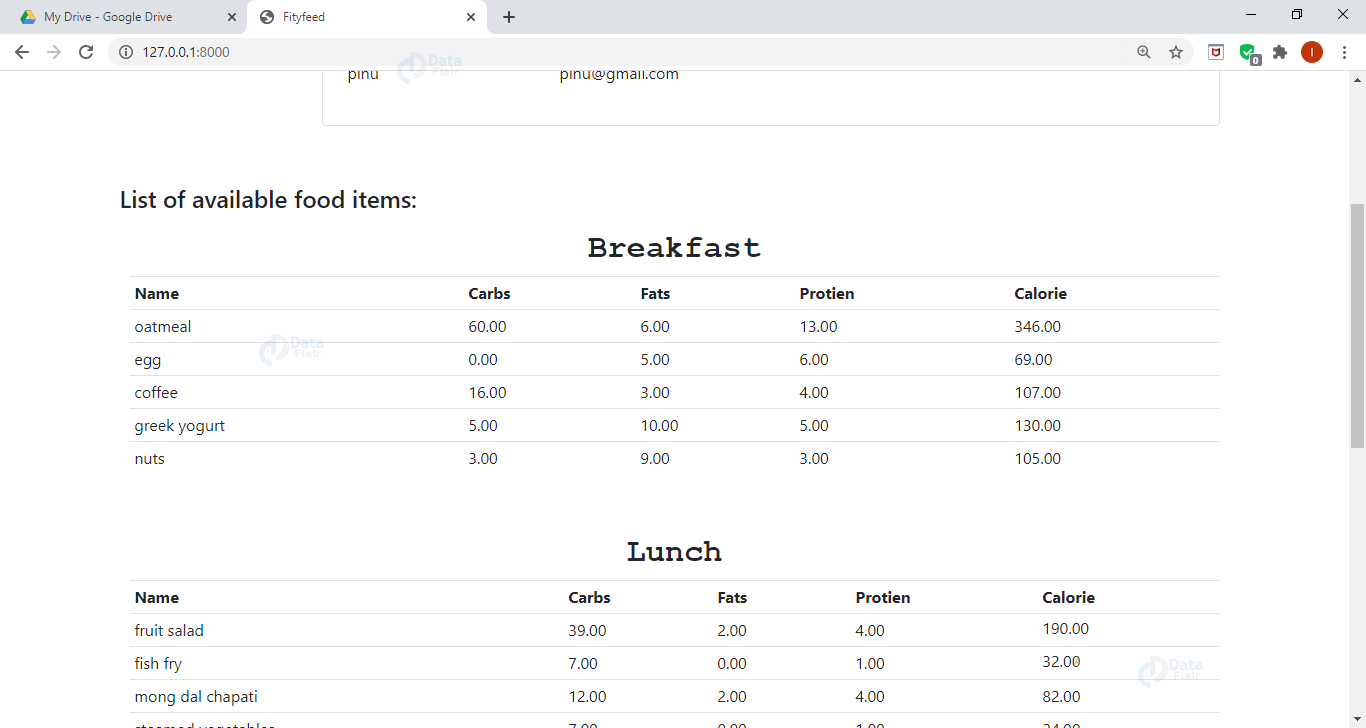
Admin Page:
7. Let’s do some styling
We need to make a new static folder in the outer project folder. For this, we need to customize our setting.py and append the following
Code:
STATIC_URL = '/static/'
STATICFILES_DIRS = [
    os.path.join(BASE_DIR,'static'),
]
We need to use this line ‘{% load static %}’ in our templates and now make a new file main.css in our static folder:
Code:
.flex-box-row {
    display:flex;
    padding : 10px;
    flex-wrap: wrap;
    justify-content: space-around;
}

#heading{
    text-shadow: antiquewhite;
    font-family: 'Courier New', Courier, monospace;
    font-weight: 550;
    font-size: xx-large;
    text-align: left;
}
8. Now the last step, develop templates:
This you can easily get from source code as there are many files so pasting it here would make it bigger.
9. Forget password functionality:
Include this in your setting.py
Code:
EMAIL_BACKEND='django.core.mail.backends.smtp.EmailBackend'
EMAIL_HOST='smtp.gmail.com'
EMAIL_PORT=587
EMAIL_USE_TLS=True
EMAIL_HOST_USER='***'
EMAIL_HOST_PASSWORD='***'
Do not forget to include your email and password here.
10. Output Screens
Below are some random screens of Calorie Calculator Python Project
Summary
We have successfully developed the calorie calculator python project in Django and now we can use it every day to keep track of what we eat and how much we should eat.
Did you like our efforts? If Yes, please give DataFlair 5 Stars on Google


how to run admin page? I mean which command to use?
Type the following url (remove space) in your browser http ://127.0.0.1 : 8000/admin change the port number accordingly(if required).
I have the error like ValueError: The view calorieapp.decorators.wrapper_func didn’t return an HttpResponse object. It returned None instead. how can i fix it
type ‘python manage.py runserver’ in command prompt then create username password for your admin login
please what can i give username and password in admin site
type;py manage.py makemigrations
py manage.py migrate
py manage.py createsuperuser
could you please give your email?
I have some doubts….
I’m not able to access localhost:8000/product page
Your application port may have different port number (maybe 8080 or any other). You can get it by running ‘py manage.py runserver’. You just have to copy this link and append ‘/product’ to the link.
Can you help me out when I am clicking to view site it is saying change DEBUG=False in settings.py I don’t know what to do help me.
You might not have added the app in your settings.py file. So go to the installed app list of the mentioned file and add your app (by appending ‘Fityfeed’) in the list.
Forget your password functionality isn’t working. Please help!
You have to provide your own email id and password in the below lines in settings.py “EMAIL_HOST_USER=’***’
EMAIL_HOST_PASSWORD=’*** ‘
The view Fityfeed.decorators.wrapper_func didn’t return an HttpResponse object. It returned None instead.
i am getting above error. please help me
You might have some error in decorators.py , we would recommend you to download the project and try with the downloaded code or you can compare your code with it.
Doubled check but its still showing that error, pls help
I am getting this error as soon as I start migrations
ModuleNotFoundError: No module named ‘web.urls’
Please paste the error stacktrace as there is no module named web.urls used in the code, you might have added it by mistake.
How do you know how much calories are there in the food ? How will you check that ?
All the information regarding a fooditem (carbohydrates, fats, calories and protein) will be added whenever a new fooditem is added by admin.
could i get a report documetation of the project.
Can anyone please guide me, How to create a database for this project?
how to run the project in pycharm please explain me step by step
dear sir ValueError at /
The view Fityfeed.decorators.wrapper_func didn’t return an HttpResponse object. It returned None instead.
Request Method: GET
Request URL: http :// 127.0.0.1 : 8000 /
Django Version: 3.2.2
Exception Type: ValueError
Exception Value:
The view Fityfeed.decorators.wrapper_func didn’t return an HttpResponse object. It returned None instead.
Exception Location: E:\djangoproject\venv\lib\site-packages\django\core\handlers\base.py, line 309, in check_response
Python Executable: E:\djangoproject\venv\Scripts\python.exe
how to run the downloaded code
Can I turn from web app to mobile app for this calorie tracker ?
Your HTML templates are not in the source code. Where do I find these??
How do I find your HTML templates??
bro plzz help me. i am getting error in running the project ‘The view Fityfeed.decorators.wrapper_func didn’t return an HttpResponse object. It returned None instead.’
How to resolve runtime error
model class Fityfeed.model.customer doesn’t declare explicite app_label and isn’t in an apllication in INSTALLED_APPS.
How to resolve runtime error
model class Fityfeed.model.customer doesn’t declare explicite app_label and isn’t in an apllication in INSTALLED_APPS.
model class Fityfeed.model.customer doesn’t declare explicite app_label and isn’t in an apllication in INSTALLED_APPS.
Please add “Fityfeed.apps.FityfeedConfig” in INSTALLED_APPS section at CalorieCalc\setting.py
Hello sir! can I change the background visual of login page or fityfeed page.
Can you please guide?
one user can add item menu of other users (which may lead to data modification) so,please support with a proper solution
could you just explain rather than this code what else do we have to add or correct to run the project successfully?