Message Encode Decode in Python with Tkinter
Master Python with 70+ Hands-on Projects and Get Job-ready - Learn Python
Python Message Encode-Decode – Secure your Information by Encoding the messages
Encoding is the process that transforms the text or information to the unrecognizable form and decryption is the process to convert the encrypted message into original form.
Message Encode-Decode
Message encoding and decoding is the process to first convert the original text to the random and meaningless text called ciphertext. This process is called encoding. Decoding is the process to convert that ciphertext to the original text. This process is also called the Encryption-Decryption process.
Message Encode-Decode Python Project
The objective of this project is to encode and decode messages using a common key. This project will be built using the Tkinter and base64 library.
In this project, users have to enter the message to encode or decode. Users have to select the mode to choose the encoding and decoding process. The same key must be used to process the encoding and decoding for the same message.
Project Prerequisites
To build this project we will use basic concept of python, Tkinter, and base64 library.
- Tkinter is a standard GUI python library
- base64 module provides a function to encode the binary data to ASCII characters and decode that ASCII characters back to binary data.
To install the library we use pip install command on the command prompt
pip install tkinter
pip install base64
Download Message Encode-Decode python code
Download source code of Message Encode-Decode Project – Python Message Encode Decode Project
Project File Structure
These are the step to build message encode – decode python project
- Import module
- Create display window
- Define function
- Define labels and buttons
So this is what we will do in this python project. Let’s start
Steps to develop message encode-decode project
1. Import Libraries
from tkinter import *
import base64
The first step is to import tkinter and base64 libraries.
2. Initialize Window
root = Tk()

root.geometry('500x300')
root.resizable(0,0)
root.title("DataFlair - Message Encode and Decode")
- Tk() initialized tkinter which means window created
- geometry() set the width and height of the window
- resizable(0,0) set the fixed size of the window
- title() set the title of the window
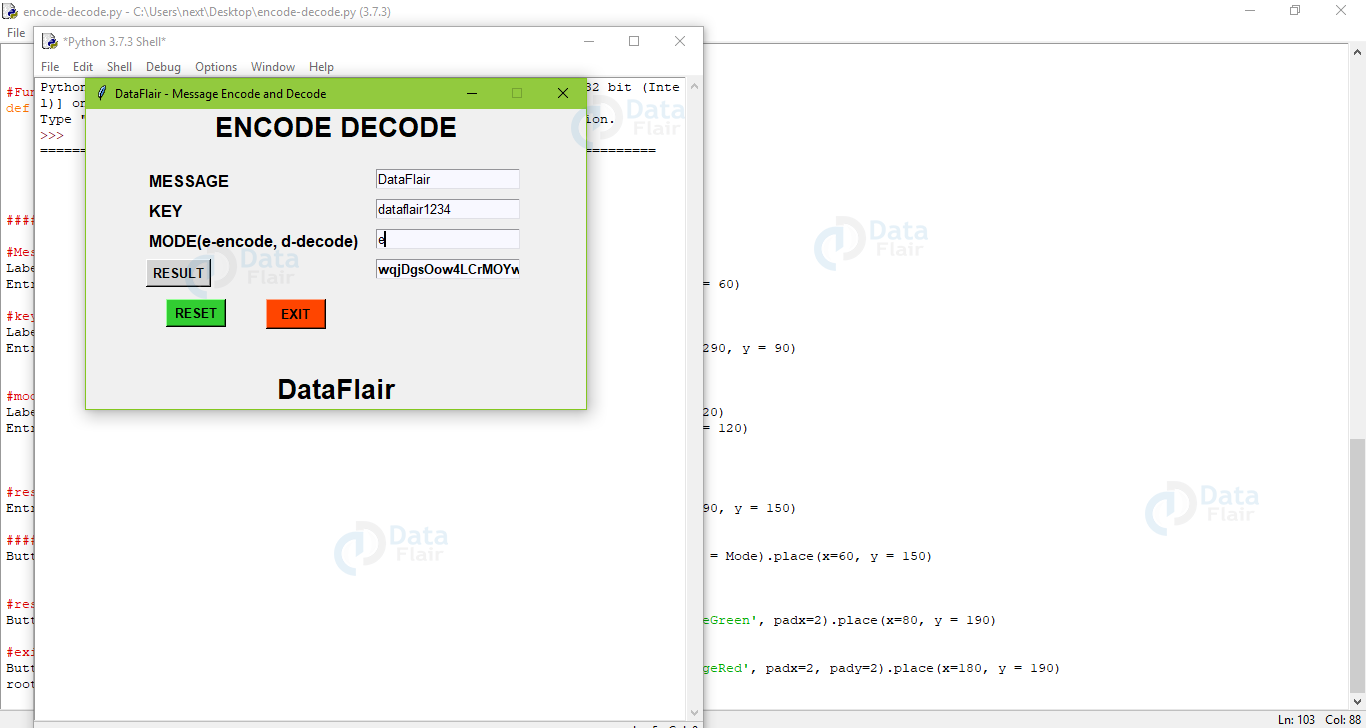
Label(root, text ='ENCODE DECODE', font = 'arial 20 bold').pack()

Label(root, text ='DataFlair', font = 'arial 20 bold').pack(side =BOTTOM)
Label() widget use to display one or more than one line of text that users aren’t able to modify.
- root is the name which we refer to our window
- text which we display on the label
- font in which the text is written
- pack organized widget in block
3. Define variables
Text = StringVar()
private_key = StringVar()
mode = StringVar()
Result = StringVar()
- Text variable stores the message to encode and decode
- private_key variable store the private key used to encode and decode
- mode is used to select that is either encoding or decoding
- Result store the result
4. Function to encode
def Encode(key,message):
    enc=[]

    for i in range(len(message)):
        key_c = key[i % len(key)]
         enc.append(chr((ord(message[i]) + ord(key_c)) % 256))
    return base64.urlsafe_b64encode("".join(enc).encode()).decode()
Encode function have arguments – key and message
- enc = [] is an empty list
- We run loop till the length of the message
- i% of len(key) gives the remainder of division between i and len(key) and that remainder used as an index of key the value of key at that index is stored in key_c
- ord() function takes string argument of a single unicode character and return its integer unicode value
- chr() function takes an integer argument and returns the string.
- ord (message[i]) convert the value of message at index i into the integer value
- ord(key_c) converts the key_c value to integer value
- ord(message[i]) + ord(key_c)) % 256 gives the remainder of division of addition of ord(message[i]) and ord( key_c) with 256 and passes that remainder to chr() function
- chr() function converts that integer value to string and store to enc
- base64.urlsafe_b64encode encode a string.
- The join() method joins each element of list, string, and tuple by a string separator and returns the concatenated string.
- encode() method returns utf-8 encoded message of the string.
- decode() method decodes the string.
- return gives the result of the encoded string.
5. Function to decode
def Decode(key,message):
    dec=[]
    message = base64.urlsafe_b64decode(message).decode()

    for i in range(len(message)):
        key_c = key[i % len(key)]
        dec.append(chr((256 + ord(message[i])- ord(key_c)) % 256))
    return "".join(dec)
Decode() function has arguments – key, message
- dec=[] is an empty list
- Decode the content from input and write the result in binary to the output
- We ran the loop till the length of the message
- 256 + ord(message[i]) – ord(key_c)) % 256 gives the remainder of addition of 256 with subtraction of ord(message[i]) – ord( key_c) and then division with 256 and passes that remainder to chr() function
- chr() function convert integer value to string and store to dec
- return “”.join(dec) return the result
6. Function to set mode
def Mode():
    if(mode.get() == 'e'):
        Result.set(Encode(private_key.get(), Text.get()))
    elif(mode.get() == 'd'):
        Result.set(Decode(private_key.get(), Text.get()))
    else:
        Result.set('Invalid Mode')
- If the mode set by the user is ‘e’ then the Encode() function will be called
- If the mode set to ‘d‘ then the Decode() function will be called
- Else print ‘invalid mode’
- private_key.get() and Text.get() values are pass to the arguments of Encode() and Decode() function
7. Function to exit window
def Exit():
    root.destroy()
root.destroy() will quit the program by stopping the mainloop()
8. Function to reset window
def Reset():
    Text.set("")
    private_key.set("")
    mode.set("")
    Result.set("")
This function set all variables to empty string
9. Labels and Buttons
Label(root, font= 'arial 12 bold', text='MESSAGE').place(x= 60,y=60)
Entry(root, font = 'arial 10', textvariable = Text, bg = 'ghost white').place(x=290, y = 60)

Label(root, font = 'arial 12 bold', text ='KEY').place(x=60, y = 90)
Entry(root, font = 'arial 10', textvariable = private_key , bg ='ghost white').place(x=290, y = 90)

Label(root, font = 'arial 12 bold', text ='MODE(e-encode, d-decode)').place(x=60, y = 120)
Entry(root, font = 'arial 10', textvariable = mode , bg= 'ghost white').place(x=290, y = 120)
Entry(root, font = 'arial 10 bold', textvariable = Result, bg ='ghost white').place(x=290, y = 150)

Button(root, font = 'arial 10 bold', text = 'RESULT'  ,padx =2,bg ='LightGray' ,command = Mode).place(x=60, y = 150)

Button(root, font = 'arial 10 bold' ,text ='RESET' ,width =6, command = Reset,bg = 'LimeGreen', padx=2).place(x=80, y = 190)

Button(root, font = 'arial 10 bold',text= 'EXIT' , width = 6, command = Exit,bg = 'OrangeRed', padx=2, pady=2).place(x=180, y = 190)

root.mainloop()
Label() widget use to display one or more than one line of text that users aren’t able to modify.
Entry() widget used to create an input text field.
Button() widget used to display button on our window
- root is the name which we refer to our window
- text which we display on the label
- font in which the text is written
- insertwidth use to set the width of the insertion cursor
- bg sets the background colour
- command is call when the button is click
- textvariable used to retrieve the current text to the entry widget
- root.mainloop() is a method that executes when we want to run our program.
Message Encode-Decode Project output

Summary
We have successfully developed Message encode – decode project in Python using the popular tkinter library for rendering graphics on a display window and base64 to encode & decode. We learned how to encode and decode the string, how to create button, widget, and pass the function to the button.
Hope you enjoyed building this python project.
Your opinion matters
Please write your valuable feedback about DataFlair on Google


we can send message directtly to email or contact no. then whats the use of this system
We encode and decode data for security purpose. Also when the data is large, encoded data is much smaller so it saves disk space and eases data transfer.
Please may I ask…
How I can modify this so that the characters to set the mode (E & D) are not case sensitive?
Thankyou
You can change the if condition under this heading ‘6. Function to set mode’ and compare the mode with both uppercase and lowercase letter.
you can try the following things:
if (mode.get==’e’ or ‘E’)
if (mode.get==’d’ or ‘D’)
am not sure if these works ,its not decoding the text
is this encpyption algorithm called Vigenere Cipher?
Yes we can say that because in this algorithm we are shifting the characters using the key provided.
Which encryption and decryption algorithm is used in this project
When I press the ‘Result’ button, it says “None”.
Please tell me what’s the problem so that I can fix it.
If the code is still not functioning correctly, try reinstalling the modules and rewriting the code.
which software we should use for implementing
Which algorithm used this program??
Please give a sample ppt for this project
How can I modify this program
What is the algorithm used in this project for encryption and decryption??
Good
Which algorithm you used can u tell me please
When I press the ‘Result’ button, it says “None”.
Please tell me what’s the problem so that I can fix it.
documentation please