Cartoonify an Image with OpenCV in Python
Machine Learning courses with 100+ Real-time projects Start Now!!
Do you miss your childhood? Yes, everyone does.! So today let’s head towards giving our pictures some cartoonic effects. This article is all about building a photo cartoonifyer using Python and OpenCV
What is OpenCV?
Python is the pool of libraries. It has numerous libraries for real-world applications. One such library is OpenCV. OpenCV is a cross-platform library used for Computer Vision. It includes applications like video and image capturing and processing. It is majorly used in image transformation, object detection, face recognition, and many other stunning applications.
What are we going to build?
At the end of this article, we aim to transform images into its cartoon. Yes, we will CARTOONIFY the images. Thus, we will build a python application that will transform an image into its cartoon using OpenCV.
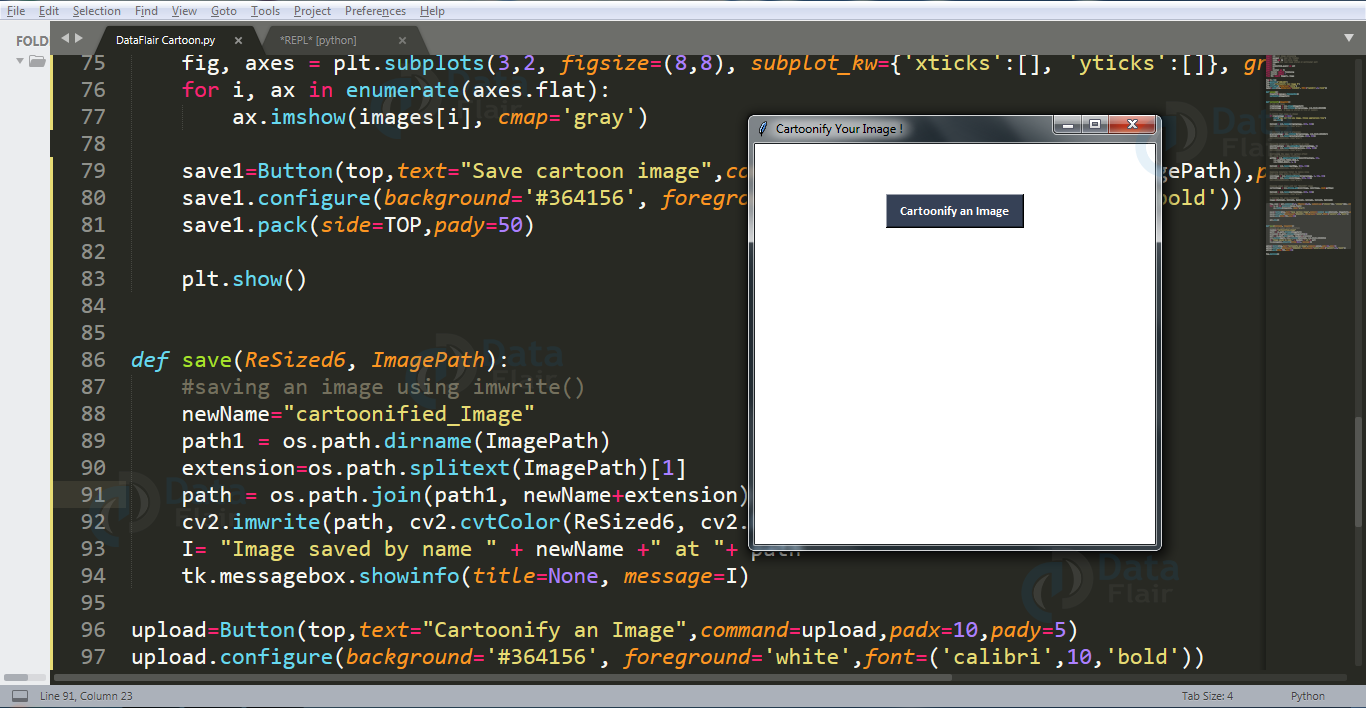
We aim to build an application which looks like:
Let’s head toward creating something CREATIVE.
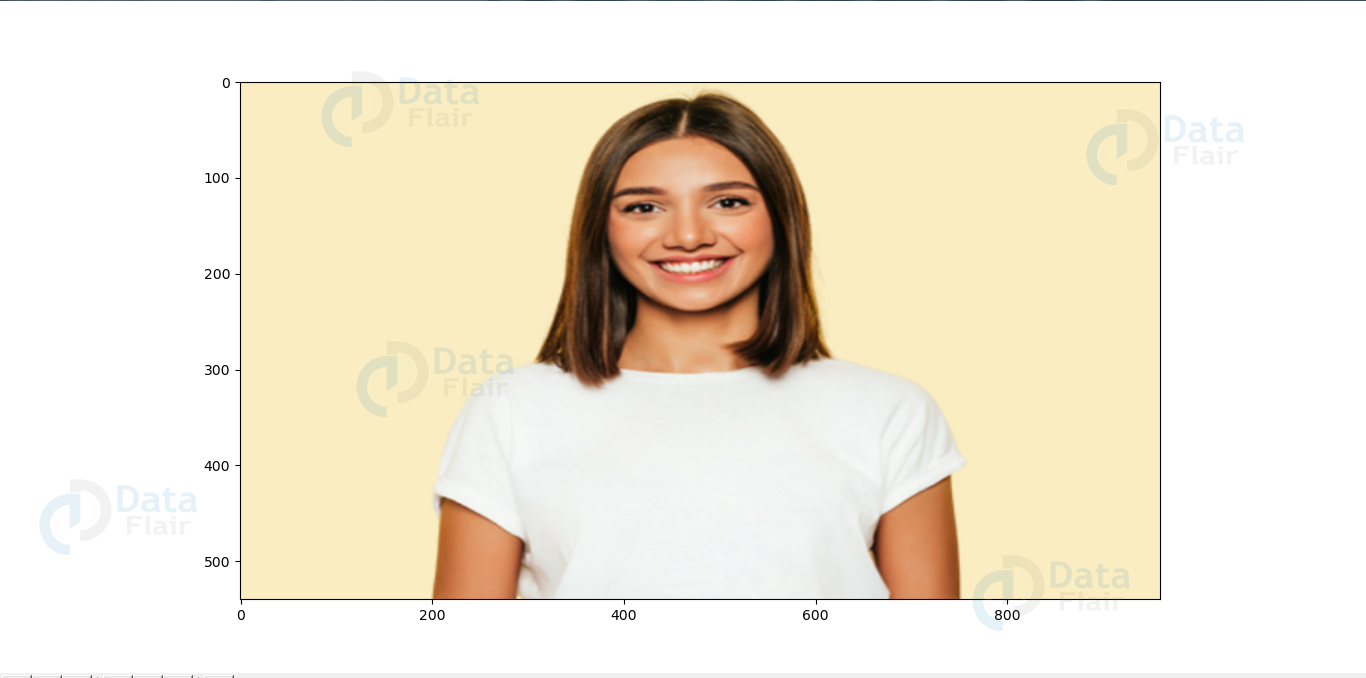
Original Image:
Steps to develop Image Cartoonifier
Download Image Cartoonifies Code
Please download source code of Image Cartoonfier Project: Cartoonify an Image in Python
1: Importing the required modules
We will import the following modules:
- CV2: Imported to use OpenCV for image processing
- easygui: Imported to open a file box. It allows us to select any file from our system.
- Numpy: Images are stored and processed as numbers. These are taken as arrays. We use NumPy to deal with arrays.
- Imageio: Used to read the file which is chosen by file box using a path.
- Matplotlib: This library is used for visualization and plotting. Thus, it is imported to form the plot of images.
- OS: For OS interaction. Here, to read the path and save images to that path.
Code:
import cv2 #for image processing
import easygui #to open the filebox
import numpy as np #to store image
import imageio #to read image stored at particular path
import sys
import matplotlib.pyplot as plt
import os
import tkinter as tk
from tkinter import filedialog
from tkinter import *
from PIL import ImageTk, Image
2: Building a File Box to choose a particular file
In this step, we will build the main window of our application, where the buttons, labels, and images will reside. We also give it a title by title() function.
Code:
""" fileopenbox opens the box to choose file
and help us store file path as string """
def upload():
    ImagePath=easygui.fileopenbox()
    cartoonify(ImagePath)
Explanation:
The above code opens the file box, i.e the pop-up box to choose the file from the device, which opens every time you run the code. fileopenbox() is the method in easyGUI module which returns the path of the chosen file as a string.
NOTE: Now, all the operation will be done on the button click, thus all the below steps are the part of function cartoonify (ImagePath)
def cartoonify(ImagePath):
3: How is an image stored?
Now, just think, how will a program read an image? For a computer, everything is just numbers. Thus, in the below code, we will convert our image into a numpy array.
Code:
#read the image
    originalmage = cv2.imread(ImagePath)
    originalmage = cv2.cvtColor(originalmage, cv2.COLOR_BGR2RGB)
#print(image)  # image is stored in form of numbers

# confirm that image is chosen
    if originalmage is None:
        print("Can not find any image. Choose appropriate file")
        sys.exit()

    ReSized1 = cv2.resize(originalmage, (960, 540))
#plt.imshow(ReSized1, cmap='gray')
Explanation:
Imread is a method in cv2 which is used to store images in the form of numbers. This helps us to perform operations according to our needs. The image is read as a numpy array, in which cell values depict R, G, and B values of a pixel.
NOTE: We resize the image after each transformation to display all the images on a similar scale at last.
Beginning with image transformations:
To convert an image to a cartoon, multiple transformations are done. Firstly, an image is converted to a Grayscale image. Yes, similar to the old day’s pictures.! Then, the Grayscale image is smoothened, and we try to extract the edges in the image. Finally, we form a color image and mask it with edges. This creates a beautiful cartoon image with edges and lightened color of the original image.
Let’s start with these transformations to convert an image to its cartoon image.
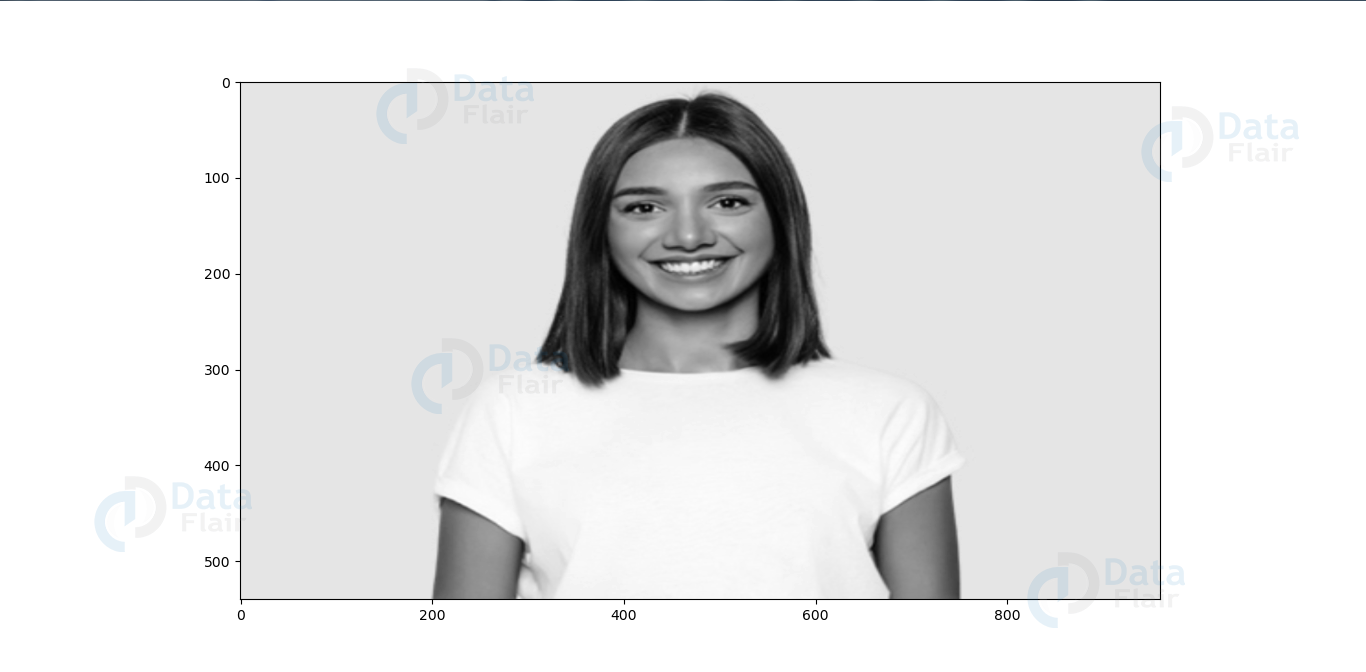
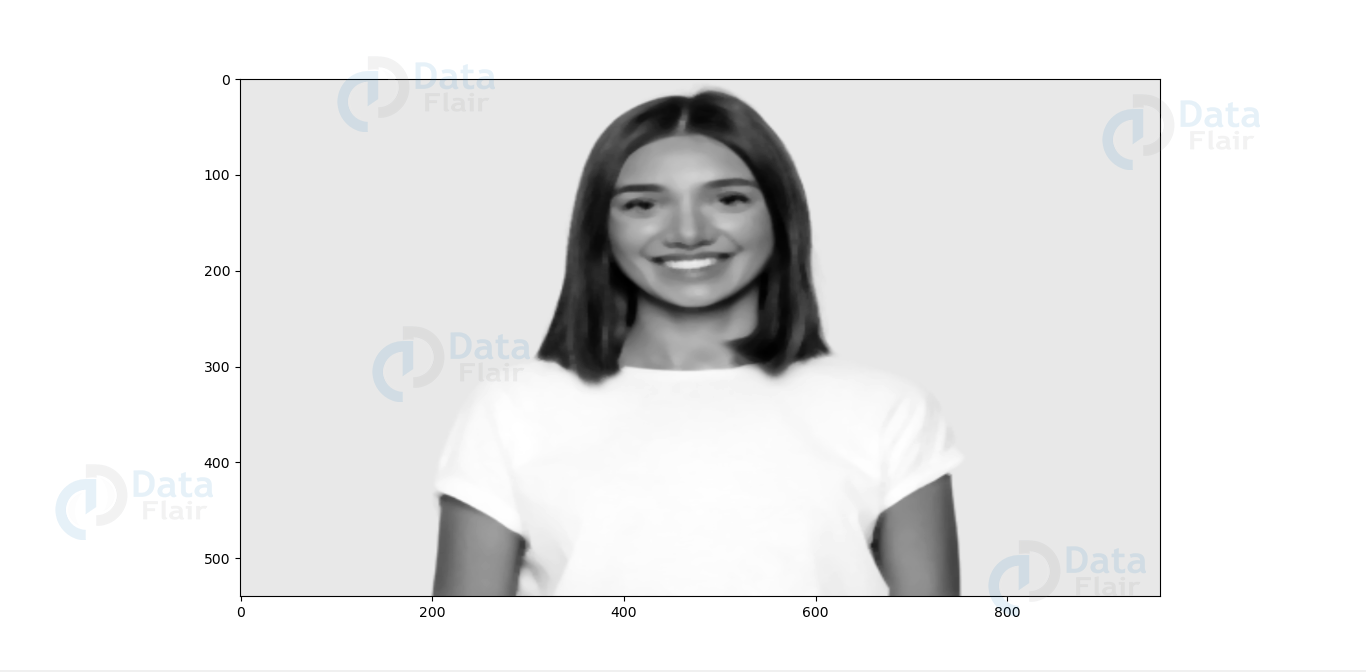
4: Transforming an image to grayscale
Code:
#converting an image to grayscale
grayScaleImage = cv2.cvtColor(originalmage, cv2.COLOR_BGR2GRAY)
ReSized2 = cv2.resize(grayScaleImage, (960, 540))
#plt.imshow(ReSized2, cmap='gray')
Explanation:
cvtColor(image, flag) is a method in cv2 which is used to transform an image into the colour-space mentioned as ‘flag’. Here, our first step is to convert the image into grayscale. Thus, we use the BGR2GRAY flag. This returns the image in grayscale. A grayscale image is stored as grayScaleImage.
After each transformation, we resize the resultant image using the resize() method in cv2 and display it using imshow() method. This is done to get more clear insights into every single transformation step.
The above code will generate the following output:
5: Smoothening a grayscale image
Code:
#applying median blur to smoothen an image
smoothGrayScale = cv2.medianBlur(grayScaleImage, 5)
ReSized3 = cv2.resize(smoothGrayScale, (960, 540))
#plt.imshow(ReSized3, cmap='gray')
Explanation:
To smoothen an image, we simply apply a blur effect. This is done using medianBlur() function. Here, the center pixel is assigned a mean value of all the pixels which fall under the kernel. In turn, creating a blur effect.
The above code generates the following output:
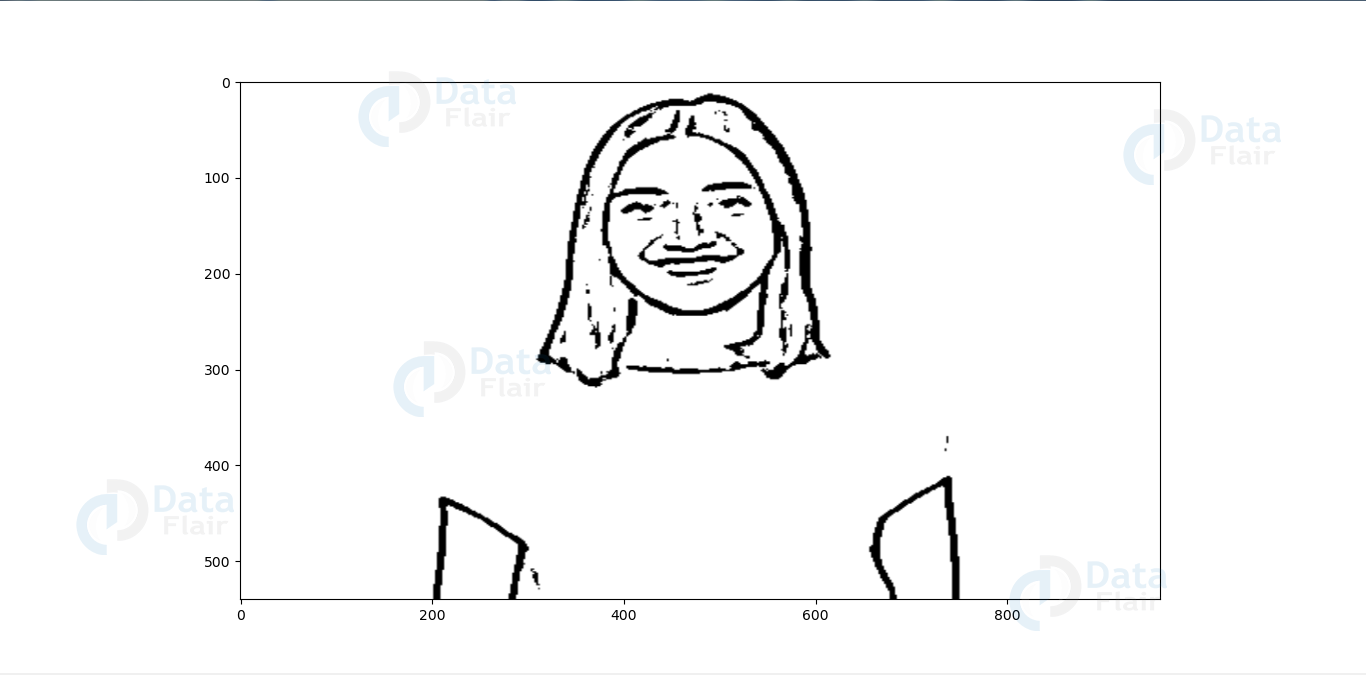
6: Retrieving the edges of an image
Code:
#retrieving the edges for cartoon effect
#by using thresholding technique
getEdge = cv2.adaptiveThreshold(smoothGrayScale, 255,
  cv2.ADAPTIVE_THRESH_MEAN_C,
  cv2.THRESH_BINARY, 9, 9)

ReSized4 = cv2.resize(getEdge, (960, 540))
#plt.imshow(ReSized4, cmap='gray')
Explanation:
Cartoon effect has two specialties:
- Highlighted Edges
- Smooth colors
In this step, we will work on the first specialty. Here, we will try to retrieve the edges and highlight them. This is attained by the adaptive thresholding technique. The threshold value is the mean of the neighborhood pixel values area minus the constant C. C is a constant that is subtracted from the mean or weighted sum of the neighborhood pixels. Thresh_binary is the type of threshold applied, and the remaining parameters determine the block size.
The above code will generate output like below:
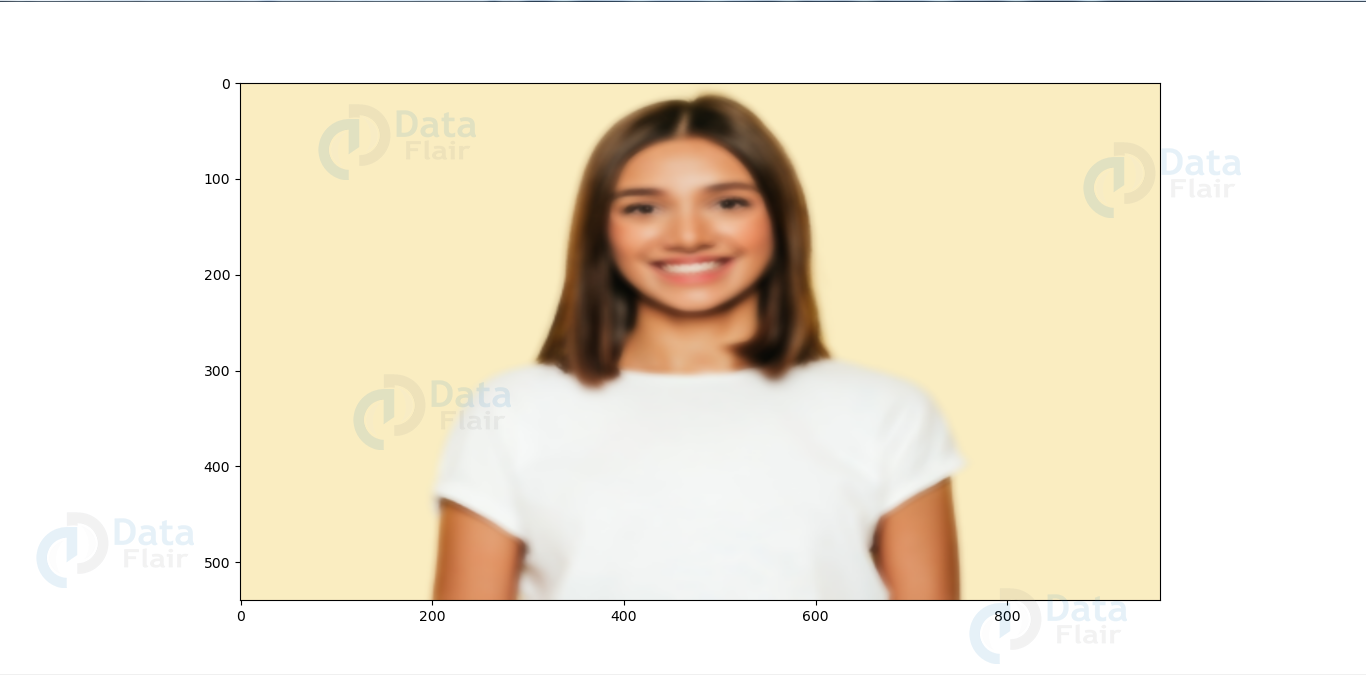
7: Preparing a Mask Image
Code:
#applying bilateral filter to remove noise
#and keep edge sharp as required
colorImage = cv2.bilateralFilter(originalmage, 9, 300, 300)
ReSized5 = cv2.resize(colorImage, (960, 540))
#plt.imshow(ReSized5, cmap='gray')
Explanation:
In the above code, we finally work on the second specialty. We prepare a lightened color image that we mask with edges at the end to produce a cartoon image. We use bilateralFilter which removes the noise. It can be taken as smoothening of an image to an extent.
The third parameter is the diameter of the pixel neighborhood, i.e, the number of pixels around a certain pixel which will determine its value. The fourth and Fifth parameter defines signmaColor and sigmaSpace. These parameters are used to give a sigma effect, i.e make an image look vicious and like water paint, removing the roughness in colors.
Yes, it’s similar to BEAUTIFY or AI effect in cameras of modern mobile phones.
The above code generates the following output:
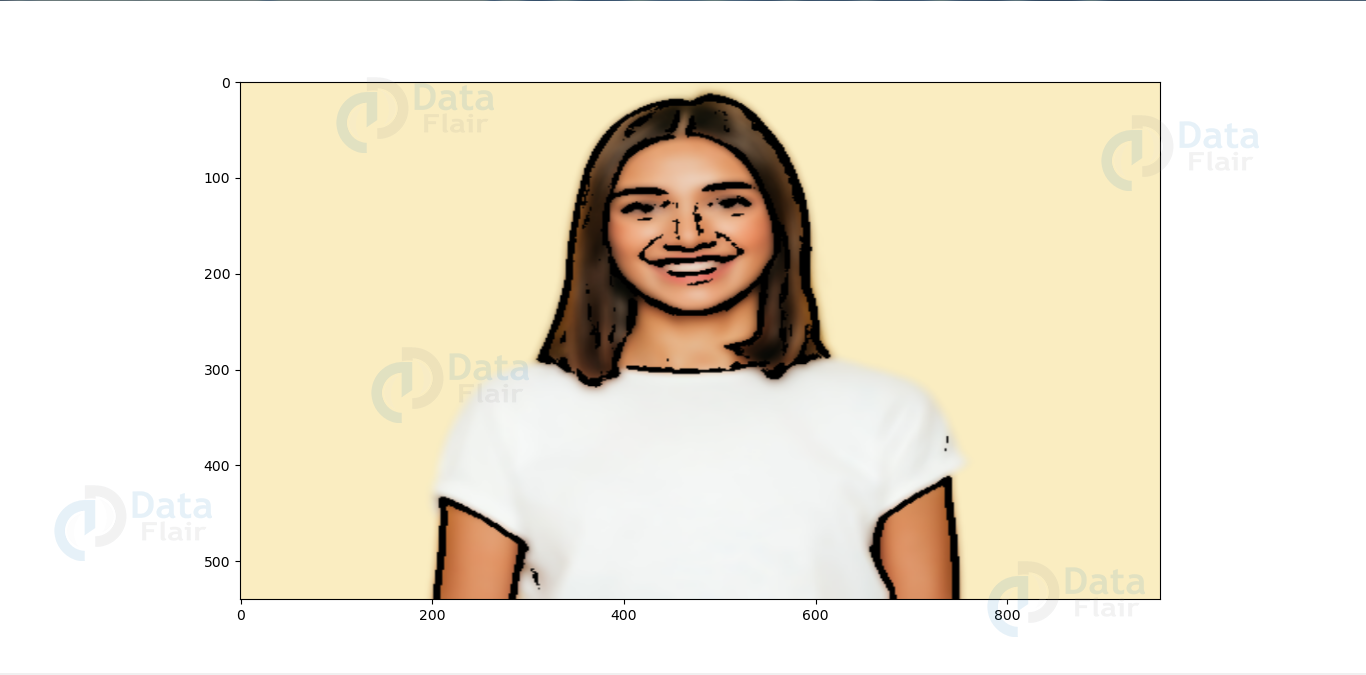
8: Giving a Cartoon Effect
Code:
#masking edged image with our "BEAUTIFY" image
cartoonImage = cv2.bitwise_and(colorImage, colorImage, mask=getEdge)

ReSized6 = cv2.resize(cartoonImage, (960, 540))
#plt.imshow(ReSized6, cmap='gray')
Explanation:
So, let’s combine the two specialties. This will be done using MASKING. We perform bitwise and on two images to mask them. Remember, images are just numbers?
Yes, so that’s how we mask edged image on our “BEAUTIFY” image.
This finally CARTOONIFY our image!
The above code will generate output like below:
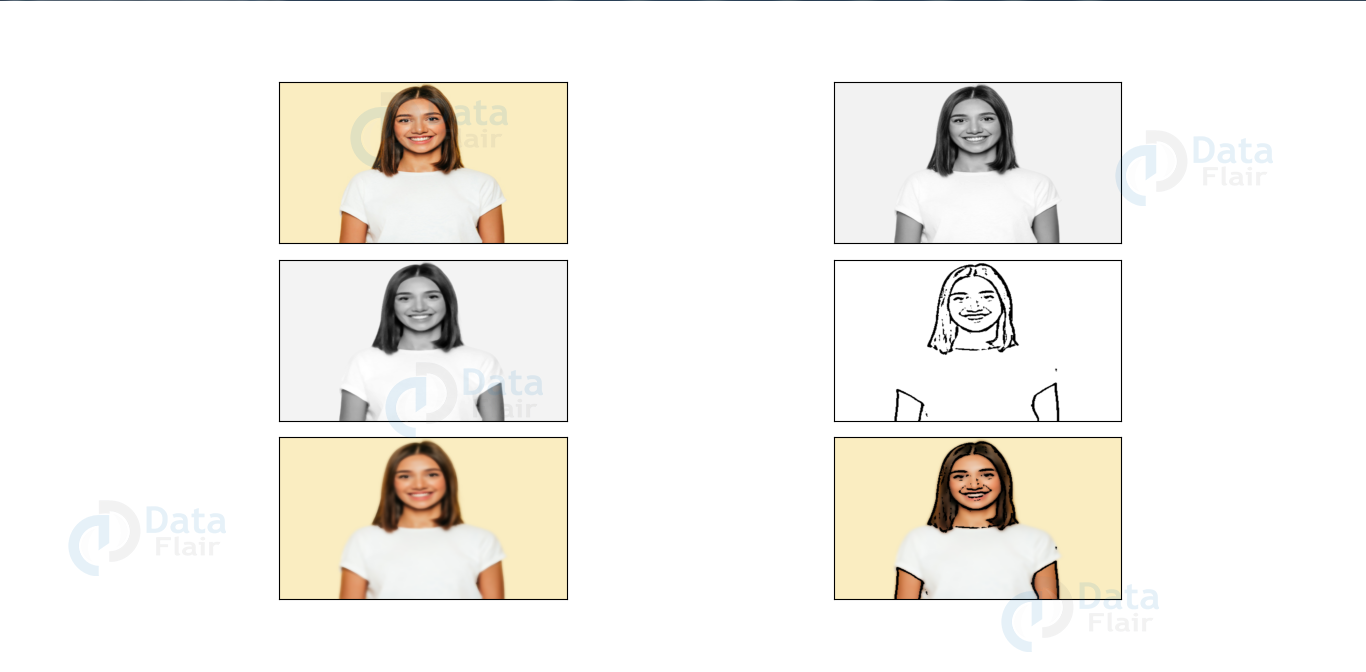
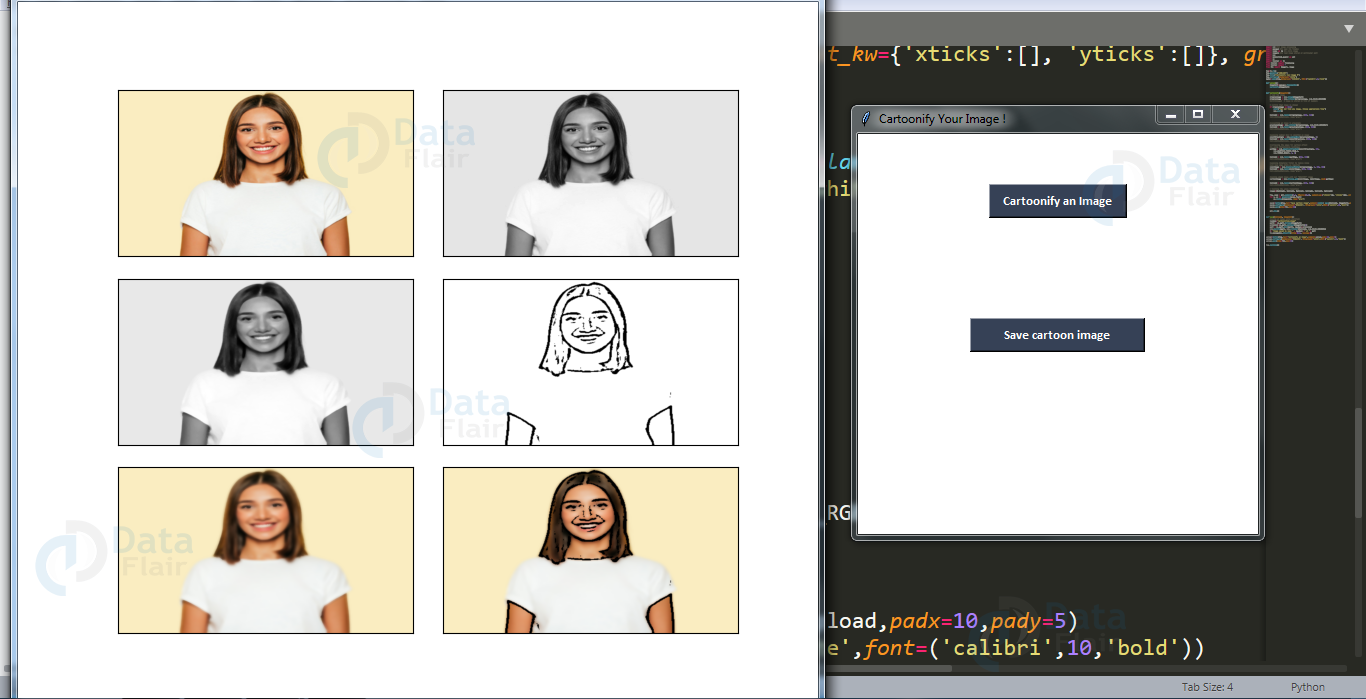
9: Plotting all the transitions together
Code:
# Plotting the whole transition
images=[ReSized1, ReSized2, ReSized3, ReSized4, ReSized5, ReSized6]
fig, axes = plt.subplots(3,2, figsize=(8,8), subplot_kw={'xticks':[], 'yticks':[]}, gridspec_kw=dict(hspace=0.1, wspace=0.1))
for i, ax in enumerate(axes.flat):
    ax.imshow(images[i], cmap='gray')
//save button code
plt.show()
Explanation:
To plot all the images, we first make a list of all the images. The list here is named “images” and contains all the resized images. Now, we create axes like subl=plots in a plot and display one-one images in each block on the axis using imshow() method.
plt.show() plots the whole plot at once after we plot on each subplot.
The above code will generate output like below:
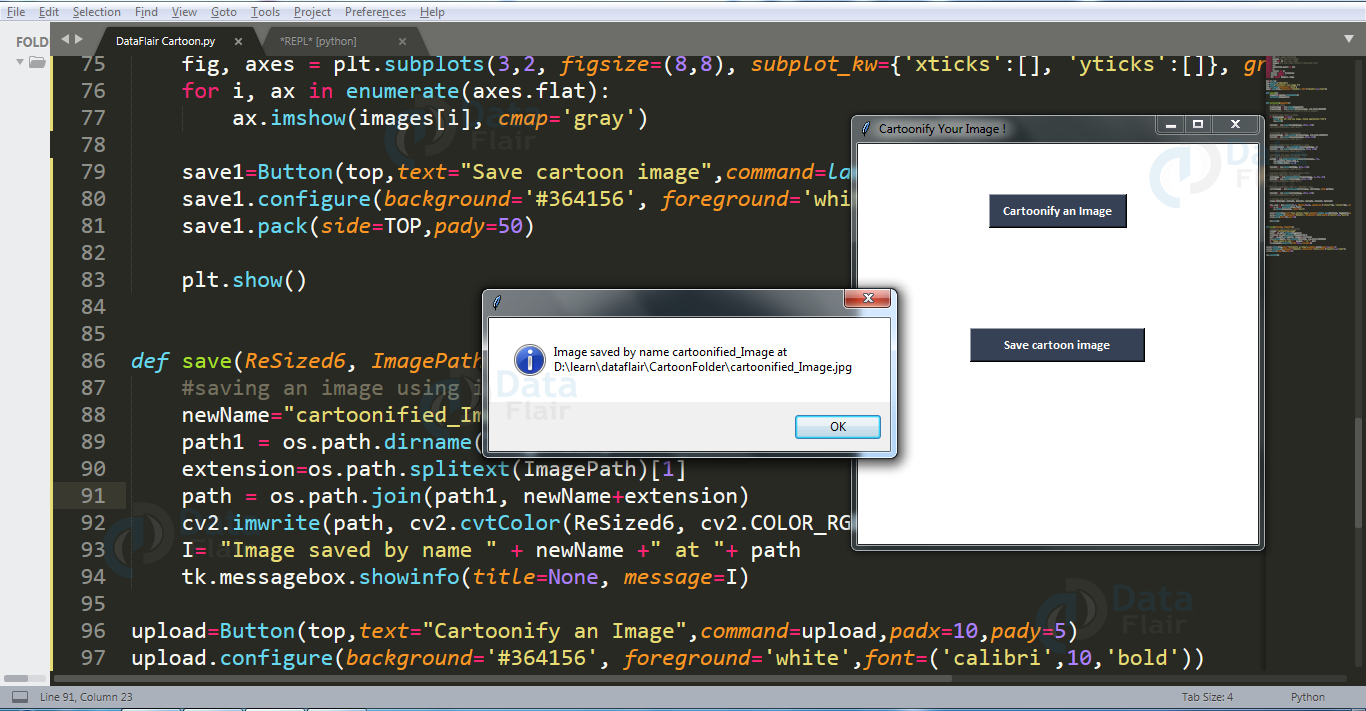
10: Functionally of save button
def save(ReSized6, ImagePath):
    #saving an image using imwrite()
    newName="cartoonified_Image"
    path1 = os.path.dirname(ImagePath)
    extension=os.path.splitext(ImagePath)[1]
    path = os.path.join(path1, newName+extension)
    cv2.imwrite(path, cv2.cvtColor(ReSized6, cv2.COLOR_RGB2BGR))
    I = "Image saved by name " + newName +" at "+ path
    tk.messagebox.showinfo(title=None, message=I)
Explanation:
Here, the idea is to save the resultant image. For this, we take the old path, and just change the tail (name of the old file) to a new name and store the cartoonified image with a new name in the same folder by appending the new name to the head part of the file.
For this, we extract the head part of the file path by os.path.dirname() method. Similarly, os.path.splitext(ImagePath)[1] is used to extract the extension of the file from the path.
Here, newName stores “Cartoonified_Image” as the name of a new file. os.path.join(path1, newName + extension) joins the head of path to the newname and extension. This forms the complete path for the new file.
imwrite() method of cv2 is used to save the file at the path mentioned. cv2.cvtColor(ReSized6, cv2.COLOR_RGB2BGR) is used to assure that no color get extracted or highlighted while we save our image. Thus, at last, the user is given confirmation that the image is saved with the name and path of the file.
Once executed with button, this function will result in below output:
11: Making the main window
top=tk.Tk()
top.geometry('400x400')
top.title('Cartoonify Your Image !')
top.configure(background='white')
label=Label(top,background='#CDCDCD', font=('calibri',20,'bold'))
12: Making the Cartoonify button in the main window
upload=Button(top,text="Cartoonify an Image",command=upload,padx=10,pady=5)
upload.configure(background='#364156', foreground='white',font=('calibri',10,'bold'))
upload.pack(side=TOP,pady=50)
13: Making a Save button in the main window
save1=Button(top,text="Save cartoon image",command=lambda: save(ImagePath, ReSized6),padx=30,pady=5)
save1.configure(background='#364156', foreground='white',font=('calibri',10,'bold'))
save1.pack(side=TOP,pady=50)
The above code makes a button as soon as the image transformation is done. It gives an option to the user to save cartoonified image.
14: Main function to build the tkinter window
top.mainloop()
The Final Result:

Summary
Turning a real photo into a cartoon is fun and popular in image editing. With Python and OpenCV, we can build a project that cartoonifies an image in just a few steps. This uses basic image processing techniques, not deep learning. It’s a great starting point for beginners who want to learn OpenCV and how images are handled by computers.
We have successfully developed Image Cartoonifier with OpenCV in Python. This is the magic of openCV which let us do miracles. We suggest you make a photo editor of your own and try different effects.
This project is creative and easy to try with your own photos. It teaches key skills like reading images, applying filters, using edge detection, and color space changes in OpenCV. You can build a simple GUI where users can upload and cartoonify images. It’s fun for school projects, social media apps, or just learning computer vision basics with Python.
Did you know we work 24x7 to provide you best tutorials
Please encourage us - write a review on Google


Can we use visual studio code to run the code? Do we require any database?
omg what a question
Good question, you are good question
yes you can !
the top.mainloop() function taking too long in the jupyter notebook to execute, the pop window for selecting an image is not showinng .. i tried the other method too to use the source code and directly select the image the it is showing no result pls conntact me as soon as possible
NameError: name ‘originalmage’ is not defined
i got this error before that easygui is not popping up any dialog box to upload the file
TclError Traceback (most recent call last)
in ()
2 matplotlib.use(‘Agg’)
3 import matplotlib.pyplot as plt
—-> 4 top=tk.Tk()
5 top.geometry(‘400×400’)
6 top.title(‘Cartoonify Your Image !’)
/usr/lib/python3.6/tkinter/__init__.py in __init__(self, screenName, baseName, className, useTk, sync, use)
2021 baseName = baseName + ext
2022 interactive = 0
-> 2023 self.tk = _tkinter.create(screenName, baseName, className, interactive, wantobjects, useTk, sync, use)
2024 if useTk:
2025 self._loadtk()
TclError: no display name and no $DISPLAY environment variable
Please help me with these errors
Same error.plz help
Yes you can use visual studio code. No database is required.
thank you for sharing this!
how does this come under machine learning project ?
where to get cv2 and all libraries in anaconda??
cv2.error: OpenCV(4.5.2) C:\Users\runneradmin\AppData\Local\Temp\pip-req-build-vi271kac\opencv\modules\imgproc\src\color.cpp:182: error: (-215:Assertion failed) !_src.empty() in function ‘cv::cvtColor’
help pleass :/
did you get the solution for that?
how to run the code?????
sure Rajatha you can use visual studio code and a database its not necessary 🙂
same error bro do you have solution
GOOD WORK can easily be implemented in PyCharm and Jupyter Notebook without any error.
can you share your code?
where does machine learning part is used?
Save button not working
what is maximum image size to be given as input?