Sign Language Recognition Using Python and OpenCV
Free Machine Learning courses with 130+ real-time projects Start Now!!
There have been several advancements in technology and a lot of research has been done to help the people who are deaf and dumb. Aiding the cause, Deep learning, and computer vision can be used too to make an impact on this cause.
This can be very helpful for the deaf and dumb people in communicating with others as knowing sign language is not something that is common to all, moreover, this can be extended to creating automatic editors, where the person can easily write by just their hand gestures.
Project Overview
In this sign language recognition project, we create a sign detector, which detects numbers from 1 to 10 that can very easily be extended to cover a vast multitude of other signs and hand gestures including the alphabets.
We have developed this project using OpenCV and Keras modules of python.
Prerequisites
The prerequisites software & libraries for the sign language project are:
- Python (3.7.4)
- IDE (Jupyter)
- Numpy (version 1.16.5)
- cv2 (openCV) (version 3.4.2)
- Keras (version 2.3.1)
- Tensorflow (as keras uses tensorflow in backend and for image preprocessing) (version 2.0.0)
Download Sign Language Project Code
Please download the source code of sign language machine learning project: Sign Language Recognition Project
Steps to develop sign language recognition project
This is divided into 3 parts:
- Creating the dataset
- Training a CNN on the captured dataset
- Predicting the data
All of which are created as three separate .py files. The file structure is given below:
1. Creating the dataset for sign language detection:
Technology is evolving rapidly!
Stay updated with DataFlair on WhatsApp!!
It is fairly possible to get the dataset we need on the internet but in this project, we will be creating the dataset on our own.
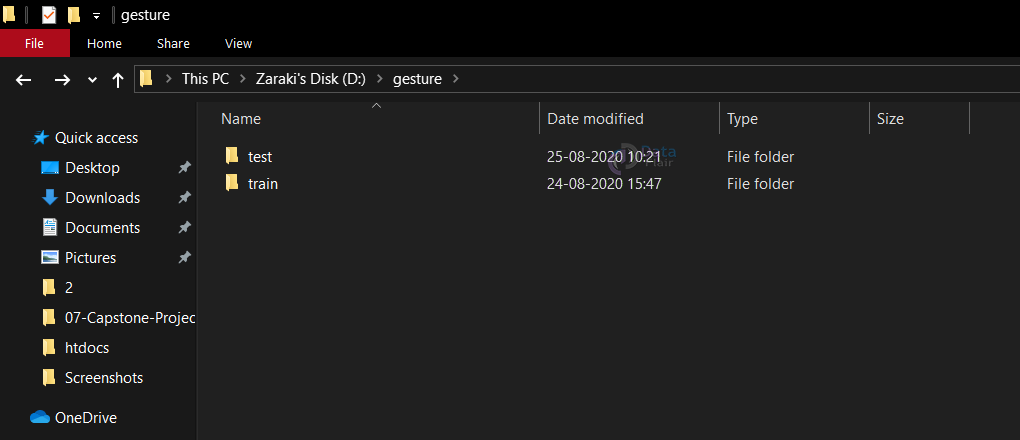
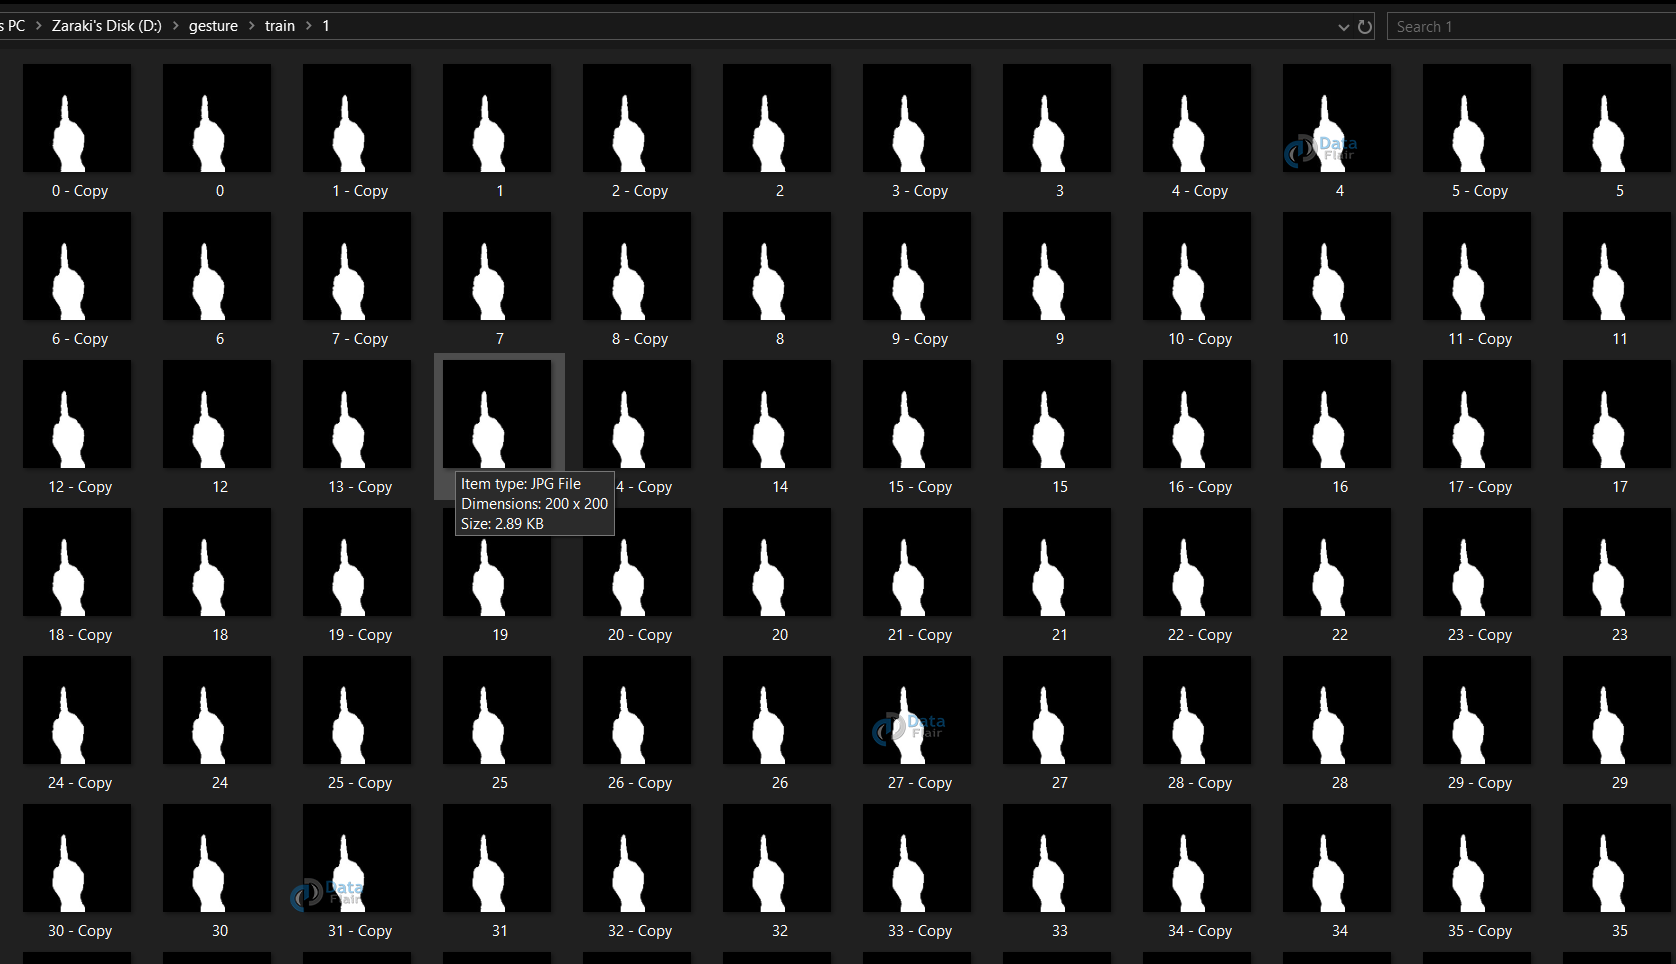
We will be having a live feed from the video cam and every frame that detects a hand in the ROI (region of interest) created will be saved in a directory (here gesture directory) that contains two folders train and test, each containing 10 folders containing images captured using the create_gesture_data.py
Directory structure
Inside of train (test has the same structure inside)
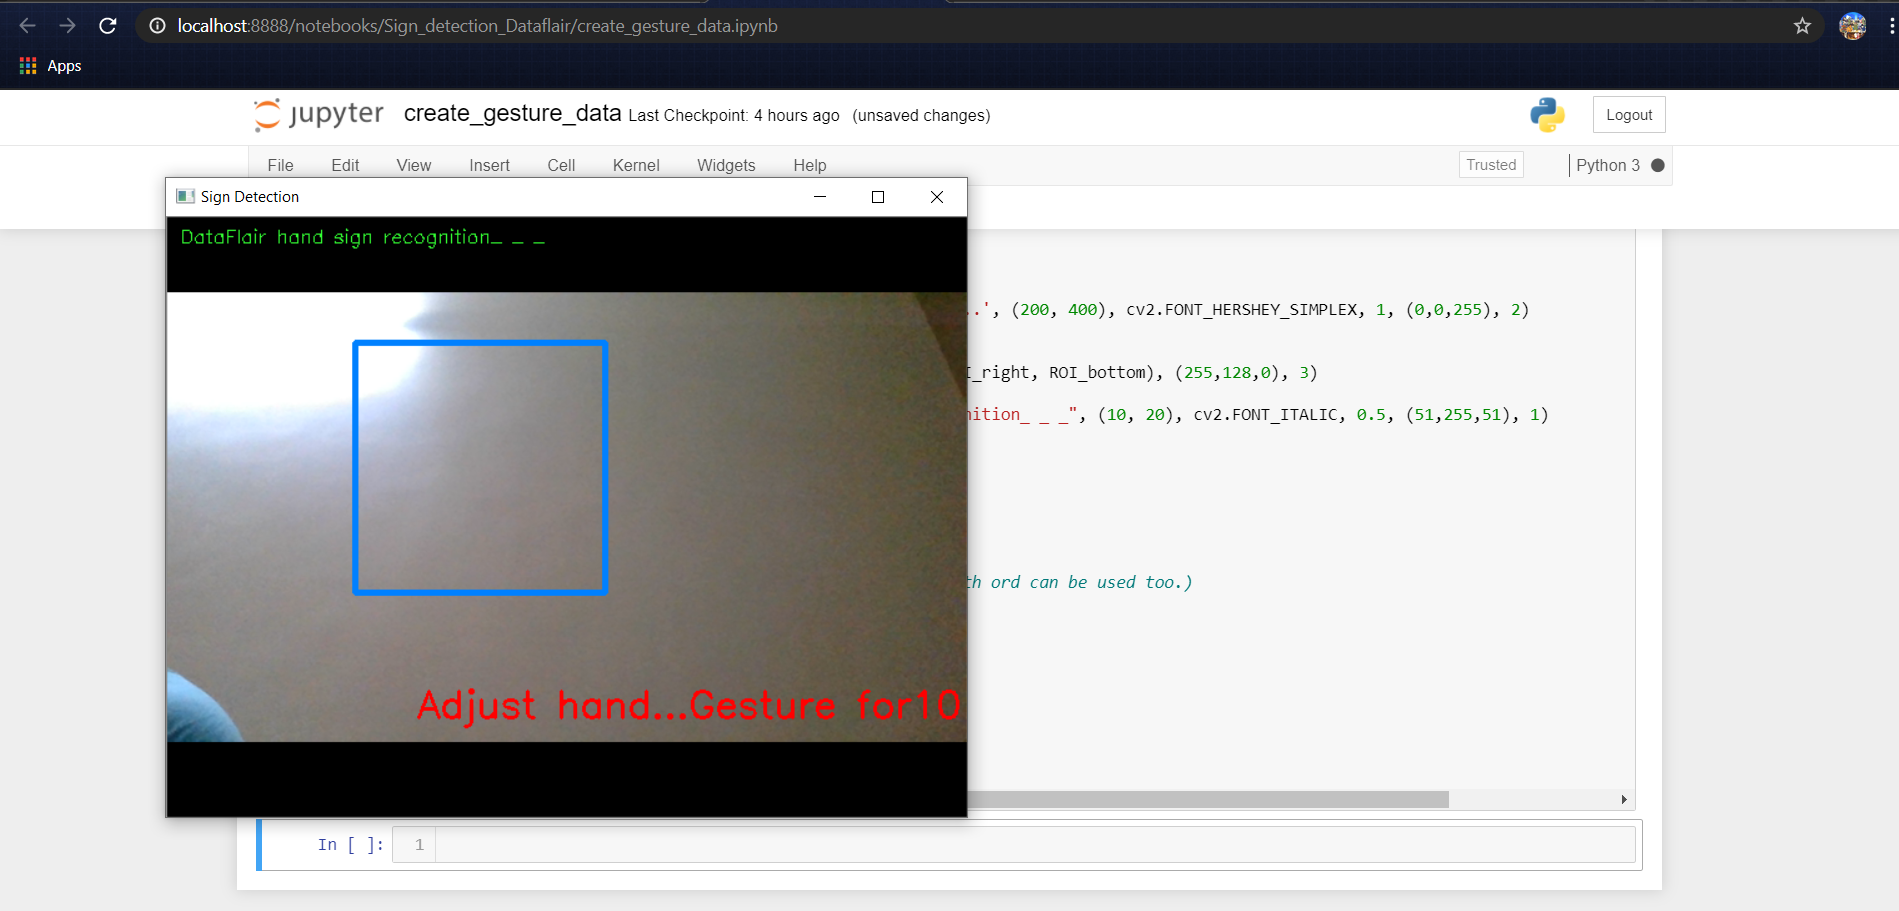
Now for creating the dataset we get the live cam feed using OpenCV and create an ROI that is nothing but the part of the frame where we want to detect the hand in for the gestures.
The red box is the ROI and this window is for getting the live cam feed from the webcam.
For differentiating between the background we calculate the accumulated weighted avg for the background and then subtract this from the frames that contain some object in front of the background that can be distinguished as foreground.
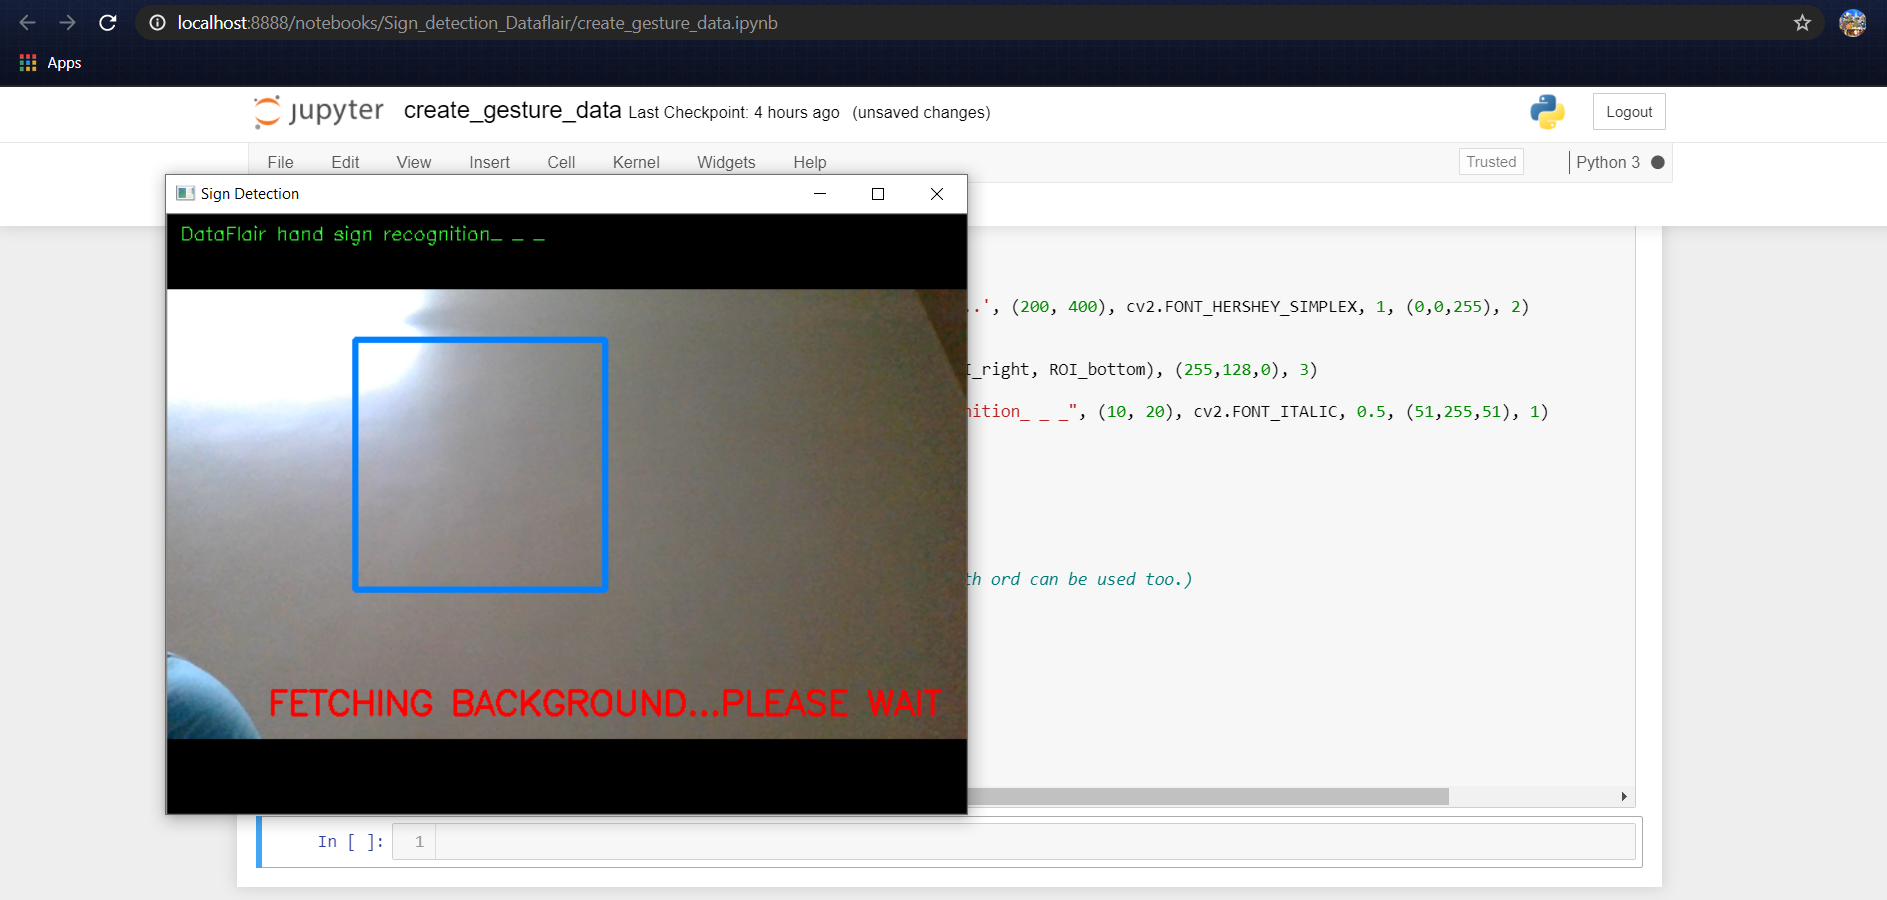
This is done by calculating the accumulated_weight for some frames (here for 60 frames) we calculate the accumulated_avg for the background.
After we have the accumulated avg for the background, we subtract it from every frame that we read after 60 frames to find any object that covers the background.
import tensorflow as tf
from tensorflow import keras
from keras.models import Sequential
from keras.layers import Activation, Dense, Flatten, BatchNormalization, Conv2D, MaxPool2D, Dropout
from keras.optimizers import Adam, SGD
from keras.metrics import categorical_crossentropy
from keras.preprocessing.image import ImageDataGenerator

import warnings
import numpy as np
import cv2
from keras.callbacks import ReduceLROnPlateau
from keras.callbacks import ModelCheckpoint, EarlyStopping
warnings.simplefilter(action='ignore', category=FutureWarning)


background = None
accumulated_weight = 0.5

#Creating the dimensions for the ROI...
ROI_top = 100
ROI_bottom = 300
ROI_right = 150
ROI_left = 350


def cal_accum_avg(frame, accumulated_weight):

    global background

    if background is None:
        background = frame.copy().astype("float")
        return None

    cv2.accumulateWeighted(frame, background, accumulated_weight)
(We put up a text using cv2.putText to display to wait and not put any object or hand in the ROI while detecting the background)
Calculate threshold value
Now we calculate the threshold value for every frame and determine the contours using cv2.findContours and return the max contours (the most outermost contours for the object) using the function segment. Using the contours we are able to determine if there is any foreground object being detected in the ROI, in other words, if there is a hand in the ROI.
def segment_hand(frame, threshold=25):
    global background

    diff = cv2.absdiff(background.astype("uint8"), frame)

    _ , thresholded = cv2.threshold(diff, threshold,255,cv2.THRESH_BINARY)

    # Grab the external contours for the image
    image, contours, hierarchy = cv2.findContours(thresholded.copy(),
    cv2.RETR_EXTERNAL, cv2.CHAIN_APPROX_SIMPLE)

    if len(contours) == 0:
        return None
    else:

        hand_segment_max_cont = max(contours, key=cv2.contourArea)

        return (thresholded, hand_segment_max_cont)
When contours are detected (or hand is present in the ROI), We start to save the image of the ROI in the train and test set respectively for the letter or number we are detecting it for.
cam = cv2.VideoCapture(0)

num_frames = 0
element = 10
num_imgs_taken = 0

while True:
    ret, frame = cam.read()

    # flipping the frame to prevent inverted image of captured frame...
    frame = cv2.flip(frame, 1)

    frame_copy = frame.copy()

    roi = frame[ROI_top:ROI_bottom, ROI_right:ROI_left]

    gray_frame = cv2.cvtColor(roi, cv2.COLOR_BGR2GRAY)
    gray_frame = cv2.GaussianBlur(gray_frame, (9, 9), 0)

    if num_frames < 60:
        cal_accum_avg(gray_frame, accumulated_weight)
        if num_frames <= 59:

            cv2.putText(frame_copy, "FETCHING BACKGROUND...PLEASE WAIT",
(80, 400), cv2.FONT_HERSHEY_SIMPLEX, 0.9, (0,0,255), 2)

    #Time to configure the hand specifically into the ROI...
    elif num_frames <= 300:

        hand = segment_hand(gray_frame)

        cv2.putText(frame_copy, "Adjust hand...Gesture for" +
  str(element), (200, 400), cv2.FONT_HERSHEY_SIMPLEX, 1,
  (0,0,255),2)

        # Checking if the hand is actually detected by counting the number
        of contours detected...
        if hand is not None:

            thresholded, hand_segment = hand

            # Draw contours around hand segment
            cv2.drawContours(frame_copy, [hand_segment + (ROI_right,
            ROI_top)], -1, (255, 0, 0),1)

            cv2.putText(frame_copy, str(num_frames)+"For" + str(element),
            (70, 45), cv2.FONT_HERSHEY_SIMPLEX, 1, (0,0,255), 2)

            # Also display the thresholded image
            cv2.imshow("Thresholded Hand Image", thresholded)

    else:

        # Segmenting the hand region...
        hand = segment_hand(gray_frame)

        # Checking if we are able to detect the hand...
        if hand is not None:

            # unpack the thresholded img and the max_contour...
            thresholded, hand_segment = hand

            # Drawing contours around hand segment
            cv2.drawContours(frame_copy, [hand_segment + (ROI_right,
            ROI_top)], -1, (255, 0, 0),1)

            cv2.putText(frame_copy, str(num_frames), (70, 45),
            cv2.FONT_HERSHEY_SIMPLEX, 1, (0,0,255), 2)

            cv2.putText(frame_copy, str(num_imgs_taken) + 'images' +"For"
      + str(element), (200, 400), cv2.FONT_HERSHEY_SIMPLEX, 1,
      (0,0,255), 2)

            # Displaying the thresholded image
            cv2.imshow("Thresholded Hand Image", thresholded)
            if num_imgs_taken <= 300:
                cv2.imwrite(r"D:\\gesture\\train\\"+str(element)+"\\" +
                str(num_imgs_taken+300) + '.jpg', thresholded)

            else:
                break
            num_imgs_taken +=1
        else:
            cv2.putText(frame_copy, 'No hand detected...', (200, 400),
 cv2.FONT_HERSHEY_SIMPLEX, 1, (0,0,255), 2)


    # Drawing ROI on frame copy
    cv2.rectangle(frame_copy, (ROI_left, ROI_top), (ROI_right,ROI_bottom), (255,128,0), 3)

    cv2.putText(frame_copy, "DataFlair hand sign recognition_ _ _", (10, 20), cv2.FONT_ITALIC, 0.5, (51,255,51), 1)

    # increment the number of frames for tracking
    num_frames += 1

    # Display the frame with segmented hand
    cv2.imshow("Sign Detection", frame_copy)

    # Closing windows with Esc key...(any other key with ord can be used too.)
    k = cv2.waitKey(1) & 0xFF

    if k == 27:
        break

# Releasing the camera & destroying all the windows...

cv2.destroyAllWindows()
cam.release()
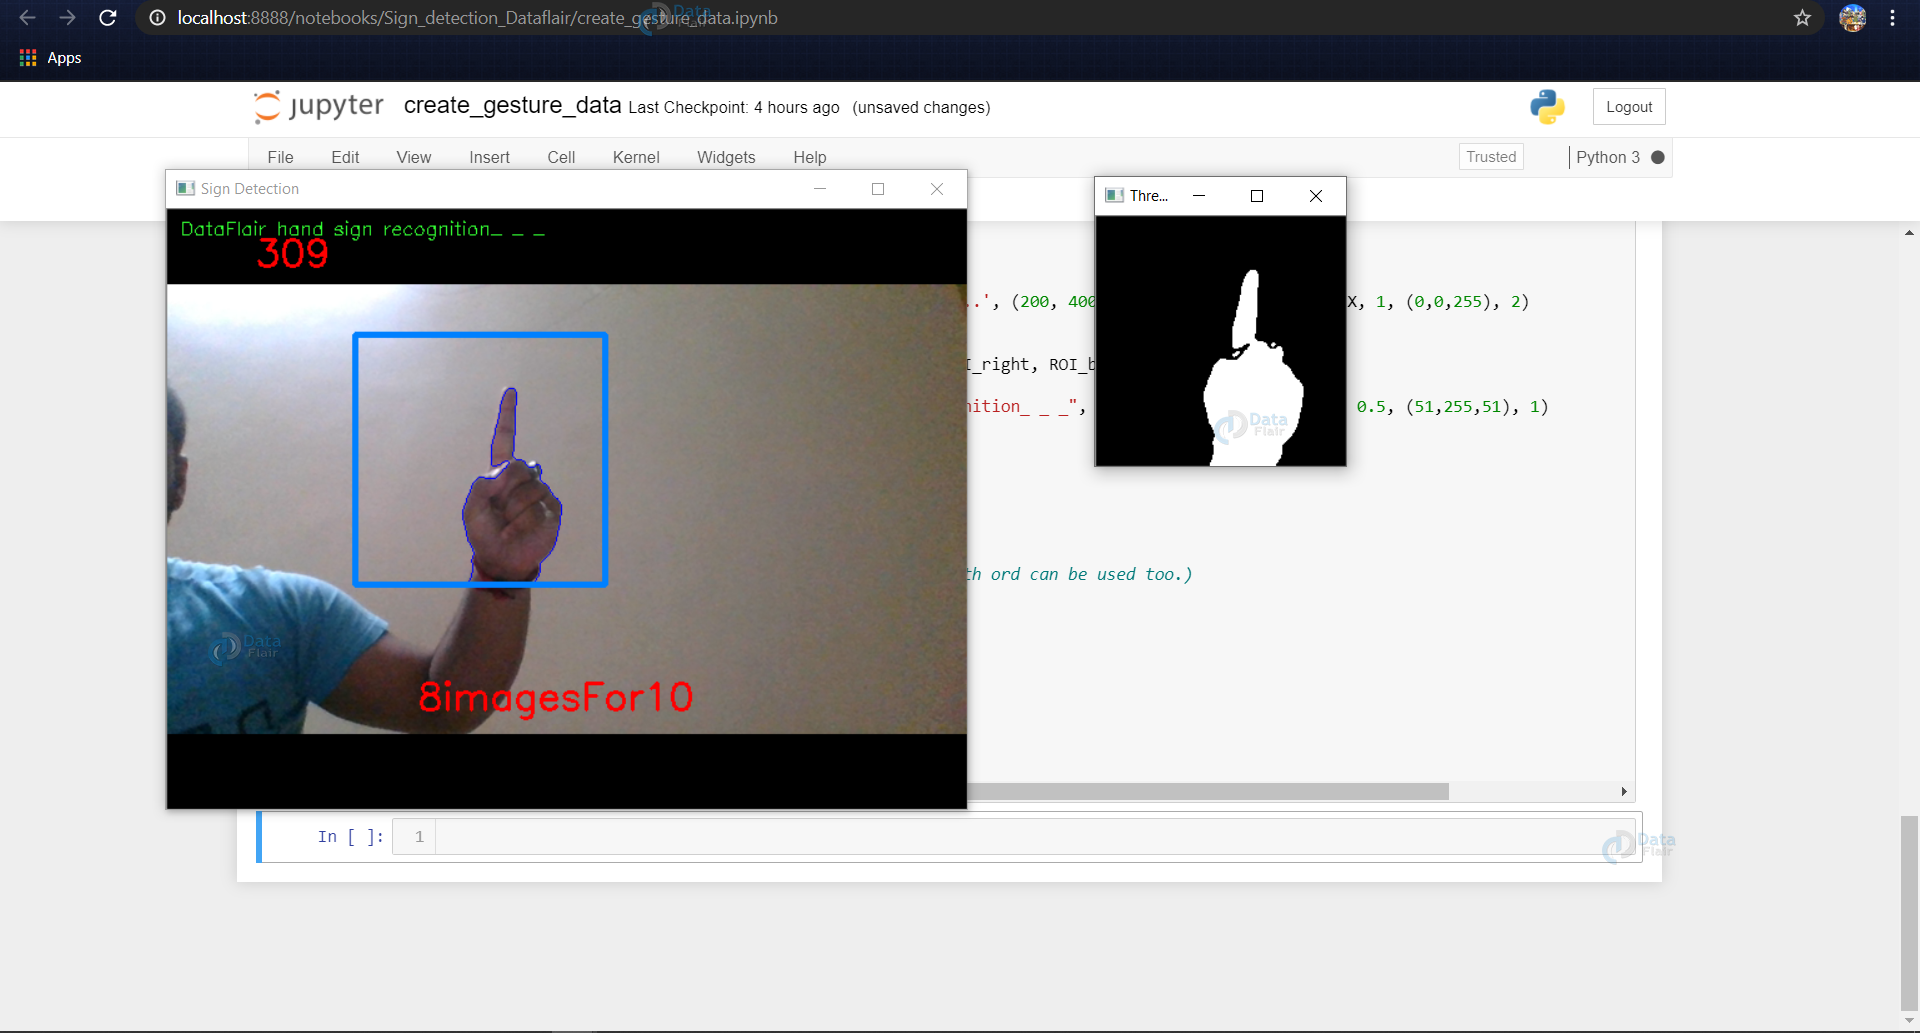
In the above example, the dataset for 1 is being created and the thresholded image of the ROI is being shown in the next window and this frame of ROI is being saved in ..train/1/example.jpg
For the train dataset, we save 701 images for each number to be detected, and for the test dataset, we do the same and create 40 images for each number.
2. Training CNN
Now on the created data set we train a CNN.
First, we load the data using ImageDataGenerator of keras through which we can use the flow_from_directory function to load the train and test set data, and each of the names of the number folders will be the class names for the imgs loaded.
train_path = r'D:\gesture\train'
test_path = r'D:\gesture\test'

train_batches = ImageDataGenerator(preprocessing_function=tf.keras.applications.vgg16.preprocess_input).flow_from_directory(directory=train_path, target_size=(64,64), class_mode='categorical', batch_size=10,shuffle=True)
test_batches = ImageDataGenerator(preprocessing_function=tf.keras.applications.vgg16.preprocess_input).flow_from_directory(directory=test_path, target_size=(64,64), class_mode='categorical', batch_size=10, shuffle=True)
plotImages function is for plotting images of the dataset loaded.
imgs, labels = next(train_batches)

#Plotting the images...
def plotImages(images_arr):
    fig, axes = plt.subplots(1, 10, figsize=(30,20))
    axes = axes.flatten()
    for img, ax in zip( images_arr, axes):
        img = cv2.cvtColor(img, cv2.COLOR_BGR2RGB)
        ax.imshow(img)
        ax.axis('off')
    plt.tight_layout()
    plt.show()


plotImages(imgs)
print(imgs.shape)
print(labels)
Now we design the CNN as follows (or depending upon some trial and error other hyperparameters can be used)
model = Sequential()

model.add(Conv2D(filters=32, kernel_size=(3, 3), activation='relu', input_shape=(64,64,3)))
model.add(MaxPool2D(pool_size=(2, 2), strides=2))

model.add(Conv2D(filters=64, kernel_size=(3, 3), activation='relu', padding = 'same'))
model.add(MaxPool2D(pool_size=(2, 2), strides=2))

model.add(Conv2D(filters=128, kernel_size=(3, 3), activation='relu', padding = 'valid'))
model.add(MaxPool2D(pool_size=(2, 2), strides=2))

model.add(Flatten())

model.add(Dense(64,activation ="relu"))
model.add(Dense(128,activation ="relu"))
#model.add(Dropout(0.2))
model.add(Dense(128,activation ="relu"))
#model.add(Dropout(0.3))
model.add(Dense(10,activation ="softmax"))
Now we fit the model and save the model for it to be used in the last module (model_for_gesture.py)
In training callbacks of Reduce LR on plateau and earlystopping is used, and both of them are dependent on the validation dataset loss.
After every epoch, the accuracy and loss are calculated using the validation dataset and if the validation loss is not decreasing, the LR of the model is reduced using the Reduce LR to prevent the model from overshooting the minima of loss and also we are using the earlystopping algorithm so that if the validation accuracy keeps on decreasing for some epochs then the training is stopped.
The example contains the callbacks used, also it contains the two different optimization algorithms used – SGD (stochastic gradient descent, that means the weights are updated at every training instance) and Adam (combination of Adagrad and RMSProp) is used.
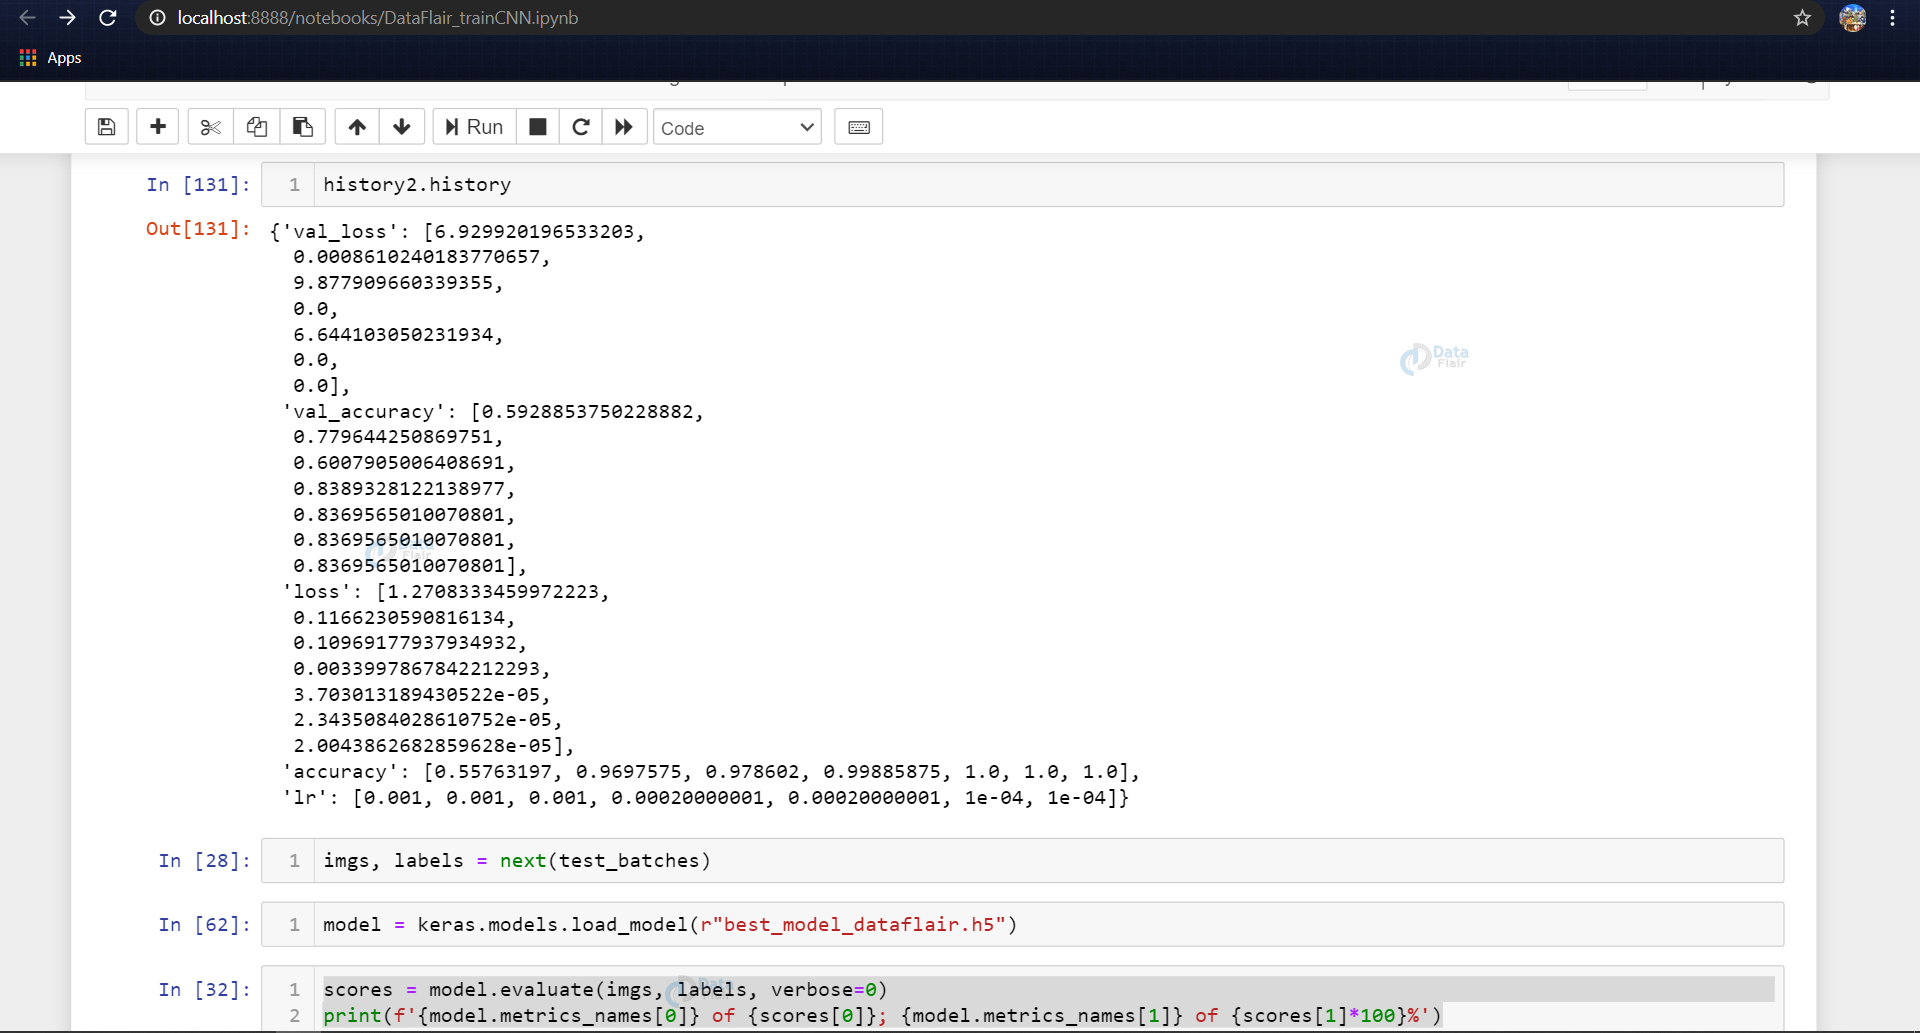
We found for the model SGD seemed to give higher accuracies. As we can see while training we found 100% training accuracy and validation accuracy of about 81%
model.compile(optimizer=Adam(learning_rate=0.001), loss='categorical_crossentropy', metrics=['accuracy'])
reduce_lr = ReduceLROnPlateau(monitor='val_loss', factor=0.2, patience=1, min_lr=0.0001)
early_stop = EarlyStopping(monitor='val_loss', min_delta=0, patience=2, verbose=0, mode='auto')


model.compile(optimizer=SGD(learning_rate=0.001), loss='categorical_crossentropy', metrics=['accuracy'])
reduce_lr = ReduceLROnPlateau(monitor='val_loss', factor=0.2, patience=1, min_lr=0.0005)
early_stop = EarlyStopping(monitor='val_loss', min_delta=0, patience=2, verbose=0, mode='auto')
After compiling the model we fit the model on the train batches for 10 epochs (may vary according to the choice of parameters of the user), using the callbacks discussed above.
history2 = model.fit(train_batches, epochs=10, callbacks=[reduce_lr, early_stop], validation_data = test_batches)
We are now getting the next batch of images from the test data & evaluating the model on the test set and printing the accuracy and loss scores.
# For getting next batch of testing imgs...
imgs, labels = next(test_batches)

scores = model.evaluate(imgs, labels, verbose=0)
print(f'{model.metrics_names[0]} of {scores[0]}; {model.metrics_names[1]} of {scores[1]*100}%')


Once the model is fitted we save the model using model.save()  function.


model.save('best_model_dataflair3.h5')
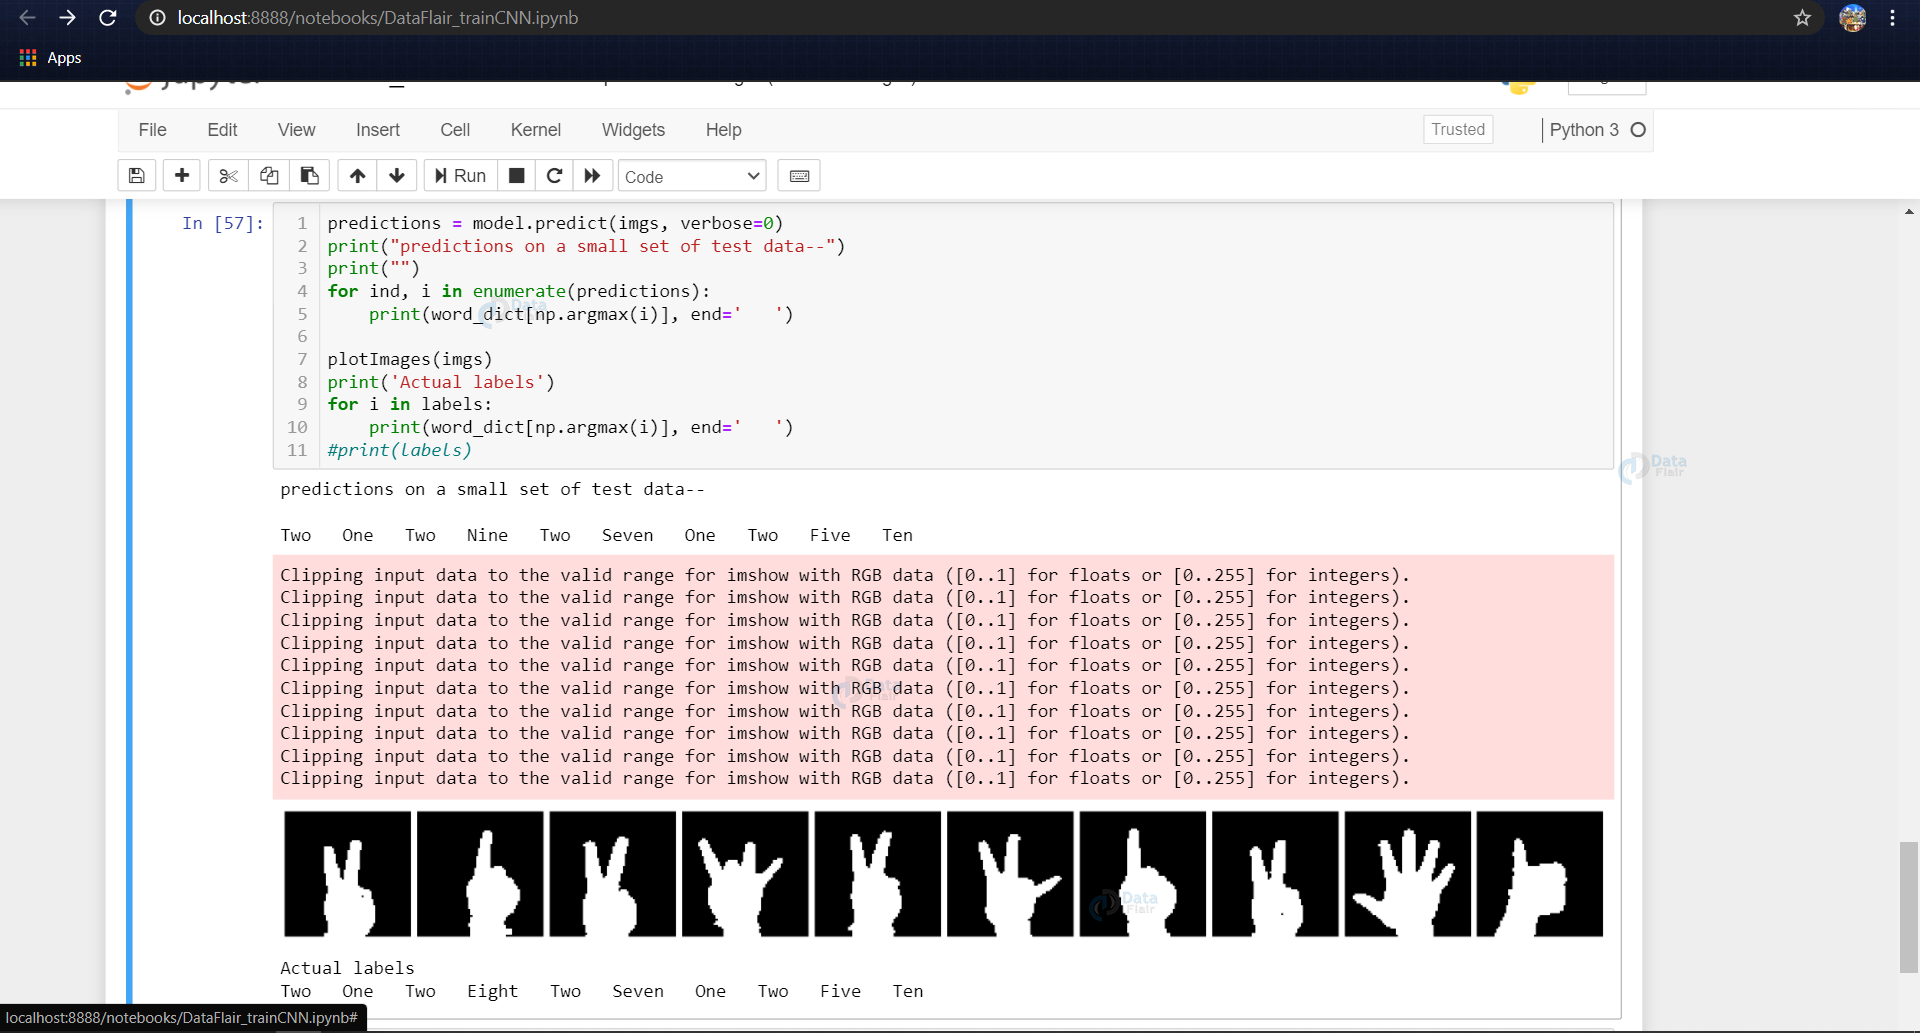
Here we are visualizing and making a small test on the model to check if everything is working as we expect it to while detecting on the live cam feed.
The word_dict is the dictionary containing label names for the various labels predicted.
(Note: Here in the dictionary we have ‘Ten’ after ‘One’, the reason being that while loading the dataset using the ImageDataGenerator, the generator considers the folders inside of the test and train folders on the basis of their folder names, ex: ‘1’, ’10’. Due to this 10 comes after 1 in alphabetical order).
word_dict = {0:'One',1:'Ten',2:'Two',3:'Three',4:'Four',5:'Five',6:'Six',7:'Seven',8:'Eight',9:'Nine'}

predictions = model.predict(imgs, verbose=0)
print("predictions on a small set of test data--")
print("")
for ind, i in enumerate(predictions):
    print(word_dict[np.argmax(i)], end='   ')

plotImages(imgs)
print('Actual labels')
for i in labels:
    print(word_dict[np.argmax(i)], end='   ')
3. Predict the gesture
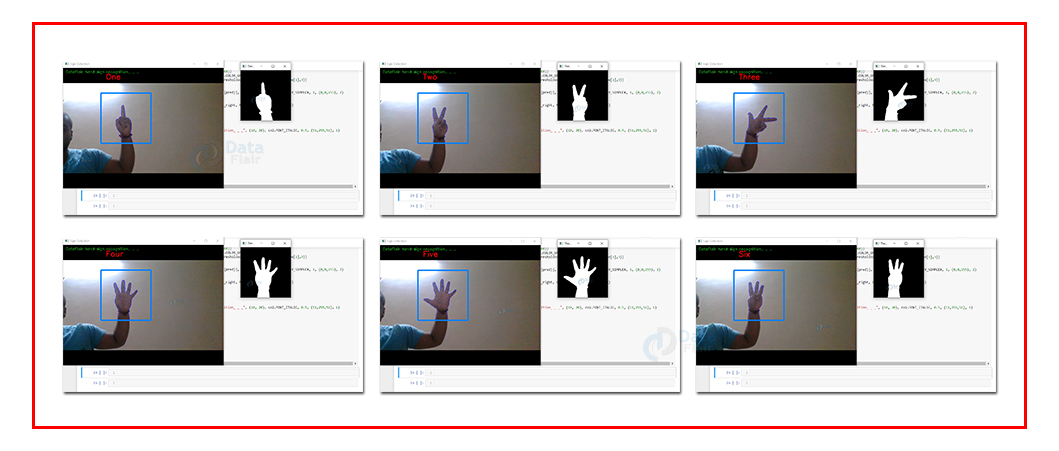
In this, we create a bounding box for detecting the ROI and calculate the accumulated_avg as we did in creating the dataset. This is done for identifying any foreground object.
Now we find the max contour and if contour is detected that means a hand is detected so the threshold of the ROI is treated as a test image.
We load the previously saved model using keras.models.load_model and feed the threshold image of the ROI consisting of the hand as an input to the model for prediction.
Getting the necessary imports for model_for_gesture.py
import numpy as np
import cv2
import keras
from keras.preprocessing.image import ImageDataGenerator
import tensorflow as tf
Now we load the model that we had created earlier and set some of the variables that we need, i.e, initializing the background variable, and setting the dimensions of the ROI.
model = keras.models.load_model(r"C:\Users\abhij\best_model_dataflair3.h5")

background = None
accumulated_weight = 0.5

ROI_top = 100
ROI_bottom = 300
ROI_right = 150
ROI_left = 350
Function to calculate the background accumulated weighted average (like we did while creating the dataset…)
def cal_accum_avg(frame, accumulated_weight):

    global background

    if background is None:
        background = frame.copy().astype("float")
        return None

    cv2.accumulateWeighted(frame, background, accumulated_weight)
Segmenting the hand, i.e, getting the max contours and the thresholded image of the hand detected.
def segment_hand(frame, threshold=25):
    global background

    diff = cv2.absdiff(background.astype("uint8"), frame)


_ , thresholded = cv2.threshold(diff, threshold, 255,
cv2.THRESH_BINARY)

     #Fetching contours in the frame (These contours can be of hand
or any other object in foreground) …

    image, contours, hierarchy =
    cv2.findContours(thresholded.copy(), cv2.RETR_EXTERNAL,
    cv2.CHAIN_APPROX_SIMPLE)

    # If length of contours list = 0, means we didn't get any
    contours...
    if len(contours) == 0:
        return None
    else:
        # The largest external contour should be the hand
        hand_segment_max_cont = max(contours, key=cv2.contourArea)

        # Returning the hand segment(max contour) and the
  thresholded image of hand...
        return (thresholded, hand_segment_max_cont)
Detecting the hand now on the live cam feed.
cam = cv2.VideoCapture(0)
num_frames =0
while True:
    ret, frame = cam.read()

    # flipping the frame to prevent inverted image of captured
    frame...

    frame = cv2.flip(frame, 1)

    frame_copy = frame.copy()

    # ROI from the frame
    roi = frame[ROI_top:ROI_bottom, ROI_right:ROI_left]

    gray_frame = cv2.cvtColor(roi, cv2.COLOR_BGR2GRAY)
    gray_frame = cv2.GaussianBlur(gray_frame, (9, 9), 0)


    if num_frames < 70:

        cal_accum_avg(gray_frame, accumulated_weight)

        cv2.putText(frame_copy, "FETCHING BACKGROUND...PLEASE WAIT",
  (80, 400), cv2.FONT_HERSHEY_SIMPLEX, 0.9, (0,0,255), 2)

    else:
        # segmenting the hand region
        hand = segment_hand(gray_frame)

        # Checking if we are able to detect the hand...
        if hand is not None:

            thresholded, hand_segment = hand

            # Drawing contours around hand segment
            cv2.drawContours(frame_copy, [hand_segment + (ROI_right,
      ROI_top)], -1, (255, 0, 0),1)

            cv2.imshow("Thesholded Hand Image", thresholded)

            thresholded = cv2.resize(thresholded, (64, 64))
            thresholded = cv2.cvtColor(thresholded,
 cv2.COLOR_GRAY2RGB)
            thresholded = np.reshape(thresholded,
(1,thresholded.shape[0],thresholded.shape[1],3))

            pred = model.predict(thresholded)
            cv2.putText(frame_copy, word_dict[np.argmax(pred)],
(170, 45), cv2.FONT_HERSHEY_SIMPLEX, 1, (0,0,255), 2)

    # Draw ROI on frame_copy
    cv2.rectangle(frame_copy, (ROI_left, ROI_top), (ROI_right,
    ROI_bottom), (255,128,0), 3)

    # incrementing the number of frames for tracking
    num_frames += 1

    # Display the frame with segmented hand
    cv2.putText(frame_copy, "DataFlair hand sign recognition_ _ _",
    (10, 20), cv2.FONT_ITALIC, 0.5, (51,255,51), 1)
    cv2.imshow("Sign Detection", frame_copy)


    # Close windows with Esc
    k = cv2.waitKey(1) & 0xFF

    if k == 27:
        break

# Release the camera and destroy all the windows
cam.release()
cv2.destroyAllWindows()
Sign Language Recognition Output
Summary
We have successfully developed sign language detection project. This is an interesting machine learning python project to gain expertise. This can be further extended for detecting the English alphabets.
We work very hard to provide you quality material
Could you take 15 seconds and share your happy experience on Google





create gesture data py 72 line module line 32 module why error
Traceback (most recent call last):
File “C:\Users\ICTSTUDENT\Desktop\sign detection\sign-language-recognition-project (3)\code\create_gesture_data.py”, line 72, in
hand = segment_hand(gray_frame)
File “C:\Users\ICTSTUDENT\Desktop\sign detection\sign-language-recognition-project (3)\code\create_gesture_data.py”, line 32, in segment_hand
image, contours, hierarchy = cv2.findContours(thresholded.copy(), cv2.RETR_EXTERNAL, cv2.CHAIN_APPROX_SIMPLE)
ValueError: not enough values to unpack (expected 3, got 2)
what is this problem
did you find a fix?
like the way you speak
what is the accuracy of the model?
Did anyone do this project? can i know if this works?
Very good 👍 ok
Well done
Can you send this project to my email pls, Thanks
can you send code for this project
Traceback (most recent call last):
File “c:\Users\gurud\OneDrive\Documents\FinalYearProject\Learn.py”, line 8, in
model=keras.models.load_model(r”C:/Users/gurud/OneDrive/Documents/FinalYearProject/Datacolllection/Validate”)
^^^^^^^^^^^^^^^^^^^^^^^^^^^^^^^^^^^^^^^^^^^^^^^^^^^^^^^^^^^^^^^^^^^^^^^^^^^^^^^^^^^^^^^^^^^^^^^^^^^^^^^
File “C:\Users\gurud\AppData\Local\Programs\Python\Python311\Lib\site-packages\keras\src\saving\saving_api.py”, line 262, in load_model
return legacy_sm_saving_lib.load_model(
^^^^^^^^^^^^^^^^^^^^^^^^^^^^^^^^
File “C:\Users\gurud\AppData\Local\Programs\Python\Python311\Lib\site-packages\keras\src\utils\traceback_utils.py”, line 70, in error_handler
raise e.with_traceback(filtered_tb) from None
File “C:\Users\gurud\AppData\Local\Programs\Python\Python311\Lib\site-packages\tensorflow\python\saved_model\loader_impl.py”, line 119, in parse_saved_model
raise IOError(
OSError: SavedModel file does not exist at: C:/Users/gurud/OneDrive/Documents/FinalYearProject/Datacolllection/Validate\{saved_model.pbtxt|saved_model.pb}
please any one help me solve this….