Python Machine Learning Project – Detecting Parkinson’s Disease with XGBoost
Machine Learning courses with 100+ Real-time projects Start Now!!
In our list of Python projects, detecting Parkinson’s disease with python is on the 3rd position. In this Python Machine learning project, we will build a model using which we can accurately detect the presence of Parkinson’s disease in one’s body.
Here are some more Python Machine Learning Projects which you can bookmark for practicing later:
- Fake News Detection Python Project
- Parkinson’s Disease Detection Python Project
- Color Detection Python Project
- Speech Emotion Recognition Python Project
- Breast Cancer Classification Python Project
- Age and Gender Detection Python Project
- Handwritten Digit Recognition Python Project
- Chatbot Python Project
- Driver Drowsiness Detection Python Project
- Traffic Signs Recognition Python Project
- Image Caption Generator Python Project
So, let’s start the Python Machine Learning Project with the introduction of terms used –
Detecting Parkinson’s Disease – Python Machine Learning Project
What is Parkinson’s Disease?
Parkinson’s disease is a progressive disorder of the central nervous system affecting movement and inducing tremors and stiffness. It has 5 stages to it and affects more than 1 million individuals every year in India. This is chronic and has no cure yet. It is a neurodegenerative disorder affecting dopamine-producing neurons in the brain.
What is XGBoost?
XGBoost is a new Machine Learning algorithm designed with speed and performance in mind. XGBoost stands for eXtreme Gradient Boosting and is based on decision trees. In this project, we will import the XGBClassifier from the xgboost library; this is an implementation of the scikit-learn API for XGBoost classification.
Detecting Parkinson’s Disease with XGBoost – Objective
To build a model to accurately detect the presence of Parkinson’s disease in an individual.
Detecting Parkinson’s Disease with XGBoost – About the Python Machine Learning Project
In this Python machine learning project, using the Python libraries scikit-learn, numpy, pandas, and xgboost, we will build a model using an XGBClassifier. We’ll load the data, get the features and labels, scale the features, then split the dataset, build an XGBClassifier, and then calculate the accuracy of our model.
Dataset for Python Machine Learning Project
You’ll need the UCI ML Parkinsons dataset for this; you can download it here. The dataset has 24 columns and 195 records and is only 39.7 KB.
Prerequisites
You’ll need to install the following libraries with pip:
pip install numpy pandas sklearn xgboost
You’ll also need to install Jupyter Lab, and then use the command prompt to run it:
C:\Users\DataFlair>jupyter lab
This will open a new JupyterLab window in your browser. Here, you will create a new console and type in your code, then press Shift+Enter to execute one or more lines at a time.
Steps for Detecting Parkinson’s Disease with XGBoost
Below are some steps required to practice Python Machine Learning Project –
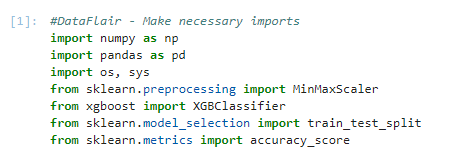
1. Make necessary imports:
import numpy as np
import pandas as pd
import os, sys
from sklearn.preprocessing import MinMaxScaler
from xgboost import XGBClassifier
from sklearn.model_selection import train_test_split
from sklearn.metrics import accuracy_score
Screenshot:
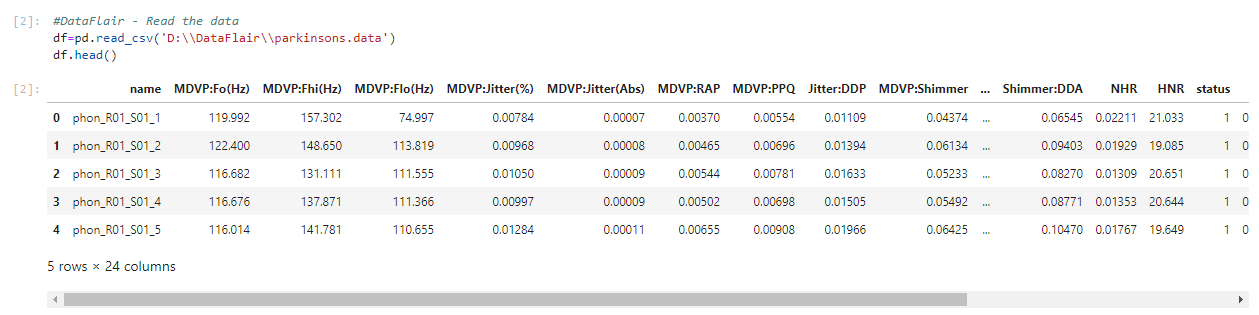
2. Now, let’s read the data into a DataFrame and get the first 5 records.
#DataFlair - Read the data
df=pd.read_csv('D:\\DataFlair\\parkinsons.data')
df.head()
Output Screenshot:
3. Get the features and labels from the DataFrame (dataset). The features are all the columns except ‘status’, and the labels are those in the ‘status’ column.
#DataFlair - Get the features and labels
features=df.loc[:,df.columns!='status'].values[:,1:]
labels=df.loc[:,'status'].values
Screenshot:

4. The ‘status’ column has values 0 and 1 as labels; let’s get the counts of these labels for both- 0 and 1.
#DataFlair - Get the count of each label (0 and 1) in labels
print(labels[labels==1].shape[0], labels[labels==0].shape[0])
Output Screenshot:

We have 147 ones and 48 zeros in the status column in our dataset.
5. Initialize a MinMaxScaler and scale the features to between -1 and 1 to normalize them. The MinMaxScaler transforms features by scaling them to a given range. The fit_transform() method fits to the data and then transforms it. We don’t need to scale the labels.
#DataFlair - Scale the features to between -1 and 1
scaler=MinMaxScaler((-1,1))
x=scaler.fit_transform(features)
y=labels
Screenshot:

6. Now, split the dataset into training and testing sets keeping 20% of the data for testing.
#DataFlair - Split the dataset
x_train,x_test,y_train,y_test=train_test_split(x, y, test_size=0.2, random_state=7)
Screenshot:

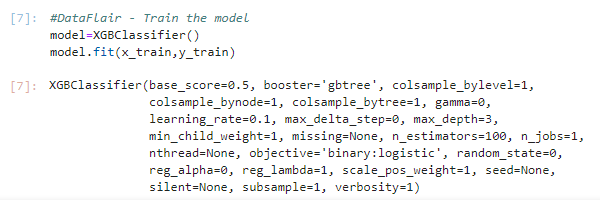
7. Initialize an XGBClassifier and train the model. This classifies using eXtreme Gradient Boosting- using gradient boosting algorithms for modern data science problems. It falls under the category of Ensemble Learning in ML, where we train and predict using many models to produce one superior output.
#DataFlair - Train the model
model=XGBClassifier()
model.fit(x_train,y_train)
Output Screenshot:
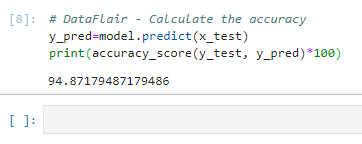
8. Finally, generate y_pred (predicted values for x_test) and calculate the accuracy for the model. Print it out.
# DataFlair - Calculate the accuracy
y_pred=model.predict(x_test)
print(accuracy_score(y_test, y_pred)*100)
Output Screenshot:
Summary
Parkinson’s disease is a brain disorder that affects movement and speech. Early detection is very important for treatment. Machine learning can help doctors detect Parkinson’s using voice features. Python and the XGBoost algorithm are great tools for this task. XGBoost is a powerful model known for speed and accuracy. It works well with small and clean datasets like the one used for Parkinson’s detection.
In this Python machine learning project, we learned to detect the presence of Parkinson’s Disease in individuals using various factors. We used an XGBClassifier for this and made use of the sklearn library to prepare the dataset. This gives us an accuracy of 94.87%, which is great considering the number of lines of code in this python project.
Hope you enjoyed this Python project. We have already provided you the links for more interesting Python Projects at the top of the blog.
Want to become next Data Scientist?
Enroll for Best Data Science Online Course and be the next Data Scientist
Did we exceed your expectations?
If Yes, share your valuable feedback on Google


Does this same code is available for matlab also.
It will be much helpfull if available for Matlab.
Any idea about Alzheimer Detection
How would I test the model?
Using the rest 80 percent?
Please let me know ASAP
Hi Ad,
No, in this using the train_test_split() function, we are splitting the inputs and the output into two parts containing 80% and 20% data. Then we are using the 80% part, named x_train and y_train, to train the model. After this, we are using the rest 20% to test and find the accuracy. Hoping that I could make it clear.
I like turtles
Contact him through his email for herpes cure_______________[[ robinson_bucler @ ]] yahoo com..
…………. Thank you! !!!
…………. Thank you! !!!❤️❤️❤️
Is it compulsory scaling the data? Because without it I got a 97% accuracy.
It is a good habit to scale the data so that the algorithm will better fit the data. It is a rear case to get a higher accuracy without scaling.
I am Always getting this error can you help.
—————————————————————————
NameError Traceback (most recent call last)
in
1 #DataFlair – Train the model
—-> 2 model=XGBClassifier()
3 model.fit(x_train,y_train)
NameError: name ‘XGBClassifier’ is not defined
Please check if you have imported the classifier using the statement ‘from xgboost import XGBClassifier’. If the problem is still not solved, try reinstalling the module again. Hope this solves the issue.
Did you install the XGBoost package on the cmd prompt? if so, may be it will fix it
Hi,
please can you let me know how do I test this model, what are the inputs required?
Hello,
Before training the model, we split the data set into two parts having 80% and 20% data. We are using the 20% data to test the model. The inputs are the same ones that are used for training, i.e., all columns except the Status column.
i have imported the classifier, but still i didn’t get the output. Output I’m getting is XGBClassifier(). I’m not getting the values.
UserWarning: The use of label encoder in XGBClassifier is deprecated and will be removed in a future release. To remove this warning, do the following: 1) Pass option use_label_encoder=False when constructing XGBClassifier object; and 2) Encode your labels (y) as integers starting with 0, i.e. 0, 1, 2, …, [num_class – 1].
warnings.warn(label_encoder_deprecation_msg, UserWarning.
i have used python 10
C:\Users\HP\AppData\Local\Programs\Python\Python310\lib\site-packages\xgboost\compat.py:36: FutureWarning: pandas.Int64Index is deprecated and will be removed from pandas in a future version. Use pandas.Index with the appropriate dtype instead.
from pandas import MultiIndex, Int64Index
warning at line from xgboost import XGBClassifier
My python stops working and restarts the kennel once i run the code:
Model=XGBClassifier()
Model.fit(x_train,y_train)
Please could be wrong
Hello,
I am getting the following error while training, could you please provide me your help in solving this?
XGBoostError: [14:21:58] C:/buildkite-agent/builds/buildkite-windows-cpu-autoscaling-group-i-08de971ced8a8cdc6-1/xgboost/xgboost-ci-windows/src/data/data.cc:455: Check failed: this->labels.Size() % this->num_row_ == 0 (156 vs. 0) : Incorrect size for labels.
the parkinsons dataset is not available when we click on download data its showing not found
. can you resolve this??
My Partner, who is 66 years old, was diagnosed with Parkinson’s disease last year. We noticed that he was experiencing hallucinations, slow movement, disturbed sleep, and twitchy hands and legs when at rest. He had to stop taking pramipexole (Sifrol), carbidopa/levodopa, and 2 mg of biperiden because of side effects. Our family doctor recommended a PD-5 treatment from natural herbs centre , which my husband has been undergoing for several months now. Exercise has been very beneficial. He has shown great improvement with the treatment thus far. He is more active now, does more, and feels less apathetic. He has more energy and can do more activities in a day than he did before. As far as tremors I observe a progress, he improved drastically. I thought I would share my husband’s story in case it could be helpful, but ultimately you have to figure out what works best for you. Salutations and well wishes
Hi I am unable to download the dataset , as the link says “Not Found” could you please provide me with the dataset
I was diagnosed Jan 2025 but had symptoms one year prior. I have left side tremors, rigidity, some dystonia in my toes and bradykinesia (all mild so far) but I still feel great and am able to go about my day without being on any medication. I try to exercise every day as well. I personally want to steer clear of any medication for as long as I can due to the fact that long term use of carbidopa-levodopa is commonly associated with side effects. I could fall asleep but can’t stay asleep. I wake up between 3 and 4 am every night. I used different supplements like Macuna and high doze B12 that didn’t work, so last July, i tried the PD-5 protocol—the best decision ever! My tremors eased, my strength returned, and I sleep soundly for 8 hours. I feel like a new woman, and I can walk and exercise again. We got the PD-5 Protocol from this website ww w. limitless naturalwellness. c om