Driver Drowsiness Detection System with OpenCV & Keras
Machine Learning courses with 100+ Real-time projects Start Now!!
With this Python project, we will be making a drowsiness detection system. A countless number of people drive on the highway day and night. Taxi drivers, bus drivers, truck drivers and people traveling long-distance suffer from lack of sleep. Due to which it becomes very dangerous to drive when feeling sleepy.
The majority of accidents happen due to the drowsiness of the driver. So, to prevent these accidents we will build a system using Python, OpenCV, and Keras which will alert the driver when he feels sleepy.
DataFlair has also published other machine learning project ideas with source code. You can check them from this ml projects list:
- Fake News Detection Python Project
- Parkinson’s Disease Detection Python Project
- Color Detection Python Project
- Speech Emotion Recognition Python Project
- Breast Cancer Classification Python Project
- Age and Gender Detection Python Project
- Handwritten Digit Recognition Python Project
- Chatbot Python Project
- Drowsy Driver Safety Alert System Python Project
- Traffic Signs Recognition Python Project
- Image Caption Generator Python Project
Drowsy Driver Alert System
Drowsiness detection is a safety technology that can prevent accidents that are caused by drivers who fell asleep while driving.
The objective of this intermediate Python project is to build a drowsiness detection system that will detect that a person’s eyes are closed for a few seconds. This system will alert the driver when drowsiness is detected.
Driver Drowsiness Detection System
In this Python project, we will be using OpenCV for gathering the images from webcam and feed them into a Deep Learning model which will classify whether the person’s eyes are ‘Open’ or ‘Closed’. The approach we will be using for this Python project is as follows :
1. Take image as input from a camera.
2. Detect the face in the image and create a Region of Interest (ROI).
3. Detect the eyes from ROI and feed it to the classifier.
4. Classifier will categorize whether eyes are open or closed.
5. Calculate score to check whether the person is drowsy.
Driver Drowsiness Detection Dataset
The dataset used for this model is created by us. To create the dataset, we wrote a script that captures eyes from a camera and stores in our local disk. We separated them into their respective labels ‘Open’ or ‘Closed’. The data was manually cleaned by removing the unwanted images which were not necessary for building the model. The data comprises around 7000 images of people’s eyes under different lighting conditions. After training the model on our dataset, we have attached the final weights and model architecture file “models/cnnCat2.h5”.
Now, you can use this model to classify if a person’s eye is open or closed.
Alternatively, if you want to build and train your own model, you can download the dataset: Driver Drowsiness Dataset
The Model Architecture
The model we used is built with Keras using Convolutional Neural Networks (CNN). A convolutional neural network is a special type of deep neural network which performs extremely well for image classification purposes. A CNN basically consists of an input layer, an output layer and a hidden layer which can have multiple layers. A convolution operation is performed on these layers using a filter that performs 2D matrix multiplication on the layer and filter.
The CNN model architecture consists of the following layers:
- Convolutional layer; 32 nodes, kernel size 3
- Convolutional layer; 32 nodes, kernel size 3
- Convolutional layer; 64 nodes, kernel size 3
- Fully connected layer; 128 nodes
The final layer is also a fully connected layer with 2 nodes. A Relu activation function is used in all the layers except the output layer in which we used Softmax.
Project Prerequisites
The requirement for this Python project is a webcam through which we will capture images. You need to have Python (3.6 version recommended) installed on your system, then using pip, you can install the necessary packages.
- OpenCV – pip install opencv-python (face and eye detection).
- TensorFlow – pip install tensorflow (keras uses TensorFlow as backend).
- Keras – pip install keras (to build our classification model).
- Pygame – pip install pygame (to play alarm sound).
Steps for Performing Driver Drowsiness Detection
Download the driver drowsiness detection system project source code from the zip and extract the files in your system: Driver Drowsiness Project Code
The contents of the zip are:

- The “haar cascade files” folder consists of the xml files that are needed to detect objects from the image. In our case, we are detecting the face and eyes of the person.
- The models folder contains our model file “cnnCat2.h5” which was trained on convolutional neural networks.
- We have an audio clip “alarm.wav” which is played when the person is feeling drowsy.
- “Model.py” file contains the program through which we built our classification model by training on our dataset. You could see the implementation of convolutional neural network in this file.
- “Drowsiness detection.py” is the main file of our project. To start the detection procedure, we have to run this file.
Let’s now understand how our algorithm works step by step.
Step 1 – Take Image as Input from a Camera
With a webcam, we will take images as input. So to access the webcam, we made an infinite loop that will capture each frame. We use the method provided by OpenCV, cv2.VideoCapture(0) to access the camera and set the capture object (cap). cap.read() will read each frame and we store the image in a frame variable.
Step 2 – Detect Face in the Image and Create a Region of Interest (ROI)
To detect the face in the image, we need to first convert the image into grayscale as the OpenCV algorithm for object detection takes gray images in the input. We don’t need color information to detect the objects. We will be using haar cascade classifier to detect faces. This line is used to set our classifier face = cv2.CascadeClassifier(‘ path to our haar cascade xml file’). Then we perform the detection using faces = face.detectMultiScale(gray). It returns an array of detections with x,y coordinates, and height, the width of the boundary box of the object. Now we can iterate over the faces and draw boundary boxes for each face.
for (x,y,w,h) in faces:
        cv2.rectangle(frame, (x,y), (x+w, y+h), (100,100,100), 1 )
Step 3 – Detect the eyes from ROI and feed it to the classifier
The same procedure to detect faces is used to detect eyes. First, we set the cascade classifier for eyes in leye and reye respectively then detect the eyes using left_eye = leye.detectMultiScale(gray). Now we need to extract only the eyes data from the full image. This can be achieved by extracting the boundary box of the eye and then we can pull out the eye image from the frame with this code.
l_eye = frame[ y : y+h, x : x+w ]
l_eye only contains the image data of the eye. This will be fed into our CNN classifier which will predict if eyes are open or closed. Similarly, we will be extracting the right eye into r_eye.
Step 4 – Classifier will Categorize whether Eyes are Open or Closed
We are using CNN classifier for predicting the eye status. To feed our image into the model, we need to perform certain operations because the model needs the correct dimensions to start with. First, we convert the color image into grayscale using r_eye = cv2.cvtColor(r_eye, cv2.COLOR_BGR2GRAY). Then, we resize the image to 24*24 pixels as our model was trained on 24*24 pixel images cv2.resize(r_eye, (24,24)). We normalize our data for better convergence r_eye = r_eye/255 (All values will be between 0-1). Expand the dimensions to feed into our classifier. We loaded our model using model = load_model(‘models/cnnCat2.h5’) . Now we predict each eye with our model
lpred = model.predict_classes(l_eye). If the value of lpred[0] = 1, it states that eyes are open, if value of lpred[0] = 0 then, it states that eyes are closed.
Step 5 – Calculate Score to Check whether Person is Drowsy
The score is basically a value we will use to determine how long the person has closed his eyes. So if both eyes are closed, we will keep on increasing score and when eyes are open, we decrease the score. We are drawing the result on the screen using cv2.putText() function which will display real time status of the person.
cv2.putText(frame, “Open”, (10, height-20), font, 1, (255,255,255), 1, cv2.LINE_AA )
A threshold is defined for example if score becomes greater than 15 that means the person’s eyes are closed for a long period of time. This is when we beep the alarm using sound.play()
The Source Code of our main file looks like this:
import cv2
import os
from keras.models import load_model
import numpy as np
from pygame import mixer
import time

mixer.init()
sound = mixer.Sound('alarm.wav')

face = cv2.CascadeClassifier('haar cascade files\haarcascade_frontalface_alt.xml')
leye = cv2.CascadeClassifier('haar cascade files\haarcascade_lefteye_2splits.xml')
reye = cv2.CascadeClassifier('haar cascade files\haarcascade_righteye_2splits.xml')

lbl=['Close','Open']

model = load_model('models/cnncat2.h5')
path = os.getcwd()
cap = cv2.VideoCapture(0)
font = cv2.FONT_HERSHEY_COMPLEX_SMALL
count=0
score=0
thicc=2
rpred=[99]
lpred=[99]

while(True):
    ret, frame = cap.read()
    height,width = frame.shape[:2]

    gray = cv2.cvtColor(frame, cv2.COLOR_BGR2GRAY)

    faces = face.detectMultiScale(gray,minNeighbors=5,scaleFactor=1.1,minSize=(25,25))
    left_eye = leye.detectMultiScale(gray)
    right_eye = reye.detectMultiScale(gray)

    cv2.rectangle(frame, (0,height-50) , (200,height) , (0,0,0) , thickness=cv2.FILLED )

    for (x,y,w,h) in faces:
cv2.rectangle(frame, (x,y) , (x+w,y+h) , (100,100,100) , 1 )

    for (x,y,w,h) in right_eye:
        r_eye=frame[y:y+h,x:x+w]
        count=count+1
        r_eye = cv2.cvtColor(r_eye,cv2.COLOR_BGR2GRAY)
        r_eye = cv2.resize(r_eye,(24,24))
        r_eye= r_eye/255
        r_eye= r_eye.reshape(24,24,-1)
        r_eye = np.expand_dims(r_eye,axis=0)
        rpred = model.predict_classes(r_eye)
        if(rpred[0]==1):
            lbl='Open'
        if(rpred[0]==0):
            lbl='Closed'
        break

    for (x,y,w,h) in left_eye:
        l_eye=frame[y:y+h,x:x+w]
        count=count+1
        l_eye = cv2.cvtColor(l_eye,cv2.COLOR_BGR2GRAY)
        l_eye = cv2.resize(l_eye,(24,24))
        l_eye= l_eye/255
        l_eye=l_eye.reshape(24,24,-1)
        l_eye = np.expand_dims(l_eye,axis=0)
        lpred = model.predict_classes(l_eye)
        if(lpred[0]==1):
            lbl='Open'
        if(lpred[0]==0):
            lbl='Closed'
        break

    if(rpred[0]==0 and lpred[0]==0):
        score=score+1
        cv2.putText(frame,"Closed",(10,height-20), font, 1,(255,255,255),1,cv2.LINE_AA)
    # if(rpred[0]==1 or lpred[0]==1):
    else:
        score=score-1
        cv2.putText(frame,"Open",(10,height-20), font, 1,(255,255,255),1,cv2.LINE_AA)

    if(score<0):
        score=0
    cv2.putText(frame,'Score:'+str(score),(100,height-20), font, 1,(255,255,255),1,cv2.LINE_AA)
    if(score>15):
        #person is feeling sleepy so we beep the alarm
        cv2.imwrite(os.path.join(path,'image.jpg'),frame)
        try:
            sound.play()

        except: # isplaying = False
            pass
        if(thicc<16):
            thicc= thicc+2
        else:
            thicc=thicc-2
            if(thicc<2):
                thicc=2
        cv2.rectangle(frame,(0,0),(width,height),(0,0,255),thicc)
    cv2.imshow('frame',frame)
    if cv2.waitKey(1) & 0xFF == ord('q'):
        break
cap.release()
cv2.destroyAllWindows()
Driver Drowsiness Detection Execution
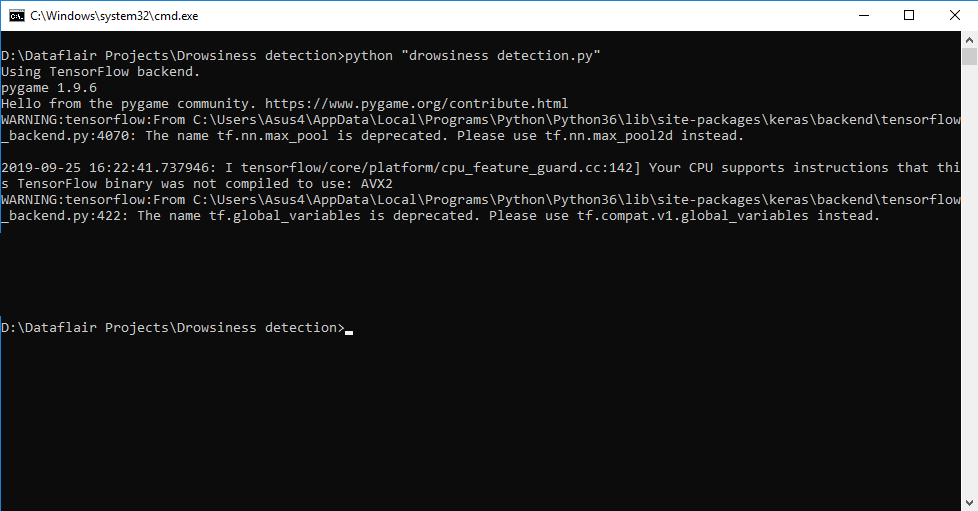
Let’s execute drive drowsiness detection system and see the working of our ml project. To start the project, you need to open a command prompt, go to the directory where our main file “drowsiness detection.py” exists. Run the script with this command.
python “drowsiness detection.py”
It may take a few seconds to open the webcam and start detection.
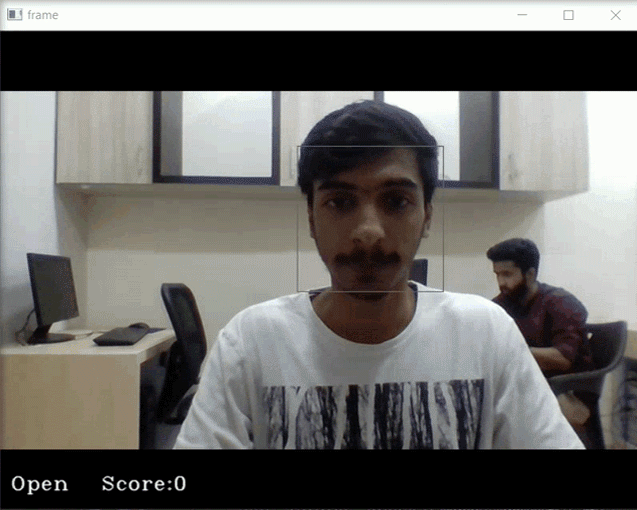
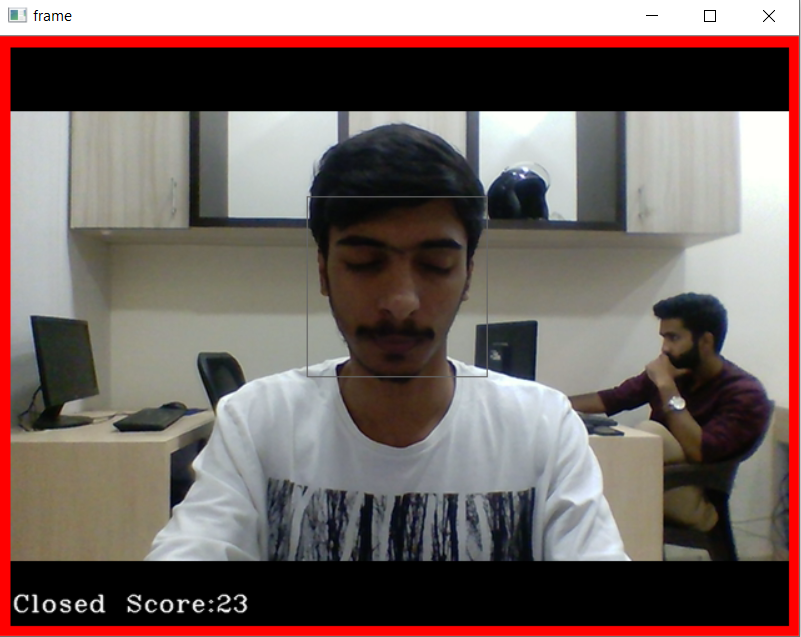
Example Screenshot:
Output Screenshot:
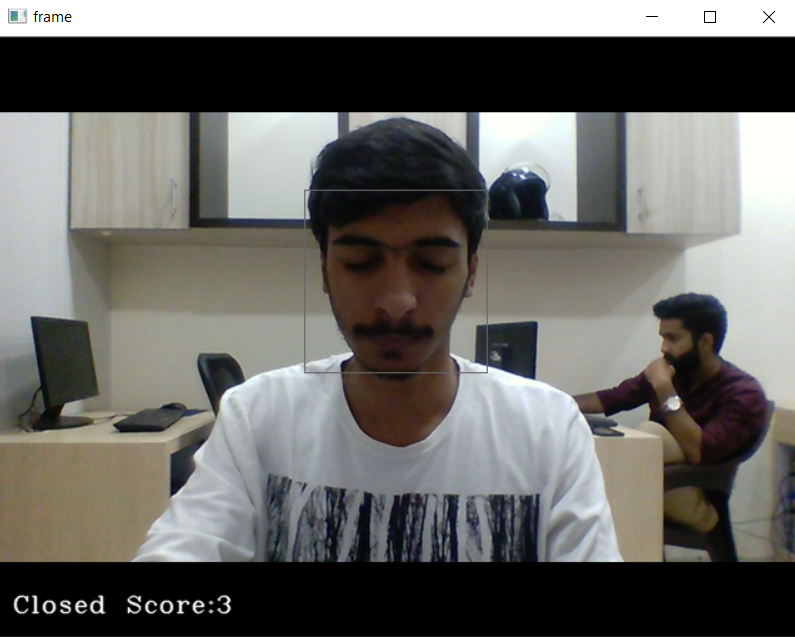
Closed Eye Detection
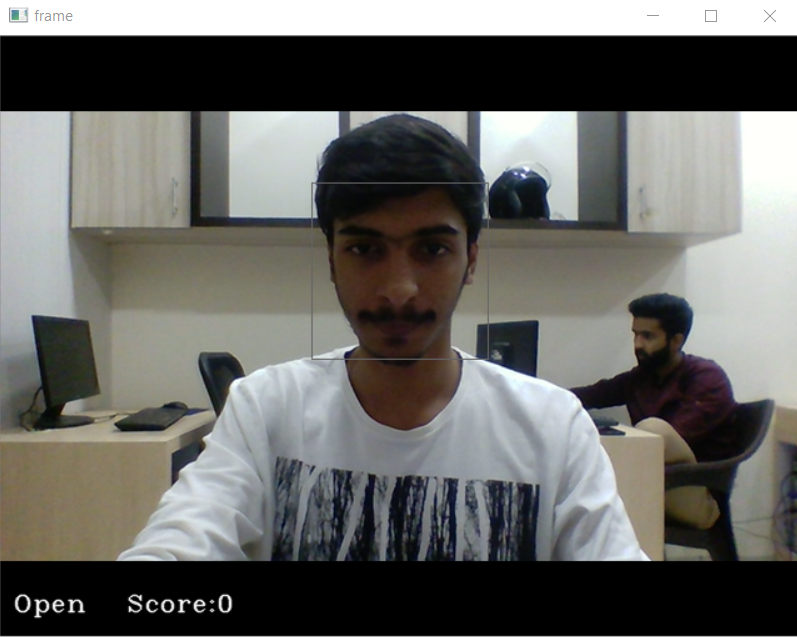
Open Eyes Detection
Sleep Alert
Summary
Drowsy driving is one of the top causes of road accidents. When drivers get sleepy, they blink slower, close their eyes for longer, or even nod off. A smart system using Python, OpenCV, and Keras can help prevent such accidents. This system watches the driver’s face in real time and checks if their eyes are closing too often. If the system finds signs of drowsiness, it gives an alert like a beep or a message on the screen.
In this Python project, we have built a drowsy driver alert system that you can implement in numerous ways. We used OpenCV to detect faces and eyes using a haar cascade classifier and then we used a CNN model to predict the status.
This project is useful in real life. You can install it in cars to alert sleepy drivers. It also helps students understand how computer vision and machine learning work together. You’ll learn how to work with real-time video, face detection, and Keras deep learning. It’s a great safety-focused project for beginners and very impressive in interviews.
Did we exceed your expectations?
If Yes, share your valuable feedback on Google


unable to download the source code zip file any one can help it
Yes, I too need the source code ..is it available in GitHub?!