Deep Surveillance with Deep Learning – Intelligent Video Surveillance Project
Machine Learning courses with 100+ Real-time projects Start Now!!
Surveillance security is a very tedious and time-consuming job. In this tutorial, we will build a system to automate the task of analyzing video surveillance. We will analyze the video feed in real-time and identify any abnormal activities like violence or theft.
There is a lot of research going on in the industry about video surveillance among them; the role of CCTV videos has overgrown. CCTV cameras are placed all over the places for surveillance and security.
In the last decade, there have been advancements in deep learning algorithms for deep surveillance. These advancements have shown an essential trend in deep surveillance and promise a drastic efficiency gain. The typical applications of deep surveillance are theft identification, violence detection, and detection of the chances of explosion.
Network architecture:
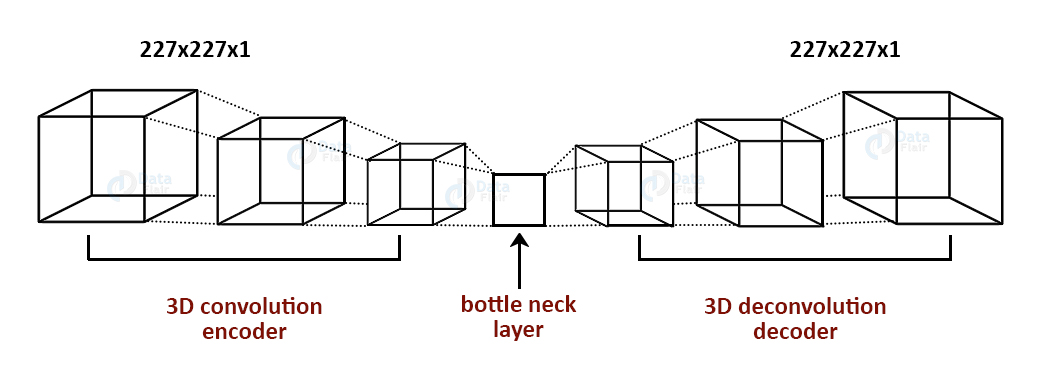
We have generally seen deep neural networks for computer vision, image classification, and object detection tasks. In this project, we have to extend deep neural networks to 3-dimensional for learning spatio-temporal features of the video feed.
For this video surveillance project, we will introduce a spatio temporal autoencoder, which is based on a 3D convolution network. The encoder part extracts the spatial and temporal information, and then the decoder reconstructs the frames. The abnormal events are identified by computing the reconstruction loss using Euclidean distance between original and reconstructed batch.
Intelligent Video Surveillance with Deep Learning
We will use spatial temporal encoders to identify abnormal activities.
The dataset for abnormal event detection in video surveillance:
Following are the comprehensive datasets that are used to train models for anomaly detection tasks.
CUHK Avenue Dataset:
This dataset contains 16 training and 21 testing video clips. The video contains 30652 frames in total.
The training videos contain video with normal situations. The testing videos contain videos with both standard and abnormal events.
Dataset Download Link: Avenue Dataset for Abnormal Event Detection
UCSD pedestrian Dataset:
This dataset contains videos with pedestrians. It includes groups of people walking towards, away, and parallel to the camera. The abnormal event includes:
- Non-pedestrian entities
- Anomalous pedestrian motion patterns
Dataset Download Link: UCSD Anomaly Detection Dataset
Project Source Code
Before proceeding ahead, please download the source code which we used in this deep learning project: Video Surveillance Project Code
Video Surveillance – Anomaly Even Detection Code:
First, download any one of the above datasets and put in a directory named “train”.
Make a new python file train.py and paste the code described in following steps:
1. Imports:
from keras.preprocessing.image import img_to_array,load_img
import numpy as np
import glob
import os
import cv2

from keras.layers import Conv3D,ConvLSTM2D,Conv3DTranspose
from keras.models import Sequential
from keras.callbacks import ModelCheckpoint, EarlyStopping
import imutils
2. Initialize directory path variable and describe a function to process and store video frames:
store_image=[]
train_path='./train'
fps=5
train_videos=os.listdir('train_path')
train_images_path=train_path+'/frames'
os.makedirs(train_images_path)

def store_inarray(image_path):
    image=load_img(image_path)
    image=img_to_array(image)
    image=cv2.resize(image, (227,227), interpolation = cv2.INTER_AREA)
    gray=0.2989*image[:,:,0]+0.5870*image[:,:,1]+0.1140*image[:,:,2]
    store_image.append(gray)
3. Extract frames from video and call store function:
for video in train_videos:
    os.system( 'ffmpeg -i {}/{} -r 1/{}  {}/frames/%03d.jpg'.format(train_path,video,fps,train_path))
    images=os.listdir(train_images_path)
    for image in images:
        image_path=train_image_path + '/' + image
        store_inarray(image_path)
4. Store the store_image list in a numpy file “training.npy”:
store_image=np.array(store_image)
a,b,c=store_image.shape

store_image.resize(b,c,a)
store_image=(store_image-store_image.mean())/(store_image.std())
store_image=np.clip(store_image,0,1)
np.save('training.npy',store_image)
5. Create spatial autoencoder architecture:
stae_model=Sequential()

stae_model.add(Conv3D(filters=128,kernel_size=(11,11,1),strides=(4,4,1),padding='valid',input_shape=(227,227,10,1),activation='tanh'))
stae_model.add(Conv3D(filters=64,kernel_size=(5,5,1),strides=(2,2,1),padding='valid',activation='tanh'))
stae_model.add(ConvLSTM2D(filters=64,kernel_size=(3,3),strides=1,padding='same',dropout=0.4,recurrent_dropout=0.3,return_sequences=True))
stae_model.add(ConvLSTM2D(filters=32,kernel_size=(3,3),strides=1,padding='same',dropout=0.3,return_sequences=True))
stae_model.add(ConvLSTM2D(filters=64,kernel_size=(3,3),strides=1,return_sequences=True, padding='same',dropout=0.5))
stae_model.add(Conv3DTranspose(filters=128,kernel_size=(5,5,1),strides=(2,2,1),padding='valid',activation='tanh'))
stae_model.add(Conv3DTranspose(filters=1,kernel_size=(11,11,1),strides=(4,4,1),padding='valid',activation='tanh'))

stae_model.compile(optimizer='adam',loss='mean_squared_error',metrics=['accuracy'])
6. Train the autoencoder on the “training.npy” file and save the model with name “saved_model.h5”:
training_data=np.load('training.npy')
frames=training_data.shape[2]
frames=frames-frames%10

training_data=training_data[:,:,:frames]
training_data=training_data.reshape(-1,227,227,10)
training_data=np.expand_dims(training_data,axis=4)
target_data=training_data.copy()

epochs=5
batch_size=1

callback_save = ModelCheckpoint("saved_model.h5", monitor="mean_squared_error", save_best_only=True)

callback_early_stopping = EarlyStopping(monitor='val_loss', patience=3)

stae_model.fit(training_data,target_data, batch_size=batch_size, epochs=epochs, callbacks = [callback_save,callback_early_stopping])
stae_model.save("saved_model.h5")
Run this script to train and save the autoencoder model.
Now make another python file “test.py” and observe the results of abnormal event detection on any custom video.
Paste the below code in “test.py”:
import cv2
import numpy as np
from keras.models import load_model
import argparse
from PIL import Image
import imutils


def mean_squared_loss(x1,x2):
    difference=x1-x2
    a,b,c,d,e=difference.shape
    n_samples=a*b*c*d*e
    sq_difference=difference**2
    Sum=sq_difference.sum()
    distance=np.sqrt(Sum)
    mean_distance=distance/n_samples

    return mean_distance


model=load_model("saved_model.h5")

cap = cv2.VideoCapture("__path_to_custom_test_video")
print(cap.isOpened())

while cap.isOpened():
    imagedump=[]
    ret,frame=cap.read()

    for i in range(10):
        ret,frame=cap.read()
        image = imutils.resize(frame,width=700,height=600)

        frame=cv2.resize(frame, (227,227), interpolation = cv2.INTER_AREA)
        gray=0.2989*frame[:,:,0]+0.5870*frame[:,:,1]+0.1140*frame[:,:,2]
        gray=(gray-gray.mean())/gray.std()
        gray=np.clip(gray,0,1)
        imagedump.append(gray)

    imagedump=np.array(imagedump)

    imagedump.resize(227,227,10)
    imagedump=np.expand_dims(imagedump,axis=0)
    imagedump=np.expand_dims(imagedump,axis=4)

    output=model.predict(imagedump)

    loss=mean_squared_loss(imagedump,output)

    if frame.any()==None:
        print("none")

    if cv2.waitKey(10) & 0xFF==ord('q'):
        break
    if loss>0.00068:
        print('Abnormal Event Detected')
        cv2.putText(image,"Abnormal Event",(100,80),cv2.FONT_HERSHEY_SIMPLEX,2,(0,0,255),4)

    cv2.imshow("video",image)

cap.release()
cv2.destroyAllWindows()
Now, run this script and observe the results of video surveillance, it will highlight the abnormal events.
Summary:
In this deep learning project, we train an autoencoder for abnormal event detection. We train the autoencoder on normal videos. We identify the abnormal events based on the euclidean distance of the custom video feed and the frames predicted by the autoencoder.
We set a threshold value for abnormal events. In this project, it is 0.0068; you can vary this threshold to experiment getting better results.
We work very hard to provide you quality material
Could you take 15 seconds and share your happy experience on Google


Hi bro it shows an image size only one dimension
And it gives an error not enough values to unpack
And what can I do now
train_path=’./train’
fps=5
train_videos=os.listdir(‘train_path’)
what path i have to give?
can you please help with this issue
train_path=’./train’
fps=5
train_videos=os.listdir(‘train_path’)
what path i have to give training video path or testing video path ?
And i changed the dataset name train ,it have the training and testing videos ,otherwise i have to give the train folder path? pls reply me insanstly.
can you please help with this issue
Hi bro it shows an image size only one dimension
And it gives an error not enough values to unpack
And what can I do now
i am getting error that keras is not resolved in pylance