Road Lane line detection – Computer Vision Project in Python
Machine Learning courses with 100+ Real-time projects Start Now!!
Lane Line detection is a critical component for self driving cars and also for computer vision in general. This concept is used to describe the path for self-driving cars and to avoid the risk of getting in another lane.
In this article, we will build a machine learning project to detect lane lines in real-time. We will do this using the concepts of computer vision using OpenCV library. To detect the lane we have to detect the white markings on both sides on the lane.
Road Lane-Line Detection with Python & OpenCV
Using computer vision techniques in Python, we will identify road lane lines in which autonomous cars must run. This will be a critical part of autonomous cars, as the self-driving cars should not cross it’s lane and should not go in opposite lane to avoid accidents.
Frame Masking and Hough Line Transformation
To detect white markings in the lane, first, we need to mask the rest part of the frame. We do this using frame masking. The frame is nothing but a NumPy array of image pixel values. To mask the unnecessary pixel of the frame, we simply update those pixel values to 0 in the NumPy array.
After making we need to detect lane lines. The technique used to detect mathematical shapes like this is called Hough Transform. Hough transformation can detect shapes like rectangles, circles, triangles, and lines.
Code Download
Please download the source code: Lane Line Detection Project Code
Follow the below steps for lane line detection in Python:
1. Imports:
import matplotlib.pyplot as plt

import numpy as np
import cv2
import os
import matplotlib.image as mpimg
from moviepy.editor import VideoFileClip
import math
2. Apply frame masking and find region of interest:
def interested_region(img, vertices):
    if len(img.shape) > 2:
        mask_color_ignore = (255,) * img.shape[2]
    else:
        mask_color_ignore = 255

    cv2.fillPoly(np.zeros_like(img), vertices, mask_color_ignore)
    return cv2.bitwise_and(img, np.zeros_like(img))
3. Conversion of pixels to a line in Hough Transform space:
def hough_lines(img, rho, theta, threshold, min_line_len, max_line_gap):
    lines = cv2.HoughLinesP(img, rho, theta, threshold, np.array([]), minLineLength=min_line_len, maxLineGap=max_line_gap)
    line_img = np.zeros((img.shape[0], img.shape[1], 3), dtype=np.uint8)
    lines_drawn(line_img,lines)
    return line_img
4. Create two lines in each frame after Hough transform:
def lines_drawn(img, lines, color=[255, 0, 0], thickness=6):
    global cache
    global first_frame
    slope_l, slope_r = [],[]
    lane_l,lane_r = [],[]

    α =0.2
  for line in lines:
        for x1,y1,x2,y2 in line:
            slope = (y2-y1)/(x2-x1)
            if slope > 0.4:
                slope_r.append(slope)
                lane_r.append(line)
            elif slope < -0.4:
                slope_l.append(slope)
                lane_l.append(line)
        img.shape[0] = min(y1,y2,img.shape[0])
    if((len(lane_l) == 0) or (len(lane_r) == 0)):
        print ('no lane detected')
        return 1
    slope_mean_l = np.mean(slope_l,axis =0)
    slope_mean_r = np.mean(slope_r,axis =0)
    mean_l = np.mean(np.array(lane_l),axis=0)
    mean_r = np.mean(np.array(lane_r),axis=0)

    if ((slope_mean_r == 0) or (slope_mean_l == 0 )):
        print('dividing by zero')
        return 1

    x1_l = int((img.shape[0] - mean_l[0][1] - (slope_mean_l * mean_l[0][0]))/slope_mean_l)
    x2_l = int((img.shape[0] - mean_l[0][1] - (slope_mean_l * mean_l[0][0]))/slope_mean_l)
    x1_r = int((img.shape[0] - mean_r[0][1] - (slope_mean_r * mean_r[0][0]))/slope_mean_r)
    x2_r = int((img.shape[0] - mean_r[0][1] - (slope_mean_r * mean_r[0][0]))/slope_mean_r)


    if x1_l > x1_r:
        x1_l = int((x1_l+x1_r)/2)
        x1_r = x1_l
        y1_l = int((slope_mean_l * x1_l ) + mean_l[0][1] - (slope_mean_l * mean_l[0][0]))
        y1_r = int((slope_mean_r * x1_r ) + mean_r[0][1] - (slope_mean_r * mean_r[0][0]))
        y2_l = int((slope_mean_l * x2_l ) + mean_l[0][1] - (slope_mean_l * mean_l[0][0]))
        y2_r = int((slope_mean_r * x2_r ) + mean_r[0][1] - (slope_mean_r * mean_r[0][0]))
    else:
        y1_l = img.shape[0]
        y2_l = img.shape[0]
        y1_r = img.shape[0]
        y2_r = img.shape[0]

    present_frame = np.array([x1_l,y1_l,x2_l,y2_l,x1_r,y1_r,x2_r,y2_r],dtype ="float32")

    if first_frame == 1:
        next_frame = present_frame
        first_frame = 0
    else :
        prev_frame = cache
        next_frame = (1-α)*prev_frame+α*present_frame

    cv2.line(img, (int(next_frame[0]), int(next_frame[1])), (int(next_frame[2]),int(next_frame[3])), color, thickness)
    cv2.line(img, (int(next_frame[4]), int(next_frame[5])), (int(next_frame[6]),int(next_frame[7])), color, thickness)

    cache = next_frame
5. Process each frame of video to detect lane:
def weighted_img(img, initial_img, α=0.8, β=1., λ=0.):
    return cv2.addWeighted(initial_img, α, img, β, λ)


def process_image(image):

    global first_frame

    gray_image = cv2.cvtColor(image, cv2.COLOR_BGR2GRAY)
    img_hsv = cv2.cvtColor(image, cv2.COLOR_RGB2HSV)


    lower_yellow = np.array([20, 100, 100], dtype = "uint8")
    upper_yellow = np.array([30, 255, 255], dtype="uint8")

    mask_yellow = cv2.inRange(img_hsv, lower_yellow, upper_yellow)
    mask_white = cv2.inRange(gray_image, 200, 255)
    mask_yw = cv2.bitwise_or(mask_white, mask_yellow)
    mask_yw_image = cv2.bitwise_and(gray_image, mask_yw)

    gauss_gray= cv2.GaussianBlur(mask_yw_image, (5, 5), 0)

    canny_edges=cv2.Canny(gauss_gray, 50, 150)

    imshape = image.shape
    lower_left = [imshape[1]/9,imshape[0]]
    lower_right = [imshape[1]-imshape[1]/9,imshape[0]]
    top_left = [imshape[1]/2-imshape[1]/8,imshape[0]/2+imshape[0]/10]
    top_right = [imshape[1]/2+imshape[1]/8,imshape[0]/2+imshape[0]/10]
    vertices = [np.array([lower_left,top_left,top_right,lower_right],dtype=np.int32)]
    roi_image = interested_region(canny_edges, vertices)

    theta = np.pi/180

    line_image = hough_lines(roi_image, 4, theta, 30, 100, 180)
    result = weighted_img(line_image, image, α=0.8, β=1., λ=0.)
    return result
6. Clip the input video to frames and get the resultant output video file:
first_frame = 1
white_output = '__path_to_output_file__'
clip1 = VideoFileClip("__path_to_input_file__")
white_clip = clip1.fl_image(process_image)
white_clip.write_videofile(white_output, audio=False)
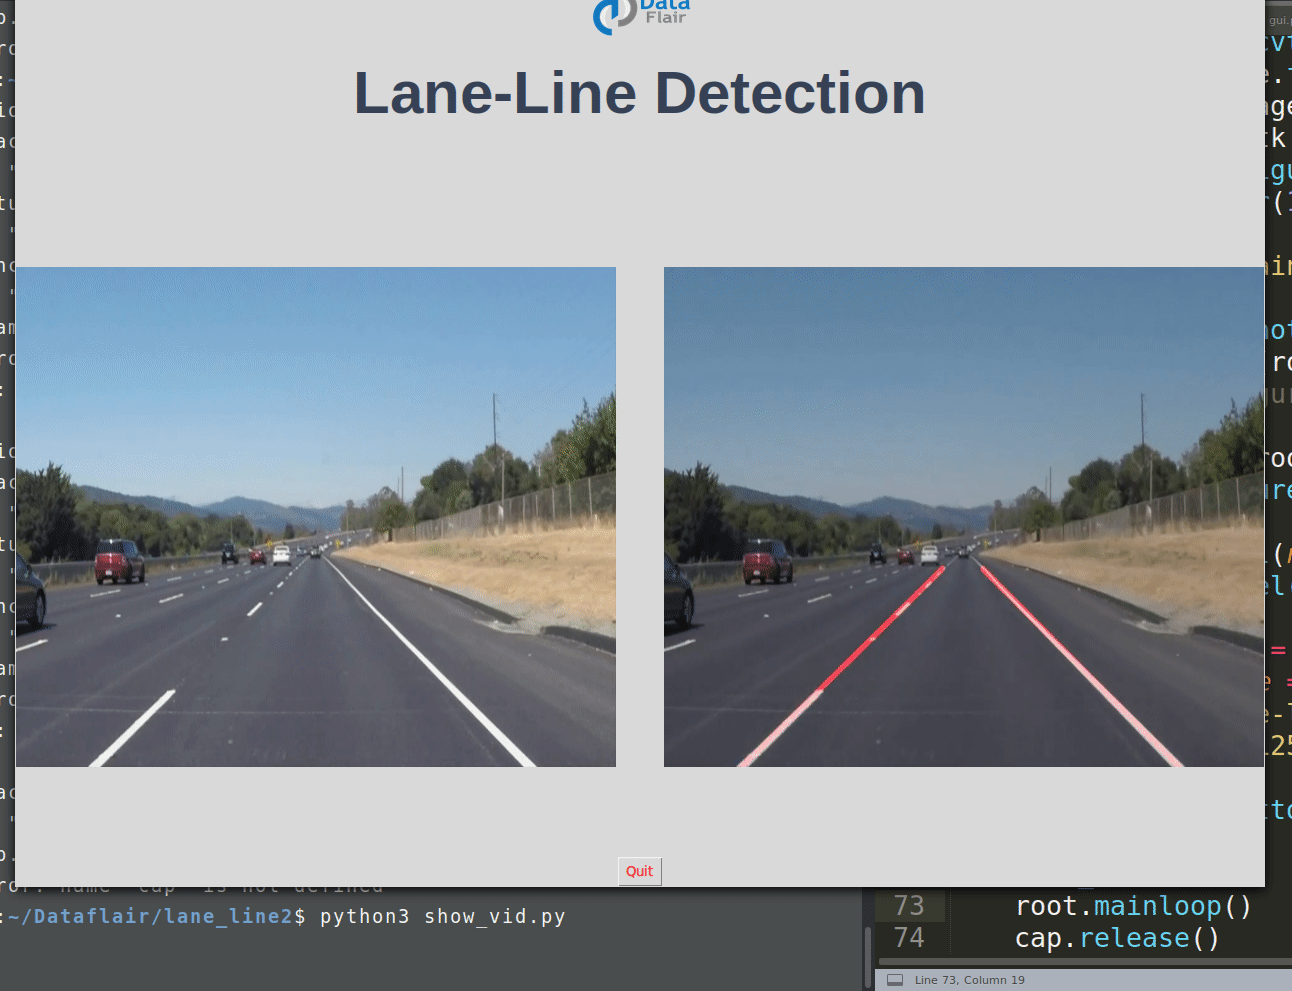
Code for Lane Line Detection Project GUI:
import tkinter as tk
from tkinter import *
import cv2
from PIL import Image, ImageTk
import os
import numpy as np
global last_frame1
last_frame1 = np.zeros((480, 640, 3), dtype=np.uint8)
global last_frame2
last_frame2 = np.zeros((480, 640, 3), dtype=np.uint8)
global cap1
global cap2
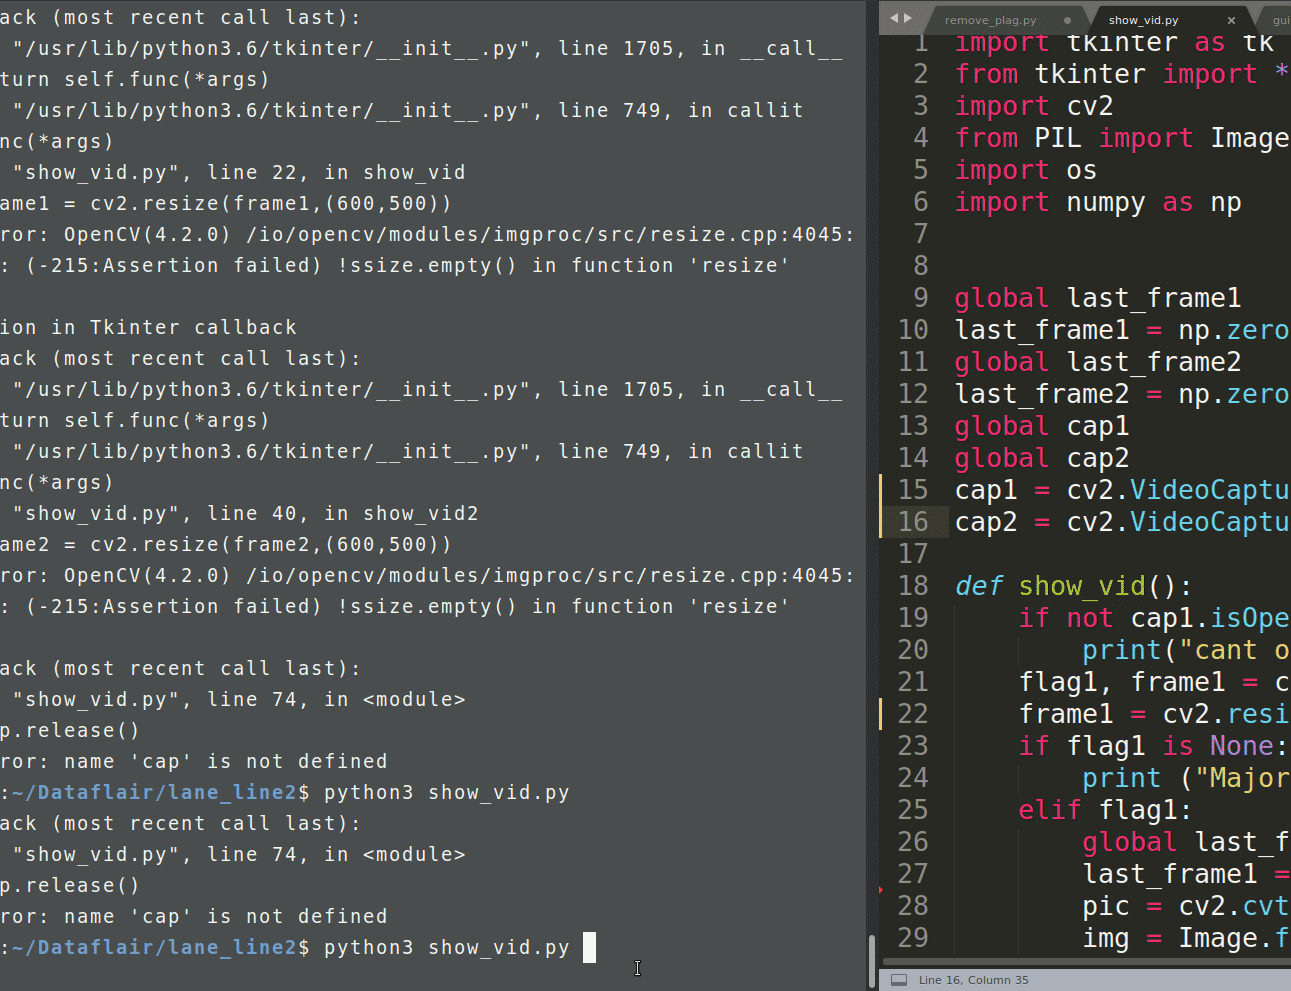
cap1 = cv2.VideoCapture("path_to_input_test_video")
cap2 = cv2.VideoCapture("path_to_resultant_lane_detected_video")
def show_vid():
if not cap1.isOpened():
print("cant open the camera1")
flag1, frame1 = cap1.read()
frame1 = cv2.resize(frame1,(400,500))
if flag1 is None:
print ("Major error!")
elif flag1:
global last_frame1
last_frame1 = frame1.copy()
pic = cv2.cvtColor(last_frame1, cv2.COLOR_BGR2RGB)
img = Image.fromarray(pic)
imgtk = ImageTk.PhotoImage(image=img)
lmain.imgtk = imgtk
lmain.configure(image=imgtk)
lmain.after(10, show_vid)
def show_vid2():
if not cap2.isOpened():
print("cant open the camera2")
flag2, frame2 = cap2.read()
frame2 = cv2.resize(frame2,(400,500))
if flag2 is None:
print ("Major error2!")
elif flag2:
global last_frame2
last_frame2 = frame2.copy()
pic2 = cv2.cvtColor(last_frame2, cv2.COLOR_BGR2RGB)
img2 = Image.fromarray(pic2)
img2tk = ImageTk.PhotoImage(image=img2)
lmain2.img2tk = img2tk
lmain2.configure(image=img2tk)
lmain2.after(10, show_vid2)
if __name__ == '__main__':
root=tk.Tk()
lmain = tk.Label(master=root)
lmain2 = tk.Label(master=root)
lmain.pack(side = LEFT)
lmain2.pack(side = RIGHT)
root.title("Lane-line detection")
root.geometry("900x700+100+10")
exitbutton = Button(root, text='Quit',fg="red",command= root.destroy).pack(side = BOTTOM,)
show_vid()
show_vid2()
root.mainloop()
cap.release()
Summary
Self-driving cars need to detect road lanes to stay in the right direction. With Python and OpenCV, we can build a project that finds lane lines in a driving video. This helps cars or bots stay in their lane by recognizing white or yellow lines on the road. The project uses basic image processing like edge detection and Hough transform.
This is an intermediate Python project in machine learning, which is helpful for the data science aspirants to master machine learning and gain expertise.
In this lane line detection project, we use OpenCV. Before detecting lane lines, we masked remaining objects and then identified the line with Hough transformation.
If you are Happy with DataFlair, do not forget to make us happy with your positive feedback on Google


gray_image = cv2.cvtColor(image, cv2.COLOmean_r[0][1] – (slope_mean_r * mean_r[0][0])BGR2GRAY)
^
SyntaxError: invalid syntax.
can you help me please..
same
gray_image = cv2.cvtColor(image, cv2.COLOmean_r[0][1] – (slope_mean_r * mean_r[0][0])BGR2GRAY),
try this please
CentOS 7.8, Python 3. We had the same error as lusifer
Could anyone solve the problem?
gray_image = cv2.cvtColor(image, cv2.COLOR_BGR2GRAY)
there is an error in step 4
for line in lines:
for x1,y1,x2,y2 in line:
slope = (y2-y1)/(x2-x1)
for line in lines: returns none hence not iterateable. anyone with a solution
position line 7 is incorrect. u can tab that line
yrs
Same problem as Ike. Can someone please share the solution?
Thanks!
Same error here as Ike.
for line in lines:
TypeError: ‘NoneType’ object is not iterable
Someone found a solution ?
THX
CAN U SHARE ME YOUR DOCUMENTATION
Hi …did you find documentation fo this project?..if yes, please help me..!
How to run it on my PC
did u found the solution
Did anyone draw uml diagrams for this project??. Please send me..!
hi have u done projet report on this?
hi do u have documentation
I want this project UML diagrams
Please send me sir..
Have you got the uml diagrams.
If then please send me sir..
I want this…lane line detection project UML diagrams… please send me sir.
lane line detection project UML diagrams…
please send me sir.
Have you got the uml diagrams.
If then please send me sir..
can anyone help me out for this project to complete
Hi , I am also doing this project. I am also going through some errors, Can you tell me which error you are getting?
Hi , I am also doing this project. I am also going through some errors, Can you tell me which error you are getting?
Do you implemented it ?
I’m inspired to do this as my final year project, but I don’t know the requirements that I would need for this project. please shortlist for me all the requirements.
Thank you!
Install the requirements first , all are mentioned there already .
i try this algoritma but i have error in moviepy.editor maybe someone can help me how to instal that
Correct code –
main.py –
import matplotlib.pyplot as plt
import numpy as np
import cv2
import os
import matplotlib.image as mpimg
from moviepy.editor import VideoFileClip
import math
def interested_region(img, vertices):
if len(img.shape) > 2:
mask_color_ignore = (255,) * img.shape[2]
else:
mask_color_ignore = 255
cv2.fillPoly(np.zeros_like(img), vertices, mask_color_ignore)
return cv2.bitwise_and(img, mask)
def lines_drawn(img, lines, color=[255, 0, 0], thickness=6):
global cache
global first_frame
slope_l, slope_r = [],[]
lane_l,lane_r = [],[]
α =0.2
for line in lines:
for x1,y1,x2,y2 in line:
slope = (y2-y1)/(x2-x1)
if slope > 0.4:
slope_r.append(slope)
lane_r.append(line)
elif slope x1_r:
x1_l = int((x1_l+x1_r)/2)
x1_r = x1_l
y1_l = int((slope_mean_l * x1_l ) + mean_l[0][1] – (slope_mean_l * mean_l[0][0]))
y1_r = int((slope_mean_r * x1_r ) + mean_r[0][1] – (slope_mean_r * mean_r[0][0]))
y2_l = int((slope_mean_l * x2_l ) + mean_l[0][1] – (slope_mean_l * mean_l[0][0]))
y2_r = int((slope_mean_r * x2_r ) + mean_r[0][1] – (slope_mean_r * mean_r[0][0]))
else:
y1_l = img.shape[0]
y2_l = img.shape[0]
y1_r = img.shape[0]
y2_r = img.shape[0]
present_frame = np.array([x1_l,y1_l,x2_l,y2_l,x1_r,y1_r,x2_r,y2_r],dtype =”float32″)
if first_frame == 1:
next_frame = present_frame
first_frame = 0
else :
prev_frame = cache
next_frame = (1-α)*prev_frame+α*present_frame
cv2.line(img, (int(next_frame[0]), int(next_frame[1])), (int(next_frame[2]),int(next_frame[3])), color, thickness)
cv2.line(img, (int(next_frame[4]), int(next_frame[5])), (int(next_frame[6]),int(next_frame[7])), color, thickness)
cache = next_frame
def hough_lines(img, rho, theta, threshold, min_line_len, max_line_gap):
lines = cv2.HoughLinesP(img, rho, theta, threshold, np.array([]), minLineLength=min_line_len, maxLineGap=max_line_gap)
line_img = np.zeros((img.shape[0], img.shape[1], 3), dtype=np.uint8)
lines_drawn(line_img,lines)
return line_img
def weighted_img(img, initial_img, α=0.8, β=1., λ=0.):
return cv2.addWeighted(initial_img, α, img, β, λ)
def process_image(image):
global first_frame
gray_image = cv2.cvtColor(image, cv2.COLOR_RGB2GRAY)
lower_yellow = np.array([20, 100, 100], dtype = “uint8″)
upper_yellow = np.array([30, 255, 255], dtype=”uint8”)
mask_yellow = cv2.inRange(img_hsv, lower_yellow, upper_yellow)
mask_white = cv2.inRange(gray_image, 200, 255)
mask_yw = cv2.bitwise_or(mask_white, mask_yellow)
mask_yw_image = cv2.bitwise_and(gray_image, mask_yw)
gauss_gray= cv2.GaussianBlur(mask_yw_image, (5, 5), 0)
canny_edges=cv2.Canny(gauss_gray, 50, 150)
imshape = image.shape
lower_left = [imshape[1]/9,imshape[0]]
lower_right = [imshape[1]-imshape[1]/9,imshape[0]]
top_left = [imshape[1]/2-imshape[1]/8,imshape[0]/2+imshape[0]/10]
top_right = [imshape[1]/2+imshape[1]/8,imshape[0]/2+imshape[0]/10]
vertices = [np.array([lower_left,top_left,top_right,lower_right],dtype=np.int32)]
roi_image = interested_region(canny_edges, vertices)
theta = np.pi/180
line_image = hough_lines(roi_image, 4, theta, 30, 100, 180)
result = weighted_img(line_image, image, α=0.8, β=1., λ=0.)
return result
gui.py –
import tkinter as tk
from tkinter import *
import cv2
from PIL import Image, ImageTk
import numpy as np
global last_frame1
last_frame1 = np.zeros((480, 640, 3), dtype=np.uint8)
global last_frame2
last_frame2 = np.zeros((480, 640, 3), dtype=np.uint8)
cap1 = cv2.VideoCapture(“./input2.mp4”)
cap2 = cv2.VideoCapture(“./output2.mp4”)
def show_vid():
if not cap1.isOpened():
print(“Can’t open the camera1”)
return
flag1, frame1 = cap1.read()
frame1 = cv2.resize(frame1, (600, 500))
if flag1:
global last_frame1
last_frame1 = frame1.copy()
pic = cv2.cvtColor(last_frame1, cv2.COLOR_BGR2RGB)
img = Image.fromarray(pic)
imgtk = ImageTk.PhotoImage(image=img)
lmain.imgtk = imgtk
lmain.configure(image=imgtk)
lmain.after(10, show_vid)
def show_vid2():
if not cap2.isOpened():
print(“Can’t open the camera2″)
return
flag2, frame2 = cap2.read()
frame2 = cv2.resize(frame2, (600, 500))
if flag2:
global last_frame2
last_frame2 = frame2.copy()
pic2 = cv2.cvtColor(last_frame2, cv2.COLOR_BGR2RGB)
img2 = Image.fromarray(pic2)
img2tk = ImageTk.PhotoImage(image=img2)
lmain2.img2tk = img2tk
lmain2.configure(image=img2tk)
lmain2.after(10, show_vid2)
if __name__ == ‘__main__’:
root = tk.Tk()
img = ImageTk.PhotoImage(Image.open(r”C:\Users\hp\Downloads\logo.png”))
heading = Label(root, image=img, text=”Lane-Line Detection”)
heading.pack()
heading2 = Label(root, text=”Lane-Line Detection”, pady=20, font=(‘arial’, 45, ‘bold’))
heading2.configure(foreground=’#364156′)
heading2.pack()
lmain = tk.Label(master=root)
lmain2 = tk.Label(master=root)
lmain.pack(side=LEFT)
lmain2.pack(side=RIGHT)
root.title(“Lane-line detection”)
root.geometry(“1250×900+100+10″)
exitbutton = Button(root, text=’Quit’, fg=”red”, command=root.destroy)
exitbutton.pack(side=BOTTOM)
show_vid()
show_vid2()
root.mainloop()
cap1.release()
cap2.release()
Note : Change the files path location as per your configuration.
To run the files ->
1. Go to the File location
2. Open it in command prompt or anaconda prompt
3. Install the Required libraries (pip install library name)
4. To run the file (python main.py) or (python gui.py)
This should display 2 images without lane and with lane detection in parallel.
Hope this will work as per your configuration.
Happy Learning!