Python Chatbot Project – Learn to build your first chatbot using NLTK & Keras
Free Machine Learning courses with 130+ real-time projects Start Now!!
Hey Siri, What’s the meaning of Life?
As per all the evidence, it’s chocolate for you.
Soon as I heard this reply from Siri, I knew I found a perfect partner to savour my hours of solitude. From stupid questions to some pretty serious advice, Siri has been always there for me.
How amazing it is to tell someone everything and anything and not being judged at all. A top class feeling it is and that’s what the beauty of a chatbot is.
This is the 9th project in the 20 Python projects series by DataFlair and make sure to bookmark other interesting projects:
- Fake News Detection Python Project
- Parkinson’s Disease Detection Python Project
- Color Detection Python Project
- Speech Emotion Recognition Python Project
- Breast Cancer Classification Python Project
- Age and Gender Detection Python Project
- Handwritten Digit Recognition Python Project
- Chatbot Python Project
- Driver Drowsiness Detection Python Project
- Traffic Signs Recognition Python Project
- Image Caption Generator Python Project
What is Chatbot?
A chatbot is an intelligent piece of software that is capable of communicating and performing actions similar to a human. Chatbots are used a lot in customer interaction, marketing on social network sites and instantly messaging the client. There are two basic types of chatbot models based on how they are built; Retrieval based and Generative based models.
1. Retrieval based Chatbots
A retrieval-based chatbot uses predefined input patterns and responses. It then uses some type of heuristic approach to select the appropriate response. It is widely used in the industry to make goal-oriented chatbots where we can customize the tone and flow of the chatbot to drive our customers with the best experience.
2. Generative based Chatbots
Generative models are not based on some predefined responses.
They are based on seq 2 seq neural networks. It is the same idea as machine translation. In machine translation, we translate the source code from one language to another language but here, we are going to transform input into an output. It needs a large amount of data and it is based on Deep Neural networks.
About the Python Project – Chatbot
In this Python project with source code, we are going to build a chatbot using deep learning techniques. The chatbot will be trained on the dataset which contains categories (intents), pattern and responses. We use a special recurrent neural network (LSTM) to classify which category the user’s message belongs to and then we will give a random response from the list of responses.
Let’s create a retrieval based chatbot using NLTK, Keras, Python, etc.
Download Chatbot Code & Dataset
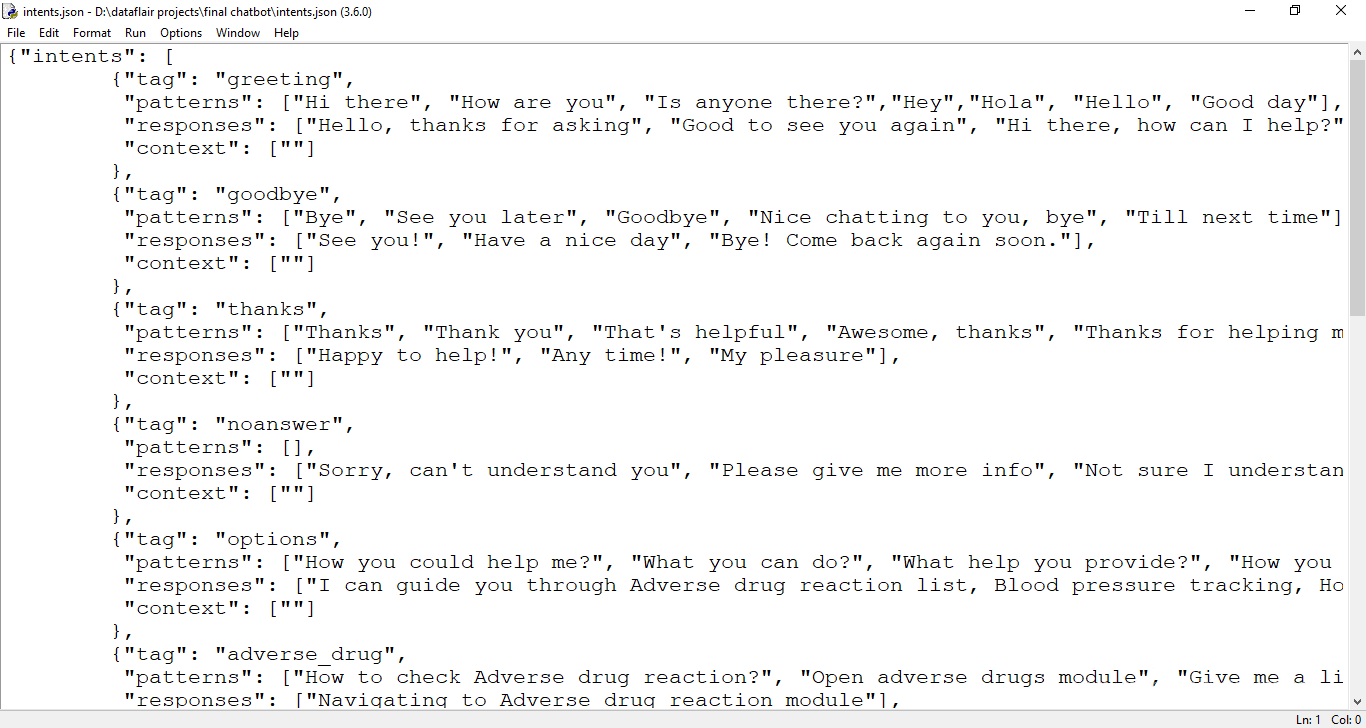
The dataset we will be using is ‘intents.json’. This is a JSON file that contains the patterns we need to find and the responses we want to return to the user.
Please download python chatbot code & dataset from the following link: Python Chatbot Code & Dataset
Prerequisites
The project requires you to have good knowledge of Python, Keras, and Natural language processing (NLTK). Along with them, we will use some helping modules which you can download using the python-pip command.
pip install tensorflow, keras, pickle, nltk
How to Make Chatbot in Python?
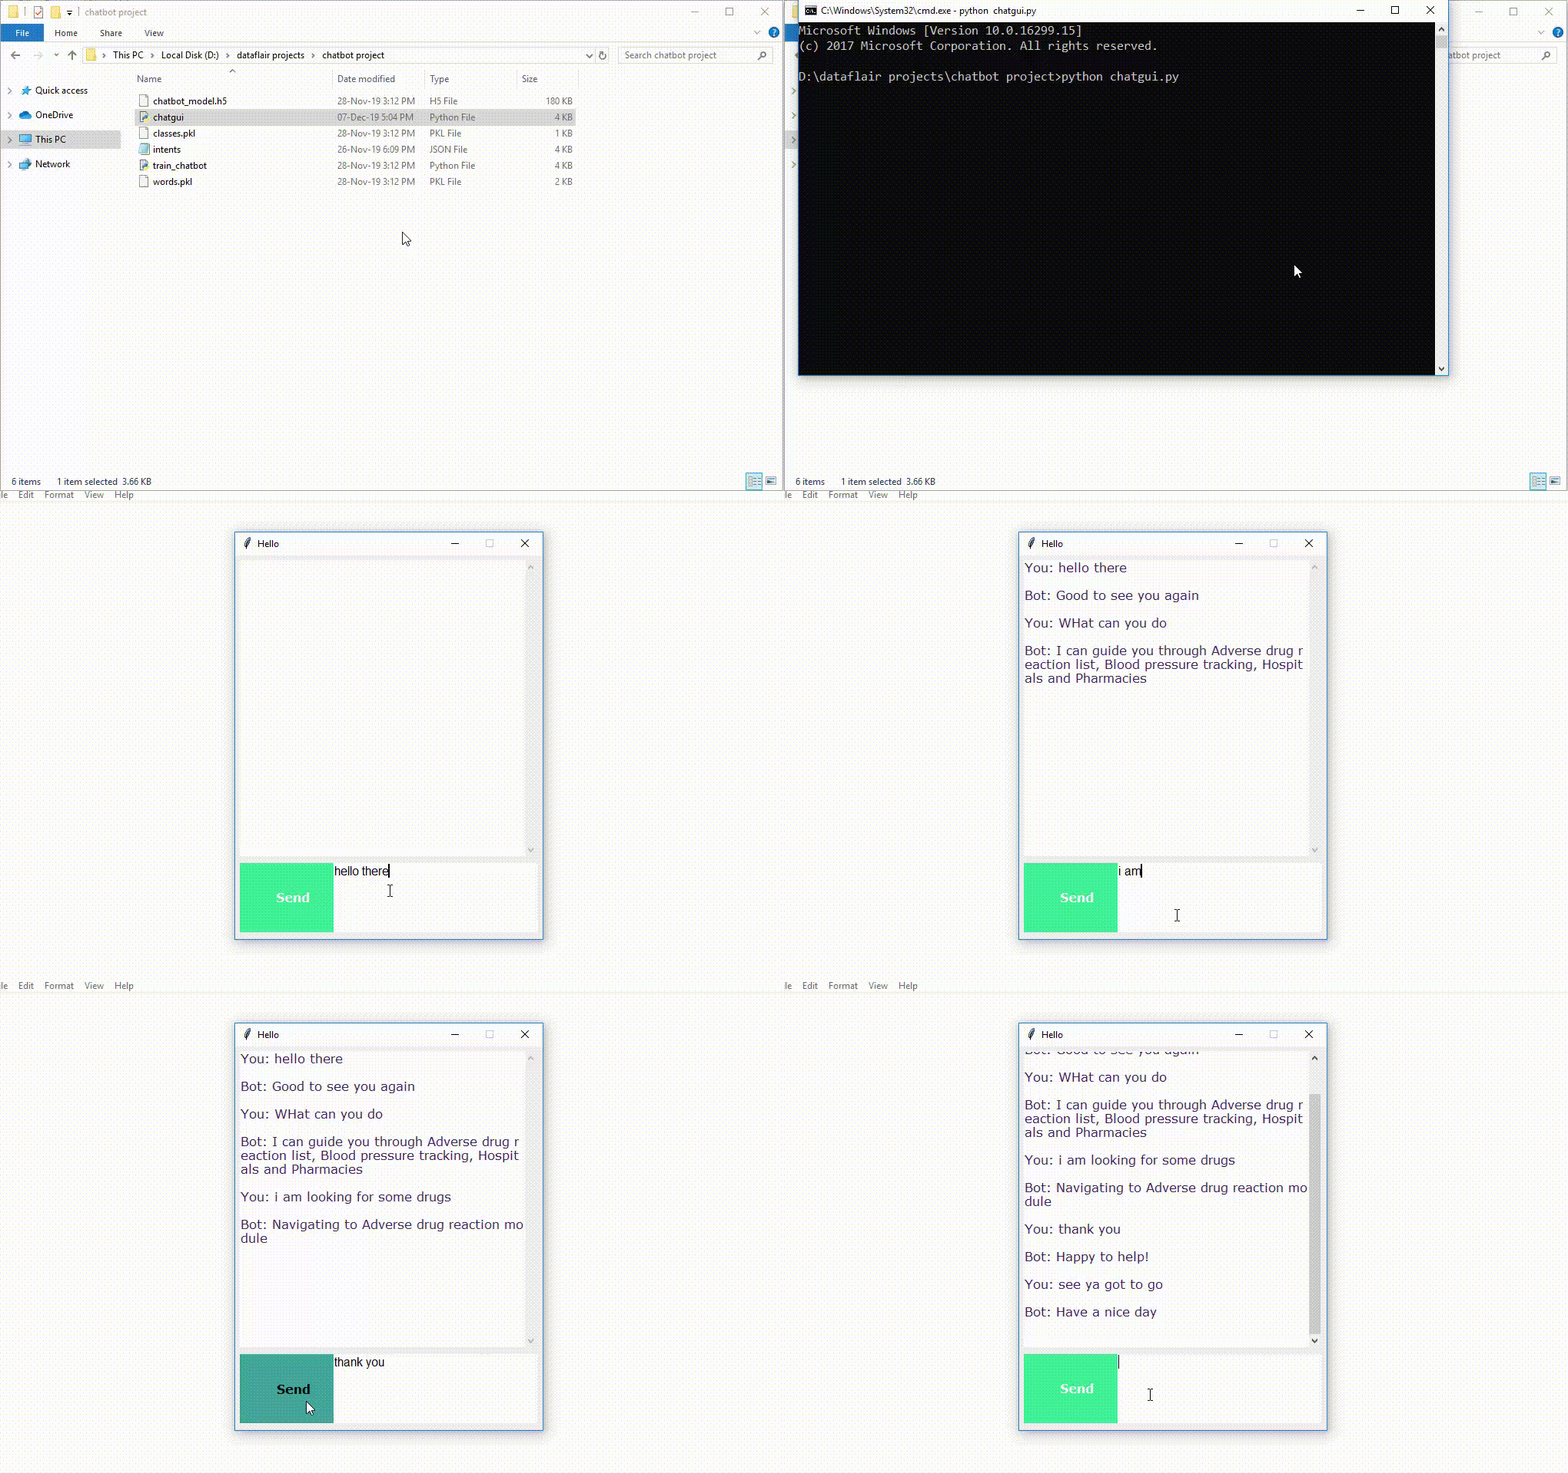
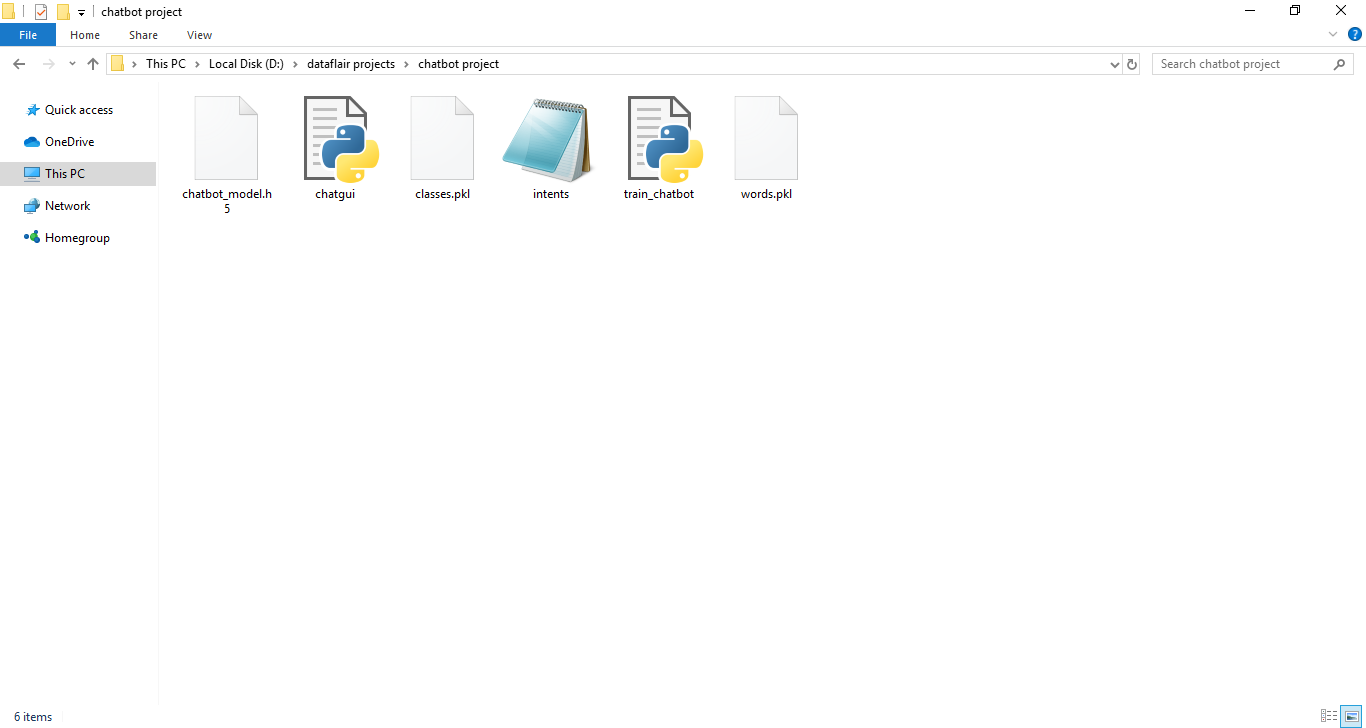
Now we are going to build the chatbot using Python but first, let us see the file structure and the type of files we will be creating:
- Intents.json – The data file which has predefined patterns and responses.
- train_chatbot.py – In this Python file, we wrote a script to build the model and train our chatbot.
- Words.pkl – This is a pickle file in which we store the words Python object that contains a list of our vocabulary.
- Classes.pkl – The classes pickle file contains the list of categories.
- Chatbot_model.h5 – This is the trained model that contains information about the model and has weights of the neurons.
- Chatgui.py – This is the Python script in which we implemented GUI for our chatbot. Users can easily interact with the bot.
Here are the 5 steps to create a chatbot in Python from scratch:
- Import and load the data file
- Preprocess data
- Create training and testing data
- Build the model
- Predict the response
1. Import and load the data file
First, make a file name as train_chatbot.py. We import the necessary packages for our chatbot and initialize the variables we will use in our Python project.
The data file is in JSON format so we used the json package to parse the JSON file into Python.
import nltk
from nltk.stem import WordNetLemmatizer
lemmatizer = WordNetLemmatizer()
import json
import pickle

import numpy as np
from keras.models import Sequential
from keras.layers import Dense, Activation, Dropout
from keras.optimizers import SGD
import random

words=[]
classes = []
documents = []
ignore_words = ['?', '!']
data_file = open('intents.json').read()
intents = json.loads(data_file)
This is how our intents.json file looks like.
2. Preprocess data
When working with text data, we need to perform various preprocessing on the data before we make a machine learning or a deep learning model. Based on the requirements we need to apply various operations to preprocess the data.
Tokenizing is the most basic and first thing you can do on text data. Tokenizing is the process of breaking the whole text into small parts like words.
Here we iterate through the patterns and tokenize the sentence using nltk.word_tokenize() function and append each word in the words list. We also create a list of classes for our tags.
for intent in intents['intents']:
    for pattern in intent['patterns']:

        #tokenize each word
        w = nltk.word_tokenize(pattern)
        words.extend(w)
        #add documents in the corpus
        documents.append((w, intent['tag']))

        # add to our classes list
        if intent['tag'] not in classes:
            classes.append(intent['tag'])
Now we will lemmatize each word and remove duplicate words from the list. Lemmatizing is the process of converting a word into its lemma form and then creating a pickle file to store the Python objects which we will use while predicting.
# lemmatize, lower each word and remove duplicates
words = [lemmatizer.lemmatize(w.lower()) for w in words if w not in ignore_words]
words = sorted(list(set(words)))
# sort classes
classes = sorted(list(set(classes)))
# documents = combination between patterns and intents
print (len(documents), "documents")
# classes = intents
print (len(classes), "classes", classes)
# words = all words, vocabulary
print (len(words), "unique lemmatized words", words)

pickle.dump(words,open('words.pkl','wb'))
pickle.dump(classes,open('classes.pkl','wb'))
3. Create training and testing data
Now, we will create the training data in which we will provide the input and the output. Our input will be the pattern and output will be the class our input pattern belongs to. But the computer doesn’t understand text so we will convert text into numbers.
# create our training data
training = []
# create an empty array for our output
output_empty = [0] * len(classes)
# training set, bag of words for each sentence
for doc in documents:
    # initialize our bag of words
    bag = []
    # list of tokenized words for the pattern
    pattern_words = doc[0]
    # lemmatize each word - create base word, in attempt to represent related words
    pattern_words = [lemmatizer.lemmatize(word.lower()) for word in pattern_words]
    # create our bag of words array with 1, if word match found in current pattern
    for w in words:
        bag.append(1) if w in pattern_words else bag.append(0)

    # output is a '0' for each tag and '1' for current tag (for each pattern)
    output_row = list(output_empty)
    output_row[classes.index(doc[1])] = 1

    training.append([bag, output_row])
# shuffle our features and turn into np.array
random.shuffle(training)
training = np.array(training)
# create train and test lists. X - patterns, Y - intents
train_x = list(training[:,0])
train_y = list(training[:,1])
print("Training data created")
4. Build the model
We have our training data ready, now we will build a deep neural network that has 3 layers. We use the Keras sequential API for this. After training the model for 200 epochs, we achieved 100% accuracy on our model. Let us save the model as ‘chatbot_model.h5’.
# Create model - 3 layers. First layer 128 neurons, second layer 64 neurons and 3rd output layer contains number of neurons
# equal to number of intents to predict output intent with softmax
model = Sequential()
model.add(Dense(128, input_shape=(len(train_x[0]),), activation='relu'))
model.add(Dropout(0.5))
model.add(Dense(64, activation='relu'))
model.add(Dropout(0.5))
model.add(Dense(len(train_y[0]), activation='softmax'))

# Compile model. Stochastic gradient descent with Nesterov accelerated gradient gives good results for this model
sgd = SGD(lr=0.01, decay=1e-6, momentum=0.9, nesterov=True)
model.compile(loss='categorical_crossentropy', optimizer=sgd, metrics=['accuracy'])

#fitting and saving the model
hist = model.fit(np.array(train_x), np.array(train_y), epochs=200, batch_size=5, verbose=1)
model.save('chatbot_model.h5', hist)

print("model created")
5. Predict the response (Graphical User Interface)
To predict the sentences and get a response from the user to let us create a new file ‘chatapp.py’.
We will load the trained model and then use a graphical user interface that will predict the response from the bot. The model will only tell us the class it belongs to, so we will implement some functions which will identify the class and then retrieve us a random response from the list of responses.
Again we import the necessary packages and load the ‘words.pkl’ and ‘classes.pkl’ pickle files which we have created when we trained our model:
import nltk
from nltk.stem import WordNetLemmatizer
lemmatizer = WordNetLemmatizer()
import pickle
import numpy as np

from keras.models import load_model
model = load_model('chatbot_model.h5')
import json
import random
intents = json.loads(open('intents.json').read())
words = pickle.load(open('words.pkl','rb'))
classes = pickle.load(open('classes.pkl','rb'))
To predict the class, we will need to provide input in the same way as we did while training. So we will create some functions that will perform text preprocessing and then predict the class.
def clean_up_sentence(sentence):
    # tokenize the pattern - split words into array
    sentence_words = nltk.word_tokenize(sentence)
    # stem each word - create short form for word
    sentence_words = [lemmatizer.lemmatize(word.lower()) for word in sentence_words]
    return sentence_words
# return bag of words array: 0 or 1 for each word in the bag that exists in the sentence

def bow(sentence, words, show_details=True):
    # tokenize the pattern
    sentence_words = clean_up_sentence(sentence)
    # bag of words - matrix of N words, vocabulary matrix
    bag = [0]*len(words)
    for s in sentence_words:
        for i,w in enumerate(words):
            if w == s:
                # assign 1 if current word is in the vocabulary position
                bag[i] = 1
                if show_details:
                    print ("found in bag: %s" % w)
    return(np.array(bag))

def predict_class(sentence, model):
    # filter out predictions below a threshold
    p = bow(sentence, words,show_details=False)
    res = model.predict(np.array([p]))[0]
    ERROR_THRESHOLD = 0.25
    results = [[i,r] for i,r in enumerate(res) if r>ERROR_THRESHOLD]
    # sort by strength of probability
    results.sort(key=lambda x: x[1], reverse=True)
    return_list = []
    for r in results:
        return_list.append({"intent": classes[r[0]], "probability": str(r[1])})
    return return_list
After predicting the class, we will get a random response from the list of intents.
def getResponse(ints, intents_json):
    tag = ints[0]['intent']
    list_of_intents = intents_json['intents']
    for i in list_of_intents:
        if(i['tag']== tag):
            result = random.choice(i['responses'])
            break
    return result

def chatbot_response(text):
    ints = predict_class(text, model)
    res = getResponse(ints, intents)
    return res
Now we will develop a graphical user interface. Let’s use Tkinter library which is shipped with tons of useful libraries for GUI. We will take the input message from the user and then use the helper functions we have created to get the response from the bot and display it on the GUI. Here is the full source code for the GUI.
#Creating GUI with tkinter
import tkinter
from tkinter import *


def send():
    msg = EntryBox.get("1.0",'end-1c').strip()
    EntryBox.delete("0.0",END)

    if msg != '':
        ChatLog.config(state=NORMAL)
        ChatLog.insert(END, "You: " + msg + '\n\n')
        ChatLog.config(foreground="#442265", font=("Verdana", 12 ))

        res = chatbot_response(msg)
        ChatLog.insert(END, "Bot: " + res + '\n\n')

        ChatLog.config(state=DISABLED)
        ChatLog.yview(END)

base = Tk()
base.title("Hello")
base.geometry("400x500")
base.resizable(width=FALSE, height=FALSE)

#Create Chat window
ChatLog = Text(base, bd=0, bg="white", height="8", width="50", font="Arial",)

ChatLog.config(state=DISABLED)

#Bind scrollbar to Chat window
scrollbar = Scrollbar(base, command=ChatLog.yview, cursor="heart")
ChatLog['yscrollcommand'] = scrollbar.set

#Create Button to send message
SendButton = Button(base, font=("Verdana",12,'bold'), text="Send", width="12", height=5,
                    bd=0, bg="#32de97", activebackground="#3c9d9b",fg='#ffffff',
                    command= send )

#Create the box to enter message
EntryBox = Text(base, bd=0, bg="white",width="29", height="5", font="Arial")
#EntryBox.bind("<Return>", send)


#Place all components on the screen
scrollbar.place(x=376,y=6, height=386)
ChatLog.place(x=6,y=6, height=386, width=370)
EntryBox.place(x=128, y=401, height=90, width=265)
SendButton.place(x=6, y=401, height=90)

base.mainloop()
6. Run the chatbot
To run the chatbot, we have two main files; train_chatbot.py and chatapp.py.
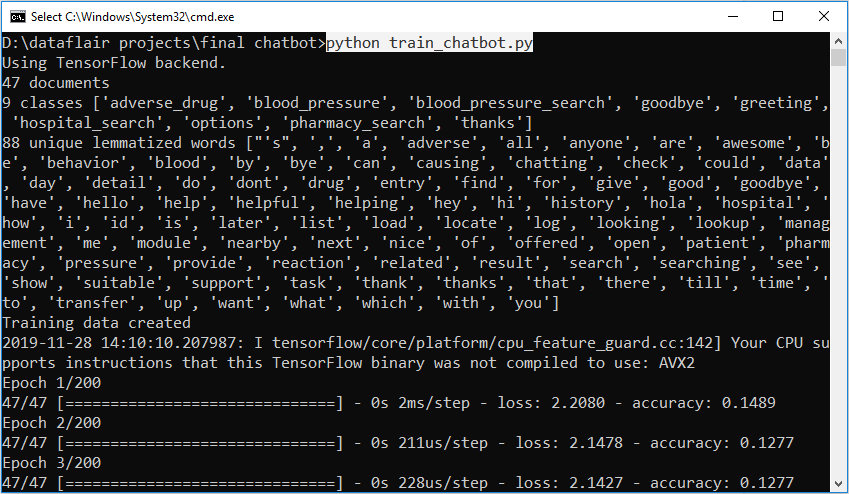
First, we train the model using the command in the terminal:
python train_chatbot.py
If we don’t see any error during training, we have successfully created the model. Then to run the app, we run the second file.
python chatgui.py
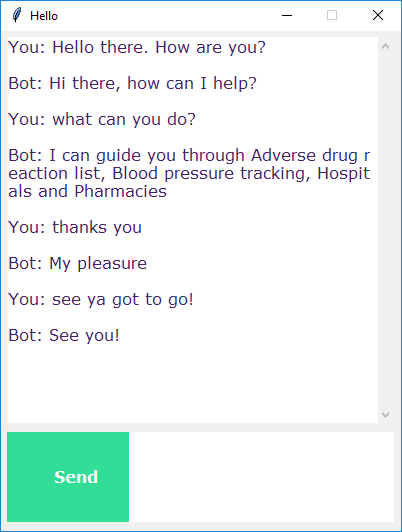
The program will open up a GUI window within a few seconds. With the GUI you can easily chat with the bot.
Screenshots:
Summary
In this Python data science project, we understood about chatbots and implemented a deep learning version of a chatbot in Python which is accurate. You can customize the data according to business requirements and train the chatbot with great accuracy. Chatbots are used everywhere and all businesses are looking forward to implementing bot in their workflow.
I hope you will practice by customizing your own chatbot using Python and don’t forget to show us your work. And, if you found the article useful, do share the project with your friends and colleagues.
Did you know we work 24x7 to provide you best tutorials
Please encourage us - write a review on Google


Error #1: NameError: name ‘msg’ is not defined
Error #2: NameError: name ‘ChatLog’ is not defined
Hi Abhi,
For the error you mentioned, just use the document having the code in the zip file. Even I faced the same issue which got resolved by using that code.
Regards,
Harika
can u tel me where exactly that zip file present
The chatbot code files are available in the article, please find the same in following section: “Download Chatbot Code & Dataset”
hai harika garu,
where is the zip file code?? please tell me where it is i can’t find where it is??
The code zip files are available in “Download Chatbot Code & Dataset” section
We have updated the code in the article
Thank you for amazing code it is work for me and able to run the code and separate chat bot opened.
Thank you
Hi Abhi,
For the error you mentioned, just use the document having the code in the zip file. Even I faced the same issue which got resolved by using that code.
Regards,
Harika
What is the Python Compiler you are using?
Can you mention it…..
Hi Kaushik,
For this Python project, we are using Python 3.6 on windows. We edited the files in Python idle and compiled the file from the command line.
i am getting ModuleNotFoundError: No module named ‘_pywrap_tensorflow’
Hi Ram,
The tensorflow library is not installed properly, if you have a GPU then you also need to install the cuDNN library from the Nvidia official website.
thanks for the nice blog. very good one. I suggest instad of using json, use database table. each time a question is asked, reply should come from the table. This makes more interestng
Thks All the best
TypeError: Unexpected keyword argument passed to optimizer: learning_rate
hi, can you give solution for above error
thanks
Hi Mohammad,
There is a simple fix for this. The keras library has different versions. Mostly the 2.2.* versions used lr in the optimizers but from 2.3.* version the keras started using learning_rate instead.
So you can see what version you have and when you are building the model
sgd = SGD(lr=0.01, decay=1e-6, momentum=0.9, nesterov=True)
In this line, change the lr to learning_rate.
Also, upgrade your TensorFlow and Keras version if they are not.
I want to modify the patterns and responses but the output is not coming after changing the content. How to modify them?
Please post the stacktrace & intent.json file.
I am not able to run the code even in the Python 3.8 .I am getting an error.
Traceback (most recent call last):
File “C:/Users/admin/Desktop/Step-1.py”, line 6, in
import numpy as np
ModuleNotFoundError: No module named ‘numpy’
=================== RESTART: C:/Users/admin/Desktop/Step-2.py ==================
Traceback (most recent call last):
File “C:/Users/admin/Desktop/Step-2.py”, line 1, in
for intent in intents[‘intents’]:
NameError: name ‘intents’ is not defined
Help me with it.It is My Project.
Resource punkt not found.
Please use the NLTK Downloader to obtain the resource:
>>> import nltk
>>> nltk.download(‘punkt’)
I too have the same problem do you got the solution
import tkinter
from tkinter import *
def send():
msg = EntryBox.get(“1.0”,’end-1c’).strip()
EntryBox.delete(“0.0″,END)
if msg != ”:
ChatLog.config(state=NORMAL)
ChatLog.insert(END, “You: ” + msg + ‘\n\n’)
ChatLog.config(foreground=”#442265″, font=(“Verdana”, 12 ))
res = chatbot_response(msg)
ChatLog.insert(END, “Bot: ” + res + ‘\n\n’)
ChatLog.config(state=DISABLED)
ChatLog.yview(END)
base = Tk()
base.title(“Hello”)
base.geometry(“400×500″)
base.resizable(width=FALSE, height=FALSE)
#Create Chat window
ChatLog = Text(base, bd=0, bg=”white”, height=”8″, width=”50″, font=”Arial”,)
ChatLog.config(state=DISABLED)
#Bind scrollbar to Chat window
scrollbar = Scrollbar(base, command=ChatLog.yview, cursor=”heart”)
ChatLog[‘yscrollcommand’] = scrollbar.set
#Create Button to send message
SendButton = Button(base, font=(“Verdana”,12,’bold’), text=”Send”, width=”12″, height=5,
bd=0, bg=”#32de97″, activebackground=”#3c9d9b”,fg=’#ffffff’,
command= send )
#Create the box to enter message
EntryBox = Text(base, bd=0, bg=”white”,width=”29″, height=”5″, font=”Arial”)
#EntryBox.bind(“”, send)
#Place all components on the screen
scrollbar.place(x=376,y=6, height=386)
ChatLog.place(x=6,y=6, height=386, width=370)
EntryBox.place(x=128, y=401, height=90, width=265)
SendButton.place(x=6, y=401, height=90)
base.mainloop()
Exception in Tkinter callback
Traceback (most recent call last):
File “C:\Users\Robinhood\Anaconda3\lib\tkinter\__init__.py”, line 1702, in __call__
return self.func(*args)
File “”, line 14, in send
res = chatbot_response(msg)
File “”, line 11, in chatbot_response
ints=predict_class(text, model)
File “”, line 27, in predict_class
p=bow(sentence, words,show_details=False)
File “”, line 12, in bow
sentence_words=clean_up_sentence(sentence)
File “”, line 5, in clean_up_sentence
sentence_words=[lemmatizer.lemmatize(word.lower() for word in sentence_words)]
File “C:\Users\Robinhood\Anaconda3\lib\site-packages\nltk\stem\wordnet.py”, line 40, in lemmatize
lemmas = wordnet._morphy(word, pos)
File “C:\Users\Robinhood\Anaconda3\lib\site-packages\nltk\corpus\reader\wordnet.py”, line 1844, in _morphy
forms = apply_rules([form])
File “C:\Users\Robinhood\Anaconda3\lib\site-packages\nltk\corpus\reader\wordnet.py”, line 1823, in apply_rules
for form in forms
File “C:\Users\Robinhood\Anaconda3\lib\site-packages\nltk\corpus\reader\wordnet.py”, line 1825, in
if form.endswith(old)]
AttributeError: ‘generator’ object has no attribute ‘endswith’
I am getting this error and chatbot is getting displayed but when I am talking it is not replying.Can someone please help me.
Hi Shobhit,
The error is causing because you forgot a closing bracket in the clean_up_sentence() function.
check the brackets again, it should be something like this.
sentence_words = [lemmatizer.lemmatize(word.lower()) for word in sentence_words]
Thank it worked for me.But now when I am saying Hello.
It is directly asking me please provide hospital name and location.
Hi Shobhit,
What was the accuracy of the model when you trained? You can try modifying the intents file but make sure the json format is maintained. Then retrain the model and see the results.
Traceback (most recent call last):
File “C:\python-project-chatbot-codes\chatgui.py”, line 1, in
import nltk
File “C:\ProgramData\Anaconda3\lib\site-packages\nltk\__init__.py”, line 150, in
from nltk.translate import *
File “C:\ProgramData\Anaconda3\lib\site-packages\nltk\translate\__init__.py”, line 23, in
from nltk.translate.meteor_score import meteor_score as meteor
File “C:\ProgramData\Anaconda3\lib\site-packages\nltk\translate\meteor_score.py”, line 10, in
from nltk.stem.porter import PorterStemmer
File “C:\ProgramData\Anaconda3\lib\site-packages\nltk\stem\__init__.py”, line 29, in
from nltk.stem.snowball import SnowballStemmer
File “C:\ProgramData\Anaconda3\lib\site-packages\nltk\stem\snowball.py”, line 32, in
from nltk.corpus import stopwords
File “C:\ProgramData\Anaconda3\lib\site-packages\nltk\corpus\__init__.py”, line 66, in
from nltk.corpus.reader import *
File “C:\ProgramData\Anaconda3\lib\site-packages\nltk\corpus\reader\__init__.py”, line 105, in
from nltk.corpus.reader.panlex_lite import *
File “C:\ProgramData\Anaconda3\lib\site-packages\nltk\corpus\reader\panlex_lite.py”, line 15, in
import sqlite3
File “C:\ProgramData\Anaconda3\lib\sqlite3\__init__.py”, line 23, in
from sqlite3.dbapi2 import *
File “C:\ProgramData\Anaconda3\lib\sqlite3\dbapi2.py”, line 27, in
from _sqlite3 import *
ImportError: DLL load failed: The specified module could not be found.
pls help me iam getting this error
Hello M Lowkya,
Install the necessary packages. Use pip install nltk to install the natural language toolkit package.
I hope this will help you!!
It is a good python project, thanks for sharing
chatbot always replying only the last response from .json file… please help asap
Hello Sid,
DataFlair’s team is here for your help.
If you observe the code then you will see that we are randomly choosing the response from the list. So you can increase the number of responses and train your model again. It is highly likely that you haven’t tested the application multiple times.
tried this… added many responses to a particular tag then to it always gives response that is added last in the intent file. also i have tried to change the epoch to 1000, but then to no improvement. ur help will be appreciated a lot. thanks
have you solved this problem?
We have updated the code, please download the code from code download section of article
I want add new intent but it not work. Is important to add in classes.pkl or words.pkl?
You can definitely modify the intent file. Just make sure it follows the json pattern.
After modifying the intent file you have to train your model again so that it will rewrite the classes and words pickle file.
Hi thanks for sharing this great project, anyway i wouldn’t able to run the project. Error:
run command: python chatgui.py
error:
Traceback (most recent call last):
File “chatgui.py”, line 1, in
import nltk
ImportError: No module named nltk
It seems nltk is not installed, please install nltk with the following command:
pip install nltk
I forgot i use python3, and the module installed under python3 version. But when i run:
python3 train_chatbot.py
The result:
Using TensorFlow backend.
[libprotobuf ERROR google/protobuf/descriptor_database.cc:394] Invalid file descriptor data passed to EncodedDescriptorDatabase::Add().
[libprotobuf FATAL google/protobuf/descriptor.cc:1356] CHECK failed: GeneratedDatabase()->Add(encoded_file_descriptor, size):
libc++abi.dylib: terminating with uncaught exception of type google::protobuf::FatalException: CHECK failed: GeneratedDatabase()->Add(encoded_file_descriptor, size):
[1] 62639 abort python3 train_chatbot.py
Please help, thanks.
It’s the issue due to incompatible versions of the libraries, please mention which version of python and other libraries you are using?
Hi, nice blog.
Why when i write something that isn’t exists in the intents, the response is like if the tag is greeting?
It depends upon the max probability matching, so for better results try to create a data intent of different tags and train them.
Hi…
how i open the chatbot_model.h5 file
Thank you…
res = chatbot_response(msg)
NameError: name ‘chatbot_response’ is not defined
Hello .This is very nice project i embedded all the files eg train_chatbot.py but one error occured
Using TensorFlow backend.
Traceback (most recent call last):
File “C:/Users/Dell/PycharmProjects/fypchatbot/chatgui.py”, line 7, in
from keras.models import load_model
File “C:\Users\Dell\AppData\Local\Programs\Python\Python38-32\lib\site-packages\keras\__init__.py”, line 3, in
from . import utils
File “C:\Users\Dell\AppData\Local\Programs\Python\Python38-32\lib\site-packages\keras\utils\__init__.py”, line 6, in
from . import conv_utils
File “C:\Users\Dell\AppData\Local\Programs\Python\Python38-32\lib\site-packages\keras\utils\conv_utils.py”, line 9, in
from .. import backend as K
File “C:\Users\Dell\AppData\Local\Programs\Python\Python38-32\lib\site-packages\keras\backend\__init__.py”, line 1, in
from .load_backend import epsilon
File “C:\Users\Dell\AppData\Local\Programs\Python\Python38-32\lib\site-packages\keras\backend\load_backend.py”, line 90, in
from .tensorflow_backend import *
File “C:\Users\Dell\AppData\Local\Programs\Python\Python38-32\lib\site-packages\keras\backend\tensorflow_backend.py”, line 5, in
import tensorflow as tf
ModuleNotFoundError: No module named ‘tensorflow’
Please help me
Thank You….
It seems TensorFlow is not installed on your machine.
Please check if the TensorFlow is installed properly, check the same with conda list; in case if the issue persists please let me know which versions of libraries you are using
Hi, I encountered the same problem as mentioned before. The moment I modify the .json-file (adding new tags with corresponding responses, …), always the same response was given (whatever is say to the bot). The given respons is always the last one in the .json-file. I re-ran the model and accuracy is 100%. Can you tell me how to solve this issue?
Hello! First of all, really nice project. I could perfectly run it and it works nice. But the moment I do any adaptation to the json-file (adding or deleting tags), the last element in the json-file is always the answer of the chatbot. I re-ran the model multiple times but nothing worked… Can you help me please?
We have updated the code, please download chatbot code from the downloads section. Please let me know in case of any other issues.
Hi, could you please share the code for the generative based chatbot and the process through which the dataset as JSON file is created.
The json dataset is created manually, based on requirements you can create your own dataset
How can I perform mathematical task with bot?
when i am double clicking train_chatbot.py the the GUI box is opening for 2 seconds and closing on its own. what should i do then
There is no GUI code present in train_chatbot.py. The GUI part is present in chatgui python file. Please follow the instructions mentioned in the article.
ValueError: Error when checking input: expected dense_6_input to have shape (88,) but got array with shape (1,)
Please can you show us how to deploy it using flask?
You got how to deploy this project?
First of all, the code present here is a GUI application that can only get executed on a Desktop like Windows, Mac, or Linux.
If you want to test and deploy chat application as a web app then you need HTML, CSS for frontend, ie an interactive page; after that, the chat application which is developed using python will work as API while it gets deployed using Flask. Also, use of Socket programming will get involved.
HI I am getting the below error could you please help me out
Exception in Tkinter callback
Traceback (most recent call last):
File “C:\Users\kumar.vibhav\AppData\Local\Continuum\anaconda3\lib\tkinter\__init__.py”, line 1705, in __call__
return self.func(*args)
File “”, line 15, in send
res = chatbot_response(msg)
File “”, line 2, in chatbot_response
ints = predict_class(text, model)
File “”, line 4, in predict_class
res=model.predict(np.array([p]))[0]
File “C:\Users\kumar.vibhav\AppData\Local\Continuum\anaconda3\lib\site-packages\keras\engine\training.py”, line 1149, in predict
x, _, _ = self._standardize_user_data(x)
File “C:\Users\kumar.vibhav\AppData\Local\Continuum\anaconda3\lib\site-packages\keras\engine\training.py”, line 751, in _standardize_user_data
exception_prefix=’input’)
File “C:\Users\kumar.vibhav\AppData\Local\Continuum\anaconda3\lib\site-packages\keras\engine\training_utils.py”, line 138, in standardize_input_data
str(data_shape))
ValueError: Error when checking input: expected dense_1_input to have shape (88,) but got array with shape (1,)
Try reshaping the array with array.reshape(-1, 1), then try out the code. Let me know if still any issue.