Python based Project – Learn to Build Image Caption Generator with CNN & LSTM
Master Python with 70+ Hands-on Projects and Get Job-ready - Learn Python
Project based on Python – Image Caption Generator
You saw an image and your brain can easily tell what the image is about, but can a computer tell what the image is representing? Computer vision researchers worked on this a lot and they considered it impossible until now! With the advancement in Deep learning techniques, availability of huge datasets and computer power, we can build models that can generate captions for an image.
This is what we are going to implement in this Python based project where we will use deep learning techniques of Convolutional Neural Networks and a type of Recurrent Neural Network (LSTM) together.
Below are some of the Python Data Science projects on which you can work later on:
- Fake News Detection Python Project
- Parkinson’s Disease Detection Python Project
- Color Detection Python Project
- Speech Emotion Recognition Python Project
- Breast Cancer Classification Python Project
- Age and Gender Detection Python Project
- Handwritten Digit Recognition Python Project
- Chatbot Python Project
- Driver Drowsiness Detection Python Project
- Traffic Signs Recognition Python Project
- Image Caption Generator Python Project
Now, let’s quickly start the Python based project by defining the image caption generator.
What is Image Caption Generator?
Image caption generator is a task that involves computer vision and natural language processing concepts to recognize the context of an image and describe them in a natural language like English.
Image Caption Generator with CNN – About the Python based Project
The objective of our project is to learn the concepts of a CNN and LSTM model and build a working model of Image caption generator by implementing CNN with LSTM.
In this Python project, we will be implementing the caption generator using CNN (Convolutional Neural Networks) and LSTM (Long short term memory). The image features will be extracted from Xception which is a CNN model trained on the imagenet dataset and then we feed the features into the LSTM model which will be responsible for generating the image captions.
The Dataset of Python based Project
For the image caption generator, we will be using the Flickr_8K dataset. There are also other big datasets like Flickr_30K and MSCOCO dataset but it can take weeks just to train the network so we will be using a small Flickr8k dataset. The advantage of a huge dataset is that we can build better models.
Thanks to Jason Brownlee for providing a direct link to download the dataset (Size: 1GB).
The Flickr_8k_text folder contains file Flickr8k.token which is the main file of our dataset that contains image name and their respective captions separated by newline(“\n”).
Pre-requisites
This project requires good knowledge of Deep learning, Python, working on Jupyter notebooks, Keras library, Numpy, and Natural language processing.
Make sure you have installed all the following necessary libraries:
- pip install tensorflow
- keras
- pillow
- numpy
- tqdm
- jupyterlab
Image Caption Generator – Python based Project
What is CNN?
Convolutional Neural networks are specialized deep neural networks which can process the data that has input shape like a 2D matrix. Images are easily represented as a 2D matrix and CNN is very useful in working with images.
CNN is basically used for image classifications and identifying if an image is a bird, a plane or Superman, etc.

It scans images from left to right and top to bottom to pull out important features from the image and combines the feature to classify images. It can handle the images that have been translated, rotated, scaled and changes in perspective.
Practise the important Python topics
Check out the 240+ Python Tutorials
What is LSTM?
LSTM stands for Long short term memory, they are a type of RNN (recurrent neural network) which is well suited for sequence prediction problems. Based on the previous text, we can predict what the next word will be. It has proven itself effective from the traditional RNN by overcoming the limitations of RNN which had short term memory. LSTM can carry out relevant information throughout the processing of inputs and with a forget gate, it discards non-relevant information.
This is what an LSTM cell looks like –
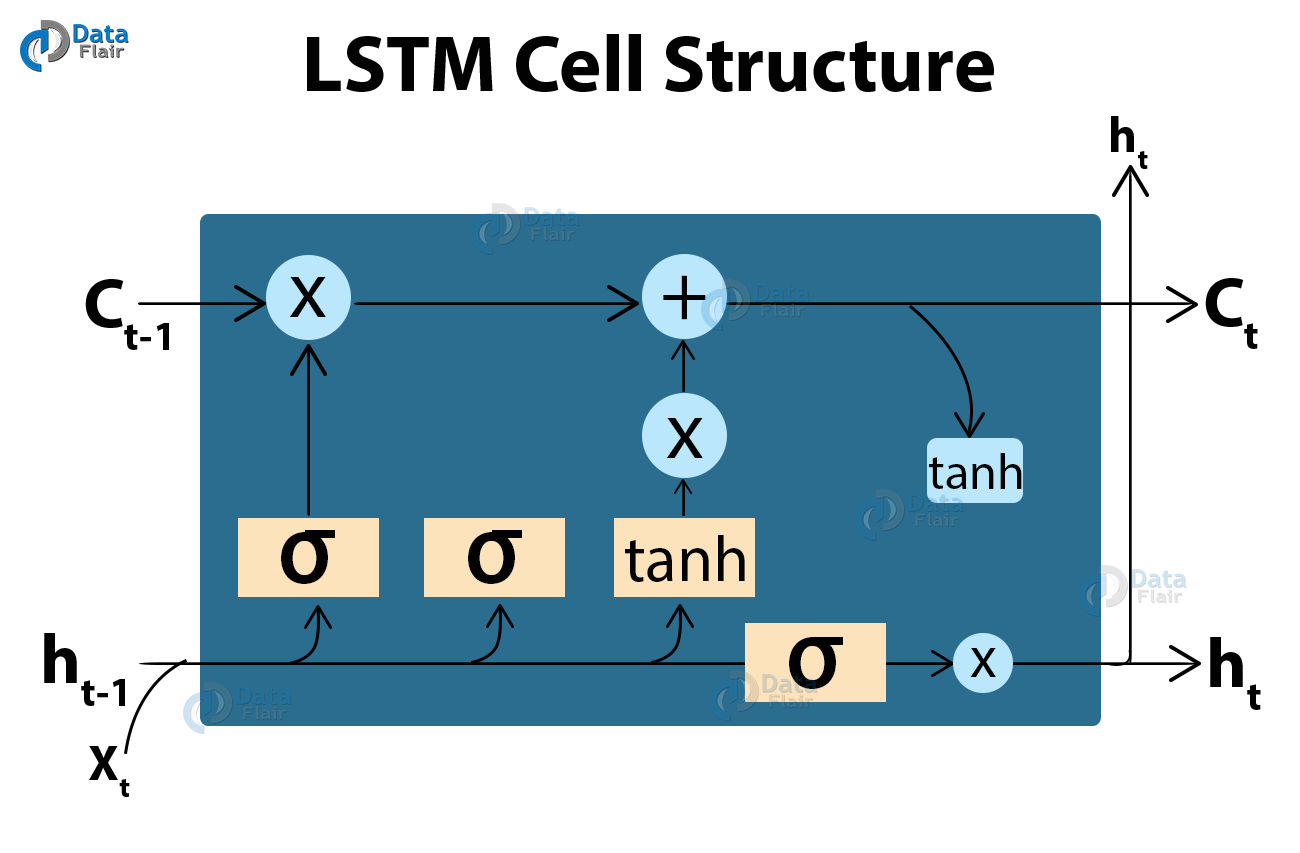
Image Caption Generator Model
So, to make our image caption generator model, we will be merging these architectures. It is also called a CNN-RNN model.
- CNN is used for extracting features from the image. We will use the pre-trained model Xception.
- LSTM will use the information from CNN to help generate a description of the image.

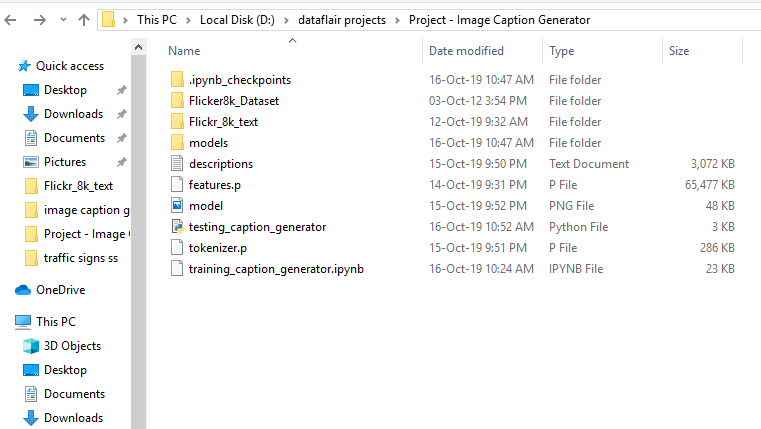
Project File Structure
Downloaded from dataset:
- Flicker8k_Dataset – Dataset folder which contains 8091 images.
- Flickr_8k_text – Dataset folder which contains text files and captions of images.
The below files will be created by us while making the project.
- Models – It will contain our trained models.
- Descriptions.txt – This text file contains all image names and their captions after preprocessing.
- Features.p – Pickle object that contains an image and their feature vector extracted from the Xception pre-trained CNN model.
- Tokenizer.p – Contains tokens mapped with an index value.
- Model.png – Visual representation of dimensions of our project.
- Testing_caption_generator.py – Python file for generating a caption of any image.
- Training_caption_generator.ipynb – Jupyter notebook in which we train and build our image caption generator.
You can download all the files from the link:
Image Caption Generator – Python Project Files
Want to become a Python expert?
Enroll for the Certified Python Training Course
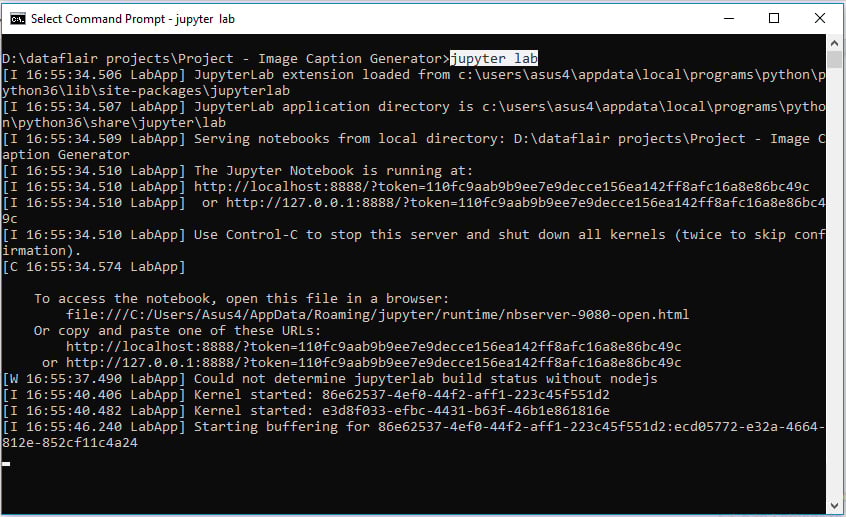
Building the Python based Project
Let’s start by initializing the jupyter notebook server by typing jupyter lab in the console of your project folder. It will open up the interactive Python notebook where you can run your code. Create a Python3 notebook and name it training_caption_generator.ipynb
1. First, we import all the necessary packages
import string
import numpy as np
from PIL import Image
import os
from pickle import dump, load
import numpy as np

from keras.applications.xception import Xception, preprocess_input
from keras.preprocessing.image import load_img, img_to_array
from keras.preprocessing.text import Tokenizer
from keras.preprocessing.sequence import pad_sequences
from keras.utils import to_categorical
from keras.layers.merge import add
from keras.models import Model, load_model
from keras.layers import Input, Dense, LSTM, Embedding, Dropout

# small library for seeing the progress of loops.
from tqdm import tqdm_notebook as tqdm
tqdm().pandas()
2. Getting and performing data cleaning
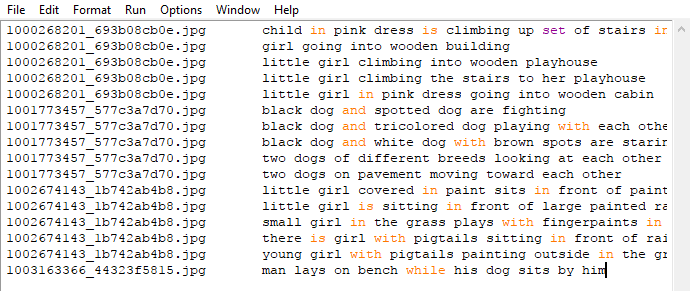
The main text file which contains all image captions is Flickr8k.token in our Flickr_8k_text folder.
Have a look at the file –
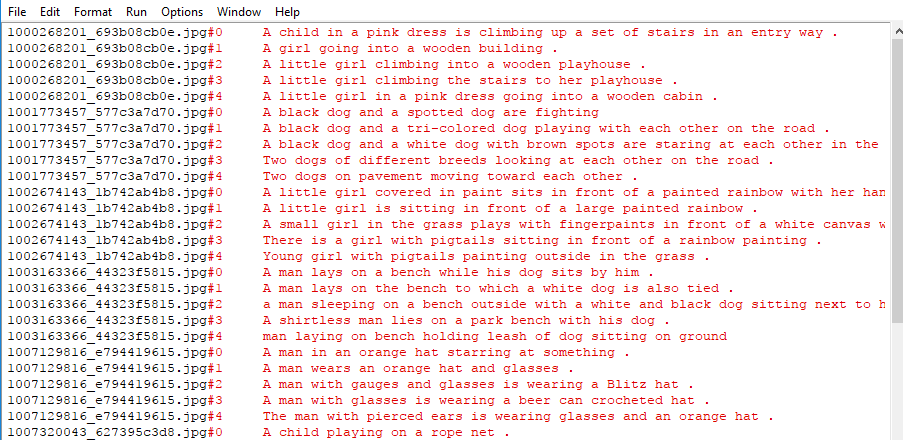
The format of our file is image and caption separated by a new line (“\n”).
Each image has 5 captions and we can see that #(0 to 5)number is assigned for each caption.
We will define 5 functions:
- load_doc( filename ) – For loading the document file and reading the contents inside the file into a string.
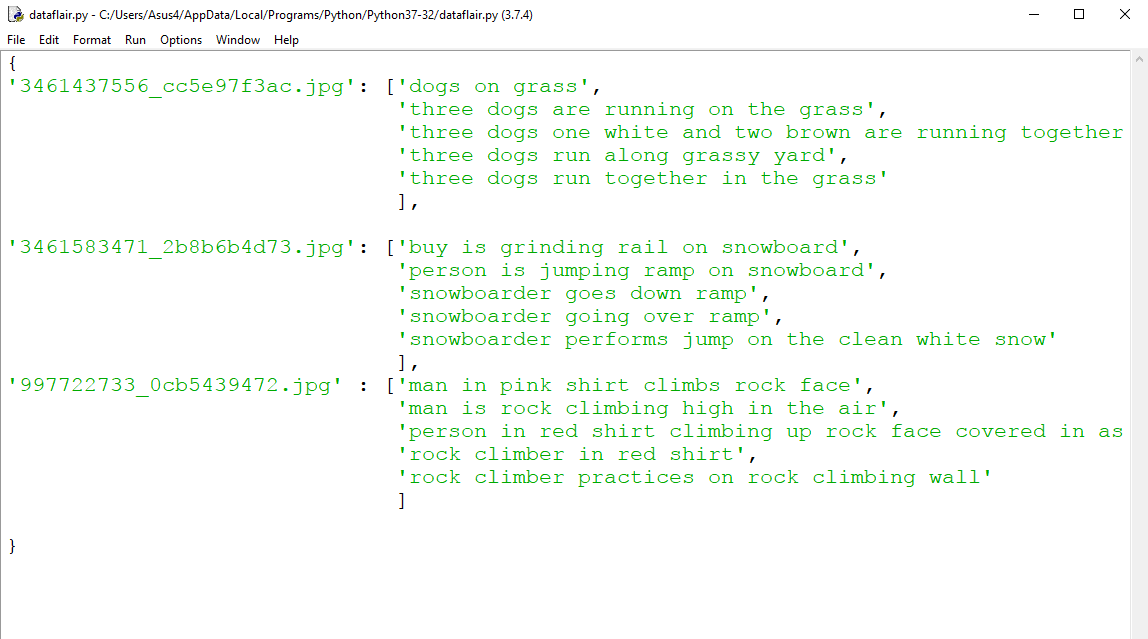
- all_img_captions( filename ) – This function will create a descriptions dictionary that maps images with a list of 5 captions. The descriptions dictionary will look something like this:
- cleaning_text( descriptions) – This function takes all descriptions and performs data cleaning. This is an important step when we work with textual data, according to our goal, we decide what type of cleaning we want to perform on the text. In our case, we will be removing punctuations, converting all text to lowercase and removing words that contain numbers.
So, a caption like “A man riding on a three-wheeled wheelchair” will be transformed into “man riding on three wheeled wheelchair” - text_vocabulary( descriptions ) – This is a simple function that will separate all the unique words and create the vocabulary from all the descriptions.
- save_descriptions( descriptions, filename ) – This function will create a list of all the descriptions that have been preprocessed and store them into a file. We will create a descriptions.txt file to store all the captions. It will look something like this:
Code :
# Loading a text file into memory
def load_doc(filename):
    # Opening the file as read only
    file = open(filename, 'r')
    text = file.read()
    file.close()
    return text

# get all imgs with their captions
def all_img_captions(filename):
    file = load_doc(filename)
    captions = file.split('\n')
    descriptions ={}
    for caption in captions[:-1]:
        img, caption = caption.split('\t')
        if img[:-2] not in descriptions:
            descriptions[img[:-2]] = [ caption ]
        else:
            descriptions[img[:-2]].append(caption)
    return descriptions

#Data cleaning- lower casing, removing puntuations and words containing numbers
def cleaning_text(captions):
    table = str.maketrans('','',string.punctuation)
    for img,caps in captions.items():
        for i,img_caption in enumerate(caps):

            img_caption.replace("-"," ")
            desc = img_caption.split()

            #converts to lowercase
            desc = [word.lower() for word in desc]
            #remove punctuation from each token
            desc = [word.translate(table) for word in desc]
            #remove hanging 's and a
            desc = [word for word in desc if(len(word)>1)]
            #remove tokens with numbers in them
            desc = [word for word in desc if(word.isalpha())]
            #convert back to string

            img_caption = ' '.join(desc)
            captions[img][i]= img_caption
    return captions

def text_vocabulary(descriptions):
    # build vocabulary of all unique words
    vocab = set()

    for key in descriptions.keys():
        [vocab.update(d.split()) for d in descriptions[key]]

    return vocab

#All descriptions in one file
def save_descriptions(descriptions, filename):
    lines = list()
    for key, desc_list in descriptions.items():
        for desc in desc_list:
            lines.append(key + '\t' + desc )
    data = "\n".join(lines)
    file = open(filename,"w")
    file.write(data)
    file.close()


# Set these path according to project folder in you system
dataset_text = "D:\dataflair projects\Project - Image Caption Generator\Flickr_8k_text"
dataset_images = "D:\dataflair projects\Project - Image Caption Generator\Flicker8k_Dataset"

#we prepare our text data
filename = dataset_text + "/" + "Flickr8k.token.txt"
#loading the file that contains all data
#mapping them into descriptions dictionary img to 5 captions
descriptions = all_img_captions(filename)
print("Length of descriptions =" ,len(descriptions))

#cleaning the descriptions
clean_descriptions = cleaning_text(descriptions)

#building vocabulary
vocabulary = text_vocabulary(clean_descriptions)
print("Length of vocabulary = ", len(vocabulary))

#saving each description to file
save_descriptions(clean_descriptions, "descriptions.txt")
3. Extracting the feature vector from all images
This technique is also called transfer learning, we don’t have to do everything on our own, we use the pre-trained model that have been already trained on large datasets and extract the features from these models and use them for our tasks. We are using the Xception model which has been trained on imagenet dataset that had 1000 different classes to classify. We can directly import this model from the keras.applications . Make sure you are connected to the internet as the weights get automatically downloaded. Since the Xception model was originally built for imagenet, we will do little changes for integrating with our model. One thing to notice is that the Xception model takes 299*299*3 image size as input. We will remove the last classification layer and get the 2048 feature vector.
model = Xception( include_top=False, pooling=’avg’ )
The function extract_features() will extract features for all images and we will map image names with their respective feature array. Then we will dump the features dictionary into a “features.p” pickle file.
Code:
def extract_features(directory):
        model = Xception( include_top=False, pooling='avg' )
        features = {}
        for img in tqdm(os.listdir(directory)):
            filename = directory + "/" + img
            image = Image.open(filename)
            image = image.resize((299,299))
            image = np.expand_dims(image, axis=0)
            #image = preprocess_input(image)
            image = image/127.5
            image = image - 1.0

            feature = model.predict(image)
            features[img] = feature
        return features

#2048 feature vector
features = extract_features(dataset_images)
dump(features, open("features.p","wb"))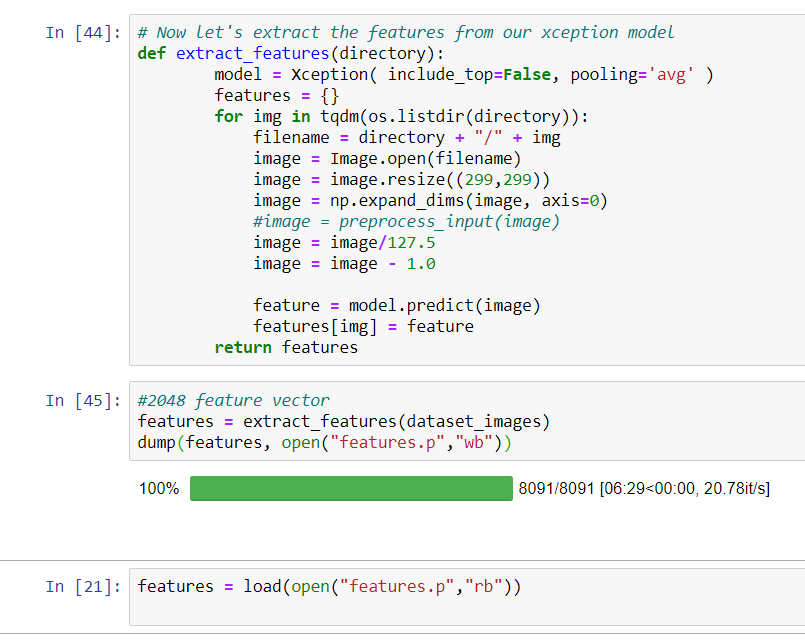
This process can take a lot of time depending on your system. I am using an Nvidia 1050 GPU for training purpose so it took me around 7 minutes for performing this task. However, if you are using CPU then this process might take 1-2 hours. You can comment out the code and directly load the features from our pickle file.
features = load(open("features.p","rb"))4. Loading dataset for Training the model
In our Flickr_8k_test folder, we have Flickr_8k.trainImages.txt file that contains a list of 6000 image names that we will use for training.
For loading the training dataset, we need more functions:
- load_photos( filename ) – This will load the text file in a string and will return the list of image names.
- load_clean_descriptions( filename, photos ) – This function will create a dictionary that contains captions for each photo from the list of photos. We also append the <start> and <end> identifier for each caption. We need this so that our LSTM model can identify the starting and ending of the caption.
- load_features(photos) – This function will give us the dictionary for image names and their feature vector which we have previously extracted from the Xception model.
Code :
#load the data
def load_photos(filename):
    file = load_doc(filename)
    photos = file.split("\n")[:-1]
    return photos


def load_clean_descriptions(filename, photos):
    #loading clean_descriptions
    file = load_doc(filename)
    descriptions = {}
    for line in file.split("\n"):

        words = line.split()
        if len(words)<1 :
            continue

        image, image_caption = words[0], words[1:]

        if image in photos:
            if image not in descriptions:
                descriptions[image] = []
            desc = '<start> ' + " ".join(image_caption) + ' <end>'
            descriptions[image].append(desc)

    return descriptions


def load_features(photos):
    #loading all features
    all_features = load(open("features.p","rb"))
    #selecting only needed features
    features = {k:all_features[k] for k in photos}
    return features


filename = dataset_text + "/" + "Flickr_8k.trainImages.txt"

#train = loading_data(filename)
train_imgs = load_photos(filename)
train_descriptions = load_clean_descriptions("descriptions.txt", train_imgs)
train_features = load_features(train_imgs)
5. Tokenizing the vocabulary
Computers don’t understand English words, for computers, we will have to represent them with numbers. So, we will map each word of the vocabulary with a unique index value. Keras library provides us with the tokenizer function that we will use to create tokens from our vocabulary and save them to a “tokenizer.p” pickle file.
Code:
#converting dictionary to clean list of descriptions
def dict_to_list(descriptions):
    all_desc = []
    for key in descriptions.keys():
        [all_desc.append(d) for d in descriptions[key]]
    return all_desc

#creating tokenizer class
#this will vectorise text corpus
#each integer will represent token in dictionary

from keras.preprocessing.text import Tokenizer

def create_tokenizer(descriptions):
    desc_list = dict_to_list(descriptions)
    tokenizer = Tokenizer()
    tokenizer.fit_on_texts(desc_list)
    return tokenizer

# give each word an index, and store that into tokenizer.p pickle file
tokenizer = create_tokenizer(train_descriptions)
dump(tokenizer, open('tokenizer.p', 'wb'))
vocab_size = len(tokenizer.word_index) + 1
vocab_size
Our vocabulary contains 7577 words.
We calculate the maximum length of the descriptions. This is important for deciding the model structure parameters. Max_length of description is 32.
#calculate maximum length of descriptions
def max_length(descriptions):
    desc_list = dict_to_list(descriptions)
    return max(len(d.split()) for d in desc_list)

max_length = max_length(descriptions)
max_length
6. Create Data generator
Let us first see how the input and output of our model will look like. To make this task into a supervised learning task, we have to provide input and output to the model for training. We have to train our model on 6000 images and each image will contain 2048 length feature vector and caption is also represented as numbers. This amount of data for 6000 images is not possible to hold into memory so we will be using a generator method that will yield batches.
The generator will yield the input and output sequence.
For example:
The input to our model is [x1, x2] and the output will be y, where x1 is the 2048 feature vector of that image, x2 is the input text sequence and y is the output text sequence that the model has to predict.
| x1(feature vector) | x2(Text sequence) | y(word to predict) |
| feature | start, | two |
| feature | start, two | dogs |
| feature | start, two, dogs | drink |
| feature | start, two, dogs, drink | water |
| feature | start, two, dogs, drink, water | end |
#create input-output sequence pairs from the image description.

#data generator, used by model.fit_generator()
def data_generator(descriptions, features, tokenizer, max_length):
    while 1:
        for key, description_list in descriptions.items():
            #retrieve photo features
            feature = features[key][0]
            input_image, input_sequence, output_word = create_sequences(tokenizer, max_length, description_list, feature)
            yield [[input_image, input_sequence], output_word]

def create_sequences(tokenizer, max_length, desc_list, feature):
    X1, X2, y = list(), list(), list()
    # walk through each description for the image
    for desc in desc_list:
        # encode the sequence
        seq = tokenizer.texts_to_sequences([desc])[0]
        # split one sequence into multiple X,y pairs
        for i in range(1, len(seq)):
            # split into input and output pair
            in_seq, out_seq = seq[:i], seq[i]
            # pad input sequence
            in_seq = pad_sequences([in_seq], maxlen=max_length)[0]
            # encode output sequence
            out_seq = to_categorical([out_seq], num_classes=vocab_size)[0]
            # store
            X1.append(feature)
            X2.append(in_seq)
            y.append(out_seq)
    return np.array(X1), np.array(X2), np.array(y)

#You can check the shape of the input and output for your model
[a,b],c = next(data_generator(train_descriptions, features, tokenizer, max_length))
a.shape, b.shape, c.shape
#((47, 2048), (47, 32), (47, 7577))
7. Defining the CNN-RNN model
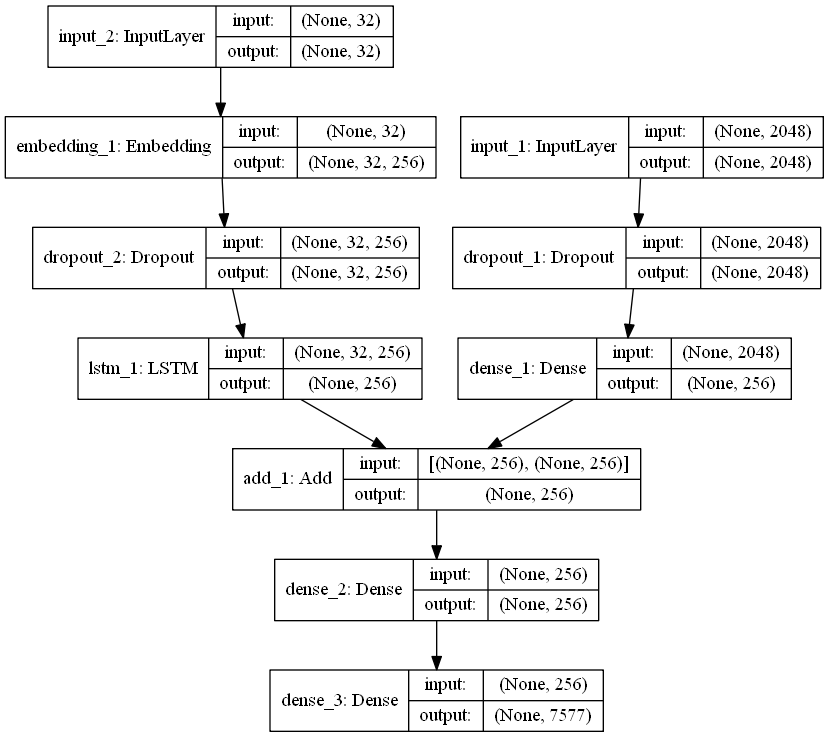
To define the structure of the model, we will be using the Keras Model from Functional API. It will consist of three major parts:
- Feature Extractor – The feature extracted from the image has a size of 2048, with a dense layer, we will reduce the dimensions to 256 nodes.
- Sequence Processor – An embedding layer will handle the textual input, followed by the LSTM layer.
- Decoder – By merging the output from the above two layers, we will process by the dense layer to make the final prediction. The final layer will contain the number of nodes equal to our vocabulary size.
Visual representation of the final model is given below –
from keras.utils import plot_model

# define the captioning model
def define_model(vocab_size, max_length):

    # features from the CNN model squeezed from 2048 to 256 nodes
    inputs1 = Input(shape=(2048,))
    fe1 = Dropout(0.5)(inputs1)
    fe2 = Dense(256, activation='relu')(fe1)

    # LSTM sequence model
    inputs2 = Input(shape=(max_length,))
    se1 = Embedding(vocab_size, 256, mask_zero=True)(inputs2)
    se2 = Dropout(0.5)(se1)
    se3 = LSTM(256)(se2)

    # Merging both models
    decoder1 = add([fe2, se3])
    decoder2 = Dense(256, activation='relu')(decoder1)
    outputs = Dense(vocab_size, activation='softmax')(decoder2)

    # tie it together [image, seq] [word]
    model = Model(inputs=[inputs1, inputs2], outputs=outputs)
    model.compile(loss='categorical_crossentropy', optimizer='adam')

    # summarize model
    print(model.summary())
    plot_model(model, to_file='model.png', show_shapes=True)

    return model
8. Training the model
To train the model, we will be using the 6000 training images by generating the input and output sequences in batches and fitting them to the model using model.fit_generator() method. We also save the model to our models folder. This will take some time depending on your system capability.
# train our model
print('Dataset: ', len(train_imgs))
print('Descriptions: train=', len(train_descriptions))
print('Photos: train=', len(train_features))
print('Vocabulary Size:', vocab_size)
print('Description Length: ', max_length)
model = define_model(vocab_size, max_length)
epochs = 10
steps = len(train_descriptions)
# making a directory models to save our models
os.mkdir("models")
for i in range(epochs):
generator = data_generator(train_descriptions, train_features, tokenizer, max_length)
model.fit_generator(generator, epochs=1, steps_per_epoch= steps, verbose=1)
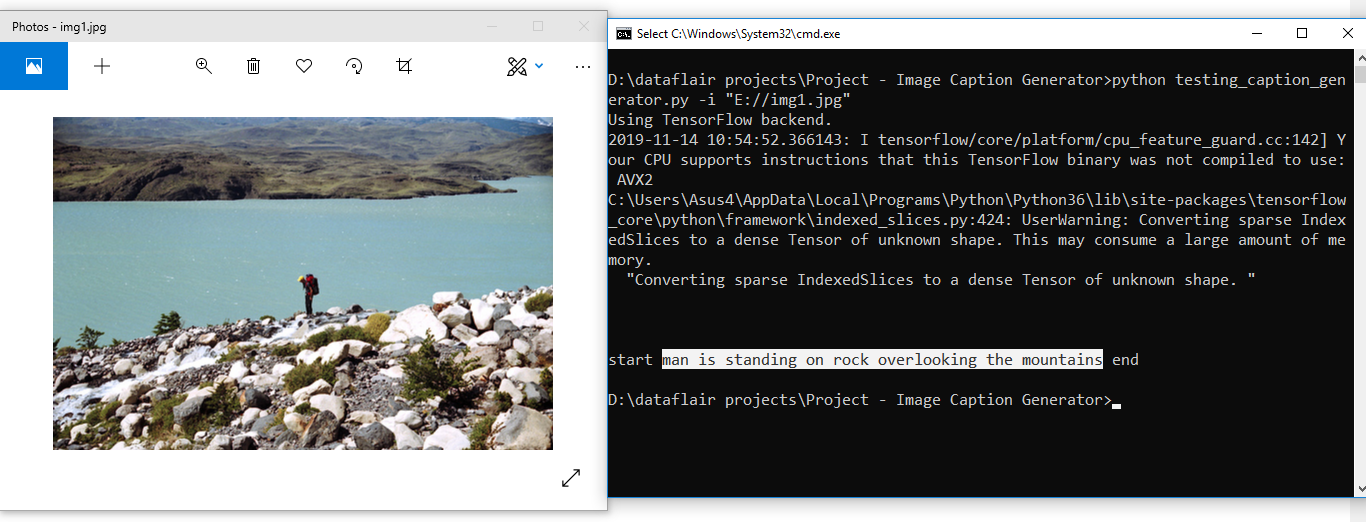
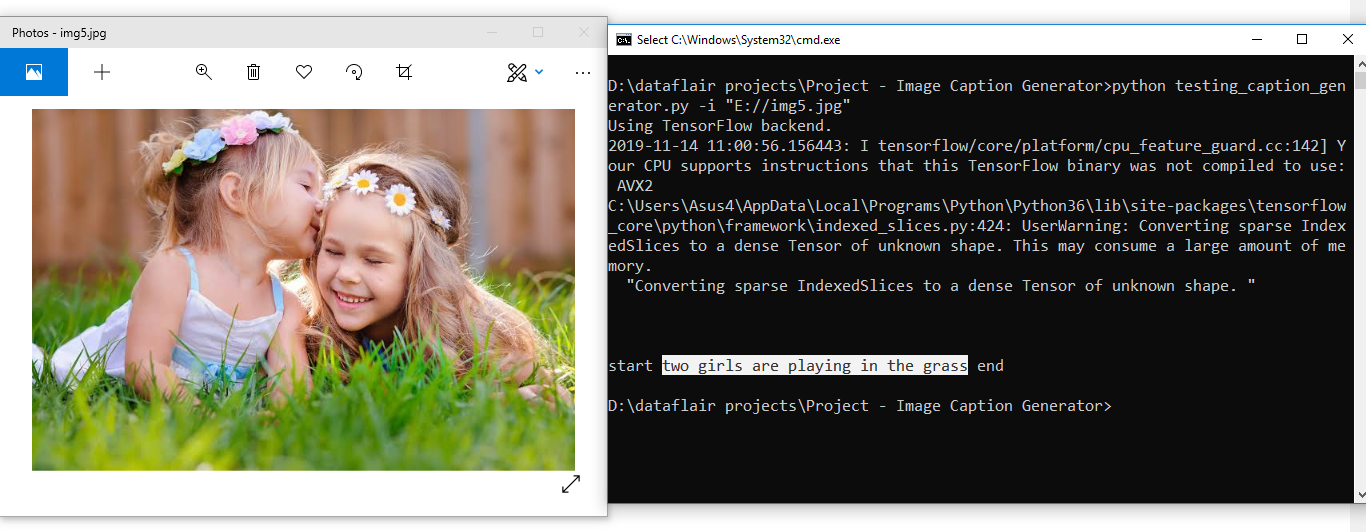
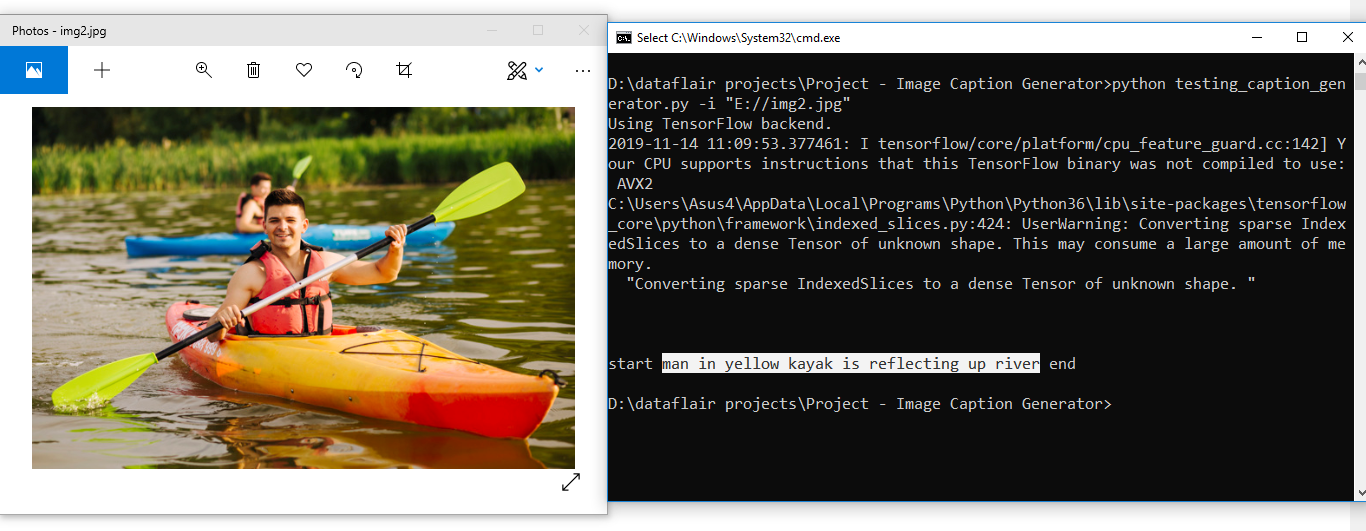
model.save("models/model_" + str(i) + ".h5")9. Testing the model
The model has been trained, now, we will make a separate file testing_caption_generator.py which will load the model and generate predictions. The predictions contain the max length of index values so we will use the same tokenizer.p pickle file to get the words from their index values.
Code:
import numpy as np
from PIL import Image
import matplotlib.pyplot as plt
import argparse


ap = argparse.ArgumentParser()
ap.add_argument('-i', '--image', required=True, help="Image Path")
args = vars(ap.parse_args())
img_path = args['image']

def extract_features(filename, model):
        try:
            image = Image.open(filename)

        except:
            print("ERROR: Couldn't open image! Make sure the image path and extension is correct")
        image = image.resize((299,299))
        image = np.array(image)
        # for images that has 4 channels, we convert them into 3 channels
        if image.shape[2] == 4:
            image = image[..., :3]
        image = np.expand_dims(image, axis=0)
        image = image/127.5
        image = image - 1.0
        feature = model.predict(image)
        return feature

def word_for_id(integer, tokenizer):
for word, index in tokenizer.word_index.items():
     if index == integer:
         return word
return None


def generate_desc(model, tokenizer, photo, max_length):
    in_text = 'start'
    for i in range(max_length):
        sequence = tokenizer.texts_to_sequences([in_text])[0]
        sequence = pad_sequences([sequence], maxlen=max_length)
        pred = model.predict([photo,sequence], verbose=0)
        pred = np.argmax(pred)
        word = word_for_id(pred, tokenizer)
        if word is None:
            break
        in_text += ' ' + word
        if word == 'end':
            break
    return in_text


#path = 'Flicker8k_Dataset/111537222_07e56d5a30.jpg'
max_length = 32
tokenizer = load(open("tokenizer.p","rb"))
model = load_model('models/model_9.h5')
xception_model = Xception(include_top=False, pooling="avg")

photo = extract_features(img_path, xception_model)
img = Image.open(img_path)

description = generate_desc(model, tokenizer, photo, max_length)
print("\n\n")
print(description)
plt.imshow(img)
Results:
Summary
In this advanced Python project, we have implemented a CNN-RNN model by building an image caption generator. Some key points to note are that our model depends on the data, so, it cannot predict the words that are out of its vocabulary. We used a small dataset consisting of 8000 images. For production-level models, we need to train on datasets larger than 100,000 images which can produce better accuracy models.
Rock the Python interview round
Practise 150+ Python Interview Questions
Hope you enjoyed making this Python based project with us. You can ask your doubts in the comment section below.
Did you like this article? If Yes, please give DataFlair 5 Stars on Google


Useful information…Thanks for sharing
simply awesome.need to run this project
how to use cmd in the end please help
and what to write in place of filename and directory please help
Why does the generator cell take a lot more time than usual to run?
#You can check the shape of the input and output for your model
[a,b],c = next(data_generator(train_descriptions, features, tokenizer, max_length))
a.shape, b.shape, c.shape
#((47, 2048), (47, 32), (47, 7577))
Please let me know if anyway I could reduce the time consumption of that cell. I am using google colaboratory.
if img[:-2] not in descriptions:
descriptions[img[:-2]] = ???
Line 18
there is something missing i think!!!
yeah. i got the same problem
did you get what is missing in this statement
descriptions[img[:-2]] = ???
I am also stuck at that problem. Did you find what is the missing value
?
descriptions[img[:-2]] = [caption]
this code is so creative but I got stuck somewhere. In the last part, despite downloading the pydot and graphwiz, code didn’t appear this. How can I solve that error?
Hi Ayca,
Please provide us with the full error you are receiving so that we can look into your code to check where the problem is.
We solved the error. Thank you for your interest.
Hey can you help me Solve my error?
ERROR: Couldn’t open image! Make sure the image path and extension is correct
Traceback (most recent call last):
File “testing_caption_generator.py”, line 63, in
photo = extract_features(img_path, xception_model)
File “testing_caption_generator.py”, line 23, in extract_features
image = image.resize((299,299))
UnboundLocalError: local variable ‘image’ referenced before assignment
Hey Sneha Roy,
This error is because you have used the wrong image path. Please use the full image path, name and extension when running the model.
The error says, you have given a wrong path of image files, please give the correct path
bro how about this one?
KeyError Traceback (most recent call last)
in
3 #loading the file that contains all data
4 #mapping them into descriptions dictionary img to 5 captions
—-> 5 descriptions = all_img_captions(filename)
6 print(“Length of descriptions =” ,len(descriptions))
7 #cleaning the descriptions
in all_img_captions(filename)
7 img, caption = caption.split(‘\t’)
8 if img [:-2] not in descriptions:
—-> 9 descriptions[img[:-2]]
10 else:
11 descriptions[img[:-2]].append(caption)
KeyError: ‘1000268201_693b08cb0e.jpg’
The descriptions dictionary coudn’t find the image with name 1000268201_693b08cb0e.jpg. Downlaod the dataset and make sure not to delete anything from the dataset. Then run the code again so that all names are mapped properly.
I am also facing the same issue. But I have that image present in my dataset. What should I do?
I am also facing the same problem and even downloaded the dataset again. Also the error image key which is displayed as not found is present in the dataset. Can you please help?
I am also facing the same problem and even downloaded the dataset again. Also the error image key which is displayed as not found is present in the dataset. Can you please help?
I think the if condition is not complete, the code should be:
if img[:-2] not in descriptions:
descriptions[img[:-2]] = [caption]
in the part 2 , i got the following error in google colab-
line 17
descriptions[img[:-2]] =
^
SyntaxError: invalid syntax
Even i got thee same error
Even i got the same error
All the above lines of code are executed, but when I am trying to run “descriptions = all_img_captions(filename)” which is present in module 2 i.e. getting and performing data cleaning, I am getting the following error:
descriptions = all_img_captions(filename)
Traceback (most recent call last):
File “”, line 1, in
descriptions = all_img_captions(filename)
File “”, line 8, in all_img_captions
descriptions[img[:-2]]
KeyError: ‘1000268201_693b08cb0e.jpg’
This has occured because the image named ‘1000268201_693b08cb0e.jpg’ was not found. Please check if the image exists at the locations or check if the extension is correct or not. Hope this solves the issue.
Error:
descriptions = all_img_captions(filename)
Traceback (most recent call last):
File “”, line 1, in
descriptions = all_img_captions(filename)
File “”, line 8, in all_img_captions
descriptions[img[:-2]]
KeyError: ‘1000268201_693b08cb0e.jpg’
i want to train the model using flickr 30k dataset can i please know how to use the results.csv file in the dataset?
ImportError: Failed to import `pydot`. Please install `pydot`. For example with `pip install pydot`.
But I’ve pydot installed why i am getting this error still
You can solve the problem by downloading the three modules pydot, pydotplus and graphviz using the commands pip install pydot, pip install pydotplus, and sudo apt-get install graphviz.
Is this project runs for all the images or
Only for limited images? ,, like if we give input from google , is this gives output?
I am getting the following error. Can anyone help????
HBox(children=(FloatProgress(value=1.0, bar_style=’info’, max=1.0), HTML(value=”)))
Traceback (most recent call last):
File “F:\python-project-image-caption-generator\.ipynb_checkpoints\testing_caption_generator-checkpoint-Modifed.py”, line 85, in
descriptions = all_img_captions(filename)
File “F:\python-project-image-caption-generator\.ipynb_checkpoints\testing_caption_generator-checkpoint-Modifed.py”, line 35, in all_img_captions
descriptions[img[:-2]]
KeyError: ‘1000268201_693b08cb0e.jpg’
Please check if the image exists at the specified locations or check if the extension, jpg, is correct or not. Hope this helps!
I am facing an issue during the testing part.
When I run this part,
ap = argparse.ArgumentParser()
ap.add_argument(‘-i’, ‘–image’, required=True, help=”Image Path”)
args = vars(ap.parse_args())
img_path = args[‘image’]
I am facing this error,
usage: ipykernel_launcher.py [-h] -i IMAGE
ipykernel_launcher.py: error: unrecognized arguments: -p proto -m amodel
An exception has occurred, use %tb to see the full traceback.
SystemExit: 2
I am facing an error during the testing part.
When I run this part,
ap = argparse.ArgumentParser()
ap.add_argument(‘-i’, ‘–image’, required=True, help=”Image Path”)
args = vars(ap.parse_args())
img_path = args[‘image’]
I am facing this error,
usage: ipykernel_launcher.py [-h] -i IMAGE
ipykernel_launcher.py: error: unrecognized arguments: -p proto -m amodel
An exception has occurred, use %tb to see the full traceback.
SystemExit: 2
Can anyone help?
Did you find the solution?
While testing i am getting this error.
usage: ipykernel_launcher.py [-h] -i IMAGE
ipykernel_launcher.py: error: unrecognized arguments: -p proto -m amodel
An exception has occurred, use %tb to see the full traceback.
Please try to resolve it.
same error
Help me!
-i “/home/phanee/Downloads/img.jpg”
Traceback (most recent call last):
File “newtest.py”, line 44, in
tokenizer = load(open(“tokenizer.p”,”rb”))
NameError: name ‘load’ is not defined
same error
You can solve the problem by specifying the respective module along with the load function. For example, is it is pickle module, you can write pickle.load(open(“tokenizer.p”,”rb”)). Or you can also use the following code: with open(‘tokenizer.p’, ‘rb’) as tk:
tokenizer = pickle.load(tk) Hope this helps!
C:\Users\HP\Desktop\Project-Image Caption Generator>python testing_caption_generator.py -i “E://abc.jpg”
Traceback (most recent call last):
File “testing_caption_generator.py”, line 3, in
import matplotlib.pyplot as plt
ModuleNotFoundError: No module named ‘matplotlib’
what is error and how to solve
hello pratibha,
No module named matplotlib means in your python there is no such library.
so simply open cmd and type “pip install matplotlib”
then you slovw your error
Manish
I am trying it using tensorflow 2.0 and got this error
Can you help me out with this .
—————————————————————————
NotImplementedError Traceback (most recent call last)
in ()
1 for i in range(epochs):
2 generator = data_generator(Descriptions,features, tokenizers, max_length)
—-> 3 model.fit(generator, epochs=10, steps_per_epoch= steps, verbose=1)
4 model.save(“models/model_” + str(i) + “.h5″)
16 frames
/tensorflow-2.1.0/python3.6/tensorflow_core/python/autograph/impl/api.py in wrapper(*args, **kwargs)
235 except Exception as e: # pylint:disable=broad-except
236 if hasattr(e, ‘ag_error_metadata’):
–> 237 raise e.ag_error_metadata.to_exception(e)
238 else:
239 raise
NotImplementedError: in converted code:
/tensorflow-2.1.0/python3.6/tensorflow_core/python/keras/engine/training_v2.py:677 map_fn
batch_size=None)
/tensorflow-2.1.0/python3.6/tensorflow_core/python/keras/engine/training.py:2410 _standardize_tensors
exception_prefix=’input’)
/tensorflow-2.1.0/python3.6/tensorflow_core/python/keras/engine/training_utils.py:513 standardize_input_data
data = [np.asarray(d) for d in data]
/tensorflow-2.1.0/python3.6/tensorflow_core/python/keras/engine/training_utils.py:513
data = [np.asarray(d) for d in data]
/usr/local/lib/python3.6/dist-packages/numpy/core/_asarray.py:85 asarray
return array(a, dtype, copy=False, order=order)
/tensorflow-2.1.0/python3.6/tensorflow_core/python/framework/ops.py:728 __array__
” array.”.format(self.name))
NotImplementedError: Cannot convert a symbolic Tensor (args_2:0) to a numpy array.
Brother same problem here…. have you got the solution..?
I am getting same caption in 90% of the cases – “A man in red shirt ” and then something like sitting on bench/ pavement etc.
What could be the reason and solution for this.
Hi i am getting an error in line no. 16 of second part of the code as
descriptions[img[:-2]] =
^
SyntaxError: invalid syntax
import collections
def all_img_with_captions(filename):
file = load_doc(filename)
captions = file.split(‘\n’)
descriptions = collections.defaultdict(list)
for caption in captions[:-1]:
img,caption = caption.split(‘\t’)
descriptions[img[:-2]].append(caption)
return descriptions
Use this
Cannot convert a symbolic Tensor (args_2:0) to a numpy array.
model.fit_generator(generator, epochs=1, steps_per_epoch=steps, verbose=1)
12 # save model
13 model.save(“models/model_” + str(i) + ‘.h5’)
~\Anaconda3\envs\tf-gpu\lib\site-packages\tensorflow_core\python\util\deprecation.py in new_func(*args, **kwargs)
322 ‘in a future version’ if date is None else (‘after %s’ % date),
323 instructions)
–> 324 return func(*args, **kwargs)
325 return tf_decorator.make_decorator(
326 func, new_func, ‘deprecated’,
~\Anaconda3\envs\tf-gpu\lib\site-packages\tensorflow_core\python\keras\engine\training.py in fit_generator(self, generator, steps_per_epoch, epochs, verbose, callbacks, validation_data, validation_steps, validation_freq, class_weight, max_queue_size, workers, use_multiprocessing, shuffle, initial_epoch)
1304 use_multiprocessing=use_multiprocessing,
1305 shuffle=shuffle,
-> 1306 initial_epoch=initial_epoch)
1307
1308 @deprecation.deprecated(
What is the Agent used and PEAS Analysis of this project?
how to use cmd in the end for the results
How can we get the accuracy of the model?
Please help me with a way to do so.
You can test the trained model by using the predict function. And then compare the obtained reslts with the predefined outputs. You can obtain the confusion matrix, using which you can find the accuracy. Python provides functions to do these operations in the sklearn module.
can you please help me with this error
SystemExit Traceback (most recent call last)
in
5 ap = argparse.ArgumentParser()
6 ap.add_argument(‘-i’, ‘–image’, required=True, help=”Image Path”)
—-> 7 args = vars(ap.parse_args())
8 img_path = args[‘image’]
9 def extract_features(filename, model):
~\Anaconda3\lib\argparse.py in parse_args(self, args, namespace)
1747 # =====================================
1748 def parse_args(self, args=None, namespace=None):
-> 1749 args, argv = self.parse_known_args(args, namespace)
1750 if argv:
1751 msg = _(‘unrecognized arguments: %s’)
~\Anaconda3\lib\argparse.py in parse_known_args(self, args, namespace)
1779 # parse the arguments and exit if there are any errors
1780 try:
-> 1781 namespace, args = self._parse_known_args(args, namespace)
1782 if hasattr(namespace, _UNRECOGNIZED_ARGS_ATTR):
1783 args.extend(getattr(namespace, _UNRECOGNIZED_ARGS_ATTR))
~\Anaconda3\lib\argparse.py in _parse_known_args(self, arg_strings, namespace)
2014 if required_actions:
2015 self.error(_(‘the following arguments are required: %s’) %
-> 2016 ‘, ‘.join(required_actions))
2017
2018 # make sure all required groups had one option present
~\Anaconda3\lib\argparse.py in error(self, message)
2499 self.print_usage(_sys.stderr)
2500 args = {‘prog’: self.prog, ‘message’: message}
-> 2501 self.exit(2, _(‘%(prog)s: error: %(message)s\n’) % args)
~\Anaconda3\lib\argparse.py in exit(self, status, message)
2486 if message:
2487 self._print_message(message, _sys.stderr)
-> 2488 _sys.exit(status)
2489
2490 def error(self, message):
SystemExit: 2