Driver Drowsiness Detection System with OpenCV & Keras
Machine Learning courses with 100+ Real-time projects Start Now!!
With this Python project, we will be making a drowsiness detection system. A countless number of people drive on the highway day and night. Taxi drivers, bus drivers, truck drivers and people traveling long-distance suffer from lack of sleep. Due to which it becomes very dangerous to drive when feeling sleepy.
The majority of accidents happen due to the drowsiness of the driver. So, to prevent these accidents we will build a system using Python, OpenCV, and Keras which will alert the driver when he feels sleepy.
DataFlair has also published other machine learning project ideas with source code. You can check them from this ml projects list:
- Fake News Detection Python Project
- Parkinson’s Disease Detection Python Project
- Color Detection Python Project
- Speech Emotion Recognition Python Project
- Breast Cancer Classification Python Project
- Age and Gender Detection Python Project
- Handwritten Digit Recognition Python Project
- Chatbot Python Project
- Drowsy Driver Safety Alert System Python Project
- Traffic Signs Recognition Python Project
- Image Caption Generator Python Project
Drowsy Driver Alert System
Drowsiness detection is a safety technology that can prevent accidents that are caused by drivers who fell asleep while driving.
The objective of this intermediate Python project is to build a drowsiness detection system that will detect that a person’s eyes are closed for a few seconds. This system will alert the driver when drowsiness is detected.
Driver Drowsiness Detection System
In this Python project, we will be using OpenCV for gathering the images from webcam and feed them into a Deep Learning model which will classify whether the person’s eyes are ‘Open’ or ‘Closed’. The approach we will be using for this Python project is as follows :
1. Take image as input from a camera.
2. Detect the face in the image and create a Region of Interest (ROI).
3. Detect the eyes from ROI and feed it to the classifier.
4. Classifier will categorize whether eyes are open or closed.
5. Calculate score to check whether the person is drowsy.
Driver Drowsiness Detection Dataset
The dataset used for this model is created by us. To create the dataset, we wrote a script that captures eyes from a camera and stores in our local disk. We separated them into their respective labels ‘Open’ or ‘Closed’. The data was manually cleaned by removing the unwanted images which were not necessary for building the model. The data comprises around 7000 images of people’s eyes under different lighting conditions. After training the model on our dataset, we have attached the final weights and model architecture file “models/cnnCat2.h5”.
Now, you can use this model to classify if a person’s eye is open or closed.
Alternatively, if you want to build and train your own model, you can download the dataset: Driver Drowsiness Dataset
The Model Architecture
The model we used is built with Keras using Convolutional Neural Networks (CNN). A convolutional neural network is a special type of deep neural network which performs extremely well for image classification purposes. A CNN basically consists of an input layer, an output layer and a hidden layer which can have multiple layers. A convolution operation is performed on these layers using a filter that performs 2D matrix multiplication on the layer and filter.
The CNN model architecture consists of the following layers:
- Convolutional layer; 32 nodes, kernel size 3
- Convolutional layer; 32 nodes, kernel size 3
- Convolutional layer; 64 nodes, kernel size 3
- Fully connected layer; 128 nodes
The final layer is also a fully connected layer with 2 nodes. A Relu activation function is used in all the layers except the output layer in which we used Softmax.
Project Prerequisites
The requirement for this Python project is a webcam through which we will capture images. You need to have Python (3.6 version recommended) installed on your system, then using pip, you can install the necessary packages.
- OpenCV – pip install opencv-python (face and eye detection).
- TensorFlow – pip install tensorflow (keras uses TensorFlow as backend).
- Keras – pip install keras (to build our classification model).
- Pygame – pip install pygame (to play alarm sound).
Steps for Performing Driver Drowsiness Detection
Download the driver drowsiness detection system project source code from the zip and extract the files in your system: Driver Drowsiness Project Code
The contents of the zip are:

- The “haar cascade files” folder consists of the xml files that are needed to detect objects from the image. In our case, we are detecting the face and eyes of the person.
- The models folder contains our model file “cnnCat2.h5” which was trained on convolutional neural networks.
- We have an audio clip “alarm.wav” which is played when the person is feeling drowsy.
- “Model.py” file contains the program through which we built our classification model by training on our dataset. You could see the implementation of convolutional neural network in this file.
- “Drowsiness detection.py” is the main file of our project. To start the detection procedure, we have to run this file.
Let’s now understand how our algorithm works step by step.
Step 1 – Take Image as Input from a Camera
With a webcam, we will take images as input. So to access the webcam, we made an infinite loop that will capture each frame. We use the method provided by OpenCV, cv2.VideoCapture(0) to access the camera and set the capture object (cap). cap.read() will read each frame and we store the image in a frame variable.
Step 2 – Detect Face in the Image and Create a Region of Interest (ROI)
To detect the face in the image, we need to first convert the image into grayscale as the OpenCV algorithm for object detection takes gray images in the input. We don’t need color information to detect the objects. We will be using haar cascade classifier to detect faces. This line is used to set our classifier face = cv2.CascadeClassifier(‘ path to our haar cascade xml file’). Then we perform the detection using faces = face.detectMultiScale(gray). It returns an array of detections with x,y coordinates, and height, the width of the boundary box of the object. Now we can iterate over the faces and draw boundary boxes for each face.
for (x,y,w,h) in faces:
        cv2.rectangle(frame, (x,y), (x+w, y+h), (100,100,100), 1 )
Step 3 – Detect the eyes from ROI and feed it to the classifier
The same procedure to detect faces is used to detect eyes. First, we set the cascade classifier for eyes in leye and reye respectively then detect the eyes using left_eye = leye.detectMultiScale(gray). Now we need to extract only the eyes data from the full image. This can be achieved by extracting the boundary box of the eye and then we can pull out the eye image from the frame with this code.
l_eye = frame[ y : y+h, x : x+w ]
l_eye only contains the image data of the eye. This will be fed into our CNN classifier which will predict if eyes are open or closed. Similarly, we will be extracting the right eye into r_eye.
Step 4 – Classifier will Categorize whether Eyes are Open or Closed
We are using CNN classifier for predicting the eye status. To feed our image into the model, we need to perform certain operations because the model needs the correct dimensions to start with. First, we convert the color image into grayscale using r_eye = cv2.cvtColor(r_eye, cv2.COLOR_BGR2GRAY). Then, we resize the image to 24*24 pixels as our model was trained on 24*24 pixel images cv2.resize(r_eye, (24,24)). We normalize our data for better convergence r_eye = r_eye/255 (All values will be between 0-1). Expand the dimensions to feed into our classifier. We loaded our model using model = load_model(‘models/cnnCat2.h5’) . Now we predict each eye with our model
lpred = model.predict_classes(l_eye). If the value of lpred[0] = 1, it states that eyes are open, if value of lpred[0] = 0 then, it states that eyes are closed.
Step 5 – Calculate Score to Check whether Person is Drowsy
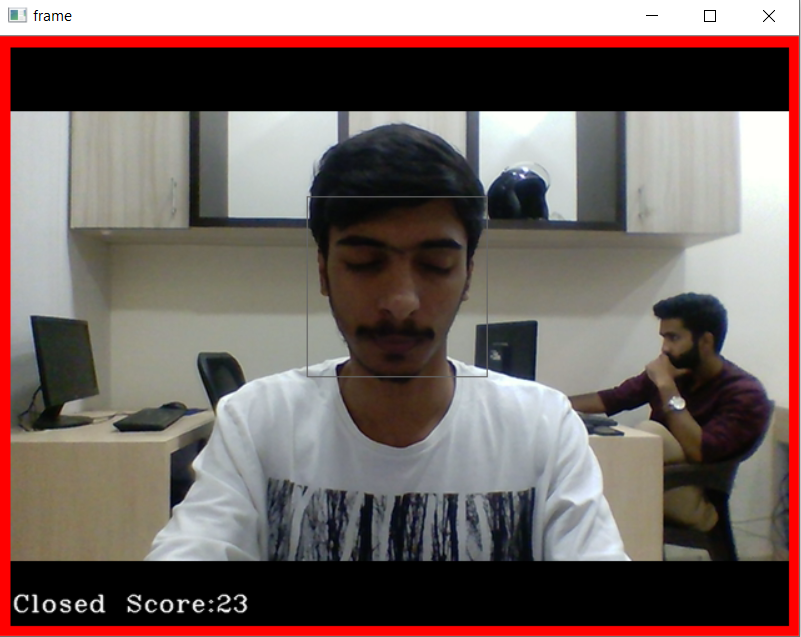
The score is basically a value we will use to determine how long the person has closed his eyes. So if both eyes are closed, we will keep on increasing score and when eyes are open, we decrease the score. We are drawing the result on the screen using cv2.putText() function which will display real time status of the person.
cv2.putText(frame, “Open”, (10, height-20), font, 1, (255,255,255), 1, cv2.LINE_AA )
A threshold is defined for example if score becomes greater than 15 that means the person’s eyes are closed for a long period of time. This is when we beep the alarm using sound.play()
The Source Code of our main file looks like this:
import cv2
import os
from keras.models import load_model
import numpy as np
from pygame import mixer
import time

mixer.init()
sound = mixer.Sound('alarm.wav')

face = cv2.CascadeClassifier('haar cascade files\haarcascade_frontalface_alt.xml')
leye = cv2.CascadeClassifier('haar cascade files\haarcascade_lefteye_2splits.xml')
reye = cv2.CascadeClassifier('haar cascade files\haarcascade_righteye_2splits.xml')

lbl=['Close','Open']

model = load_model('models/cnncat2.h5')
path = os.getcwd()
cap = cv2.VideoCapture(0)
font = cv2.FONT_HERSHEY_COMPLEX_SMALL
count=0
score=0
thicc=2
rpred=[99]
lpred=[99]

while(True):
    ret, frame = cap.read()
    height,width = frame.shape[:2]

    gray = cv2.cvtColor(frame, cv2.COLOR_BGR2GRAY)

    faces = face.detectMultiScale(gray,minNeighbors=5,scaleFactor=1.1,minSize=(25,25))
    left_eye = leye.detectMultiScale(gray)
    right_eye = reye.detectMultiScale(gray)

    cv2.rectangle(frame, (0,height-50) , (200,height) , (0,0,0) , thickness=cv2.FILLED )

    for (x,y,w,h) in faces:
cv2.rectangle(frame, (x,y) , (x+w,y+h) , (100,100,100) , 1 )

    for (x,y,w,h) in right_eye:
        r_eye=frame[y:y+h,x:x+w]
        count=count+1
        r_eye = cv2.cvtColor(r_eye,cv2.COLOR_BGR2GRAY)
        r_eye = cv2.resize(r_eye,(24,24))
        r_eye= r_eye/255
        r_eye= r_eye.reshape(24,24,-1)
        r_eye = np.expand_dims(r_eye,axis=0)
        rpred = model.predict_classes(r_eye)
        if(rpred[0]==1):
            lbl='Open'
        if(rpred[0]==0):
            lbl='Closed'
        break

    for (x,y,w,h) in left_eye:
        l_eye=frame[y:y+h,x:x+w]
        count=count+1
        l_eye = cv2.cvtColor(l_eye,cv2.COLOR_BGR2GRAY)
        l_eye = cv2.resize(l_eye,(24,24))
        l_eye= l_eye/255
        l_eye=l_eye.reshape(24,24,-1)
        l_eye = np.expand_dims(l_eye,axis=0)
        lpred = model.predict_classes(l_eye)
        if(lpred[0]==1):
            lbl='Open'
        if(lpred[0]==0):
            lbl='Closed'
        break

    if(rpred[0]==0 and lpred[0]==0):
        score=score+1
        cv2.putText(frame,"Closed",(10,height-20), font, 1,(255,255,255),1,cv2.LINE_AA)
    # if(rpred[0]==1 or lpred[0]==1):
    else:
        score=score-1
        cv2.putText(frame,"Open",(10,height-20), font, 1,(255,255,255),1,cv2.LINE_AA)

    if(score<0):
        score=0
    cv2.putText(frame,'Score:'+str(score),(100,height-20), font, 1,(255,255,255),1,cv2.LINE_AA)
    if(score>15):
        #person is feeling sleepy so we beep the alarm
        cv2.imwrite(os.path.join(path,'image.jpg'),frame)
        try:
            sound.play()

        except: # isplaying = False
            pass
        if(thicc<16):
            thicc= thicc+2
        else:
            thicc=thicc-2
            if(thicc<2):
                thicc=2
        cv2.rectangle(frame,(0,0),(width,height),(0,0,255),thicc)
    cv2.imshow('frame',frame)
    if cv2.waitKey(1) & 0xFF == ord('q'):
        break
cap.release()
cv2.destroyAllWindows()
Driver Drowsiness Detection Execution
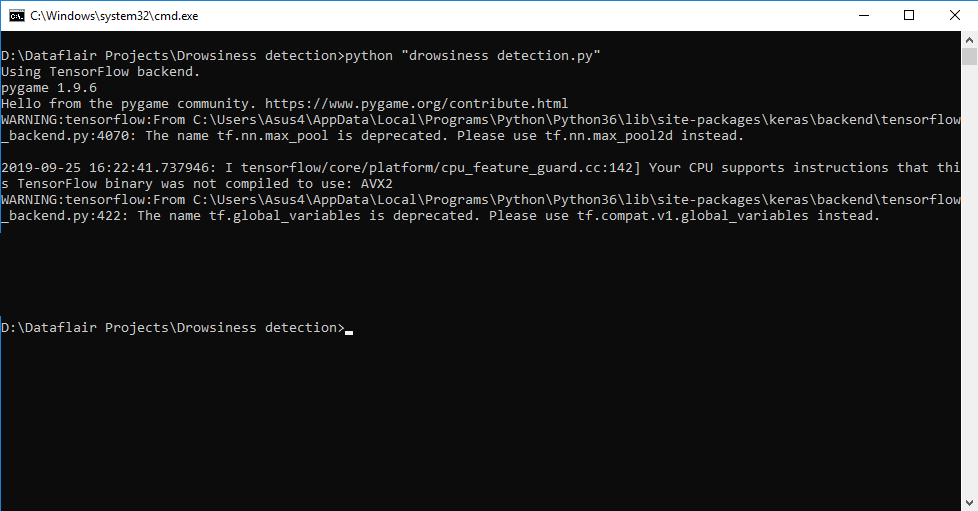
Let’s execute drive drowsiness detection system and see the working of our ml project. To start the project, you need to open a command prompt, go to the directory where our main file “drowsiness detection.py” exists. Run the script with this command.
python “drowsiness detection.py”
It may take a few seconds to open the webcam and start detection.
Example Screenshot:
Output Screenshot:
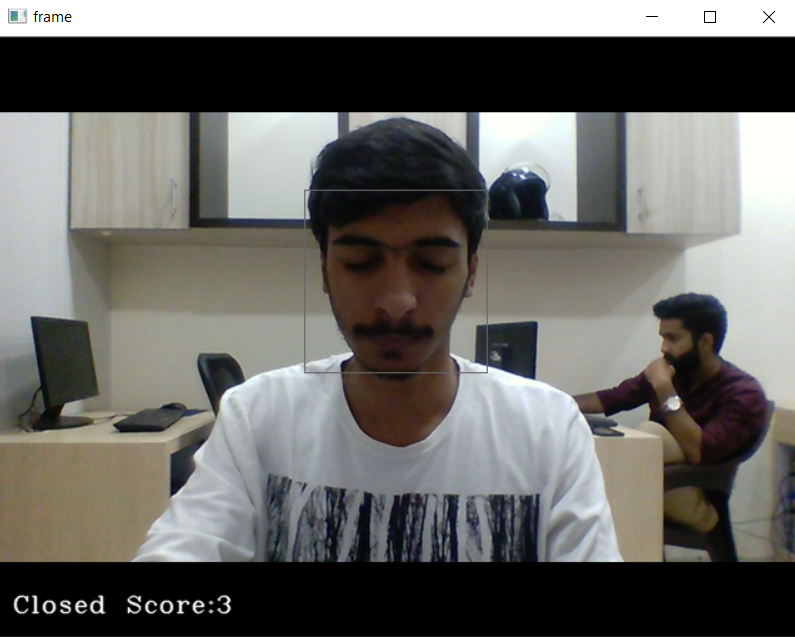
Closed Eye Detection
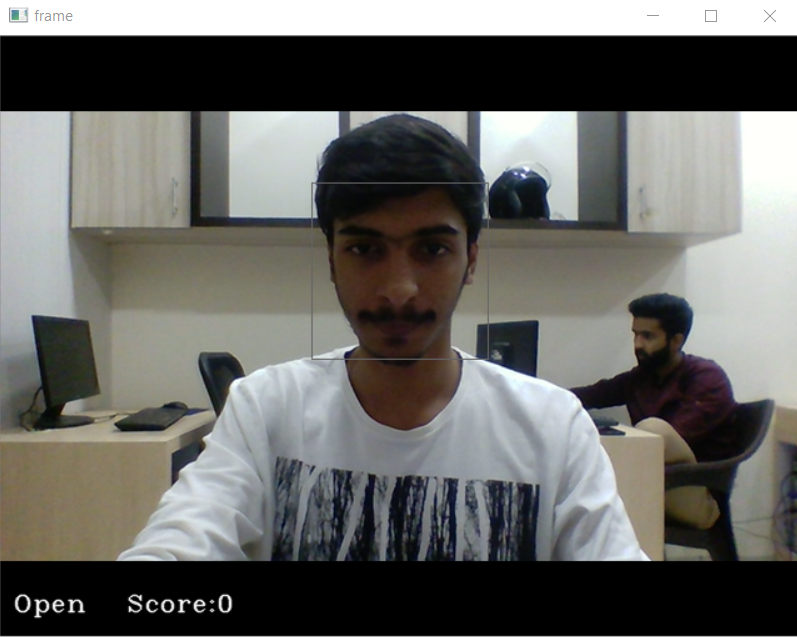
Open Eyes Detection
Sleep Alert
Summary
Drowsy driving is one of the top causes of road accidents. When drivers get sleepy, they blink slower, close their eyes for longer, or even nod off. A smart system using Python, OpenCV, and Keras can help prevent such accidents. This system watches the driver’s face in real time and checks if their eyes are closing too often. If the system finds signs of drowsiness, it gives an alert like a beep or a message on the screen.
In this Python project, we have built a drowsy driver alert system that you can implement in numerous ways. We used OpenCV to detect faces and eyes using a haar cascade classifier and then we used a CNN model to predict the status.
This project is useful in real life. You can install it in cars to alert sleepy drivers. It also helps students understand how computer vision and machine learning work together. You’ll learn how to work with real-time video, face detection, and Keras deep learning. It’s a great safety-focused project for beginners and very impressive in interviews.
You give me 15 seconds I promise you best tutorials
Please share your happy experience on Google


Nothing train and valid dataset. Can you give me a link for download it?
train_batch= generator(‘data/train’,shuffle=True, batch_size=BS,target_size=TS)
valid_batch= generator(‘data/valid’,shuffle=True, batch_size=BS,target_size=TS)
i can’t compile the model.py
i can’t compile the model.py and drowsiness detection.py
in your Drowsiness detection.zip
Cannot seem to open on mac-os using the command python “drowsiness detection.py”
Can you please provide the full error that you are getting? Actually, this Python project is made on Windows so you will have to do some changes for Mac OS.
I mean the dataset the model was trained on
Is there an available link to the dataset?
Yes, you can download it from here – Python Project Zip File
I mean the dataset the model was trained on
Shouldn’t I learn deep learning and Image recognition if I am to truly understand the code. I’m a complete beginner, what is the point for me to do this project without actually having the knowledge preexisting requisites?
Yes, before starting this Python project it is recommended to get some knowledge about the following prerequisites that we have mentioned –
OpenCV is a Computer vision library while Keras is a deep learning framework. Learn the concepts first and then go for their libraries to build projects.
@DataFlairTeam
Sir could you please share the data set which used to generate the cnnCat2.h5. It is very helpful for me. I want to learn more and expand this project further.
Hi, Thank you for this wonder full project, Can you please give the training data set and also the training architecture code for cnnCat2.h5
Thank you for sharing your knowledge. Could you send me the link where the training data is to my email? Thank you
please share the dataset links I wanna update this projects to a new level.
I have an awesome idea to integrate it with blockchain networking.
if you are willing to share the dataset. please do share it in the comment section.
waiting for your reply
train_batch= generator(‘data/train’,shuffle=True, batch_size=BS,target_size=TS)
valid_batch= generator(‘data/valid’,shuffle=True, batch_size=BS,target_size=TS)
File “C:\Users\dbda\AppData\Local\Continuum\anaconda3\lib\site-packages\keras_preprocessing\image\directory_iterator.py”, line 106, in __init__
for subdir in sorted(os.listdir(directory)):
FileNotFoundError: [WinError 3] The system cannot find the path specified: ‘data/train’
How to solve this problem?
Thank you for this project. Can you please mail me the link for the dataset on which the model was trained?
can you please mail the dataset on which the model was trained?
sir could you share the dataset, based on the model was trained.
please, sir, send me the data set, it is very helpful for extending this project and learn more on this.
@DataFlairTeam
Sir could you please share the data set which used to generate the cnnCat2.h5. It is very helpful for me. I want to learn more and expand this project further.
can we run this program in ubuntu 14??
Sir the code is not running the frame application . Only the light of camera opens after running the main file. It is only throwing the message that is” your cpu supports instructions that this tensorflow binary was not compiled to use avx2″ . Can you tell me what’s the issue i am facing
Hi Sumit,
This is the warning message that comes when your CPU doesn’t support the AVX. However, the program will execute further and it may take few seconds to load the TensorFlow library and start the webcam.
If you still face the issue then you can try reinstalling the TensorFlow library or run the program on a different system.
.
Sir reinstalled and tried but thing happened. However, I thing I noticed that as soon as the above warning msg related to CPU comes,camera light gets on but instead of running frame application , it always throws some message from taskbar that “Display driver stopped responding and has recovered”. Does it is related to this ?
Hi Sumit,
The TensorFlow uses a lot of your CPU resources, so yes the display driver not working might be the issue your program won’t run. You should upgrade all the windows update, display drivers and then try again.
Yes, now it works. I fixed it by referring from microsoft official page, they said either you can update windows to update drivers or you can lower the visual effects to enhance Cpu performance so I adjust these effects then it worked. Now sir I would be really grateful to you if you can provide me project report and some learning stuff regarding this project.
Sir can you provide the project report for reference to understand its algorithm and learning model completely so then I could make a project by own related to this for my learning purpose as I have to work on it for my final year project.
sir can i get the dataset of this project for looking towards it.it would be helpful for understanding and implementing it more.
Hi Prince,
The dataset used in this Python project is a private dataset. It is not available publicly. But you are free to use the trained model that is available in the project dataset folder.
sir can i please get the dataset behind this project to enhance it more and to get easily understandable.
sir can i get the data set behind this project to understand the performance more clearly.
sir can i get the data set behind this project to understand the performance more clearly.
how to install TensorFlow module in windows I tried on google but I got an error
saying module not found
Hi Vamsi,
Refer to the TensorFlow Installation article to install it in windows.
Sir reinstalled and tried but thing happened. However, I thing I noticed that as soon as the above warning msg related to CPU comes,camera light gets on but instead of running frame application , it always throws some message from taskbar that “Display driver stopped responding and has recovered”. Does it is related to this ?
I want to download all data. The data comprises around 7000 images of people’s eyes under different lighting conditions.
Microsoft Windows [Version 6.3.9600]
(c) 2013 Microsoft Corporation. All rights reserved.
C:\Users\sai>cd Documents
C:\Users\sai\Documents>python “drowsiness detection.py”
Using TensorFlow backend.
Traceback (most recent call last):
File “C:\Users\sai\AppData\Local\Programs\Python\Python37\lib\site-packages\te
nsorflow_core\python\pywrap_tensorflow.py”, line 58, in
from tensorflow.python.pywrap_tensorflow_internal import *
File “C:\Users\sai\AppData\Local\Programs\Python\Python37\lib\site-packages\te
nsorflow_core\python\pywrap_tensorflow_internal.py”, line 28, in
_pywrap_tensorflow_internal = swig_import_helper()
File “C:\Users\sai\AppData\Local\Programs\Python\Python37\lib\site-packages\te
nsorflow_core\python\pywrap_tensorflow_internal.py”, line 24, in swig_import_hel
per
_mod = imp.load_module(‘_pywrap_tensorflow_internal’, fp, pathname, descript
ion)
File “C:\Users\sai\AppData\Local\Programs\Python\Python37\lib\imp.py”, line 24
2, in load_module
return load_dynamic(name, filename, file)
File “C:\Users\sai\AppData\Local\Programs\Python\Python37\lib\imp.py”, line 34
2, in load_dynamic
return _load(spec)
ImportError: DLL load failed: A dynamic link library (DLL) initialization routin
e failed.
During handling of the above exception, another exception occurred:
Traceback (most recent call last):
File “drowsiness detection.py”, line 3, in
from keras.models import load_model
File “C:\Users\sai\AppData\Local\Programs\Python\Python37\lib\site-packages\ke
ras\__init__.py”, line 3, in
from . import utils
File “C:\Users\sai\AppData\Local\Programs\Python\Python37\lib\site-packages\ke
ras\utils\__init__.py”, line 6, in
from . import conv_utils
File “C:\Users\sai\AppData\Local\Programs\Python\Python37\lib\site-packages\ke
ras\utils\conv_utils.py”, line 9, in
from .. import backend as K
File “C:\Users\sai\AppData\Local\Programs\Python\Python37\lib\site-packages\ke
ras\backend\__init__.py”, line 1, in
from .load_backend import epsilon
File “C:\Users\sai\AppData\Local\Programs\Python\Python37\lib\site-packages\ke
ras\backend\load_backend.py”, line 90, in
from .tensorflow_backend import *
File “C:\Users\sai\AppData\Local\Programs\Python\Python37\lib\site-packages\ke
ras\backend\tensorflow_backend.py”, line 5, in
import tensorflow as tf
File “C:\Users\sai\AppData\Local\Programs\Python\Python37\lib\site-packages\te
nsorflow\__init__.py”, line 98, in
from tensorflow_core import *
File “C:\Users\sai\AppData\Local\Programs\Python\Python37\lib\site-packages\te
nsorflow_core\__init__.py”, line 40, in
from tensorflow.python.tools import module_util as _module_util
File “C:\Users\sai\AppData\Local\Programs\Python\Python37\lib\site-packages\te
nsorflow\__init__.py”, line 50, in __getattr__
module = self._load()
File “C:\Users\sai\AppData\Local\Programs\Python\Python37\lib\site-packages\te
nsorflow\__init__.py”, line 44, in _load
module = _importlib.import_module(self.__name__)
File “C:\Users\sai\AppData\Local\Programs\Python\Python37\lib\importlib\__init
__.py”, line 127, in import_module
return _bootstrap._gcd_import(name[level:], package, level)
File “C:\Users\sai\AppData\Local\Programs\Python\Python37\lib\site-packages\te
nsorflow_core\python\__init__.py”, line 49, in
from tensorflow.python import pywrap_tensorflow
File “C:\Users\sai\AppData\Local\Programs\Python\Python37\lib\site-packages\te
nsorflow_core\python\pywrap_tensorflow.py”, line 74, in
raise ImportError(msg)
ImportError: Traceback (most recent call last):
File “C:\Users\sai\AppData\Local\Programs\Python\Python37\lib\site-packages\te
nsorflow_core\python\pywrap_tensorflow.py”, line 58, in
from tensorflow.python.pywrap_tensorflow_internal import *
File “C:\Users\sai\AppData\Local\Programs\Python\Python37\lib\site-packages\te
nsorflow_core\python\pywrap_tensorflow_internal.py”, line 28, in
_pywrap_tensorflow_internal = swig_import_helper()
File “C:\Users\sai\AppData\Local\Programs\Python\Python37\lib\site-packages\te
nsorflow_core\python\pywrap_tensorflow_internal.py”, line 24, in swig_import_hel
per
_mod = imp.load_module(‘_pywrap_tensorflow_internal’, fp, pathname, descript
ion)
File “C:\Users\sai\AppData\Local\Programs\Python\Python37\lib\imp.py”, line 24
2, in load_module
return load_dynamic(name, filename, file)
File “C:\Users\sai\AppData\Local\Programs\Python\Python37\lib\imp.py”, line 34
2, in load_dynamic
return _load(spec)
ImportError: DLL load failed: A dynamic link library (DLL) initialization routin
e failed.
Failed to load the native TensorFlow runtime.
See https://www.tensorflow.org/install/errors
for some common reasons and solutions. Include the entire stack trace
above this error message when asking for help.
C:\Users\sai\Documents>
Hey Sanjay,
Here is the solution to your problem.
This error is because the TensorFlow could not load the specific DLL files. Use Python 3.6 version as TensorFlow is more stable in Python 3.6 version. Install the TensorFlow package again using pip install TensorFlow.
will this solve this problem am getting same problem. I’m using python 3.7.
Did this solved your problem. I am having same issue.
train_batch= generator(‘data/train’,shuffle=Truebatch_size=BS,target_size=TS)
please tell me From where I can download the ‘data/train’
without providing proper dataset it there will be no use providing the code
Hey Sandeep,
The model file contains the weights of the convolutional neural network which was trained on the dataset. You can learn how to use a pretrained model and use them in your use case. If you want to train the model from scratch then you have to make your own dataset as sometimes the dataset is not available to us.
sir, when i’m trying to execute the code..it results no available audio device at mixer.init()..plz let me know what i want to do..Thanks in advance
Hey Manoj,
This is because you don’t have all the packages installed for pygame library. If you are using ubuntu then you can try these commands sudo apt-get install libsdl1.2-dev libsdl-image1.2-dev libsdl-mixer1.2-dev libsdl-ttf2.0-dev
sir, i’m running the code online using google colabs..then how to rectify the error..
can you tell me, how to use model.py. I mean train and valid data, how to handle this, what type of data is required?
Hey Arjit Yadav,
Typically the dataset will contain a folder dataset. In that, there will be two folders named as train and valid. Each of these folder will contain open and closed folder. The open folder will contain thousands of images of open eyes and the closed folder will have thousands of closed eye images. You can capture your own images and put them in the respective folders and then use the model.py to train the model.
please send me the project
Sir i understand that you can not provide the dataset because it’s private but you can share the script that you used to create the dataset as you said dataset was created by you.
Or else you can share the idea behind the script. I just wanna know that dataset contains both eyes in a single image or there is different folders for left eyes and right eyes in both open and closed folder of your dataset .
inorder to learn the complete project is there any video lectures in youtube
Hello Swaroop,
Presently we don’t have any video lectures on youtube regarding Python projects. If you have any queries related to Python projects you can ask us.
Can we have a contact mail id to know more about this topic.
Hi Stephy,
You can contact us at [email protected]