Deep Learning Project – Handwritten Digit Recognition using Python
Machine Learning courses with 100+ Real-time projects Start Now!!
Python Deep Learning Project
To make machines more intelligent, the developers are diving into machine learning and deep learning techniques. A human learns to perform a task by practicing and repeating it again and again so that it memorizes how to perform the tasks. Then the neurons in his brain automatically trigger and they can quickly perform the task they have learned. Deep learning is also very similar to this. It uses different types of neural network architectures for different types of problems. For example – object recognition, image and sound classification, object detection, image segmentation, etc.
This is the 11th project in the DataFlair’s series of 20 Python projects. I suggest you to bookmark the previous projects:
- Fake News Detection Python Project
- Parkinson’s Disease Detection Python Project
- Color Detection Python Project
- Speech Emotion Recognition Python Project
- Breast Cancer Classification Python Project
- Age and Gender Detection Python Project
- Handwritten Digit Recognition Python Project
- Chatbot Python Project
- Driver Drowsiness Detection Python Project
- Traffic Signs Recognition Python Project
- Image Caption Generator Python Project
What is Handwritten Digit Recognition?
The handwritten digit recognition is the ability of computers to recognize human handwritten digits. It is a hard task for the machine because handwritten digits are not perfect and can be made with many different flavors. The handwritten digit recognition is the solution to this problem which uses the image of a digit and recognizes the digit present in the image.
About the Python Deep Learning Project
In this article, we are going to implement a handwritten digit recognition app using the MNIST dataset. We will be using a special type of deep neural network that is Convolutional Neural Networks. In the end, we are going to build a GUI in which you can draw the digit and recognize it straight away.
Prerequisites
The interesting Python project requires you to have basic knowledge of Python programming, deep learning with Keras library and the Tkinter library for building GUI.
Install the necessary libraries for this project using this command:
pip install numpy, tensorflow, keras, pillow,
The MNIST dataset
This is probably one of the most popular datasets among machine learning and deep learning enthusiasts. The MNIST dataset contains 60,000 training images of handwritten digits from zero to nine and 10,000 images for testing. So, the MNIST dataset has 10 different classes. The handwritten digits images are represented as a 28×28 matrix where each cell contains grayscale pixel value.
Download the full source code for the project
Building Python Deep Learning Project on Handwritten Digit Recognition
Below are the steps to implement the handwritten digit recognition project:
1. Import the libraries and load the dataset
First, we are going to import all the modules that we are going to need for training our model. The Keras library already contains some datasets and MNIST is one of them. So we can easily import the dataset and start working with it. The mnist.load_data() method returns us the training data, its labels and also the testing data and its labels.
import keras
from keras.datasets import mnist
from keras.models import Sequential
from keras.layers import Dense, Dropout, Flatten
from keras.layers import Conv2D, MaxPooling2D
from keras import backend as K

# the data, split between train and test sets
(x_train, y_train), (x_test, y_test) = mnist.load_data()

print(x_train.shape, y_train.shape)
2. Preprocess the data
The image data cannot be fed directly into the model so we need to perform some operations and process the data to make it ready for our neural network. The dimension of the training data is (60000,28,28). The CNN model will require one more dimension so we reshape the matrix to shape (60000,28,28,1).
x_train = x_train.reshape(x_train.shape[0], 28, 28, 1)
x_test = x_test.reshape(x_test.shape[0], 28, 28, 1)
input_shape = (28, 28, 1)

# convert class vectors to binary class matrices
y_train = keras.utils.to_categorical(y_train, num_classes)
y_test = keras.utils.to_categorical(y_test, num_classes)

x_train = x_train.astype('float32')
x_test = x_test.astype('float32')
x_train /= 255
x_test /= 255
print('x_train shape:', x_train.shape)
print(x_train.shape[0], 'train samples')
print(x_test.shape[0], 'test samples')
3. Create the model
Now we will create our CNN model in Python data science project. A CNN model generally consists of convolutional and pooling layers. It works better for data that are represented as grid structures, this is the reason why CNN works well for image classification problems. The dropout layer is used to deactivate some of the neurons and while training, it reduces offer fitting of the model. We will then compile the model with the Adadelta optimizer.
batch_size = 128
num_classes = 10
epochs = 10

model = Sequential()
model.add(Conv2D(32, kernel_size=(3, 3),activation='relu',input_shape=input_shape))
model.add(Conv2D(64, (3, 3), activation='relu'))
model.add(MaxPooling2D(pool_size=(2, 2)))
model.add(Dropout(0.25))
model.add(Flatten())
model.add(Dense(256, activation='relu'))
model.add(Dropout(0.5))
model.add(Dense(num_classes, activation='softmax'))

model.compile(loss=keras.losses.categorical_crossentropy,optimizer=keras.optimizers.Adadelta(),metrics=['accuracy'])
4. Train the model
The model.fit() function of Keras will start the training of the model. It takes the training data, validation data, epochs, and batch size.
It takes some time to train the model. After training, we save the weights and model definition in the ‘mnist.h5’ file.
hist = model.fit(x_train, y_train,batch_size=batch_size,epochs=epochs,verbose=1,validation_data=(x_test, y_test))
print("The model has successfully trained")

model.save('mnist.h5')
print("Saving the model as mnist.h5")
5. Evaluate the model
We have 10,000 images in our dataset which will be used to evaluate how good our model works. The testing data was not involved in the training of the data therefore, it is new data for our model. The MNIST dataset is well balanced so we can get around 99% accuracy.
score = model.evaluate(x_test, y_test, verbose=0)
print('Test loss:', score[0])
print('Test accuracy:', score[1])
6. Create GUI to predict digits
Now for the GUI, we have created a new file in which we build an interactive window to draw digits on canvas and with a button, we can recognize the digit. The Tkinter library comes in the Python standard library. We have created a function predict_digit() that takes the image as input and then uses the trained model to predict the digit.
Then we create the App class which is responsible for building the GUI for our app. We create a canvas where we can draw by capturing the mouse event and with a button, we trigger the predict_digit() function and display the results.
Here’s the full code for our gui_digit_recognizer.py file:
from keras.models import load_model
from tkinter import *
import tkinter as tk
import win32gui
from PIL import ImageGrab, Image
import numpy as np
model = load_model('mnist.h5')
def predict_digit(img):
#resize image to 28x28 pixels
img = img.resize((28,28))
#convert rgb to grayscale
img = img.convert('L')
img = np.array(img)
#reshaping to support our model input and normalizing
img = img.reshape(1,28,28,1)
img = img/255.0
#predicting the class
res = model.predict([img])[0]
return np.argmax(res), max(res)
class App(tk.Tk):
def __init__(self):
tk.Tk.__init__(self)
self.x = self.y = 0
# Creating elements
self.canvas = tk.Canvas(self, width=300, height=300, bg = "white", cursor="cross")
self.label = tk.Label(self, text="Thinking..", font=("Helvetica", 48))
self.classify_btn = tk.Button(self, text = "Recognise", command = self.classify_handwriting)
self.button_clear = tk.Button(self, text = "Clear", command = self.clear_all)
# Grid structure
self.canvas.grid(row=0, column=0, pady=2, sticky=W, )
self.label.grid(row=0, column=1,pady=2, padx=2)
self.classify_btn.grid(row=1, column=1, pady=2, padx=2)
self.button_clear.grid(row=1, column=0, pady=2)
#self.canvas.bind("<Motion>", self.start_pos)
self.canvas.bind("<B1-Motion>", self.draw_lines)
def clear_all(self):
self.canvas.delete("all")
def classify_handwriting(self):
HWND = self.canvas.winfo_id() # get the handle of the canvas
rect = win32gui.GetWindowRect(HWND) # get the coordinate of the canvas
im = ImageGrab.grab(rect)
digit, acc = predict_digit(im)
self.label.configure(text= str(digit)+', '+ str(int(acc*100))+'%')
def draw_lines(self, event):
self.x = event.x
self.y = event.y
r=8
self.canvas.create_oval(self.x-r, self.y-r, self.x + r, self.y + r, fill='black')
app = App()
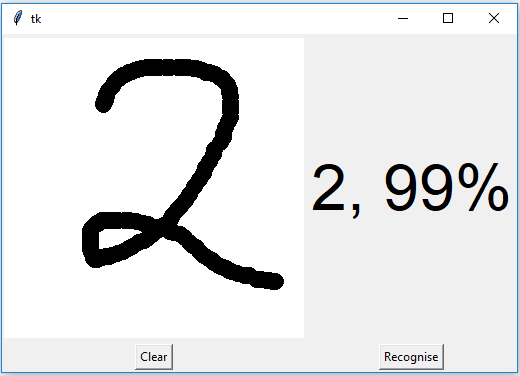
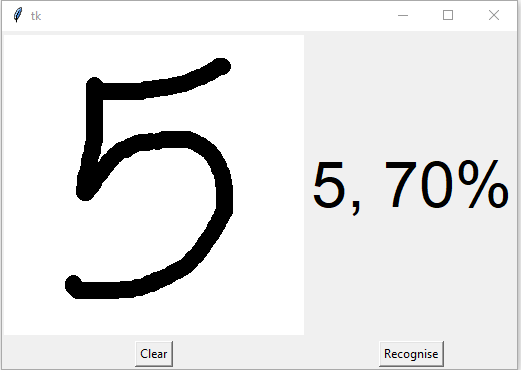
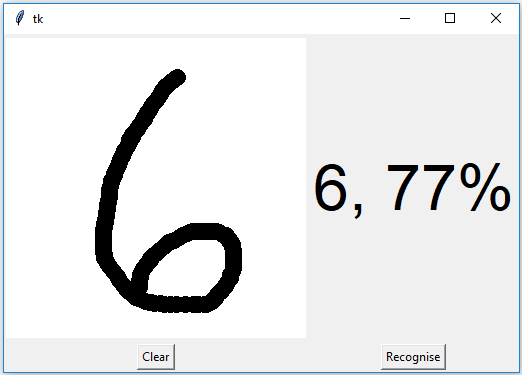
mainloop()Screenshots:
Summary
In this article, we have successfully built a Python deep learning project on handwritten digit recognition app. We have built and trained the Convolutional neural network which is very effective for image classification purposes. Later on, we build the GUI where we draw a digit on the canvas then we classify the digit and show the results.
Want to get hired as a Python expert? Practice the 150+ Python Interview Questions by DataFlair
Do share your views regarding the intermediate Python project in the comment section.
Did you know we work 24x7 to provide you best tutorials
Please encourage us - write a review on Google


Hi
I have tried working.
But prediction values is not working as expected. None of the result is as expected.
Hey Srikanth Pusa,
It is hard to interpret the cause of this issue as there can be any number of factors. You can try changing the hyperparameters and train the model yourself. Look at the testing and validation accuracy graph to see how your model works.
What do you mean by that? I have tried everything i can think of and it still predicts wrong everytime
The problem can be solved by first of all, preprocessing the images to make it similar to the images in test data. To do this, you should create bounding box around digit, crop it and resize it 18×18 and then add padding of 5px all around to make image size equal t 28×28.
You can refer to my project repo ‘https://github.com/Sanchay-Goel/Real-time-digit-recognition’ for implementation
But we are resizing image of size 300*300 to 28*28.
So while resizing, quality of image may get reduced and it may affect our prediction values.
I tried same code but predictions are not correct can you please help me
Hi,
I am getting the error that ModuleNotFoundError: No module named ‘win32gui’
even after installing win32gui in my PC any help.?
Hey Kingo,
We are here to help!!
Make sure the module is installed at the proper place. You should use python3 and install the package using pip install win32gui command.
i am getting an error num_classes is not defined
Hey,
i have tried on spyder, but the thing is,
few imports are as useused throws error.
Help if possible
bro, just give 10 instead num_classes
Hey Can you please tell me how do i train the model.
Running just the gui_digit_recognizer.py is not giving a good result.
I need to train it first I guess but i am not sure how to do that
How can i run this project in Linux
I tried this but I am getting some errors:
Traceback (most recent call last):
File “C:\Python36\gui_digit_recognizer.py”, line 1, in
from keras.models import load_model
File “C:\Python36\lib\site-packages\keras\__init__.py”, line 3, in
from . import activations
File “C:\Python36\lib\site-packages\keras\activations.py”, line 3, in
from . import backend as K
File “C:\Python36\lib\site-packages\keras\backend\__init__.py”, line 64, in
from .tensorflow_backend import *
File “C:\Python36\lib\site-packages\keras\backend\tensorflow_backend.py”, line 1, in
import tensorflow as tf
File “C:\Python36\lib\site-packages\tensorflow\__init__.py”, line 24, in
from tensorflow.python import pywrap_tensorflow # pylint: disable=unused-import
File “C:\Python36\lib\site-packages\tensorflow\python\__init__.py”, line 52, in
from tensorflow.core.framework.graph_pb2 import *
File “C:\Python36\lib\site-packages\tensorflow\core\framework\graph_pb2.py”, line 6, in
from google.protobuf import descriptor as _descriptor
File “C:\Python36\lib\site-packages\google\protobuf\descriptor.py”, line 47, in
from google.protobuf.pyext import _message
ImportError: DLL load failed: The specified procedure could not be found.
Please help me
the training code runs correctly (on a win10 box with GTX1080) until line 47, at which point i get:
Traceback (most recent call last):
File “train_digit_recognizer.py”, line 47, in
hist = model.fit(x_train, y_train,batch_size=batch_size,epochs=epochs,verbose=1,validation_data=(x_test, y_test))
File “A:\TRAINING COURSES IN USE\PYTHON\Handwritten-Digit-Recognition\lib\site-packages\keras\engine\training.py”, line 1239, in fit
validation_freq=validation_freq)
File “A:\TRAINING COURSES IN USE\PYTHON\Handwritten-Digit-Recognition\lib\site-packages\keras\engine\training_arrays.py”, line 196, in fit_loop
outs = fit_function(ins_batch)
File “A:\TRAINING COURSES IN USE\PYTHON\Handwritten-Digit-Recognition\lib\site-packages\tensorflow_core\python\keras\backend.py”, line 3727, in __call__
outputs = self._graph_fn(*converted_inputs)
File “A:\TRAINING COURSES IN USE\PYTHON\Handwritten-Digit-Recognition\lib\site-packages\tensorflow_core\python\eager\function.py”, line 1551, in __call__
return self._call_impl(args, kwargs)
File “A:\TRAINING COURSES IN USE\PYTHON\Handwritten-Digit-Recognition\lib\site-packages\tensorflow_core\python\eager\function.py”, line 1591, in _call_impl
return self._call_flat(args, self.captured_inputs, cancellation_manager)
File “A:\TRAINING COURSES IN USE\PYTHON\Handwritten-Digit-Recognition\lib\site-packages\tensorflow_core\python\eager\function.py”, line 1692, in _call_flat
ctx, args, cancellation_manager=cancellation_manager))
File “A:\TRAINING COURSES IN USE\PYTHON\Handwritten-Digit-Recognition\lib\site-packages\tensorflow_core\python\eager\function.py”, line 545, in call
ctx=ctx)
File “A:\TRAINING COURSES IN USE\PYTHON\Handwritten-Digit-Recognition\lib\site-packages\tensorflow_core\python\eager\execute.py”, line 67, in quick_execute
six.raise_from(core._status_to_exception(e.code, message), None)
File “”, line 3, in raise_from
tensorflow.python.framework.errors_impl.UnknownError: Failed to get convolution algorithm. This is probably because cuDNN failed to initialize, so try looking to see if a warning log message was printed above.
[[node conv2d_1/convolution (defined at A:\TRAINING COURSES IN USE\PYTHON\Handwritten-Digit-Recognition\lib\site-packages\keras\backend\tensorflow_backend.py:3009) ]] [Op:__inference_keras_scratch_graph_1536]
i have searched the web for solutions, nothing i have seen really addresses the issue. any help gratefully received.
using pycharm and carefully installing and updating all the appropriate libraries, i have now got everything working. the only problem is that actual recognition success rate is much less than 10%. it is more or less hopeless – a random guessing machine would give better results! i have tried it both with the given mnist.h5 file and my own training and the results are equally bad. of course i can try changing the hyperparameters, but so far the results are very disappointing.
i will try to create my own data library to train it on so that it recognises my handwriting, which is for me and all other private users surely the most useful thing.
Can you tell me how to solve avx avx2 problem
can you tell me the python and tensorflow version that you used in this project because i am getting error after many tries.
hey when i run this,and draw any digit ,it predict wrong digit.
Can I have a mentor or an advisor please for this project
I am a beginner in coding world
I am trying to run this code on a Mac. I Understand that win32 is a windows thing and that does not work for Mac. I would greatly appreciate it. if you could explain or provide an alternative.
From what I can tell only these lines are affected:
HWND = self.canvas.winfo_id() # get the handle of the canvas
rect = win32gui.GetWindowRect(HWND) # get the coordinate of the canvas || Does not work as win32 gui module not available for Mac
im = ImageGrab.grab(rect)
Error when checking target: expected dense_8 to have 2 dimensions, but got array with shape (60000, 10, 10)
how and where save mnist.h5 file
Download folder if you are working on your local machine.
first install python 3.5 64 bit then run pip install tensorflow it will get appropriate version automatically
tensorflow runs only on 64 bit python
Sir Everything is running fine best but, at this line
model = load_model(mnist.h5) it gives me an error
ValueError Traceback (most recent call last)
in
—-> 1 m = load_model(‘mnist.h5′)
~\Anaconda3\envs\tensorflow\lib\site-packages\keras\engine\saving.py in load_wrapper(*args, **kwargs)
490 os.remove(tmp_filepath)
491 return res
–> 492 return load_function(*args, **kwargs)
493
494 return load_wrapper
~\Anaconda3\envs\tensorflow\lib\site-packages\keras\engine\saving.py in load_model(filepath, custom_objects, compile)
582 if H5Dict.is_supported_type(filepath):
583 with H5Dict(filepath, mode=’r’) as h5dict:
–> 584 model = _deserialize_model(h5dict, custom_objects, compile)
585 elif hasattr(filepath, ‘write’) and callable(filepath.write):
586 def load_function(h5file):
~\Anaconda3\envs\tensorflow\lib\site-packages\keras\engine\saving.py in _deserialize_model(h5dict, custom_objects, compile)
272 raise ValueError(‘No model found in config.’)
273 model_config = json.loads(model_config.decode(‘utf-8’))
–> 274 model = model_from_config(model_config, custom_objects=custom_objects)
275 model_weights_group = h5dict[‘model_weights’]
276
~\Anaconda3\envs\tensorflow\lib\site-packages\keras\engine\saving.py in model_from_config(config, custom_objects)
625 ‘`Sequential.from_config(config)`?’)
626 from ..layers import deserialize
–> 627 return deserialize(config, custom_objects=custom_objects)
628
629
~\Anaconda3\envs\tensorflow\lib\site-packages\keras\layers\__init__.py in deserialize(config, custom_objects)
166 module_objects=globs,
167 custom_objects=custom_objects,
–> 168 printable_module_name=’layer’)
~\Anaconda3\envs\tensorflow\lib\site-packages\keras\utils\generic_utils.py in deserialize_keras_object(identifier, module_objects, custom_objects, printable_module_name)
145 config[‘config’],
146 custom_objects=dict(list(_GLOBAL_CUSTOM_OBJECTS.items()) +
–> 147 list(custom_objects.items())))
148 with CustomObjectScope(custom_objects):
149 return cls.from_config(config[‘config’])
~\Anaconda3\envs\tensorflow\lib\site-packages\keras\engine\sequential.py in from_config(cls, config, custom_objects)
299 for conf in layer_configs:
300 layer = layer_module.deserialize(conf,
–> 301 custom_objects=custom_objects)
302 model.add(layer)
303 if not model.inputs and build_input_shape:
~\Anaconda3\envs\tensorflow\lib\site-packages\keras\layers\__init__.py in deserialize(config, custom_objects)
166 module_objects=globs,
167 custom_objects=custom_objects,
–> 168 printable_module_name=’layer’)
~\Anaconda3\envs\tensorflow\lib\site-packages\keras\utils\generic_utils.py in deserialize_keras_object(identifier, module_objects, custom_objects, printable_module_name)
147 list(custom_objects.items())))
148 with CustomObjectScope(custom_objects):
–> 149 return cls.from_config(config[‘config’])
150 else:
151 # Then `cls` may be a function returning a class.
~\Anaconda3\envs\tensorflow\lib\site-packages\keras\engine\base_layer.py in from_config(cls, config)
1177 A layer instance.
1178 “””
-> 1179 return cls(**config)
1180
1181 def count_params(self):
~\Anaconda3\envs\tensorflow\lib\site-packages\keras\legacy\interfaces.py in wrapper(*args, **kwargs)
89 warnings.warn(‘Update your `’ + object_name + ‘` call to the ‘ +
90 ‘Keras 2 API: ‘ + signature, stacklevel=2)
—> 91 return func(*args, **kwargs)
92 wrapper._original_function = func
93 return wrapper
~\Anaconda3\envs\tensorflow\lib\site-packages\keras\layers\convolutional.py in __init__(self, filters, kernel_size, strides, padding, data_format, dilation_rate, activation, use_bias, kernel_initializer, bias_initializer, kernel_regularizer, bias_regularizer, activity_regularizer, kernel_constraint, bias_constraint, **kwargs)
482 kernel_constraint=kernel_constraint,
483 bias_constraint=bias_constraint,
–> 484 **kwargs)
485
486 def get_config(self):
~\Anaconda3\envs\tensorflow\lib\site-packages\keras\layers\convolutional.py in __init__(self, rank, filters, kernel_size, strides, padding, data_format, dilation_rate, activation, use_bias, kernel_initializer, bias_initializer, kernel_regularizer, bias_regularizer, activity_regularizer, kernel_constraint, bias_constraint, **kwargs)
115 self.activation = activations.get(activation)
116 self.use_bias = use_bias
–> 117 self.kernel_initializer = initializers.get(kernel_initializer)
118 self.bias_initializer = initializers.get(bias_initializer)
119 self.kernel_regularizer = regularizers.get(kernel_regularizer)
~\Anaconda3\envs\tensorflow\lib\site-packages\keras\initializers.py in get(identifier)
513 def get(identifier):
514 if isinstance(identifier, dict):
–> 515 return deserialize(identifier)
516 elif isinstance(identifier, six.string_types):
517 config = {‘class_name’: str(identifier), ‘config’: {}}
~\Anaconda3\envs\tensorflow\lib\site-packages\keras\initializers.py in deserialize(config, custom_objects)
508 module_objects=globals(),
509 custom_objects=custom_objects,
–> 510 printable_module_name=’initializer’)
511
512
~\Anaconda3\envs\tensorflow\lib\site-packages\keras\utils\generic_utils.py in deserialize_keras_object(identifier, module_objects, custom_objects, printable_module_name)
138 if cls is None:
139 raise ValueError(‘Unknown ‘ + printable_module_name +
–> 140 ‘: ‘ + class_name)
141 if hasattr(cls, ‘from_config’):
142 custom_objects = custom_objects or {}
ValueError: Unknown initializer: GlorotUniform
please give me solution, Thnakyou!
Sir it gives me an error at this line
model = load_model(‘mnist.h5’)
here is the Error
ValueError Traceback (most recent call last)
in
—-> 1 m = load_model(‘mnist.h5′)
~\Anaconda3\envs\tensorflow\lib\site-packages\keras\engine\saving.py in load_wrapper(*args, **kwargs)
490 os.remove(tmp_filepath)
491 return res
–> 492 return load_function(*args, **kwargs)
493
494 return load_wrapper
~\Anaconda3\envs\tensorflow\lib\site-packages\keras\engine\saving.py in load_model(filepath, custom_objects, compile)
582 if H5Dict.is_supported_type(filepath):
583 with H5Dict(filepath, mode=’r’) as h5dict:
–> 584 model = _deserialize_model(h5dict, custom_objects, compile)
585 elif hasattr(filepath, ‘write’) and callable(filepath.write):
586 def load_function(h5file):
~\Anaconda3\envs\tensorflow\lib\site-packages\keras\engine\saving.py in _deserialize_model(h5dict, custom_objects, compile)
272 raise ValueError(‘No model found in config.’)
273 model_config = json.loads(model_config.decode(‘utf-8’))
–> 274 model = model_from_config(model_config, custom_objects=custom_objects)
275 model_weights_group = h5dict[‘model_weights’]
276
~\Anaconda3\envs\tensorflow\lib\site-packages\keras\engine\saving.py in model_from_config(config, custom_objects)
625 ‘`Sequential.from_config(config)`?’)
626 from ..layers import deserialize
–> 627 return deserialize(config, custom_objects=custom_objects)
628
629
~\Anaconda3\envs\tensorflow\lib\site-packages\keras\layers\__init__.py in deserialize(config, custom_objects)
166 module_objects=globs,
167 custom_objects=custom_objects,
–> 168 printable_module_name=’layer’)
~\Anaconda3\envs\tensorflow\lib\site-packages\keras\utils\generic_utils.py in deserialize_keras_object(identifier, module_objects, custom_objects, printable_module_name)
145 config[‘config’],
146 custom_objects=dict(list(_GLOBAL_CUSTOM_OBJECTS.items()) +
–> 147 list(custom_objects.items())))
148 with CustomObjectScope(custom_objects):
149 return cls.from_config(config[‘config’])
~\Anaconda3\envs\tensorflow\lib\site-packages\keras\engine\sequential.py in from_config(cls, config, custom_objects)
299 for conf in layer_configs:
300 layer = layer_module.deserialize(conf,
–> 301 custom_objects=custom_objects)
302 model.add(layer)
303 if not model.inputs and build_input_shape:
~\Anaconda3\envs\tensorflow\lib\site-packages\keras\layers\__init__.py in deserialize(config, custom_objects)
166 module_objects=globs,
167 custom_objects=custom_objects,
–> 168 printable_module_name=’layer’)
~\Anaconda3\envs\tensorflow\lib\site-packages\keras\utils\generic_utils.py in deserialize_keras_object(identifier, module_objects, custom_objects, printable_module_name)
147 list(custom_objects.items())))
148 with CustomObjectScope(custom_objects):
–> 149 return cls.from_config(config[‘config’])
150 else:
151 # Then `cls` may be a function returning a class.
~\Anaconda3\envs\tensorflow\lib\site-packages\keras\engine\base_layer.py in from_config(cls, config)
1177 A layer instance.
1178 “””
-> 1179 return cls(**config)
1180
1181 def count_params(self):
~\Anaconda3\envs\tensorflow\lib\site-packages\keras\legacy\interfaces.py in wrapper(*args, **kwargs)
89 warnings.warn(‘Update your `’ + object_name + ‘` call to the ‘ +
90 ‘Keras 2 API: ‘ + signature, stacklevel=2)
—> 91 return func(*args, **kwargs)
92 wrapper._original_function = func
93 return wrapper
~\Anaconda3\envs\tensorflow\lib\site-packages\keras\layers\convolutional.py in __init__(self, filters, kernel_size, strides, padding, data_format, dilation_rate, activation, use_bias, kernel_initializer, bias_initializer, kernel_regularizer, bias_regularizer, activity_regularizer, kernel_constraint, bias_constraint, **kwargs)
482 kernel_constraint=kernel_constraint,
483 bias_constraint=bias_constraint,
–> 484 **kwargs)
485
486 def get_config(self):
~\Anaconda3\envs\tensorflow\lib\site-packages\keras\layers\convolutional.py in __init__(self, rank, filters, kernel_size, strides, padding, data_format, dilation_rate, activation, use_bias, kernel_initializer, bias_initializer, kernel_regularizer, bias_regularizer, activity_regularizer, kernel_constraint, bias_constraint, **kwargs)
115 self.activation = activations.get(activation)
116 self.use_bias = use_bias
–> 117 self.kernel_initializer = initializers.get(kernel_initializer)
118 self.bias_initializer = initializers.get(bias_initializer)
119 self.kernel_regularizer = regularizers.get(kernel_regularizer)
~\Anaconda3\envs\tensorflow\lib\site-packages\keras\initializers.py in get(identifier)
513 def get(identifier):
514 if isinstance(identifier, dict):
–> 515 return deserialize(identifier)
516 elif isinstance(identifier, six.string_types):
517 config = {‘class_name’: str(identifier), ‘config’: {}}
~\Anaconda3\envs\tensorflow\lib\site-packages\keras\initializers.py in deserialize(config, custom_objects)
508 module_objects=globals(),
509 custom_objects=custom_objects,
–> 510 printable_module_name=’initializer’)
511
512
~\Anaconda3\envs\tensorflow\lib\site-packages\keras\utils\generic_utils.py in deserialize_keras_object(identifier, module_objects, custom_objects, printable_module_name)
138 if cls is None:
139 raise ValueError(‘Unknown ‘ + printable_module_name +
–> 140 ‘: ‘ + class_name)
141 if hasattr(cls, ‘from_config’):
142 custom_objects = custom_objects or {}
ValueError: Unknown initializer: GlorotUniform
where can i find the detail explanation for full code for gui_digit_recognizer.py file
For linux users please replace rect = win32gui.GetWindowRect(HWND) with rect = self.canvas.coords(HWND)
And replace from PIL import ImageGrab, Image with import pyscreenshot as ImageGrab in the gui_digit_recognizer.py file
bro set it as this,
y_train = keras.utils.to_categorical(y_train, num_classes=None)
y_test = keras.utils.to_categorical(y_test, num_classes=None)
Hey, the program is running but it is giving the wrong output. I draw 0 and it gives 4. Please help
It always gives wrong prediction. Please help
The problem with the GUI is that is generates an image with black digits on white background but the model is trained on white digits on black background. Add this line to the GUI python code predict_digit function: img = PIL.ImageOps.invert(img)
It will then look like this
def predict_digit(img):
#resize image to 28×28 pixels
img = img.resize((28,28))
#convert rgb to grayscale
img = img.convert(‘L’)
#invert colors so background is black, number is white
img = PIL.ImageOps.invert(img)
img = np.array(img)
#reshaping to support our model input and normalizing
img = img.reshape(1,28,28,1)
img = img/255.0
#predicting the class
res = model.predict([img])[0]
return np.argmax(res), max(res)
Hi, article
which version Tensorflow and Keras when you install them?
Thank you so much!
num_classes = 10 should be initialized in section 2 before line 7, in order to avoid errors.
Also, it is better to invert the grabbed image colors just before converting it into ndarray, because train images have black background and white digits.
what is this “hist” variable why creating ?
after fitting model you are not using that model
If you facing a problem with wrong prediction and very low accuracy just try making this code changes in the gui file:
# predicting images
img= cv2.imread(‘image_name’, 0)
#resize image to 28×28 pixels
img_resized = cv2.resize(img, dsize=(28, 28), interpolation=cv2.INTER_CUBIC)
img_resized = np.array(img_resized)
img_reshaped = img_resized.reshape(1,28,28,1)
img_reshaped = img_reshaped/255.0
#predicting the class
res = model.predict([img_reshaped])[0]
digit, accuracy= np.argmax(res), max(res)
print(‘digit= ‘ + str(digit), ‘and accuracy= ‘ + str(accuracy))
Also make sure your input to the model is a black background with no. written in white image as the mnist dataset consists of datasets with such images.
You can also use a python command to invert the color of the image and then pass the image to the model.
Any other quieries you can email them to me.
test set accuracy is very low. can u suggest how to improve test set accuracy?
cv2 not defined
Wanted Full code of this project
.