Pneumonia Detection using CNN in Python
Machine Learning courses with 100+ Real-time projects Start Now!!
With this Machine Learning Project, we are going to build a pneumonia detection system. This system will be used to detect whether a person has pneumonia or not. This system will take input as an image and will detect if the person has pneumonia or not. For this project, the accuracy factor is very important. We are going to use the VGG16 CNN model for this project.
So, let’s start with the project.
Pneumonia Detection
Pneumonia is responsible for 16% of all deaths of children under five worldwide. About 1 million people seek medical care from hospitals in the United States each year, resulting in 50,000 deaths. Thousands of people are at risk of death as a result of complicated Coronavirus disease (COVID-19) due to pneumonia. Pneumonia is an inflammatory lung disease characterized by multiple illnesses caused by different microorganisms.
A lower respiratory tract infection begins as an upper respiratory tract infection. During breathing, microscopic organisms are constantly exposed to the alveolar ducts and bronchioles.
In the upper respiratory tract (the nasal passages, the pharynx, paranasal sinuses, and the larynx above the vocal folds), the flora compete with pathogens for nutrients, while in the lower respiratory tract (the bronchi and bronchioles, trachea, and alveoli), cough reflexes, immunoglobulins, and complement proteins help expel mucus and foreign matter.
Pneumonia progresses based on the body’s immune response, the virulence of the causative organism, and the amount of organisms in the pre-stage infection.
The Model Architecture
Chest X-Ray radiographs (CXR) are commonly used as a diagnostic tool for pneumonia disease. Clinical history, vital signs, and various laboratory examinations are used to confirm the diagnosis of the areas of increased opacity.
There are always other scenarios and conditions in the lungs that can complicate the pneumonia diagnosis on CXR, such as bleeding, fluid overload, volume loss, post-radiation, and post-surgical changes.
Radiologists have known differences or variability in how they interpret chest radiographs.
Since the turn of the century, computer-aided systems have been widely used for pneumonia detection in order to improve efficiency and accuracy.
In many medical imaging analysis tasks, including detection, classification, and segmentation, deep learning approaches outperformed or outnumbered conventional machine learning methods.
This paper by Karen Simonyan and Andrew Zisserman reports VGG-16 architecture, composed of 13 convolutional layers, two fully connected layers, and one SoftMax classifier. An eight-layer network consisting of convolutional and fully connected layers was created by Karen and Andrew. Convolutions are stacked in threes on top of each other in order to simplify the process.
The precise structure of the VGG-16 network is as follows:
1. The first convolutional layer and the second convolutional layer consist of 64 feature kernel filters each with a size of 3×3. As input image (RGB image with depth 3 passed into first and second convolutional layer, dimensions changes to 224x224x64. Then the resulting output is passed to max pooling layer with a stride of 2.
2. In the third and fourth convolutional layers, there are 124 feature kernel filters, and the size of the filters is 3×3. As a result, the resulting output is 56x56x128 after two layers of max pooling with stride 2.
3. There are three layers of convolutional neural networks, the fifth, the sixth, and the seventh, which have kernel sizes of 3×3. A 256 feature map is used by all three. Then there is a layer with stride 2 called max pooling.
4. A total of seven convolutional layers are in the range of eight to thirteen, each with a kernel size of three by three. There are 512 kernel filters in all of these sets of convolutional layers. After these layers, there is a max pooling layer that has a stride of 1.
5. A fully connected hidden layer (fourteenth layer) contains 4096 units, followed by a 1000-unit softmax output layer (fourteenth layer).
Project Prerequisites
The required modules for this project are:
- Pandas – pip install pandas
- Numpy- pip install numpy
- Tensorflow – pip install tensorflow
Pneumonia Detection Project
This pneumonia detection dataset contains 1000s of images of X-rays. This dataset is divided into training, testing, and Val for the final testing of the model. Further, each dataset is divided into 2 categories a pneumonia image and a normal x-ray image. Please download pneumonia detection machine learning project code and dataset from the following link: Pneumonia Detection Project
Steps to Implement Pneumonia Detection
1. Importing all the modules to be used in the project.
import numpy as np
import matplotlib.pyplot as plt
%matplotlib inline

from tensorflow.keras.layers import Input,Conv2D,MaxPooling2D,Dropout,Flatten,Dense,Activation,BatchNormalization,add
from tensorflow.keras.models  import Model,Sequential
from tensorflow.keras.preprocessing.image import ImageDataGenerator
from tensorflow.keras.utils import plot_model
from tensorflow.keras.applications.vgg16 import VGG16,preprocess_input
import os
2. Here we are loading the VGG16 model and defining our model and its layers which are going to be used to detect pneumonia.
vgg = VGG16(weights= 'imagenet', include_top = False, input_shape = (224,224,3))layers)


for layer in vgg.layers:
    layer.trainable = False #making all the layers non-trainable

x = Flatten()(vgg.output)

predictions = Dense(2,activation='softmax')(x)


model = Model(inputs=vgg.input, outputs=predictions)
model.summary()
3. Here we are initializing the data generator for training the model and we are loading the VGG16 model with ImageNet weights without the Fully Connected Layers.
target_shape = (224,224)

train_dir = "train"
val_dir = "val"     # -- Directories for data
test_dir = "test"   #

vgg = VGG16(weights= 'imagenet', include_top = False, input_shape = (224,224,3))
for layer in vgg.layers:
    layer.trainable = False # Making all the layers non-trainable
4. Here defining the model and its layers.
x = Flatten()(vgg.output)
predictions = Dense(2,activation='softmax')(x)
model = Model(inputs=vgg.input, outputs=predictions)
model.summary()
5. Here we are getting our training and testing data.
train_gen = ImageDataGenerator(rescale=1/255.0,
                               horizontal_flip=True,
                               zoom_range=0.2,
                               shear_range=0.2)


# Making the data loader for validation data
test_gen = ImageDataGenerator(rescale=1/255.0)


# Function to make iterable object for training
train_data_gen = train_gen.flow_from_directory(train_dir,
                                               target_shape,
                                               batch_size=16,
                                               class_mode='categorical')

# Function to make iterable object for training
test_data_gen = train_gen.flow_from_directory(test_dir,
                                               target_shape,
                                               batch_size=16,
                                               class_mode='categorical')
6. Here We are fitting our training data into our model. Also, we are passing the test data and generating the output.
model.compile(loss='categorical_crossentropy',optimizer='adam',metrics=['accuracy'])
hist = model.fit_generator(train_data_gen,
        steps_per_epoch=20,
        epochs=20,
        validation_data=test_data_gen,
        validation_steps=10)
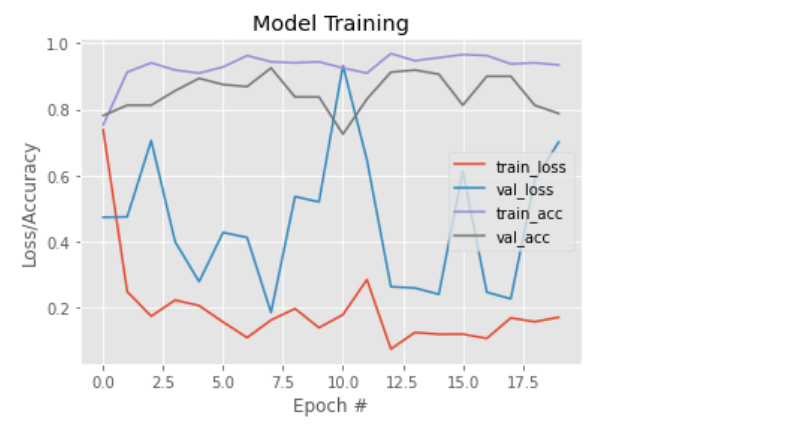
7. Here we are plotting an accuracy and loss curve.
plt.style.use("ggplot")
plt.figure()
plt.plot(hist.history["loss"], label="train_loss")
plt.plot(hist.history["val_loss"], label="val_loss")
plt.plot(hist.history["accuracy"], label="train_acc")
plt.plot(hist.history["val_accuracy"], label="val_acc")
plt.title("Model Training")
plt.xlabel("Epoch #")
plt.ylabel("Loss/Accuracy")
plt.legend()
plt.savefig("epochs.png")
Summary
Pneumonia is a serious infection that affects the lungs. Doctors usually find it by looking at chest X-ray images. But this takes time and needs a trained expert. Using a Convolutional Neural Network (CNN) in Python, we can build a machine learning project that checks X-ray images and tells if a person has pneumonia. CNN is very good at working with image data because it looks at small parts of the image and learns patterns.
In this Machine Learning project, we learned how to build a pneumonia detection system that is used to detect whether a person has pneumonia or not. In this project, we have used VGG16 CNN. This is used in a lot of detection and classification problems.
Did we exceed your expectations?
If Yes, share your valuable feedback on Google


