Pan Card Fraud Detection using Python & OpenCV
Machine Learning courses with 100+ Real-time projects Start Now!!
Nowadays frauds are everywhere. From cyber technology to legal documents, everywhere is fraud. So here, we’re going to build a pan card fraud detection project using Computer Vision with OpenCV – Python and Deep Learning.
What is OpenCV?
OpenCV is a real-time computer vision library. It is very fast and lightweight because it runs on C++ in the backend. Using OpenCV we can perform any kind of image processing task because it comes with more than 2500 image processing algorithms.
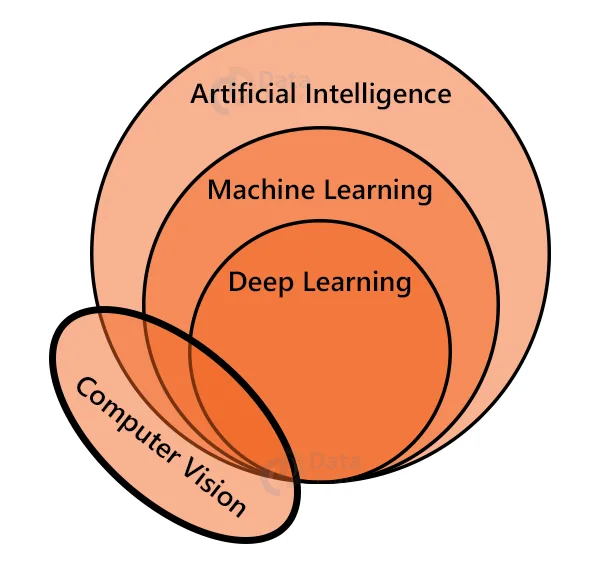
Computer Vision is a field of artificial intelligence that enables the extraction of information from images, videos, or other visual inputs such as cameras.
What is an Artificial Neural Network?
Artificial Neural Network is the core of deep learning algorithms. It mimics biological neurons. It works the same way of sending signals to one another of biological neurons. Neural networks are a set of layers that contains an input layer, one or more hidden layers, and an output layer.
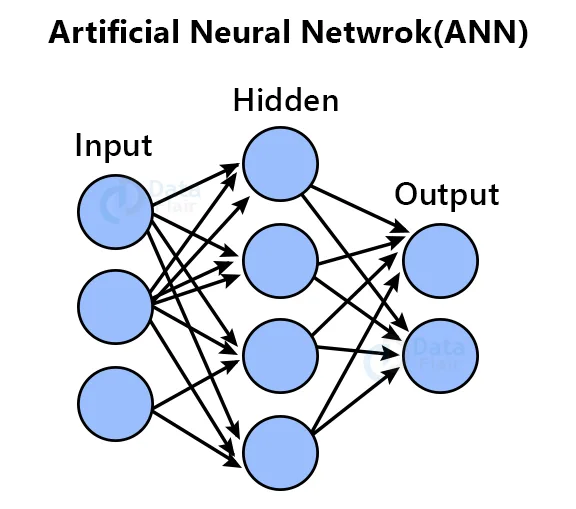
Here we’ll work with images, so we have to use a Convolutional neural network (CNN).
What is a Convolutional Neural Network?
In deep learning, a convolutional neural network or CNN is a type of algorithm that is commonly used to process images. It is specifically designed to process images. CNN takes images as input, then applies some filters, assigns some learnable weights and biases, and then it will be able to differentiate between one class from another.
What is Deep Learning?
Deep learning is a subset of machine learning and artificial intelligence. It is inspired by the human brain’s architecture. Deep learning is used to solve very complex problems that cannot be solved using traditional machine learning algorithms.
Prerequisites:-
1. Python 3.x (We used python 3.7.10 for this project).
2. OpenCV – 4.4.0
3. Numpy – 1.19.3
4. Tensorflow – 2.5.0
5. Scikit-learn – 0.24.2
6. MediaPipe – 0.8.5
7. Tqdm – 4.60.0
We’ll train a classifier model that will be able to distinguish between real and fake pan cards. We’ll use the TensorFlow library to build the model. Tensorflow is a Deep learning Library developed by Google.
Download Pan Card Fraud Detection Project Code
Please download the source code of pan card fraud detection with opencv: Pan Card Fraud Detection Project Code
Steps to create pan card fraud detection system using python:
- Import necessary packages.
- Data preprocessing.
- Create our model architecture.
- Train the model.
- Test the model.
Step 1 – Import necessary packages :
# Pan card fraud detection- DataFlair
import os
import cv2
import numpy as np
from tqdm import tqdm
import tensorflow as tf
import matplotlib.pyplot as plt
from sklearn.model_selection import train_test_split
from tensorflow.keras.models import Sequential
from tensorflow.keras.layers import Conv2D, Dense, Flatten, Dropout
- From TensorFlow, we’ve imported some modules that we’ll be using to build our model architecture.
Dense: Dense is a commonly used layer of deep learning. A Dense layer takes all outputs from the previous layer to its all neurons, and then each neuron provides one output to the next layer.
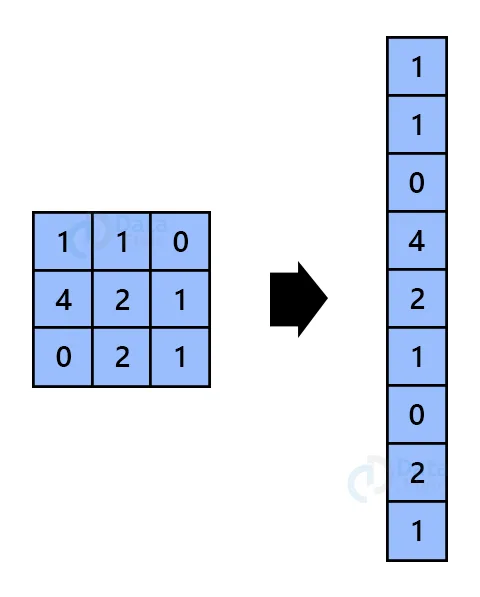
Flatten: Flatten layer reshapes multi-dimensional data to one-dimensional. if a layer is having an input shape of (batch_size, 100,100,3), then the output shape will be (batch_size, 30000).
Dropout: Dropout randomly ignores neurons during the training phase. It helps to prevent the overfitting of the model.
Step 2 – Data preprocessing :
img_size = 100
datadir = r'images'	# root data directory
CATEGORIES = os.listdir(datadir)
print(CATEGORIES)
- os.listdir() returns a list of all files and directories in the specific given path.
Output:-
[‘fake’, ‘real’]
- Here we can see that there are two folders in the root data directory. Each folder contains its corresponding data.
# Preprocessing Function
def PreProcess(img_size, path):
    """This function reads images from the given folders subfolder
    	and returns a normalized array along with their respective classes"""
    x, y = [], []
    CATEGORIES = os.listdir(path)
    print("Found {} classes: {}".format(len(CATEGORIES), CATEGORIES))

    for category in CATEGORIES:
    	path = os.path.join(datadir, category)
    	classIndex = CATEGORIES.index(category)

    	for imgs in tqdm(os.listdir(path)):
        	img_arr = cv2.imread(os.path.join(path, imgs))

        	# resize the image
        	resized_array = cv2.resize(img_arr, (img_size, img_size))
        	cv2.imshow("images", resized_array)
        	cv2.waitKey(1)
        	# Normalize the image
        	resized_array = resized_array/255.0
        	x.append(resized_array)
        	y.append(classIndex)
    cv2.destroyAllWindows()
    return x, y, CATEGORIES
- First, we defined a function that takes target training image size and the root directory as input, and returns processed training feature as x, training label as y, and the class names.
- Here all image data and class indexes are collected and then stored in the x and y list respectively.
- Tqdm is a loop progress visualizer.
- cv2.imread() reads an image from the local path and stores it in memory as a numpy array.
- We’ll try to make the model lightweight, so using the cv2.resize() function we reduce the image size to 100×100. Image resizing is an important step because the model accepts the same dimensional image as input.
- Deep Learning gives the best accuracy with float32 data type. So we divide the resized image array by 255.
# Split the dataset into training and testing
X_train, x_test, Y_train, y_test = train_test_split(x, y, random_state=42)

# Convert all the list to numpy array
X_train = np.array(X_train)
x_test = np.array(x_test)
Y_train = np.array(Y_train)
y_test = np.array(y_test)
- Using train_test_split, we split the dataset into training and testing. Later we’ll use the testing list to evaluate the model accuracy.
- After that, we convert all the lists to a numpy array.
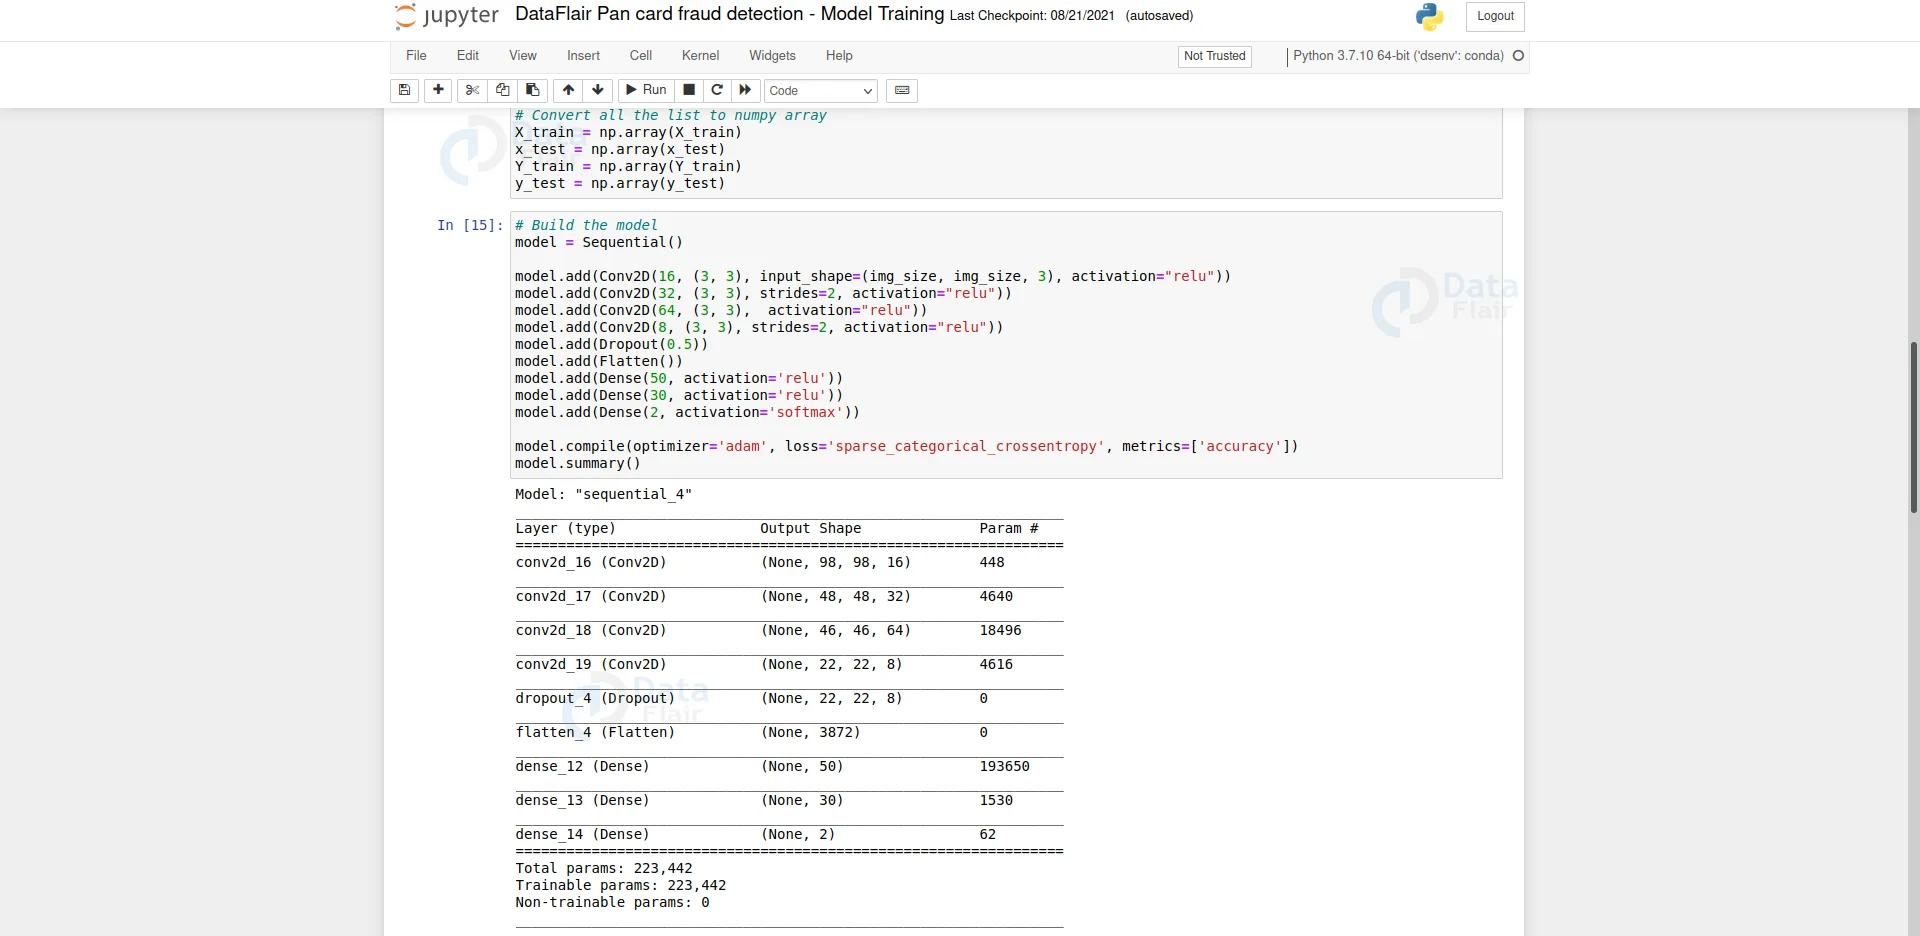
Step 3 – Create our model architecture:
# Build the model
model = Sequential()

model.add(Conv2D(16, (3, 3), input_shape=(img_size, img_size, 3),
 activation="relu"))
model.add(Conv2D(32, (3, 3), strides=2, activation="relu"))
model.add(Conv2D(64, (3, 3),  activation="relu"))
model.add(Conv2D(8, (3, 3), strides=2, activation="relu"))
model.add(Dropout(0.5))
model.add(Flatten())
model.add(Dense(50, activation='relu'))
model.add(Dense(30, activation='relu'))
model.add(Dense(2, activation='softmax'))

model.compile(optimizer='adam', loss='sparse_categorical_crossentropy',
 metrics=['accuracy'])
model.summary()
- Sequential API is used to build simple model architecture. It is a plain stack of layers where each layer has one input and one output.
- Using model.add() we can add layers to our model.
- In this model architecture, we have used 4 Convolution layers, 1 Dropout layer, 1 Flatten layer, and 3 Dense layers.
- The first convolution layer takes a batch of arrays.
- The final Dense layer has 2 outputs. Because we have only two classes.
- We have categorical data, that’s why we’ve used ‘softmax’ activation function in the last layer and ‘’sparse_categorical_crossentropy’’ as the loss function.
- Finally, we compile the model using model.compile().
Step 4 – Train the model:
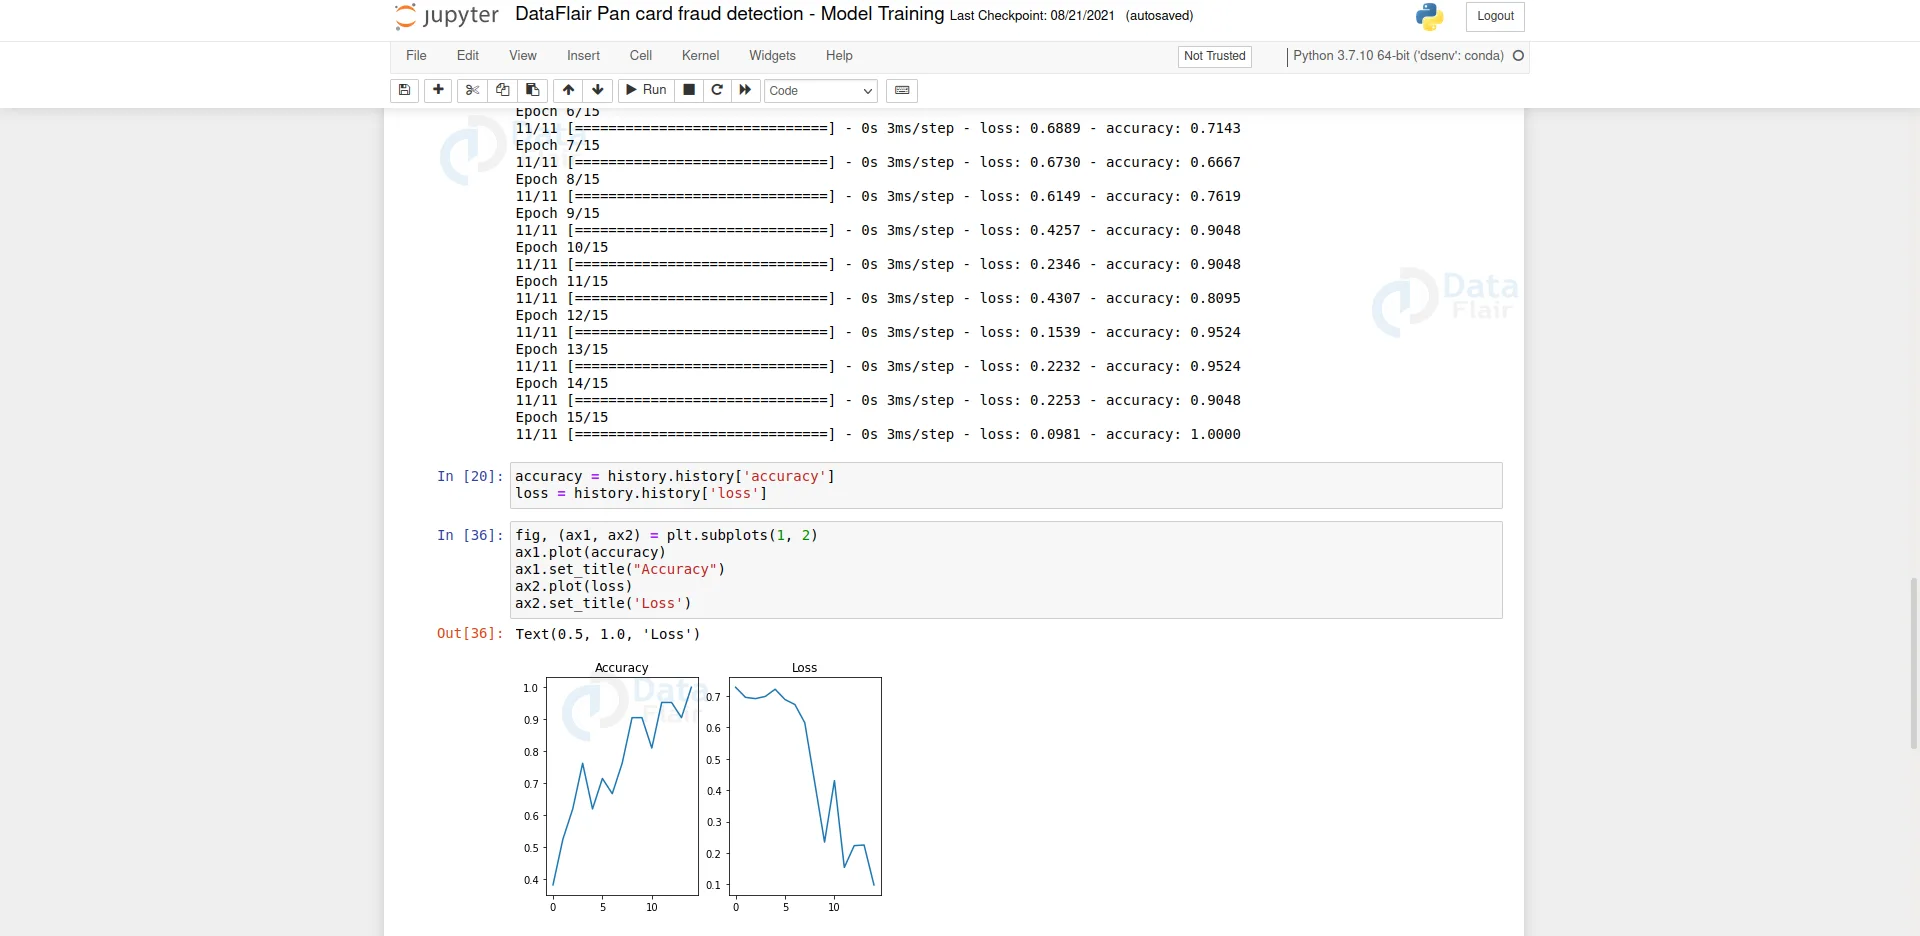
history = model.fit(X_train, Y_train, batch_size = 2, epochs=15, verbose=1)
- Finally, we start the training using model.fit().
- Here we take a batch size of 2. This means 2 images will be fed into the model at the same time.
- Epochs is a hyperparameter that defines the number of times the model will work through the dataset.
Now we’ll plot the accuracy and loss overtime in each loop. We’ll use matplotlib to plot the accuracy and loss.
Step 5 – Test the model:
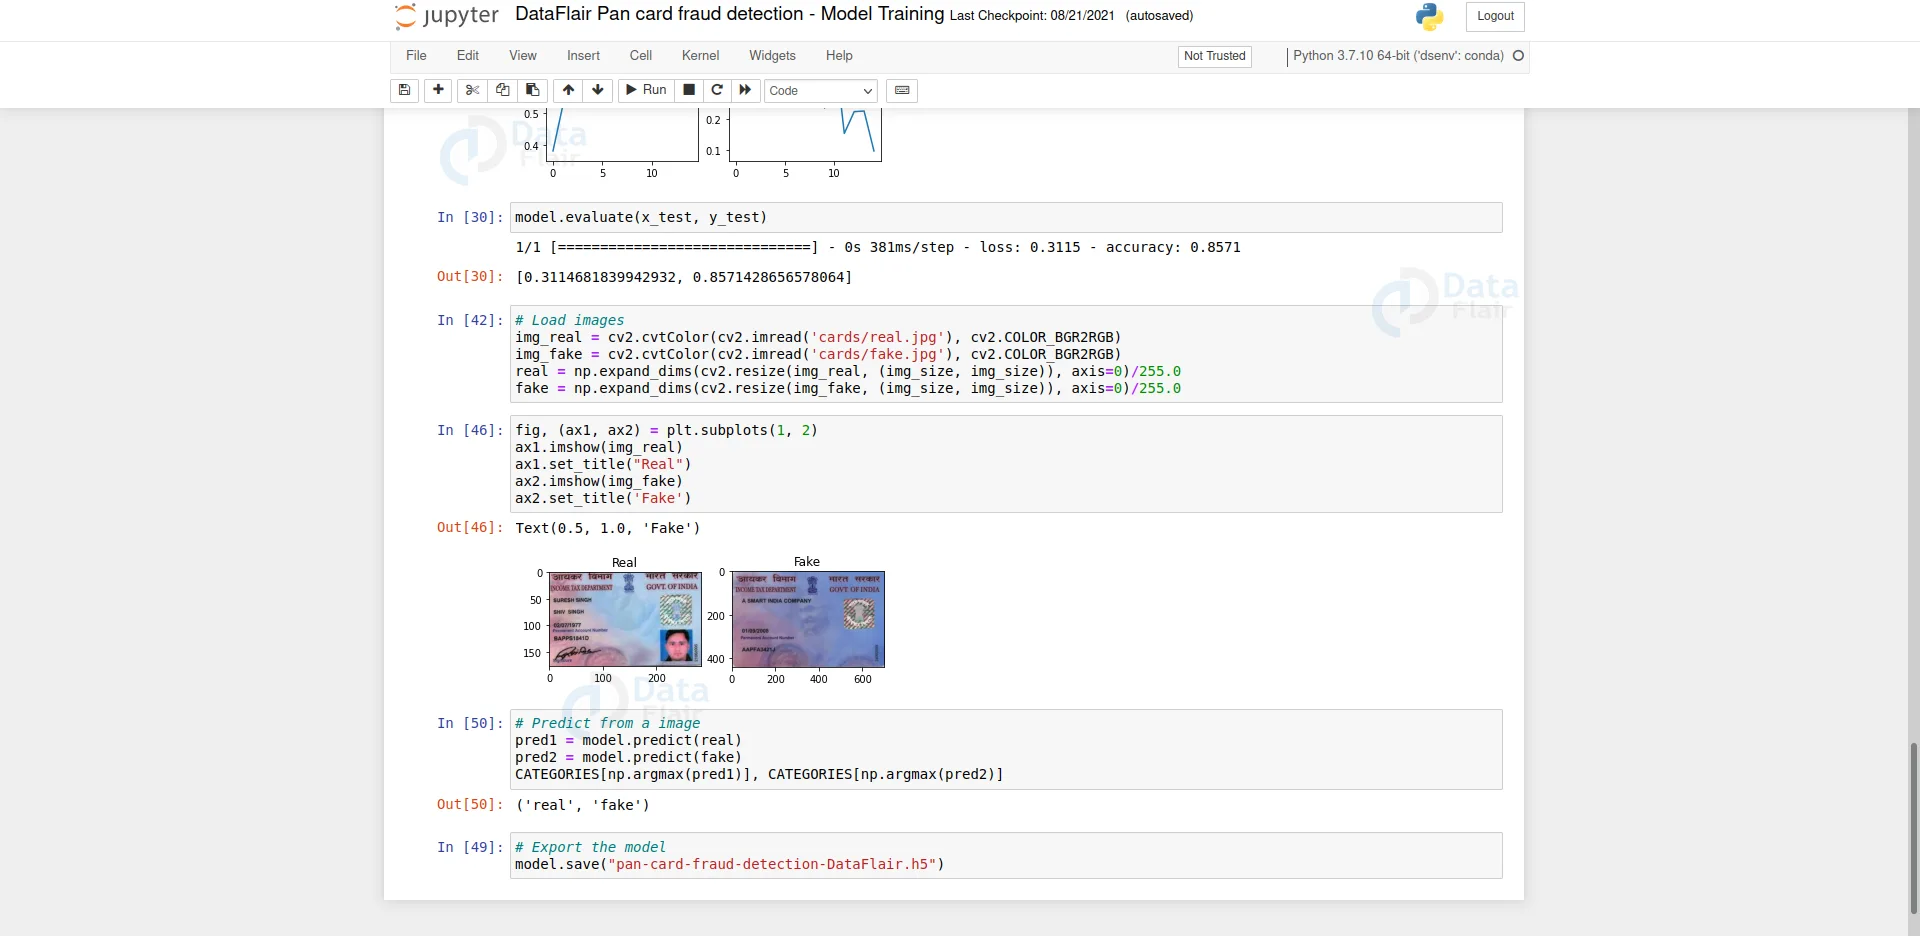
validation_loss, validation_accuracy = model.evaluate(X_test, y_test)
Output: [0.3114681839942932, 0.8571428656578064]
- The first item represents a loss of the test dataset and the 2nd item represents the accuracy of the test dataset.
Here we can see that the model has over 85% accuracy in the test dataset.
Now let’s predict from images directly.
# load images
img_real = cv2.cvtColor(cv2.imread('cards/real.jpg'), cv2.COLOR_BGR2RGB)
img_fake = cv2.cvtColor(cv2.imread('cards/fake.jpg'), cv2.COLOR_BGR2RGB)
real = np.expand_dims(cv2.resize(img_real, (img_size, img_size)), axis=0)/255.0
fake = np.expand_dims(cv2.resize(img_fake, (img_size, img_size)), axis=0)/255.0
- We need to process the image exactly the same way as the training images.
- Using np.expand_dims we expand the image dimension. Suppose the image has a shape of (100, 100, 3), after applying np.expand_dims the image shape will be (1, 100, 100, 3)
fig, (ax1, ax2) = plt.subplots(1, 2) ax1.imshow(img_real) ax1.set_title("Real") ax2.imshow(img_fake) ax2.set_title('Fake') - In this part, we just show the images and their corresponding ground truth labels.
# Predict from a image
pred1 = model.predict(real)
pred2 = model.predict(fake)
CATEGORIES[np.argmax(pred1)], CATEGORIES[np.argmax(pred2)]
Output:
(‘real’, ‘fake’)
- Using model.predict we can predict the output from an image.
- In the output, we can see that our model has successfully predicted whether the pan cards are real or fake.
# Export the model model.save("pan-card-fraud-detection-DataFlair.h5") - Finally, we export the model using model.save() and save it in h5 format.
Summary:
In this project, we’ve built pan card fraud detection using Python Deep learning. We’ve used Tensorflow- sequential API to build the model architecture and OpenCV for other image processing techniques. Through this project, we’ve learned to build our own image classifier using deep learning. Using the same model architecture we can create a classifier that can predict more than 2 classes.
This project is important for banks, verification systems, and digital KYC. It teaches learners how to work with document images, extract data, and apply validation. You will understand real-world fraud patterns, text extraction, and data security. It’s a powerful project that blends OpenCV, OCR, and Python for social and industrial applications.
Note: This project is only for educational purposes. Pan card fraud detection is a very complex problem and it cannot be solved by just using computer vision or deep learning. Nowadays fake pan cards look exactly like the original ones. So, to properly distinguish between real or fake pan cards, government verification is needed.
Did you know we work 24x7 to provide you best tutorials
Please encourage us - write a review on Google


