Real-Time Object Detection using TensorFlow
Machine Learning courses with 100+ Real-time projects Start Now!!
Object detection is used to detect, locate, and trace the object for a given image, we can also detect in real time. But the main question is how we can do this? So to implement this we will be using the Object Detection API provided by Tensorflow. The main purpose of this is that it identifies the class of objects (person, table, chair, etc.) and their specific coordinates in the given image, and recognizes it. Then this specific coordinates are traced out
by drawing a box around those specific objects, and it depends on our model how accurately it locates the position of these objects.
So the ability to locate the object inside an image defines the performance of the algorithm used for detection.
The object detection algorithms may be pre-trained or you can train it from scratch. In this we will be using pre-trained models and changing them as per our requirements.
About Tensorflow
Tensorflow is an open-source library developed by google. It is the best and the most popular deep learning library available in the field. It can run on both GPU and CPU. Neural networks run much faster in GPU. The basic idea of TensorFlow is to be able to create dataflow graphs. These graphs have nodes and edges. The array (data) passed along from layer of nodes to layer of nodes is known as tensor.
It uses Python as front end and runs it efficiently in optimized C++.
Let’s understand the Object Detection API provided by Tensorflow:
The TensorFlow Object Detection API is an open-source framework of TensorFlow that makes it easy for us to construct, train and deploy object detection models.
In Tensorflow Object Detection API, we have pre-trained models that are known as Model Zoo.
These pre-trained models are trained on various datasets like COCO (Common Objects in context) dataset, KITTI dataset , and Open Images Dataset. As these models are trained on a number of datasets, these models work very efficiently and accuracy is also very high.
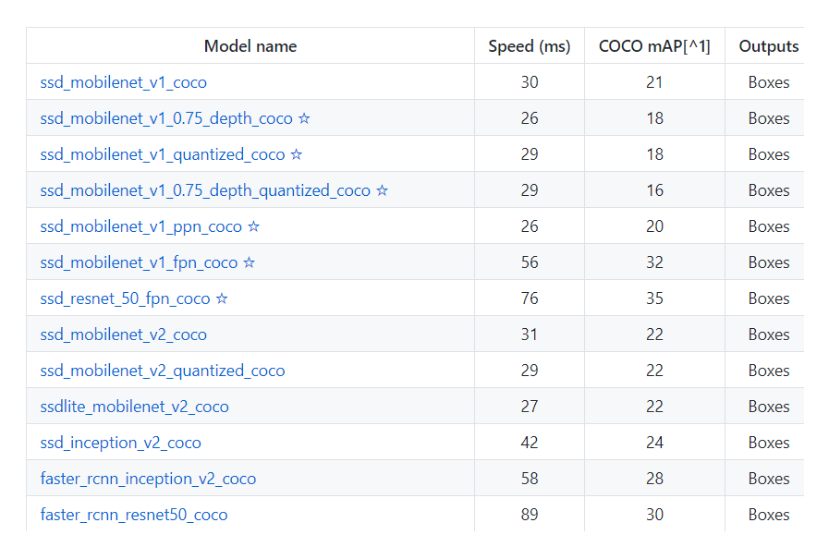
As you can see below there are various models available for you , we can choose any model according to the system we have. Now one question comes to mind: what is different in these models? So the difference is that every model has its own architecture which makes it different from other models.
With different model architectures, their accuracies are also different.
This is the various model available for detecting object:
How to use Object Detection API:
It is not mandatory for you to have complete knowledge of neural networks and machine learning for using this API, as we are mostly going to use the files provided by the Tensorflow Object Detection API. All you need to have is knowledge of python and know how to work on a jupyter notebook.
To use this API it is not mandatory to have Anaconda in your PC, just we need a jupyter notebook as we will be running code in jupyter notebook.
Download TensorFlow Object Detection Code
Please download the source code of tensorflow object detection: TensorFlow Object Detection Project Code
So let’s start implementing this Tensorflow Object Detection API:
1) Firstly let’s start by downloading some files which is required:
We will download Tensorflow API from Github:
We can download Tensorflow API in two ways:
1. Download by going to GitHub and download the zip file, and extract the files.
2. The other way to download is much easier compared to the previous one, but you need to have git installed in your system. Open the command prompt and type this command:
git clone https://github.com/tensorflow/models
2) Next step is to set Virtual environment:
Reason for setting a virtual environment is that it creates a separate environment for projects which means that each project can have its own dependencies, regardless of what dependencies other projects have.
So I named my virtual environment as TOD( short for Tensorflow Object Detection), you can name it anything you want.
If you have Anaconda, open your Anaconda prompt and type:
# this command will create a virtual environment of name TOD
conda create -n TOD
# this command is to activate the TOD virtual environment
conda activate TOD
If you don’t have Anaconda, and Python is installed in your system, then pip comes in handy.
Then follow the following steps:
# Install virtualenv in your system:
pip install virtualenv
# Now in which ever directory you are, this line below will create a    virtualenv there:
virtualenv myenv
# if you are in same directory then type:
myenv\Scripts\activate
# this command is to deactivate this virtual environment:
Deactivate
3) Now install these libraries:
The next step is to install all the dependencies that are needed to make this API work.
Type this command after setting up your virtual environment,
pip install tensorflow
If you have GPU on your PC, use this instead:
pip install tensorflow-gpu
Next,
pip install pillow Cython lxml jupyter matplotlib contextlib2 tf_slim
Now you need to download Protocol Buffer (Protobuf). Download the appropriate version of Protobuf from https://github.com/protocolbuffers/protobuf/releases and extract it to the ‘research’ sub-folder in the ‘models’ folder we downloaded earlier.
Now in the anaconda prompt, navigate to the folder containing the protoc file using the cd ‘path of folder’ and run this command
protoc object_detection/protos/*.proto –python_out=.
For confirmation, you need to go to the protos folder inside models>object_detection>protos and here check that for every proto file there is one python file created.
4) Object Detection Code:
Now you need to go to the ‘object_detection’ directory inside the research subfolder and then open a jupyter notebook at that path. You can use both Spyder or Jupyter to write code, but I will be using a Jupyter notebook and recommend you also to use this only.
- First step is to import all the libraries which will be required to learn and use this Object Detection API. In this the main libraries will be :
- Numpy
- Tensorflow
- Pathlib
- Matplotlib
- PIL
#Importing all the libraries that is required to run this Tensorflow Object Detection API:

import numpy as np
import os
import six.moves.urllib as urllib
import sys
import tarfile
import tensorflow as tf
import zipfile
import pathlib
from collections import defaultdict
from io import StringIO
from matplotlib import pyplot as plt
from PIL import Image
from IPython.display import display

# This are the libraries which we need to import to use this Object Detection API given by Tensorflow(set the path of object_detection folder correctly):

from object_detection.utils import ops as utils_ops
from object_detection.utils import label_map_util
from object_detection.utils import visualization_utils as vis_util
- Second step is to load and save model:
while "models" in pathlib.Path.cwd().parts:
    os.chdir('..')

# We have created a function loading_model To load the model and save it on the system:

def loading_model(model_name):
  base_url = 'http://download.tensorflow.org/models/object_detection/'
  model_file = model_name + '.tar.gz'
  model_dir = tf.keras.utils.get_file(
    fname=model_name,
    origin=base_url + model_file,
    untar=True)

  model_dir = pathlib.Path(model_dir)/"saved_model"

  model = tf.saved_model.load(str(model_dir))

  return model
- Now we load the labels which are present in object_detection/data folder by setting the path, or if the labels are not present in your system then you can download labels by using commented code, both will work.
# set the path of label file and Load label map data (for plotting):
labels_path = 'models/research/object_detection/data/mscoco_label_map.pbtxt'
category_index = label_map_util.create_category_index_from_labelmap(labels_path , use_display_name=True)
###To download Labels Manually:
# def downloading_labels(filename):
#     base_url = 'https://raw.githubusercontent.com/tensorflow/models/master/research/object_detection/data/'
#     label_dir = tf.keras.utils.get_file(fname=filename,
#                                         origin=base_url + filename,
#                                         untar=False)
#     label_dir = pathlib.Path(label_dir)
#     return str(label_dir)

# label_filename = 'mscoco_label_map.pbtxt'
# labels_path= download_labels(label_filename)

# category_index = label_map_util.create_category_index_from_labelmap(labels_path, use_display_name=True)
- In this we load the specific model, I am using “ssd_inception_v2_coco_2017_11_17”, you can choose any model that is shown above according to your system
# In this we are loading the model(you can choose model according to your system , the name of available models is shown above):

model = 'ssd_inception_v2_coco_2017_11_17'
model = load_model(model)
- We will create function run_model_for_single_image, to run the model for a single image:
# Now we will run the model for single image:

def run_model_for_single_image(model,image):
    #converting image to array:
    image = np.asarray(image)

    #converting the image into tensor(as input should be a tensor):
    tensor_image = tf.convert_to_tensor(image)


    tensor_image = tensor_image[tf.newaxis,...]

    # Run model:
    model_fn = model.signatures['serving_default']
    result_dict = model_fn(tensor_image)

    #detecting
    detections = int(result_dict.pop('num_detections'))
    result_dict = {key:value[0,:detections].numpy() for key,value in result_dict.items()}
    result_dict['num_detections'] = detections

    # convert detection_classes to int
    result_dict['detection_classes'] = result_dict['detection_classes'].astype(np.int64)


    if 'detection_masks' in result_dict:
        # we have to set that mask according to the size of image:
        modified_detection_masks = utils_ops.reframe_box_masks_to_image_masks(
              result_dict['detection_masks'], result_dict['detection_boxes'],
               image.shape[0], image.shape[1])
        modified_detection_masks = tf.cast(modified_detection_masks > 0.5,tf.uint8)

        result_dict['modified_detection_masks'] = modified_detection_masks.numpy()

    return result_dict
- In this, we will create function show_model which will show the image with boxes, and labels
# now we will create a function to show this model:
def model_show(model, image_path):
    image = np.array(Image.open(image_path))

    # Actual detection:
    result_dict = run_model_for_single_image(model,image)

    # Visualize the Detection:
    vis_util.visualize_boxes_and_labels_on_image_array(
      image,
      result_dict['detection_boxes'],
      result_dict['detection_classes'],
      result_dict['detection_scores'],
      category_index,
      instance_masks=result_dict.get('modified_detection_masks', None),
      use_normalized_coordinates=True,
      line_thickness=8)

    display(Image.fromarray(image))
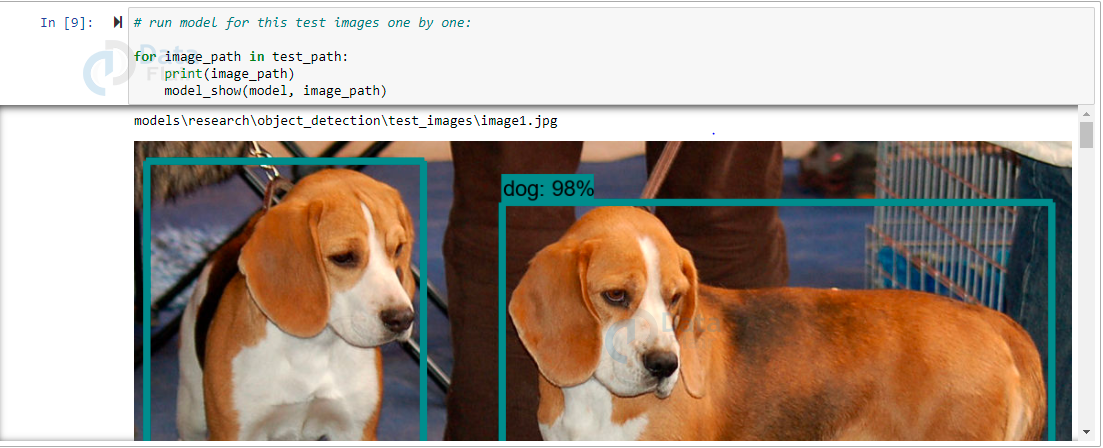
- Now this is our last step. In this, we’ll set the path to our test image folder to check that the model is working efficiently or not.
# Set path to test image directory:

test_path= pathlib.Path('models/research/object_detection/test_images')
test_path= sorted(list(test_path.glob("*.jpg")))

# run model for this test images one by one:

for image_path in test_path:
    print(image_path)
    model_show(model, image_path)
TensorFlow Object Detection Output


Summary
So, in this, we learned how to detect objects using Tensorflow Object Detection API. We can use this API in various forms where we detect, identify the objects.
This project teaches how to connect ML models with real-time inputs. You will understand frame-by-frame image processing, performance tuning, and using TensorFlow’s GPU capabilities. You’ll also learn about confidence thresholds and live result visualization. Real-time detection is an impressive project to showcase in interviews or hackathons, as it blends deep learning, camera input, and practical implementation into one complete solution.
If we want we can further enhance it to count objects by detecting and identifying them.
If you are Happy with DataFlair, do not forget to make us happy with your positive feedback on Google


Very good