Language Translation with Machine Learning
Machine Learning courses with 100+ Real-time projects Start Now!!
Create a real-time machine learning language translator with TensorFlow
Savez-vous comment créer une application de traduction de langue?
Did you understand the above sentence?
Well after googling it, I found its meaning as:
Do you know how to create a language translator app?
We all know about Google Translate which allows us to convert from one language to another and it’s very useful for learning and understanding new languages.
About Language Translator Project:
In this machine learning project, we will develop a Language Translator App using a many-to-many encoder-decoder sequence model. We will train our model using LSTM which will convert English to French language where English will be input text and French will be the target text. For this, we will be using English-French dataset.
Project Prerequisites
This project requires you to have a good knowledge of Python, TensorFlow, and Keras.
Modules required for this project are tensorflow, pickle, and sklearn. You can install with the following command:
pip install tensorflow , pickle , sklearn , numpy
The versions which are used in this project for python and its corresponding modules are as follows:
- python: 3.8.5
- TensorFlow: 2.3.1 (Note: TensorFlow version should be 2.2 or higher in order to use keras or else install keras directly)
- Sklearn: 0.24.2
- Pickle: 4.0
- Numpy: 1.19.5
Download Language Translation Machine Learning Code
Please download the source code of language translation machine learning: Language Translation Machine Learning Code
Project file structure:
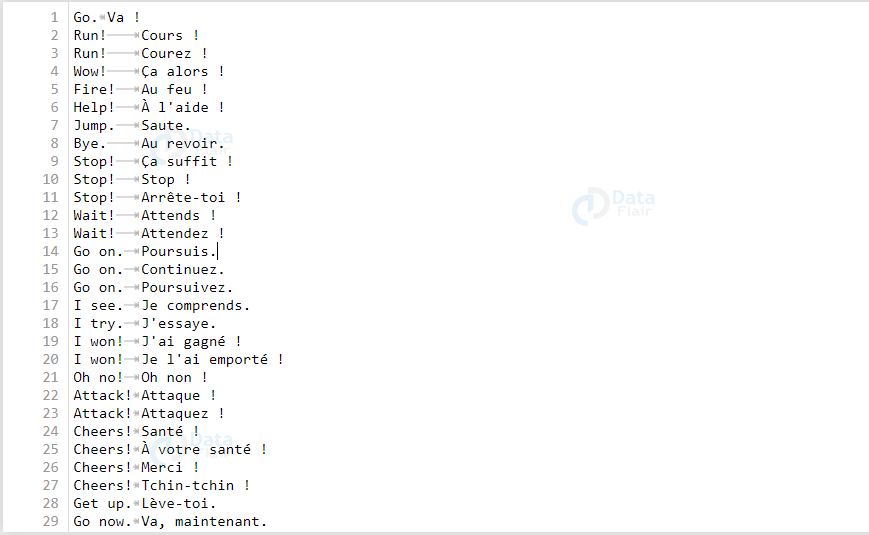
- eng-french.txt: This is dataset for our project, contains English text and corresponding french texts.
- langTraining.py: This file is used to create and train the model.
- training_data.pkl: This file contains lists of characters, text of input, and target data in a binary format.
- s2s: This directory contains optimizer, metrics, and weights of our trained model.
- LangTransGui.py: Gui file of our project where we load the trained model and predict output for given text.
Steps to develop a Language Translator App:
1. Import Libraries and initialize variables.
Firstly we will create a file called “langTraining.py” and import all libraries which have been shared in the prerequisites section. Also we need to initialize variables globally which can be used throughout our functions.
Code:
from tensorflow.keras.models import Model
from tensorflow.keras import models
from tensorflow.keras.utils import plot_model
from tensorflow.keras.layers import Input,LSTM,Dense
from sklearn.feature_extraction.text import CountVectorizer

import numpy as np
import pickle

#initialize all variables
input_texts=[]
target_texts=[]
input_characters=set()
target_characters=set()
2. Parse the dataset file
We will traverse the dataset file and extract all the input and target texts. For this, we will be using the first 10,000 rows of our dataset for the training and testing part. It can be changed as per requirements. To separate input and target texts from the row we will use ‘\t’ and to separate rows we will use ‘\n’.
We will also use the Teacher Forcing algorithm:
Teacher Forcing Algorithm (TFA): The TFA network model uses ground truth input rather than output from the previous model.
For example, we want to predict the next word from the sequence ‘Python is a programming language’. So we will put ‘\t’ at the start and ‘\n’ at the end of the text(sequence) to tell the model that this is the starting and ending of the text which becomes ‘\tPython is a programming language\n’. So we feed ‘\t’ to the model at the first timestep and so on for every timestep.
(x) (y^)
\t, Python
\tPython, is
\tPython is, a
As you can see after feeding input(x) it is predicting the next word(y^), it will do the same till it reaches ‘\n’ which is our end of the sentence. This can be seen in Google when we type some words, next words are automatically predicted.
Code:
#read dataset file
with open('eng-french.txt','r',encoding='utf-8') as f:
    rows=f.read().split('\n')

#read first 10,000 rows from dataset
for row in rows[:10000]:

    #split input and target by '\t'=tab
    input_text,target_text = row.split('\t')

    #add '\t' at start and '\n' at end of text.
    target_text='\t' + target_text + '\n'
    input_texts.append(input_text.lower())
    target_texts.append(target_text.lower())

    #split character from text and add in respective sets
    input_characters.update(list(input_text.lower()))
    target_characters.update(list(target_text.lower()))
dataset file:
Now, We will use the same procedure and separate the text from rows and characters. Also, get the maximum length of encoder as well as decoder sequence. Repeat the same for target text as well.
Code:
#sort input and target characters
input_characters = sorted(list(input_characters))
target_characters = sorted(list(target_characters))

#get the total length of input and target characters
num_en_chars = len(input_characters)
num_dec_chars = len(target_characters)

#get the maximum length of input and target text.
max_input_length = max([len(i) for i in input_texts])
max_target_length = max([len(i) for i in target_texts])

print("number of encoder characters : ",num_en_chars)
print("number of decoder characters : ",num_dec_chars)

print("maximum input length : ",max_input_length)
print("maximum target length : ",max_target_length)
After the execution of above code, we will get the total number of encoder characters, the total number of decoder characters, maximum input length, and maximum target length.
3. One Hot Encoding (Vectorization)
Models cannot work directly on the categorical data. For this, we require one hot encoding process. One-hot encoding deals with the data in binary format so we encode the categorical data in binary format.
One-hot means that we can only make an index of data 1 (true) if it is present in the vector or else 0 (false). So every data has its unique representation in vector format.
For example, if we have an array of data like : [“python”,”java”,”c++”] then the one hot encoding representation of this array will be :
[ [ 1 , 0 , 0 ]
[ 0 , 1 , 0 ]
[ 0 , 0 , 1 ] ]
So in our project after separating characters from input and target text we will use a one-hot encoding process. We will fit characters and transform the texts accordingly. So if the character from input text is present in the sets of characters then it will put 1 and 0 otherwise.
Our encoder input data, decoder input data, and decoder target data will be a 3D array where encoder input data will have shape (number of pairs, max length of English text, number of English text characters), decoder input data will have shape (number of pairs, max length of french texts, number of french characters). Decoder target data will be same as decoder input data but it will be one timestep ahead as it will not include the start character i.e. ‘\t’ of our target sentence.
Code:
def bagofcharacters(input_texts,target_texts):

    #initialize encoder , decoder input and target data.
    en_in_data=[] ; dec_in_data=[] ; dec_tr_data=[]

    #padding variable with first character as 1 as rest all 0.
    pad_en=[1]+[0]*(len(input_characters)-1)
    pad_dec=[0]*(len(target_characters)) ; pad_dec[2]=1

    #countvectorizer for one hot encoding as we want to tokenize character so
    #analyzer is true and None the stopwords action.
    cv=CountVectorizer(binary=True,tokenizer=lambda txt:
    txt.split(),stop_words=None,analyzer='char')

    for i,(input_t,target_t) in enumerate(zip(input_texts,target_texts)):
        #fit the input characters into the CountVectorizer function
        cv_inp= cv.fit(input_characters)

        #transform the input text from the help of CountVectorizer fit.
        #it character present than put 1 and 0 otherwise.
        en_in_data.append(cv_inp.transform(list(input_t)).toarray().tolist())
        cv_tar= cv.fit(target_characters)
        dec_in_data.append(cv_tar.transform(list(target_t)).toarray().tolist())

        #decoder target will be one timestep ahead because it will not consider
        #the first character i.e. '\t'.
        dec_tr_data.append(cv_tar.transform(list(target_t)[1:]).toarray().tolist())
Also, we need the same length of input data throughout so we will be adding an extra array of 0’s to make all input text the same vector length. Repeat the same procedure for target data also.
Code:
  #add padding variable if the length of the input or target text is smaller
  #than their respective maximum input or target length.
  if len(input_t) < max_input_length:
    for _ in range(max_input_length-len(input_t)):
      en_in_data[i].append(pad_en)
  if len(target_t) < max_target_length:
    for _ in range(max_target_length-len(target_t)):
      dec_in_data[i].append(pad_dec)
  if (len(target_t)-1) < max_target_length:
    for _ in range(max_target_length-len(target_t)+1):
      dec_tr_data[i].append(pad_dec)

#convert list to numpy array with data type float32
en_in_data=np.array(en_in_data,dtype="float32")
dec_in_data=np.array(dec_in_data,dtype="float32")
dec_tr_data=np.array(dec_tr_data,dtype="float32")
return en_in_data,dec_in_data,dec_tr_data
4. Build the training model
In this language translation project, we will be using LSTM to train our machine learning model to translater language, so let’s see what is LSTM:
LSTM (Long Short Term Memory) network: LSTM is a type of RNN (Recurrent Neural Network) that solves scenarios where RNN is failed.
Long-Term Dependency: In RNN, networks have the data of previous output in memory for a short period of time because of this they are unaware about the actual context of the sentence over a long period of time. This raised the issue of long-term dependency.
Vanishing Gradient: While training our models, in order to get the best output we have to minimize the loss i.e. errors after every time step. This can be achieved by propagating backward and calculating the gradients, that is loss with respect to weights applied to every vector at different time steps. We repeat this process until we get an optimal set of weights for which the error is minimum. After reaching at some time step gradient value becomes so less that it approximates to zero or gradient vanishes. After reaching that limit, the network stops training. This leads to the problem of vanishing gradient.
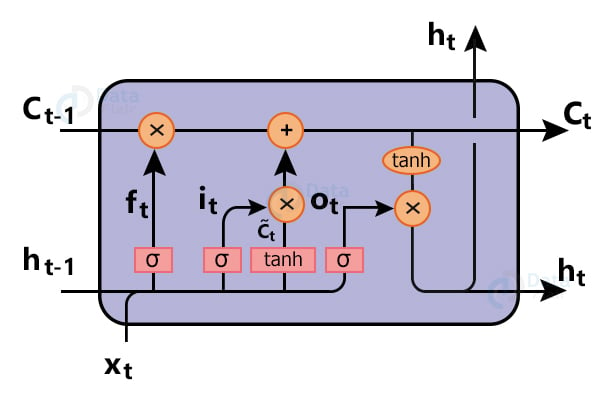
These are some issues which are resolved by the LSTM networks. Instead of a single neural network layer, LSTM has three gates along with hidden and cell states. We will use following example to understand the basic functionality of LSTM:
“John wants to know how Language Translators work so he started studying a technique known as Deep Learning. His friend Jim, on the other hand, is interested in Self-Driving Cars and is learning about a technique known as Reinforcement Learning.”
Cell Memory state ( ct ): Cell state is actually what makes LSTM a unique network. Cell state holds the memory for over a long period of time. Data can be removed or added in cell state depending upon the layer requirements.
Hidden state ( ht ): hidden state is basically output of the previous block. We decide what to do with the memory looking at the previous hidden state output and current input. And also we don’t want output after every timestep until we reach the last input of our sequence.
Forget Gate ( ft ): Forget Gate is used to check what data we want to neglect away from the cell state. This is done using a sigmoid layer. This Gate looks at hidden output from previous time steps and current input, after that it outputs number 0 which means neglect the data, or 1 means keep the data.
So from our example, in the first half of the sentence, we say “John” is interested in “Language Translator”. In order to answer “Deep Learning”, we can frame a question like “Which technique is used to develop a Language Translator?” For this, we require “Language Translator” throughout every time step. So what about “John”? In this sentence the context is about technique, so we don’t require “John” therefore we will forget or remove the data of “John” using forget Gate ( ft ).
Input Gate: We want to check what new information we are going to store in the cell memory state ( ct ). So data will pass through the sigmoid function which decides which values to update ( it ). Next a tanh function creates a vector of new candidates ( čt ) for our state.
Now our new data is ready and we want to update cell state with our new data. In order to do that we will multiply the old value of the cell state with the forget gate which will remove the data and then add the combined value of the tanh function which contains the candidate value ( čt ) and the input vector ( it ) for the new data.
From our example we know “Language translator” is required so we will store that in the cell state which can be accessible for the layers after every time step. And likewise we also want “technique” so we will store it in cell state.
Now our cell state contains “Language Translator” as well as “technique”.
Output Gate: We want to pass the output to the next layer. As the output is dependent upon the cell state, we will be using sigmoid which decides what parts of the cell state we are going to output. Then we will apply tanh and multiply them with sigmoid value of output ( ot ) so that we only output values that are required.
So we will pass cell state and hidden state value output to another block of the LSTM layer as an input.
For the second part of our example now his friend “Jim” is interested in “Self-Driving Cars” we can frame a question like “Which technique is used for Self-Driving Cars?”.
As you can see the context remains same i.e. “technique” but now we require a technique for “Self-Driving Car” so we will forget the previous stored data i.e. “Language Translator” from cell state using the forget gate and we will add “Self-Driving Cars” in the cell state.
And this cell and hidden output are passed to the next block of LSTM layers where the same steps repeat till we reach the right prediction.
Encoder: For the language translation machine learning model we will be creating keras Input objects whose shape will be equal to the total number of input characters. We will use RNN’s LSTM model and only the return state will be True because we only want value from hidden and cell state so we will discard encoder output and only keep the states.
Code:
#create input object of total number of encoder characters
en_inputs = Input(shape=(None, num_en_chars))

#create LSTM with the hidden dimension of 256
#return state=True as we don't want output sequence.
encoder = LSTM(256, return_state=True)

#discard encoder output and store hidden and cell state.
en_outputs, state_h, state_c = encoder(en_inputs)
en_states = [state_h, state_c]
Decoder: In decoder, our Input object shape will be equal to the total number of target characters. The LSTM model with the return state and return sequence will be True as we need a model to return full output sequence(text) as well as states. We will be using a softmax activation function and also a Dense layer for our output.
Code:
#create input object of total number of decoder characters
dec_inputs = Input(shape=(None, num_dec_chars))

#create LSTM with the hidden dimension of 256
#return state and return sequences as we want output sequence.
dec_lstm = LSTM(256, return_sequences=True, return_state=True)

#initialize the decoder model with the states on encoder.
dec_outputs, _, _ = dec_lstm(dec_inputs, initial_state=en_states)

#Output layer with shape of total number of decoder characters
dec_dense = Dense(num_dec_chars, activation="softmax")
dec_outputs = dec_dense(dec_outputs)
5. Train the model
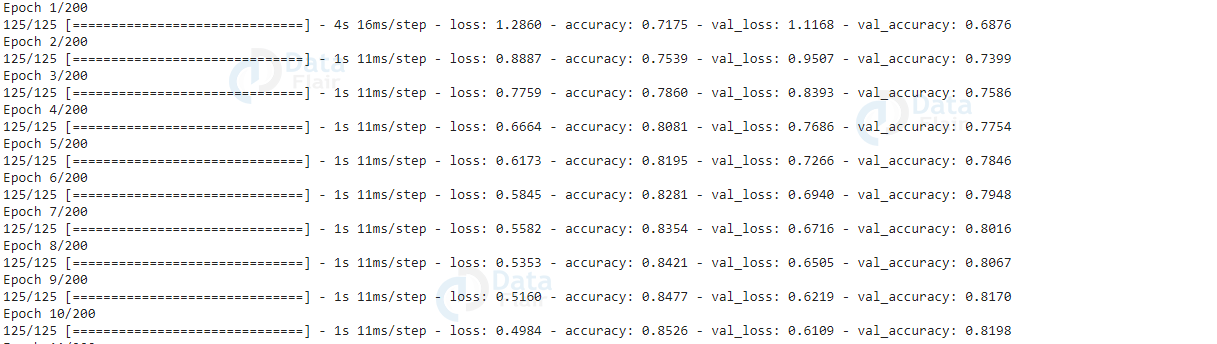
To train the model we will fit ‘(encoder input and decoder input)’ which will turn into (‘decoder target data’) using ‘Adam’ optimizer with a validation split of 0.2 and provide an epoch of 200 in a batch size of 64. Also, we will store all required variables in a binary or bytes stream like object format file using the ‘pickle’ module.
Code:
#create Model and store all variables
model = Model([en_inputs, dec_inputs], dec_outputs)

pickle.dump({'input_characters':input_characters,'target_characters':target_characters, 'max_input_length':max_input_length, 'max_target_length':max_target_length, 'num_en_chars':num_en_chars, 'num_dec_chars':num_dec_chars}, open("training_data.pkl", "wb"))

#load the data and train the model
en_in_data,dec_in_data,dec_tr_data = bagofcharacters(input_texts,target_texts)
model.compile(
    optimizer="adam", loss="categorical_crossentropy", metrics=["accuracy"]
)

model.fit(
    [en_in_data, dec_in_data],
    dec_tr_data,
    batch_size=64,
    epochs=200,
    validation_split=0.2,
)

# Save model
model.save("s2s")
After language translation ml model gets trained we will get a directory as ‘s2s’ with ‘saved_model.pb’ which includes optimizer, losses, and metrics of our model. The weights are saved in the variables / directory.
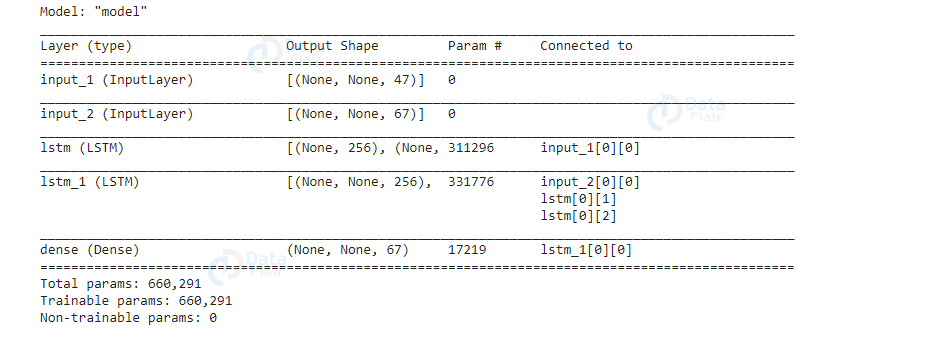
Also, we can see the summary or visualize our model. The summary contains 1) Layers that we have used for our model 2) Output Shape which shows dimensions or shapes of our layers 3) The number of parameters for every layer is the total number of output size, i.e. number of neurons associated with the total number of input weights and one weight of connection with bias so basically
N (number of parameters) = (number of neurons) * (number of inputs + 1)
So the number of parameters for our dense layer (output layer) will be number of decoder characters present in our dataset i.e 67 associated with the number of input weights i.e. 256 and one weight of connection with bias, therefore our N will be
N = 67 * ( 256 + 1) = 17219
Code:
#summary and model plot
model.summary()

plot_model(model, to_file='Model_plot.png', show_shapes=True, show_layer_names=True)
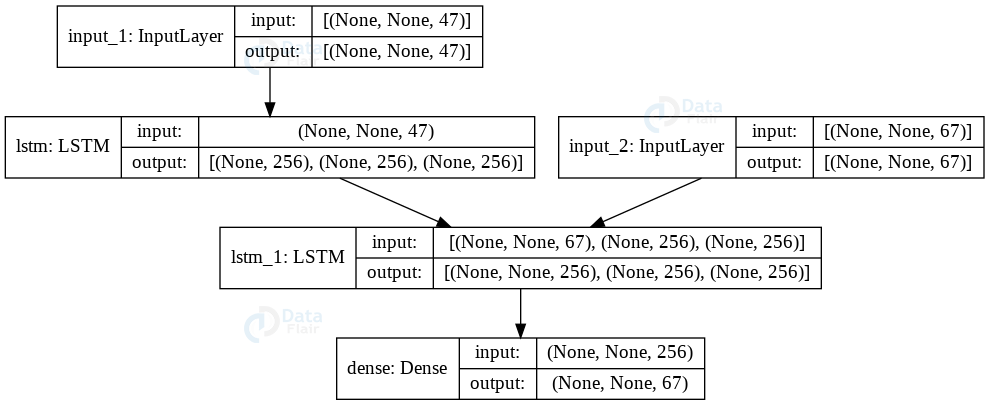
After plotting our model we can see that our first input layer has a shape of the total number of input characters (English characters) i.e 47, which we will then pass to the first LSTM layer that has the input shape same as the previous layer and the latent(hidden) dimension of 256. Model initializes the second LSTM layer with the output of the first LSTM layer along with input from the decoder layer which has a shape of total number of target characters(french characters) i.e 67. Finally we will pass the output of the second LSTM layer to the dense layer which is our final output layer that has the shape of target characters.
6. Create Gui for our prediction
Now we will create a GUI for language translation machine learning project using the “tkinter” module to get input and display the decoded (translated) french text on the display window.
Initialize the window and load all the modules:
Code:
from tkinter import *
import pickle
import numpy as np
from sklearn.feature_extraction.text import CountVectorizer
from tensorflow.keras.models import Model
from tensorflow.keras import models
from tensorflow.keras.layers import Input,LSTM,Dense

BG_GRAY="#ABB2B9"
BG_COLOR="#000"
TEXT_COLOR="#FFF"
FONT="Melvetica 14"
FONT_BOLD="Melvetica 13 bold"

cv=CountVectorizer(binary=True,tokenizer=lambda txt: txt.split(),stop_words=None,analyzer='char')

class LangTRans:
    def __init__(self):
        #initialize tkinter window and load the file
        self.window=Tk()
        self.main_window()
        self.datafile()
Load all the variables from the datafile using the pickle module:
Code:
def datafile(self):
    #get all datas from datafile and load the model.

    datafile = pickle.load(open("training_data.pkl","rb"))
    self.input_characters = datafile['input_characters']
    self.target_characters = datafile['target_characters']

    self.max_input_length = datafile['max_input_length']
    self.max_target_length = datafile['max_target_length']
    self.num_en_chars = datafile['num_en_chars']
    self.num_dec_chars = datafile['num_dec_chars']

    self.loadmodel()
Create the main window for language translation. Also create scrollbar, text widget for the GUI:
Code:
def main_window(self):
    #add title to window and configure it
    self.window.title("Language Translator")
    self.window.resizable(width=False,height=False)
    self.window.configure(width=520,height=520,bg=BG_COLOR)

    head_label=Label(self.window,bg=BG_COLOR, fg=TEXT_COLOR, text="Welcome to DataFlair",font=FONT_BOLD, pady=10)
    head_label.place(relwidth=1)

    line = Label(self.window,width=450,bg=BG_COLOR)
    line.place(relwidth=1,rely=0.07,relheight=0.012)

    #create text widget where input and output will be displayed
    self.text_widget=Text(self.window,width=20,height=2,bg="#fff",fg="#000", font=FONT,padx=5,pady=5)
    self.text_widget.place(relheight=0.745,relwidth=1,rely=0.08)
    self.text_widget.configure(cursor="arrow",state=DISABLED)

    #create scrollbar
    scrollbar=Scrollbar(self.text_widget)
    scrollbar.place(relheight=1,relx=0.974)
    scrollbar.configure(command=self.text_widget.yview)

    #create bottom label where text widget will placed
    bottom_label=Label(self.window,bg=BG_GRAY,height=80)
    bottom_label.place(relwidth=1,rely=0.825)

    #this is for user to put english text
    self.msg_entry=Entry(bottom_label,bg="#2C3E50", fg=TEXT_COLOR,font=FONT)
    self.msg_entry.place(relwidth=0.788,relheight=0.06,rely=0.008,relx=0.008)
    self.msg_entry.focus()
    self.msg_entry.bind("<Return>",self.on_enter)

    #send button which will call on_enter function to send the text
    send_button=Button(bottom_label,text="Send",font=FONT_BOLD, width=8,bg="#fff",command=lambda: self.on_enter(None))
    send_button.place(relx=0.80,rely=0.008,relheight=0.06,relwidth=0.20)
7. Inference (sampling) model and prediction
Load the saved model and construct encoder and decoder. We will get the inputs from the saved model and LSTM to get the hidden and cell state of the encoder which is required to create the encoder model.
Code:
def loadmodel(self):
    #Inference model
    #load the model
    model = models.load_model("s2s")

    #construct encoder model from the output of second layer
    #discard the encoder output and store only states.
    enc_outputs, state_h_enc, state_c_enc = model.layers[2].output

    #add input object and state from the layer.
    self.en_model = Model(model.input[0], [state_h_enc, state_c_enc])
For the decoder, we will take the second input and create an input object for hidden as well for cell state of shape (256,) which is latent(hidden) dimension of layer. Also, we will run one step of the decoder with this initial state and a start of text character after that our output will be the next character of the text.
We will use reverse lookup to get characters from the index of the ‘input_text’ variable.
Code:
#create Input object for hidden and cell state for decoder
#shape of layer with hidden or latent dimension
dec_state_input_h = Input(shape=(256,), name="input_3")
dec_state_input_c = Input(shape=(256,), name="input_4")
dec_states_inputs = [dec_state_input_h, dec_state_input_c]

#add input from the encoder output and initialize with states.
dec_lstm = model.layers[3]
dec_outputs, state_h_dec, state_c_dec = dec_lstm(
    model.input[1], initial_state=dec_states_inputs
)

dec_states = [state_h_dec, state_c_dec]
dec_dense = model.layers[4]
dec_outputs = dec_dense(dec_outputs)

#create Model with the input of decoder state input and encoder input
#and decoder output with the decoder states.
self.dec_model = Model(
    [model.input[1]] + dec_states_inputs, [dec_outputs] + dec_states
)
Encode the input sequence as state vectors. Create an empty array of the target sequence of length 1 and generate the start character i.e ‘\t’ in our case of every pair to be 1. Use this state value along with the input sequence to predict the output index. Use reverse character index to get the character from output index and append to the decoded sequence.
Code:
def decode_sequence(self,input_seq):
    #create a dictionary with a key as index and value as characters.
    reverse_target_char_index = dict(enumerate(self.target_characters))
    #get the states from the user input sequence
    states_value = self.en_model.predict(input_seq)

    #fit target characters and
    #initialize every first character to be 1 which is '\t'.
    #Generate empty target sequence of length 1.
    co=cv.fit(self.target_characters)
    target_seq=np.array([co.transform(list("\t")).toarray().tolist()],dtype="float32")

    #if the iteration reaches the end of text than it will be stop the it
    stop_condition = False
    #append every predicted character in decoded sentence
    decoded_sentence = ""

    while not stop_condition:
        #get predicted output and discard hidden and cell state.
        output_chars, h, c = self.dec_model.predict([target_seq] + states_value)

        #get the index and from the dictionary get the character.
        char_index = np.argmax(output_chars[0, -1, :])
        text_char = reverse_target_char_index[char_index]
        decoded_sentence += text_char
For every index, put 1 to that index of our target array. So for the next iteration, our target sequence will be having a vector of the previous character. Iterate until our character is equal to the last character or max length of the target text.
Code:
    # Exit condition: either hit max length
    # or find a stop character.
    if text_char == "\n" or len(decoded_sentence) > self.max_target_length:
        stop_condition = True
    #update target sequence to the current character index.
    target_seq = np.zeros((1, 1, self.num_dec_chars))
    target_seq[0, 0, char_index] = 1.0
    states_value = [h, c]
#return the decoded sentence
return decoded_sentence
Get the input (English) text from the user and pass it to a bag of characters for a one-hot encoding process. After that pass the encoded vector into ‘decode_sequence()’ for the decoded(french) text.
Code:
    def bagofcharacters(self,input_t):
        cv=CountVectorizer(binary=True,tokenizer=lambda txt:
        txt.split(),stop_words=None,analyzer='char')
        en_in_data=[] ; pad_en=[1]+[0]*(len(self.input_characters)-1)

        cv_inp= cv.fit(self.input_characters)
        en_in_data.append(cv_inp.transform(list(input_t)).toarray().tolist())

        if len(input_t)< self.max_input_length:
          for _ in range(self.max_input_length-len(input_t)):
            en_in_data[0].append(pad_en)

        return np.array(en_in_data,dtype="float32")

    def decoded_output(self,msg,sender):
        self.text_widget.configure(state=NORMAL)
        en_in_data = self.bagofcharacters(msg.lower()+".")
        self.text_widget.insert(END,str(sender)+" :
        "+self.decode_sequence(en_in_data)
                                +"\n\n")
        self.text_widget.configure(state=DISABLED)
        self.text_widget.see(END)

    def my_msg(self,msg,sender):
        if not msg:
            return
        self.msg_entry.delete(0,END)
        self.text_widget.configure(state=NORMAL)
        self.text_widget.insert(END,str(sender)+" : "+str(msg)+"\n")
        self.text_widget.configure(state=DISABLED)

    #runwindow
    def run(self):
        self.window.mainloop()

# run the file
if __name__=="__main__":
    LT = LangTRans()
    LT.run()
8. Run Language Translation Code File
In order to run the language translator app, we need these two main files langTraining.py and LangTransGui.py.
First, we will train the model by using the following command in the terminal.
python langTraining.py
Your ml model is trained after the successful execution of the above command.
Similarly to run the second file run the following command.
python LangTransGui.py
Now, you are ready to use Language Translator machine learning app.
The language translator machine learning model is trained for only 10,000 rows from the dataset. You can make your predictions better by training more rows from the dataset. Also, adjust the epochs and batch_size accordingly.
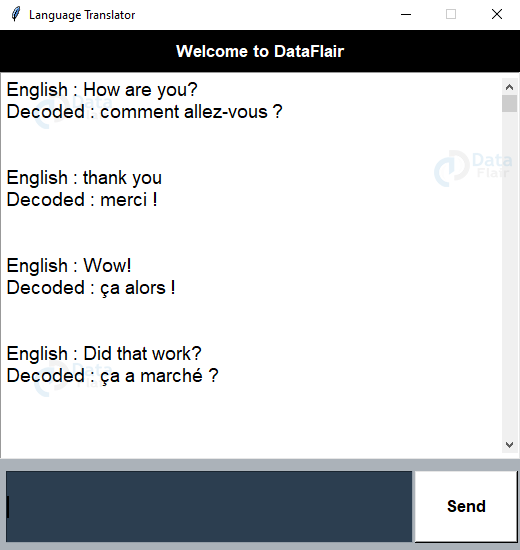
Language Translation Machine Learning Output
Summary
Language translation is the task of changing text from one language to another using machine learning. It’s a part of NLP (Natural Language Processing). Tools like Google Translate use deep learning models trained on massive datasets. In this project, you can train a smaller model to translate between two languages like English to French, or Hindi to English. It helps in understanding sequence modeling and encoder-decoder architectures.
In this machine learning project, we have developed a language translator app. This accepts the input from the user in English language and decodes it into French language using the LSTM model and Teacher Forcing algorithm. Language Translators are used in order to understand and communicate in various languages.
Did you like our efforts? If Yes, please give DataFlair 5 Stars on Google


awesome 🔥🔥🔥
did it work for you?
i am unable to run the gui file
C:\Users\rohit\AppData\Roaming\Python\Python39\site-packages\sklearn\feature_extraction\text.py:516: UserWarning: The parameter ‘token_pattern’ will not be used since ‘tokenizer’ is not None’
warnings.warn(
C:\Users\rohit\AppData\Roaming\Python\Python39\site-packages\sklearn\feature_extraction\text.py:551: UserWarning: The parameter ‘tokenizer’ will not be used since ‘analyzer’ != ‘word’
warnings.warn(
I am getting this error while running this code, can anyone please solve it?
did it work for you?
i am unable to run the gui file
Me too
In gui docoded output is not shown